
Popular categories
Looking for a yarn?


Comments / Questions (173)
![]() Astrid wrote:
Astrid wrote:
Ich verstehe nicht den Unterschied zwischen den Absatz RAGLANZUNAHMEN in jeder 2. Rd. mit 12 Maschen und dem nachfolgenden Absatz mit der Zunahme in jeder 2. Rd mit 8 Maschen. In der Beschreibung der PASSE geht man nur auf den 1. Absatz ein. Wann bzw. ab wann wird denn der 2. Absatz gestrickt?
01.04.2026 - 17:07DROPS Design answered:
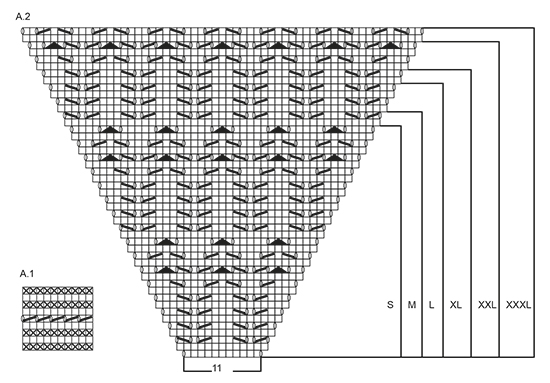
Liebe Astrid, man soll zuerst insgesamt 12 Maschen 1-3-4-8-11-15 x insgesamt zunehmen, dann wenn alle diese ersten Zunahmen fertig sind, wird man nur 8 maschen insgesamt 16-15-16-13-12-9 x zunehmen. Viel Spaß beim Stricken!
07.04.2026 - 16:33
![]() Uschi wrote:
Uschi wrote:
Guten Tag, ich habe Probleme mit der Maschenaufteilung. Ich soll bei Größe S nach Pass-zunahme 102 Ma auf der Nadel haben. Die Einteilung zur Raglanzunahme ist: 17 Ma halber Rücken 11 Ma Ärmel 34 Ma Vordereil 11 Ma Ärmel 17 Ma halbes Rückenteil = 90 Ma Ich habe jedoch 102 Maschen auf der Nadel. Wo ist der Fehler?
01.04.2026 - 17:00DROPS Design answered:
Liebe Uschi, es fehlen die Raglanmaschen, so sollen die Maschen gerechnet werden: 17 M re, 1 M re, 2 M re, A.2 (= 11 M), 2 M re, 1 M re, 34 M re, 1 M re, 2 M re, A.2, 2 M re, 1 M re, 17 M re = 17+1+2+11+2+1+34+1+2+11+2+1+17=102 Maschen. Viel Spaß beim Stricken!
07.04.2026 - 16:31
![]() Elena wrote:
Elena wrote:
Buonasera Vi chiedo se il primo giro della manica inizia a dritto o subito con il motivo relativo allo schema A3 Grazie
11.03.2026 - 15:52DROPS Design answered:
Buonasera Elena, deve lavorare con la sequenza indicata, che comprende anche lo schema A.3. Buon lavoro!
11.03.2026 - 23:38
![]() Elena wrote:
Elena wrote:
Buongiorno Vi chiedo gentilmente se i gettati in A3 devo in seguito lavorarli a diritto ritorto. Grazie. Elena
10.03.2026 - 13:59DROPS Design answered:
Buonasera Elena, i gettati di A.3 vanno lavorati poi a diritto come indicato nella legenda. Buon lavoro!
11.03.2026 - 23:45
![]() Marisa wrote:
Marisa wrote:
Sto per cominciare questo modello e volevo sapere se gli aumenti raglan delle maniche vanno lavorati prima uno e poi l'altro (prima quello con aumento di 12 maglie e poi di 8 - oppure viceversa?), senza che siano inframezzati da giri "neutri" senza aumenti. grazie!
15.09.2025 - 12:20DROPS Design answered:
Buonasera Marisa, deve seguire quanto riportato nel paragrafo RAGLAN all'inizio del lavoro. Gli aumenti si lavorano a giri alterni, prima lavorerà i 12 aumenti per il numero di volte per la sua taglia e poi gli 8 per il numero di volte indicato per la sua taglia. Buon lavoro!
15.09.2025 - 22:19
![]() Ingeborg Mansell wrote:
Ingeborg Mansell wrote:
Skal man felle ragland på samme runde som mønsterstrikkingen? Jeg mener skal det strikkes rett på ragland fellingen når det strikkes rett m/kast i mønster A.2?
15.09.2025 - 09:14DROPS Design answered:
Hei Ingeborg. Denne genseren strikkes ovenfra og ned og det økes da til raglan. Tenker du på en annen gensere? mvh DROPS Design
23.09.2025 - 19:28
![]() Jytte Ringgren wrote:
Jytte Ringgren wrote:
Kan det passe man skal strikke 2 m sammen rundt i bærestykket i A1 hele omgangen rundt
11.09.2025 - 17:01DROPS Design answered:
Hei Jytte. Når du strikker etter A.1 og 5. omgang strikker man 2 og 2 masker sammen, samtidig som man lager et kast, så på neste omgang har man like mange masker og et hullmønster, se diagram og les diagramteksten. mvh DROPS Design
15.09.2025 - 10:13
![]() Ulla-Britt wrote:
Ulla-Britt wrote:
Det mest välsittande plagg jag någonsin stickat. Jag gjorde två stycken. Lättstickade och roliga att sticka. Uppifrån och ner.
24.06.2025 - 12:50
![]() Dana Hohansson wrote:
Dana Hohansson wrote:
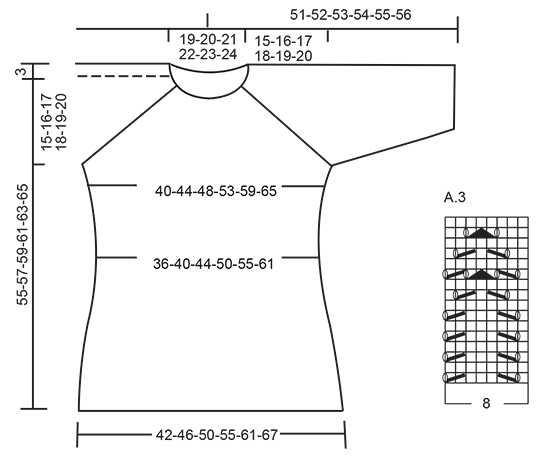
Stickar modell nr 168-1 och undrar om det ska bli en slätstickad ”kil” i mitten av ärmen eller om hela ärmen ( runtom ) ska vara stickad i mönstret ?
23.06.2025 - 09:15DROPS Design answered:
Hei Dana. Det kommer litt an på hvilken str. du strikker. I f.eks str. L vil det bli en liten kile før man kan strikke mønstret rundt, samt felle masker under ermet, men i f.eks str. S vil det bli en større kile. mvh DROPS Design
23.06.2025 - 14:25
![]() Ulla-Britt Andersson wrote:
Ulla-Britt Andersson wrote:
Vad menas när det står att man skall sätta en markör mellan dessa maskor.Ex Oket. Var sätter jag markören? Sticka 20 rm, 1 omslag, 1 rm, 1 omslag 2 rm (sätt en markör mellan dessa maskor), 1 omslag, 1 rm, 1omslag, 40 rm Är det efter de 2 räta maskorna?
05.03.2025 - 17:08DROPS Design answered:
Hej Ulla-Britt. Du sätter markören mellan de 2 räta maskorna. Mvh DROPS Design
06.03.2025 - 09:32
|
|||||||||||||||||||
Sea Nymph#seanymphsweater |
|||||||||||||||||||
 |
 |
||||||||||||||||||
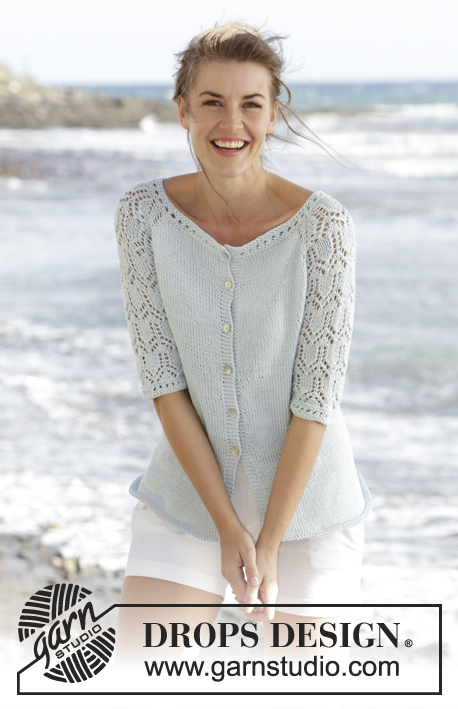
Knitted DROPS jumper with raglan, lace pattern and ¾ sleeves in "Muskat". Worked top down. Size: S - XXXL.
DROPS 168-1 |
|||||||||||||||||||
|
GARTER ST (worked in the round): 1 ridge = 2 rounds. * K 1 round and P 1 round *, repeat from *-*. PATTERN: See diagrams A.1 to A.3. See diagram for size! RAGLAN: Inc every other round as follows: Inc 4 sts on back piece, 4 sts on front piece and 2 sts on each sleeve (= 12 sts inc, inc on sleeve are drawn in pattern) – beg 3 sts before each A.2 and work as follows: 1 YO, K 1, 1 YO, K 2 (marker is in the middle of these sts), A.2, K 2 (marker is in the middle of these sts), 1 YO, K 1, 1 YO. K the YOs closest to markers on next row to make holes, K YOs towards back/front piece twisted to avoid holes. Inc 12 sts this way 0-2-3-7-10-14 times more (= 1-3-4-8-11-15 times in total, first inc is explained in the text). Then inc every other round as follows: Inc 2 sts on back piece, 2 sts on front piece and 2 sts on each sleeve (= 8 sts inc, inc on sleeve are drawn in pattern) – beg 2 sts before each A.2 and work as follows: 1 YO, K 2 (marker is in the middle of these sts), A.2, K 2 (marker is in the middle of these sts), 1 YO. K YOs on next round to make a hole. Inc 8 sts this way 16-15-16-13-12-9 times in total. ---------------------------------------------------------- JUMPER: Worked in the round on circular needle, top down. YOKE: Cast on 87-91-95-99-103-107 sts on circular needle size 4 mm with Muskat. K 1 round, them work A.1, on last round in A.1 inc 15 sts evenly = 102-106-110-114-118-122 sts. Then work as follows from mid back: K 17-18-19-20-21-22, 1 YO, K 1, 1 YO, K 2 (insert a marker between these sts), A.2 (= 11 sts), K 2 (insert a marker between these sts), 1 YO, K 1, 1 YO, K 34-36-38-40-42-44, 1 YO, K 1, 1 YO, K 2 (insert a marker between these sts), A.2, K 2 (insert a marker between these sts), 1 YO, K 1, 1 YO, K 17-18-19-20-21-22. Continue this pattern, and inc for RAGLAN as explained above, first inc is now done. REMEMBER THE KNITTING TENSION When A.2 has been worked vertically - see marking for your size, there are 242-262-286-314-346-374 sts on round, inc are now done. Work next round as follows: Work 38-42-46-52-58-64 sts (= half back piece), slip the next 45-47-51-53-57-59 sts on a stitch holder (= sleeve), cast on 8 sts under sleeve, work the next 76-84-92-104-116-128 sts (= front piece), slip the next 45-47-51-53-57-59 sts on a stitch holder (= sleeve), cast on 8 new sts under sleeve, work the last 38-42-46-52-58-64 sts (= half back piece). BODY: There are now 168-184-200-224-248-272 sts on body. Continue in stocking st. Insert a marker in each side, in the middle of the 8 new sts that were cast on. NOW MEASURE PIECE FROM HERE. When piece measures 4 cm, dec 1 st on each side of marker (= 4 sts dec), repeat dec every 4-4-4-5-5-5 cm 3 more times = 152-168-184-208-232-256 sts. When piece measures 22-23-24-25-26-27 cm, inc 1 st on each side of each marker (= 4 sts inc), repeat inc every 2 cm 5 more times = 176-192-208-232-256-280 sts. When piece measures 36-37-38-39-40-41 cm, work 2 ridges in GARTER ST - see explanation above, over all sts. Cast off K 1/P 1 (to avoid a wavy cast-off edge), piece measures approx. 55-57-59-61-63-65 cm from cast-on edge. SLEEVE: Worked in the round. Slip sts from sleeve back on double pointed needles size 4 mm, pick up 1 st in each of the 8 sts under sleeve = 53-55-59-61-65-67 sts. Insert 1 marker mid under sleeve = beg of round. NOW MEASURE PIECE FROM HERE! Then work as follows: 6-7-1-2-4-5 sts in stocking st, A.3 over the next 40-40-56-56-56-56 sts (beg A.3 where A.2 ends for your size), 7-8-2-3-5-6 sts in stocking st. When piece measures 4 cm, dec 1 st on each side of marker. Work the sts that do not fit the pattern in stocking st, make sure that no of dec and inc in pattern is correct. Repeat dec every 7-7-5-5-3-3 cm 2-2-3-3-4-4 more times = 47-49-51-53-55-57 sts. When piece measures 24-23-23-22-22-21 cm, work A.1 over all sts, then cast off. Work the other sleeve the same way. |
|||||||||||||||||||
Diagram explanations |
|||||||||||||||||||
|
|||||||||||||||||||
 |
|||||||||||||||||||
 |
|||||||||||||||||||
Have you finished this pattern?Tag your pictures with #dropspattern #seanymphsweater or submit them to the #dropsfan gallery. Do you need help with this pattern?You'll find 25 tutorial videos, a Comments/Questions area and more by visiting the pattern on garnstudio.com. © 1982-2026 DROPS Design A/S. We reserve all rights. This document, including all its sub-sections, has copyrights. Read more about what you can do with our patterns at the bottom of each pattern on our site. |
|||||||||||||||||||


With over 40 years in knitting and crochet design, DROPS Design offers one of the most extensive collections of free patterns on the internet - translated to 17 languages. As of today we count 324 catalogues and 12290 patterns translated into English (UK/cm). 12290
We work hard to bring you the best knitting and crochet have to offer, inspiration and advice as well as great quality yarns at incredible prices! Would you like to use our patterns for other than personal use? You can read what you are allowed to do in the Copyright text at the bottom of all our patterns. Happy crafting!
Post a comment to pattern DROPS 168-1
We would love to hear what you have to say about this pattern!
If you want to leave a question, please make sure you select the correct category in the form below, to speed up the answering process. Required fields are marked *.