
Popular categories
Looking for a yarn?


Comments / Questions (21)
![]() Valerie0510 wrote:
Valerie0510 wrote:
Bonjour j'aimerais faire cette veste en fiesta + kidsilk combien de grammes de chaque me faudra-t-il ? Merci pour la réponse
01.12.2025 - 17:16DROPS Design answered:
Bonjour Valérie, calculez le métrage Air nécessaire pour votre taille et divisez ce montant par 210 m pour avoir le nombre de pelotes Kid-Silk et divisez-le à nouveau mais par 110 cette fois ci pour avoir le nombre de pelotes Fiesta; et, comme d'habitude bien sûr, pensez à bien vérifier votre tension. Bon tricot!
02.12.2025 - 09:38
![]() Else Hansen wrote:
Else Hansen wrote:
Hej jeg kan ikke finde opskrif til sjalskraven til denne,har strikket det andet så håber i kan hjælpe
20.04.2024 - 09:50DROPS Design answered:
Hej Else, jo du fortsætter med sjalskraven når du har lukket skuldermaskerne af. Det står på forstykket der hvor vi skriver. Fortsæt med forkortede pinde.... se her hvordan det ser ud: Hvordan sys halskanten sammen og fast til halsen bagpå Hvis du vil se flere videoer så klik på sjalskrave øverst på videoen :)
23.04.2024 - 13:20
![]() Helichryse wrote:
Helichryse wrote:
Dommage , je ne sais pas tricoter avec une aiguille circulaire ..... Pourquoi tous vos modèles sont ils réalisés ainsi ?
06.12.2019 - 19:12
![]() Pat Miller wrote:
Pat Miller wrote:
Hello. How do I print the photo of the jacket for pattern Pattern no ai-015? I can print the rest of the pattern, but not the photo (which would be very helpful when I'm not near a pc). Thank you, Pat
04.08.2019 - 20:16DROPS Design answered:
Hello Pat. You can print the photo by choosing the button Photo, just above the “Pattern instructions” line. Happy knitting!
04.08.2019 - 21:38
![]() Ille Wiklund wrote:
Ille Wiklund wrote:
Tänkte sticka denna i Alaska eller Nepal. Hur mycket garn behöver jag då?
01.03.2019 - 10:46DROPS Design answered:
Hei Ille. Det kommer an på hvilken størrelse du skal strikke. Om du fyller inn "Air", og garnmengden i din størrelse i garnkalkulator her vil du få opp alle alternativer med ny garnmengde (Alaska og Nepal vil begge komme opp). God fornøyelse
04.03.2019 - 11:42
![]() Barbara wrote:
Barbara wrote:
Dzien dobry, chcialam spytac o zamykanie oczek w rekawie. Kiedy piszecie" Nastepnie zamknac 2 o. z kazdej strony,az dlugosc rekawa osiagnie 53-54-54-55-56cm. Zamknac 3 o.na poczatku 2 nast. rzedow(...)" Czy mam rozumiec, ze powtarzam zamkniecie 2 o z kazdej strony, w kazdym rzedzie, az do 54 cm dlugosci rekawa? Czy jest to jednorazowe zamkniecie 2 oczek z kazdzej strony rzedu? Dziekuje za odpowiedz. Pozdrawiam
07.01.2019 - 23:27DROPS Design answered:
Witaj Barbaro! Powtarzasz zamykanie 2. o z każdej strony (kilka razy), w każdym rzędzie, aż do 54 cm długości rękawa. Lekko zmodyfikujemy to w opisie, aby było bardziej czytelne. Pozdrawiamy!
08.01.2019 - 17:54
![]() Anke wrote:
Anke wrote:
Ich verstehe nicht ganz, wie der Kragen entsteht. Passiert das automatisch wenn ich die kurzen Reihen stricke? Ich muss keine Machen aufnehmen?
21.10.2018 - 09:29DROPS Design answered:
Liebe Anke, bei den Schalkragen werden keine neuen Maschen anschlagen: nachdem Sie die Maschen für den Schulter abgekettet haben, sind es 16-20 M (siehe Größe), über diese 16-20 M stricken Sie verkürzten Reihen (mit einer Hinreihe angangen): 2 Reihen über 8-10 M, 2 Reihen über alle Maschen bis der Kragen 7-9 cm an der kürzsten Seite mißt. Viel Spaß beim stricken!
22.10.2018 - 09:06
![]() Judith Williams wrote:
Judith Williams wrote:
When knitting the main part of the garment in stocking stitch and the front bands in garter stitch, the instructions say to work short rows in the bands every 10th row. Does this continue with this when you change to working all stitches in garter stitch?
07.12.2016 - 19:41DROPS Design answered:
Dear Mrs Williams, the short rows have to be worked only when you are working in stocking st at the same time to compensate height difference between stocking st and garter st. When working in garter st, short rows are not necessary. Happy knitting!
08.12.2016 - 08:42
![]() Michele wrote:
Michele wrote:
Where are the instructions for the collar. Instructions for the back don't tell how to finish it and make the collar or are the front pieces of the collar for the back too? Thank you.
03.10.2016 - 15:10DROPS Design answered:
Dear Michelle, the shawl collar is worked at the end of front pieces (when working short rows), you will then sew shawl collar first tog (from left and right front pieces) then sew the collar along neckline on back piece. Happy knitting!
03.10.2016 - 15:53
![]() Susanna wrote:
Susanna wrote:
Hur blir den här, stickad i bomull t ex Paris?
16.05.2016 - 10:00DROPS Design answered:
Hej Susanna. Jeg tror den vil blive meget tung / haengende. For denne jakke i Paris i f.eks. den mindste str skal du bruge 800 gr og 1200 gr for den störste.
17.05.2016 - 11:55
|
|
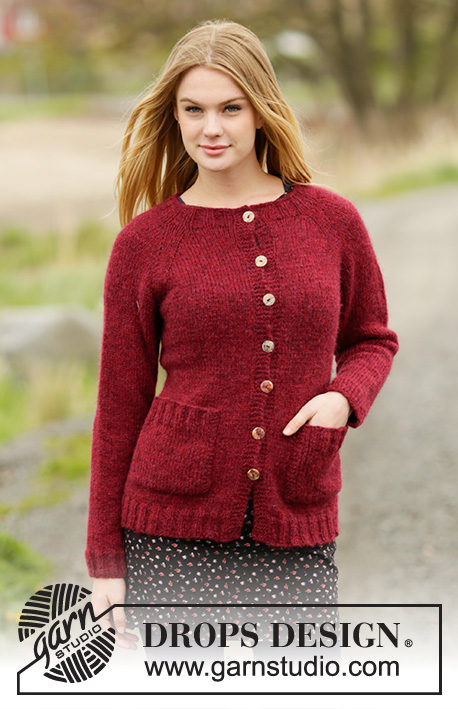
Autumn Forest Jacket#autumnforestjacket |
|
|
|
|
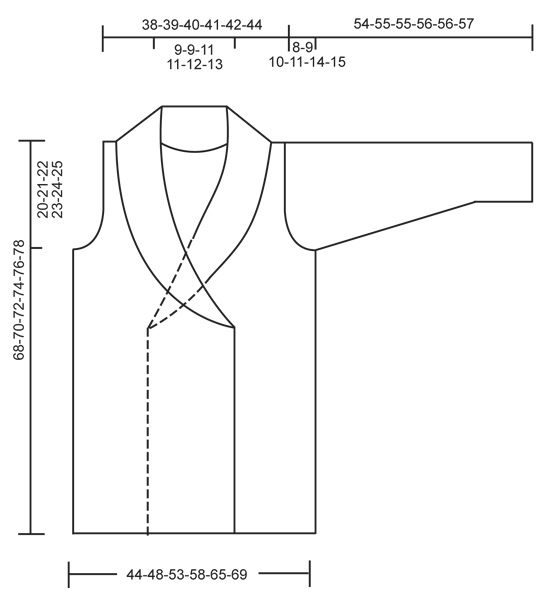
Knitted DROPS jacket with garter st and shawl collar in ”Air”. Size: S - XXXL.
DROPS 164-40 |
|
|
GARTER ST (back and forth on needle): K all rows. 1 ridge = 2 rows K. GARTER ST (worked in the round): * K 1 round and P 1 round *, repeat from *-*. 1 ridge = 2 rounds. SHORT ROWS IN BAND: Work short rows over sts in band to avoid it contracting vertically. Work like this every 10th row – from RS: Work 16-16-18-18-20-20 sts (= right band), turn and work back. Work 1 row over all sts as before. Turn and work 16-16-18-18-20-20 sts (= left band), turn and work back. Turn and work 1 row over all sts as before. BUTTONHOLES: Dec for buttonholes on right band. 2 buttonholes = K tog third and fourth st from edge and make 1 YO, and K tog third and fourth last band st and make 1 YO. Dec for buttonholes when piece measures: SIZE S: 31 and 41 cm SIZE M: 31 and 41 cm SIZE L: 32 and 42 cm SIZE XL: 32 and 42 cm SIZE XXL: 33 and 43 cm SIZE XXXL: 33 and 43 cm ---------------------------------------------------------- BODY: Worked back and forth on circular needle to make room for all the sts. Cast on 162-178-198-214-238-254 sts (incl 16-16-18-18-20-20 band sts in each side towards mid front) on circular needle size 5 mm with Air. Work 3 ridges in GARTER ST - see explanation above. Then work as follows from RS: 16-16-18-18-20-20 sts in garter st (= band), stocking st until 16-16-18-18-20-20 sts and finish with 16-16-18-18-20-20 sts in garter st (= band). Continue in stocking st and garter st AT THE SAME TIME work SHORT ROWS IN BAND – see explanation above. Remember to dec for BUTTONHOLES - see explanation above. REMEMBER THE KNITTING TENSION When piece measures 46-47-48-49-50-51 cm, switch to circular needle size 4.5 mm and work in garter st over all sts until finished measurements. When piece measures 48-49-50-51-52-53 cm, work as follows: Work 41-45-51-55-61-65 sts, cast off the next 6 sts, work 68-76-84-92-104-112 sts, cast off the next 6 sts and work the last 41-45-51-55-61-65 sts. Now finish each part separately. BACK PIECE: = 68-76-84-92-104-112 sts. Now cast off for armholes in each side on every other row as follows: 2 sts 1-1-2-3-5-6 times and 1 st 0-3-4-5-6-7 times = 64-66-68-70-72-74 sts. Continue in garter st. When piece measures 66-68-70-72-74-76 cm, cast off the middle 18-18-18-18-22-22 sts for neck = 23-24-25-26-25-26 sts remain on each shoulder. Finish each part separately. Continue in garter st until piece measures 68-70-72-74-76-78 cm, cast off. RIGHT FRONT PIECE: = 41-45-51-55-61-65 sts. Continue in garter st and cast off for armhole in the side as on back piece = 39-40-43-44-45-46 sts. When piece measures 68-70-72-74-76-78 cm, cast off the first 23-24-25-26-25-26 sts from WS for shoulder = 16-16-18-18-20-20 sts remain on needle. Work the rest of row. Then work short rows over the 16-16-18-18-20-20 sts as follows - beg from RS: * Work 2 rows back and forth over the first 8-8-9-9-10-10 sts, work 2 rows back and forth over all sts *, repeat from *-* until neck edge measures 7-7-8-8-9-9 cm at the shortest. Cast off. LEFT FRONT PIECE: Work as right but reversed. Cast off for shoulder from RS and beg short rows from WS. SLEEVE: Worked in the round on double pointed needles. Cast on 40-40-44-44-48-48 sts on double pointed needle size 4.5 mm with Air. Work 3 ridges in GARTER ST - see explanation above. Switch to double pointed needles size 5 mm and work in stocking st. Insert 1 marker at the beg of round. When piece measures 8 cm, inc 1 st on each side of marker, repeat inc every 3½-3½-3-2½-2-2 cm 9-11-11-14-14-16 more times = 60-64-68-74-78-82 sts. When piece measures 46-46-45-45-42-42 cm (shorter measurements in the larger sizes because of longer sleeve cap and wider shoulders), cast off 6 sts mid under sleeve and work back and forth until finished measurements. Cast off for sleeve cap at beg of every row in each side as follows: 2 sts 3-3-3-3-4-4 times and 1 st 1-2-3-4-5-6 times. Then cast off 2 sts in each side until piece measures 53-54-54-55-55-56 cm. Cast off 3 sts at beg of the next 2 rows before loosely casting off all sts. Knit another sleeve. POCKETS: Worked back and forth on circular needle. Cast on 20 sts on circular needle size 5 mm with Air. Work 1 ridge, then work in stocking st with 2 sts in garter st in each side. When piece measures 13 cm, work 2 ridges over all sts. Cast off. Knit another pocket. ASSEMBLY: Sew the shoulder seams. Sew in sleeves. Sew the collar tog mid back and sew it to the neckline. Fasten pockets, approx. in the middle of stocking st on front piece and 5 cm from bottom edge (see picture). |
|
 |
|
Have you finished this pattern?Tag your pictures with #dropspattern #autumnforestjacket or submit them to the #dropsfan gallery. Do you need help with this pattern?You'll find 20 tutorial videos, a Comments/Questions area and more by visiting the pattern on garnstudio.com. © 1982-2026 DROPS Design A/S. We reserve all rights. This document, including all its sub-sections, has copyrights. Read more about what you can do with our patterns at the bottom of each pattern on our site. |


With over 40 years in knitting and crochet design, DROPS Design offers one of the most extensive collections of free patterns on the internet - translated to 17 languages. As of today we count 324 catalogues and 12290 patterns translated into English (UK/cm). 12290
We work hard to bring you the best knitting and crochet have to offer, inspiration and advice as well as great quality yarns at incredible prices! Would you like to use our patterns for other than personal use? You can read what you are allowed to do in the Copyright text at the bottom of all our patterns. Happy crafting!
Post a comment to pattern DROPS 164-40
We would love to hear what you have to say about this pattern!
If you want to leave a question, please make sure you select the correct category in the form below, to speed up the answering process. Required fields are marked *.