
Popular categories
Looking for a yarn?


Comments / Questions (43)
![]() Sophie wrote:
Sophie wrote:
Bonjour J' aimerais remplacer la merino extra fine par la baby merino Qu en pensez vous est-ce possible Merci
08.07.2025 - 14:22DROPS Design answered:
Bonjour Sophie, DROPS Merino Extra Fine est du groupe B et DROPS Baby Merino de A. L'echantillon ne sera pas correct. Pour plus d'informations concernant le changement de fils, regardez la video ICI. Bon tricot!
08.07.2025 - 18:06
![]() Lynette wrote:
Lynette wrote:
For the increase part. Inc by working 2 sc in 1 sc. NOTE: Inc alternately before and after markers….Are you saying on the same row to increase before one marker and the next after the marker. Or are you saying one row inc before and the next row inc after.
08.07.2025 - 04:51DROPS Design answered:
Dear Lynette, yes, in the pattern you work the first increase before all markers. So in the next increase row you will work the increase after each of the markers. Then before the markers again, e.t.c. Happy crochetting!
14.07.2025 - 01:16
![]() Sigrid Pettersson wrote:
Sigrid Pettersson wrote:
Jag förstår inte ökningstipsen på detta mönster. Ska det va 1 ökn, 1 fm o 1 ökn före o efter markören?? Alltså 1fm i maskan där markören sitter? Och hur kan det va 14cm när ökn är klara när efter 5 ökn bara blir 8cm???
19.07.2023 - 09:29DROPS Design answered:
Hei Sigrid. Det økes ved å hekle 2 fastmasker i 1 fastmaske. Første gang / 1.rad det økes hekles det 2 fastmasker i masken før merke (merket sitter mellom 2 masker), øk slik ved alle merkene raden ut. Snu og hekle raden tilbake uten økninger. På neste rad / 3. rad skal det økes igjen og denne gangen skal det hekles 2 fastmasker i masken etter merket, øk slik raden ut. Neste gang det skal økes / 5. rad økes det i masken foran merke og neste gang deretter / 7. rad økes det i masken etter merket osv. Du hekler 8 rader før du begynner å øke, så hekles det 16 rader med økninger = ca 14 cm. mvh DROPS Design
26.07.2023 - 11:44
![]() Luisa wrote:
Luisa wrote:
Hallo! Leider ist mir der Rock um den Bauch zu locker geworden. Was kann ich im Nachhinein machen? Wie nähe ich da Zb einen Gummizug ein? Gibt es andere Möglichkeiten?Liebe Grüsse
04.11.2022 - 06:49
![]() Eva wrote:
Eva wrote:
Jeg er færdig med nederdelen som er blevet rigtig fin. Syntes dog den virker løs og at vægten trækker den ned. Har I en ide til hvordan man kan "stramme" bærestykket?
18.04.2022 - 11:52DROPS Design answered:
Hei Eva. Du kan evnt prøve å hekle en luftmaskerad fast på innsiden øverst på skjørtet / evnt lengre ned , der du hekler litt færre luftmasker enn hva det er fastmasker, slik at det strammer litt. Men pass på at det ikke strammer for mye slik at det bølge seg. mvh DROPS Design
19.04.2022 - 14:03
![]() Claudia wrote:
Claudia wrote:
I am adapting this pattern for a thicker yarn so I need to reduce the number of stitches per row. In this pattern I do not understand why, at the beginning, after the first row of chains one needs to "* skip 1 ch, 1 dc in each of the next 6 ch *, repeat from *-*". What is the reason for letting one chain out every 7 chains? Thank you so much!
04.02.2021 - 23:36DROPS Design answered:
Dear Claudia, most of the time when you crochet the foundation chain, it's too tight, to avoid this, you cast on more chains at the beginning and skip evenly chains on very first row. If your chains are wide enough, you can just start with the number of double crochets required on first round (= 116 to 202 sts depending on the size). Happy crocheting!
05.02.2021 - 08:41
![]() Elodie wrote:
Elodie wrote:
Bonjour, J'ai fini de faire les 7 augmentations tous les 2 rangs. Mais je n'arrive pas à 14 cm de hauteur. Cela fait 8 cm. Avant de fermer je peux continuer sans augmenter jusqu'à obtenir 14 cm? Merci de votre aide
19.06.2020 - 12:15DROPS Design answered:
Bonjour Élodie, continuez effectivement jusqu'à 14 cm pour que la jupe soit plus simple à enfiler. Bonne continuation!
19.06.2020 - 13:27
![]() Aurélie wrote:
Aurélie wrote:
Est ce que il faut garder les 6 marqueurs pour faire le point fantaisie spirale??
02.03.2020 - 02:42DROPS Design answered:
Bonjour Aurélie, on peut retirer les marqueurs des augmentations quand on crochète le point spirale, on ne va plus les utiliser (gardez celui du début du rang si besoin). Bon crochet!
02.03.2020 - 10:58
![]() Lily wrote:
Lily wrote:
Hello, I’d like to make sure I’m not missing any rows at the top. When you say the piece measures 14cm; that’s after 23 rows. Given the gauge of 18 rows for 10cm, that’s a couple of centimetres short, isn’t it? Did I miss 2 rows before joining in the round that would make it 14cm? Thank you in advance for clarifying.
02.02.2020 - 22:56DROPS Design answered:
Dear Lily, the 14 cm are measured from cast on edge (= from the fundation chain) and are for the waist band (where you will crochet later buttonbands on). You increase evenly on first round and now continue in spiral pattern in the round. Happy crocheting!
03.02.2020 - 10:32
![]() Montserrat wrote:
Montserrat wrote:
No entiendo esta parts del patron, me lo podeis explicar. Muchas gracias 1 p.b. en cada uno de los sig 1-2-5-3-3-3 p.de cad, *saltar 1 p.de cad, 1 p.b. en cada uno de los sig 6 p.de cad*, repetir de * a * el resto de la fila = 116-129-144-166-184-202 p.b.
17.01.2020 - 10:41DROPS Design answered:
Hola Montserrat. Entiendo que tienes dificultades en la siguiente parte:... 1 p.b. en cada uno de los sig 1-2-5-3-3-3 p.de cad,...Los patrones de Drops están preparados para varias tallas, por lo que incluye en el texto los puntos para cada una de las tallas. Es decir, 1 p.b. en cada uno de los sig 1 (talla S)-2 (talla M)-5 (L)-3(XL)-3(XXL)-3 (XXXL) p.de cad, Tienes que trabajar según tu talla.
26.01.2020 - 23:19
|
|
Miss Moneypenny#missmoneypennyskirt |
|
|
|
|
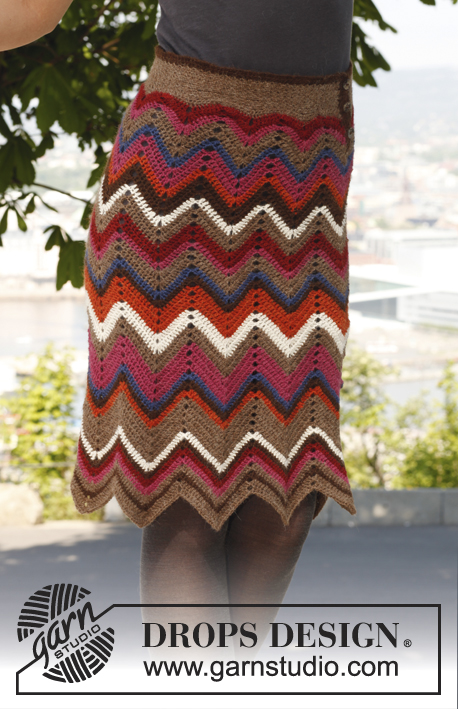
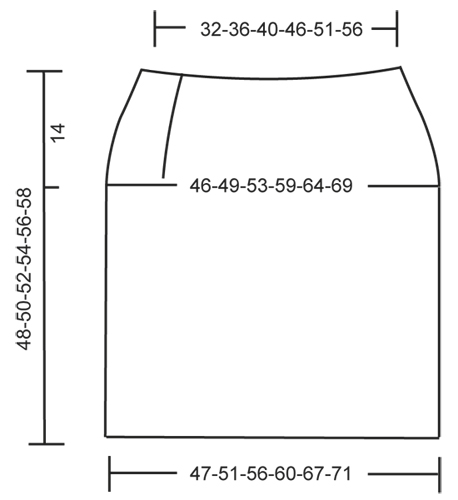
Crochet DROPS skirt with spiral pattern, worked top down in ”Merino Extra Fine”. Size: S - XXXL.
DROPS 156-6 |
|
|
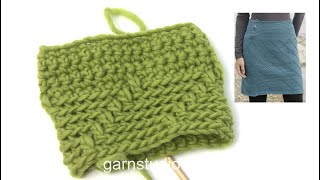
CROCHET INFO: Replace first dc at beg of every dc row with 1 ch. Finish round with 1 sl st in first ch at beg of round. INCREASE TIP: Inc by working 2 dc in 1 dc. NOTE: Inc alternately before and after markers. SPIRAL PATTERN: * 1 dc in back loop of each of the next 7 sts, 1 tr in front loop of st from 2 rows below next st *, repeat from *-* the entire round. Pattern is over 8 sts and no of sts are divisible by 8 + 1. Work in the round without finishing the round, this way the pattern will automatically displace 1 st on every round and form a spiral pattern. ---------------------------------------------------------- SKIRT: The piece is worked top down. First back and forth, then put tog and worked in the round. Work 136-151-168-194-215-236 loose ch with Merino Extra Fine on hook size 4 mm. Work first row (= RS) as follows: 1 dc in 2nd ch from hook, 1 dc in each of the next 1-2-5-3-3-3 ch, * skip 1 ch, 1 dc in each of the next 6 ch *, repeat from *-* the rest of row = 116-129-144-166-184-202 dc. READ CROCHET INFO! Then work 6 rows with 1 dc in every dc. REMEMBER THE CROCHET TENSION! Now insert 6 markers in the piece as follows: 1st marker after 11-12-12-16-15-19 sts, then there should be 19-21-24-27-30-33 sts between each of the markers, there will be 10-12-12-15-15-18 sts after last marker at the end of row. On next row inc 1 dc before all markers – READ INCREASE TIP! Repeat inc every other row 7 more times = 164-177-192-214-232-250 dc. On next row from RS work the entire row before putting piece tog with 1 sl st in 1st dc from beg of row. Piece measures 14 cm, now work in the round. On next round, inc 5-8-9-3-9-7 dc evenly = 169-185-201-217-241-257 dc. Then work SPIRAL PATTERN - see explanation above. Work until piece measures 48-50-52-54-56-58 cm in total. Fasten off. BUTTONHOLE LOOPS: Work buttonhole loops along left side of opening at the top (beg at the bottom) from WS as follows: 1 dc in each of the first 2 sts, 3 ch, skip 1 cm, * work dc for 2 cm, 3 ch, skip 1 cm *, repeat from *-* 4 more times, finish with 2 dc at the top, turn and work back as follows: 1 dc in every dc and 3 dc in every ch-space. BUTTON FOLDING EDGE: Along the other side of the opening (i.e. right side) work 5 rows with dc back and forth, cut the yarn. Sew the buttons on to the button folding edge. |
|
 |
|
Have you finished this pattern?Tag your pictures with #dropspattern #missmoneypennyskirt or submit them to the #dropsfan gallery. Do you need help with this pattern?You'll find 8 tutorial videos, a Comments/Questions area and more by visiting the pattern on garnstudio.com. © 1982-2026 DROPS Design A/S. We reserve all rights. This document, including all its sub-sections, has copyrights. Read more about what you can do with our patterns at the bottom of each pattern on our site. |


With over 40 years in knitting and crochet design, DROPS Design offers one of the most extensive collections of free patterns on the internet - translated to 17 languages. As of today we count 324 catalogues and 12290 patterns translated into English (UK/cm). 12290
We work hard to bring you the best knitting and crochet have to offer, inspiration and advice as well as great quality yarns at incredible prices! Would you like to use our patterns for other than personal use? You can read what you are allowed to do in the Copyright text at the bottom of all our patterns. Happy crafting!
Post a comment to pattern DROPS 156-6
We would love to hear what you have to say about this pattern!
If you want to leave a question, please make sure you select the correct category in the form below, to speed up the answering process. Required fields are marked *.