
Popular categories
Looking for a yarn?


Comments / Questions (66)
![]() Maeva wrote:
Maeva wrote:
Bonjour, j'ai bientôt terminé le modèle (taille L). Une fois faits les rangs raccourcis du col, le fil de pelote se trouve au niveau du dos. Lorqu'on reprend toutes les mailles en attente sur l'aiguille, faut-il couper le fil et démarrer le dernier rang avec un nouveau fil ? Ou faudrait-il tricoter d'abord un rang sans les 61 mailles du côté du fil, puis un deuxième pour inclure ces mailles ? (aucune des 2 solutions n'est indiquée dans le patron). Merci pour votre aide !
23.01.2025 - 16:59DROPS Design answered:
Bonjour Maeva, vous pouvez faire les deux, au choix; couper le fil et reprendre au début du rang vous évitera d'avoir une différence dans le nombre de rangs des deux côtés du col. Bon tricot!
24.01.2025 - 08:59
![]() Sunny wrote:
Sunny wrote:
Hallöchen. Ich habe ein absolutes denk Problem mit dem Kragen. Mir erschließt es sich absolut nicht mit den stillgelegten Maschen. Könnte mir da vielleicht jemand helfen? Vielen lieben Dank
19.08.2024 - 08:29DROPS Design answered:
Liebe Sunny, damit der Kragen höher hinten als beidseitig wird, wird man verkürzten Reihen stricken, dh immer weniger Maschen stricken (die ersten 15-18 Maschen am Anfang jeder Reihe stilllegen) bis 61-70 M beidseitig stillgelegt werden, dann stricken Sie alle Maschen wieder. Viel Spaß beim Stricken!
20.08.2024 - 08:07
![]() Thea wrote:
Thea wrote:
Waarom eerst de mouwen en dan de kraag? Het werk wordt dan veel zwaarder om te breien
19.03.2023 - 15:12DROPS Design answered:
Dag Thea,
Je kan inderdaad ook eerst de kraag doen en daarna pas de mouwen innaaien. Bedankt voor de tip!
19.03.2023 - 16:24
![]() Emilie wrote:
Emilie wrote:
Bonjour, Pouvez vous m'expliquer comment coudre les poches je ne sais pas comment m'y prendre car les mailles lisières vont être visibles, nous ne pouvons pas de couture invisible. Ou avez vous un tuto qui le montre ? Merci par avance. Cordialement.
02.07.2022 - 00:31DROPS Design answered:
Bonjour Emilie, cette vidéo montre justement comment coudre une poche. Bonne continuation!
04.07.2022 - 08:55
![]() Karine Bresler wrote:
Karine Bresler wrote:
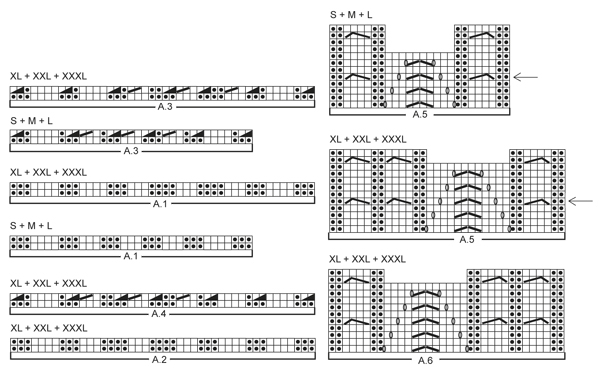
Bonjour, Je tricote le modèle Drops 141-19. Dans le diagramme A5 en taille S apres le dernier rang du point ajouré rang 8 on reprend le diagramme des le début. Mais en ce qui concerne la flèche en face du motif de la torsade pour faire le rang raccourci doit on faire ce rang raccourci à chaque torsade ou une torsade sur deux? Merci pour votre réponse
25.02.2022 - 15:32DROPS Design answered:
Bonjour Mme Bresler, les rangs raccourcis vont se faire 1 torsade sur 2 (= comptez les rangs des torsades, pas du point ajouré). Bon tricot!
25.02.2022 - 16:06
![]() Camilla wrote:
Camilla wrote:
Hei! I diagram A.5 og A.6 så er det et område på midten øverst som er helt blankt. Hvordan strikker jeg disse diagrammene?
14.01.2022 - 19:38
![]() Valérie wrote:
Valérie wrote:
Bonsoir, Je débute ce tricot en taille L. Une petite chose que j’ai du mal à comprendre. Le diagramme A5 comporte 8 rangs à répéter. Le diagramme A7 comporte 14 rangs à répéter. Comment faire ? Et à quoi servent les 4 rangs à gauche et à droite sur le schéma A5, il n’y a rien au milieu ? Merci par avance pour votre aide.
26.09.2021 - 20:44DROPS Design answered:
Bonjour Valérie, les différents motifs/diagrammes ne se répètent pas sur le même nombre de mailles en hauteur, par ex. dans A.5 quand le point ajouré est terminé, reprenez le au 1er rang, mais continuez les torsades de chaque côté comme avant. Quand A.7 est terminé, reprenez-le au 1er rang. Bon tricot!
27.09.2021 - 08:39
![]() Sareith wrote:
Sareith wrote:
Bonjour, J'ai placé les 2 marqueurs ; à 47-50-54-59-66-71 m de chaque côté = 77-83-89-99-109-119 m entre les marqueurs pour le dos. Et je dois continuer en point fantaisie, sur le rang envers dois je tricoter les rangs comme elle suit ou tricoter le rang suivant des points fantaisies ?
11.08.2021 - 22:40DROPS Design answered:
Bonjour Mme Sareith, les marqueurs sont juste ajoutés pour servir de repères pour les diminutions, tricotez les diagrammes comme avant: lisez-les de droite à gauche sur l'endroit et de gauche à droite sur l'envers - cette leçon pourra peut-être vous aider si besoin. Bon tricot!
12.08.2021 - 08:44
![]() Annette Hesteng wrote:
Annette Hesteng wrote:
Rib forneden.str s, skal slå 239 m op, men tæller man m sammen i ribben, bliver det kun 224 m, nu sidder jeg, efter at ha strikket ribben 1 gang igennem, med 15 m i overskud, og det er anden gang, hvad gør jeg? hilsen annette
15.01.2021 - 19:11DROPS Design answered:
Hei Annette. Usikker på hvor det blir feil hos deg, men det er riktig slik det står i oppskriften. Prøv å del opp avsnittet og skriv ned de maskene du skal strikke, f.eks slik: 3 kantmasker + 18 (3 rett, 3 vrang x 3)+ 3 rett + 35 (A.1) + 12 ( 3 rett, 3 vrang x2) + 3 rett + 35 (A.1) + 18 (3 rett, 3 vrang x 3) + 3 rett + 35 (A.1) + 12 (3 rett, 3 vrang x 2) + 3 rett + 35 (A.1) + 18 ( 3 rett, 3 vrang x 3) + 3 rett + 3 kantmasker = 239 masker. God Fornøyelse!
25.01.2021 - 14:12
![]() Merja Schroeder wrote:
Merja Schroeder wrote:
Ik kom er niet helemaal uit. Ik maak xxl. Op het moment dat je van boord steek overgaat naar het patroon op nld 6mm staat er nadat A3 gebreid is. Brei en minder tegelijkertijd 11 steken gelijkmatig. Maar brei je dan alle steken recht of recht boven recht averecht boven ? Mvg, Merja
23.12.2020 - 15:08DROPS Design answered:
Dag Merja,
Het maakt niet uit of je die minderingen boven de rechte of averechte steken maakt, want in de volgende naald worden er ribbels boven deze steken gebreid.
17.01.2021 - 14:33
|
|||||||||||||||||||||||||
Birch Leaves#birchleavesjacket |
|||||||||||||||||||||||||
 |
 |
||||||||||||||||||||||||
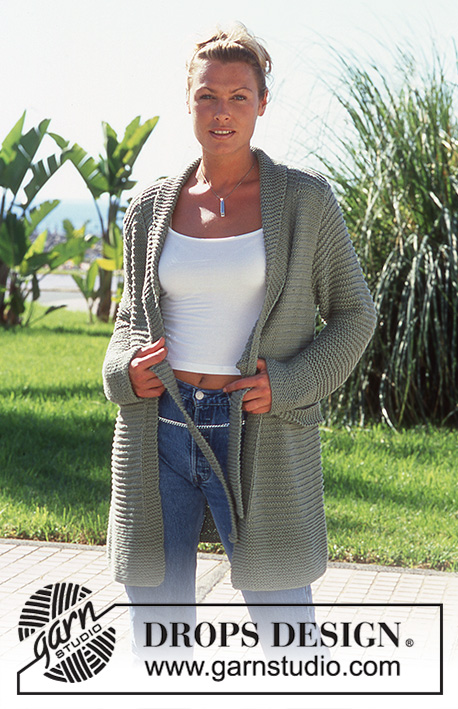
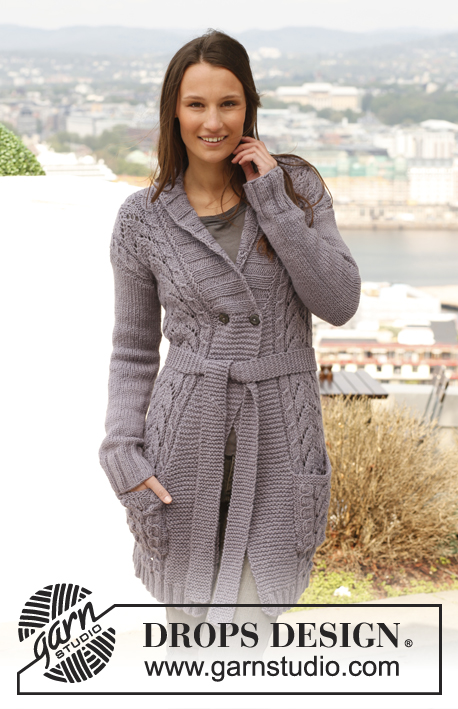
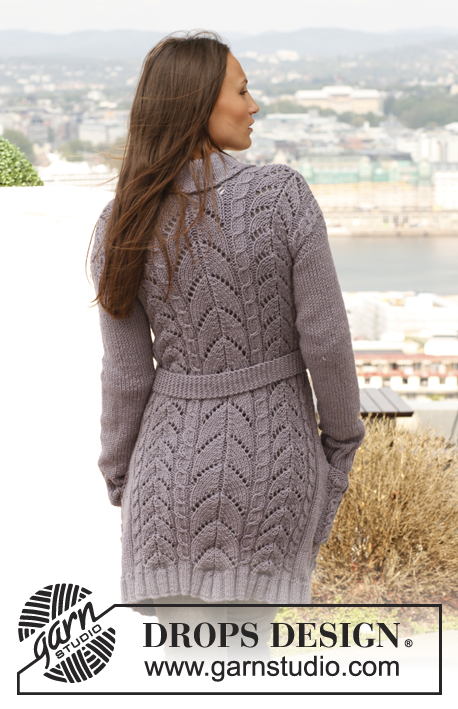
Knitted DROPS jacket with cables, lace pattern and band collar in ”Nepal”. Size: S - XXXL.
DROPS 141-19 |
|||||||||||||||||||||||||
|
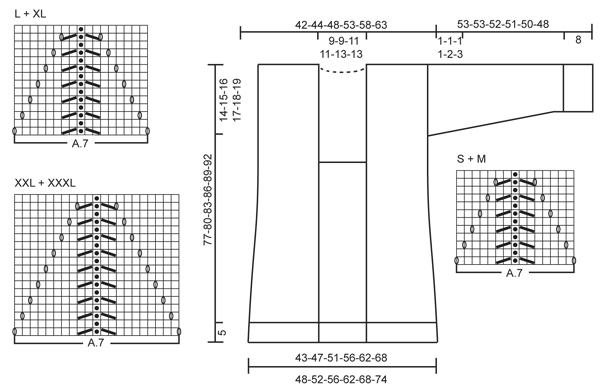
GARTER ST (back and forth on needle): K all rows. 1 ridge = 2 rows K. PATTERN: See diagrams A.1 to A.7. Diagrams show all rows in pattern seen from RS. Choose diagram for your size. DECREASE TIP (applies to sides of body): All dec are done from RS! Dec as follows before marker: K 2 tog. Dec as follows after marker: Slip 1 st as if to K, K 1, psso. KNITTING TIP (applies to band): To avoid the bands contracting at the front, work short rows over bands on every row marked with arrow in diagram A.5/A.6 as follows: * Beg from RS on right front piece (= mid front) on row marked with arrow in diagram and K 1 row over the outermost 16-16-18-18-22-22 sts (= band – the other sts on row are not worked), turn piece, tighten thread and K the rest of row, turn piece and work 1 row as before (in garter st and with pattern) over all sts, turn piece, K 1 row over the outermost 16-16-18-18-22-22 sts (= band on left front piece – the other sts on row are not worked), turn piece, tighten thread and K the rest of row *, repeat from *-* on every row marked with arrow in diagram. BUTTONHOLES: Cast off for 2 buttonholes on right band as follows: K tog third and fourth st from edge and make 1 YO, work until 5 sts remain on band, K the next 2 tog and make 1 YO. ---------------------------------------------------------- JACKET: Worked back and forth on circular needle from mid front. Cast on 239-251-269-305-335-347 sts (incl 16-16-18-18-22-22 band sts in each side towards mid front) on circular needle size 5 mm with Nepal. P 1 row from WS. Work next row as follows from RS: 3 edge sts in GARTER ST – see explanation above , * K 3, P 3 *, repeat from *-* a total of 3-3-4-4-5-5 times, K 3, work diagram A.1 (choose diagram for your size = 35-35-35-44-44-44 sts), * K 3, P 3 *, repeat from *-* a total of 2-3-3-3-4-5 times, K 3, work diagram A.1 in sizes S + M + L (= 35 sts) and diagram A.2 in sizes XL + XXL + XXXL (= 44 sts), * K 3, P 3 *, repeat from *-* a total of 3-3-4-4-5-5 times, K 3, work diagram A.1 (choose diagram for your size = 35-35-35-44-44-44 sts), * K 3, P 3 *, repeat from *-* a total of 2-3-3-3-4-5 times, K 3, work diagram A.1 in sizes S + M + L (= 35 sts) and diagram A.2 in sizes XL + XXL + XXXL (= 44 sts), * K 3, P 3 *, repeat from *-* a total of 3-3-4-4-5-5 times, K 3 and 3 edge sts in GARTER ST. Continue rib like this until piece measures 5 cm. Switch to circular needle size 6 mm and work next row from RS as follows: 3 edge sts in garter st, K while AT THE SAME TIME dec 8-7-9-12-12-10 sts evenly over the next 21-21-27-27-33-33 sts, work last row in A.3 over sts from A.1 (choose diagram for your size = 9-9-9-10-10-10 sts dec), K while AT THE SAME TIME dec 5-7-7-7-11-11 sts evenly over the next 15-21-21-21-27-33 sts, work last row in A.3 in sizes S + M + L over sts from A.1 (= 9 sts dec) and work last row in A.4 in sizes XL + XXL + XXXL over sts from A.2 (= 10 sts dec), K while AT THE SAME TIME dec 6-4-4-10-8-4 sts evenly over the next 21-21-27-27-33-33 sts, work last row in A.3 over sts from A.1 (choose diagram for your size = 9-9-9-10-10-10 sts dec), K while AT THE SAME TIME dec 5-7-7-7-11-11 sts evenly over the next 15-21-21-21-27-33 sts, work last row in A.3 in sizes S + M + L over sts from A.1 (= 9 sts dec) and work last row in A.4 in sizes XL + XXL + XXXL over sts from A.2 (= 10 sts dec), K while AT THE SAME TIME dec 8-7-9-12-12-10 sts evenly over the next 21-21-27-27-33-33 sts and finish with 3 edge sts in garter st = 171-183-197-217-241-261 sts. Work 1 row from WS with K over K and P over P but K the outermost 16-16-18-18-22-22 sts in each side (= bands). Then work pattern as follows, beg from RS - READ KNITTING TIP: 16-16-18-18-22-22 band sts in garter st, 0-1-3-0-2-4 sts in reverse stocking st, work pattern according to diagram A.5 (choose diagram for your size = 26-26-26-34-34-34 sts), work in stocking st over the next 10-14-14-14-16-22 sts, work A.5 in sizes S + M + L (= 26 sts) and A.6 in sizes XL + XXL + XXXL (= 34 sts), 0-1-3-0-2-4 sts in reverse stocking st, work diagram A.7 (choose diagram for your size = 15-15-17-17-21-21 sts), 0-1-3-0-2-4 sts in reverse stocking st, work A.5 (choose diagram for your size = 26-26-26-34-34-34 sts), work in stocking st over the next 10-14-14-14-16-22 sts, work A.5 in sizes S + M + L (= 26 sts) and A.6 in sizes XL + XXL + XXXL (= 34 sts) and 0-1-3-0-2-4 sts in reverse stocking st and 16-16-18-18-22-22 band sts in garter st. Insert 2 markers in the piece; 47-50-54-59-66-71 sts in from each side = 77-83-89-99-109-119 sts between markers on back piece. Continue pattern. REMEMBER THE KNITTING TENSION! When piece measures 10 cm, dec 1 st on each side of both markers – READ DECREASE TIP (= 4 sts dec). Repeat dec every 10-10-10-8-9-9 cm, 3-3-3-4-4-4 more times = 155-167-181-197-221-241 sts. When piece measures 50-52-54-56-58-60 cm, cast off for 2 buttonholes on right band - see explanation above! When piece measures 51-53-55-57-59-61 cm, cast off the first 15-15-17-17-21-21 sts on row, insert 1 marker (shows where to beg knit up for collar), work the rest of row. Turn piece, cast off the first 15-15-17-17-21-21 sts on row, insert 1 marker (this marks where to end the knit up for collar), work the rest of row = 125-137-147-163-179-199 sts. Continue pattern as before with 1 edge st in garter st in each side. When piece measures 63-65-67-69-71-73 cm, cast off 2-4-4-4-6-8 sts in each side for armholes (i.e. 1-2-2-2-3-4 sts on each side of both markers) = 67-71-77-85-93-101 sts on back piece and 27-29-31-35-37-41 sts on front piece. Finish each part separately. BACK PIECE: Continue pattern as before with 1 edge st in garter st in each side. When piece measures 75-78-81-84-87-90 cm, cast off the middle 11-11-13-13-17-17 sts for neck and finish each shoulder separately. Then cast off 1 st on next row from neck = 27-29-31-35-37-41 sts remain on needle. Continue until piece measures 77-80-83-86-89-92 cm and cast off. RIGHT FRONT PIECE: Continue pattern as before with 1 edge st in garter st in each side. When piece measures 77-80-83-86-89-92 cm – adjust so that same no of rows has been worked as on back piece, cast off. LEFT FRONT PIECE: Work as right front piece. SLEEVE: Worked in the round. Cast on 42-42-42-48-48-48 sts on double pointed needles size 5 mm with Nepal. K 1 round, then work rib (= K 3/P 3). When rib measures 8 cm, switch to double pointed needles size 6 mm. K 1 round while AT THE SAME TIME dec 8-7-6-11-10-9 sts evenly = 34-35-36-37-38-39 sts. Then work in stocking st. Insert 1 marker at the beg of round. When piece measures 10 cm, inc 1 st on each side of marker mid under sleeve. Repeat inc every 13-10-7½-6-5-4 cm 3-4-5-6-7-8 more times = 42-45-48-51-54-57 sts. When piece measures 52-52-51-50-48-45 cm (shorter measurements in the larger sizes because of longer sleeve cap and broader shoulder width), finish the piece back and forth on needle from mid under sleeve as follows: Sizes S + M + L + XL: Cast on 1 new st in each side (= edge st for assembly) and work until piece measures 53-53-52-51 cm, loosely cast off. Size XXL + XXXL: Cast on 1 new st in each side (= edge st for assembly) and work until 2 rows remain before piece measures 50-48 cm. Now cast off 5 sts at beg of the next 2 rows before casting off all sts. ASSEMBLY: Sew the shoulder seams. Sew in sleeves inside 1 edge st (section worked back and forth at the top of sleeve should fit the cast off for armhole). Sew on buttons. COLLAR: Knit up sts from RS (inside 1 edge st) on circular needle size 5 mm - start mid front at marker on right front piece: Knit up approx. 38 to 46 sts up to shoulder, then 16 to 22 sts along the neck, and 38 to 46 sts down along left front piece until marker = 92 to 114 sts. K 1 row from WS. Then K 1 row from RS while AT THE SAME TIME inc no of sts evenly to 137-143-149-155-161-167. Then work rib as follows (from WS): 1 edge st in garter st, * P 3, K 3 *, repeat from *-* until 4 sts remain and finish with P 3 and 1 edge st in garter st (from RS there are 3 K sts in each side inside edge st). Continue rib like this until collar measures approx. 5 cm. Now inc 1 st in each of the middle 12 P-sections, seen from RS (= back of neck) = 149-155-161-167-173-179 sts. Continue with K over K and P over P until collar measures approx. 9-9-11-11-13-13 cm. Now work as follows: Work 1 row as before and slip the first 16 sts worked on a stitch holder, turn piece, work the rest of row and slip the first 16 sts worked at the beg of row on another stitch holder. Turn piece, work the rest of row and slip the first 15-15-15-18-18-18 sts worked at the beg of row on the first stitch holder, turn piece, work the rest of row and slip the first 15-15-15-18-18-18 sts worked at the beg of row on the other stitch holder. Continue like this by slipping the first 15-15-15-18-18-18 sts worked on stitch holder in each side until there are 61-61-61-70-70-70 sts in total on stitch holder in each side. Then slip sts from stitch holders back on needle and work 1 row as before over all the 149-155-161-167-173-179 sts – NOTE: To avoid holes in every transition where piece was turned, slip loop before next st twisted on needle and work tog with first st on needle. On next row cast off with K over K and P over P. Neatly fasten collar with stitches in each side towards band – sew edge to edge to avoid a chunky seam. POCKET: Worked back and forth on circular needle. Cast on 28-28-28-36-36-36 sts on circular needle size 6 mm with Nepal. Work pattern according to diagram A.5 (choose diagram for your size) with 1 edge st in garter st in each side. When pocket measures approx. 17-17-17-20-20-20 cm – adjust after one whole repetition of lace pattern in the middle – dec from RS 2 sts over each cable and 3 sts over lace pattern in the middle = 21-21-21-27-27-27 sts. Switch to circular needle size 5 mm and K 4 rows and cast off with K from WS. Knit another pocket but in sizes XL + XXL + XXXL work diagram A.6 instead of A.5. Sew 1 pocket on to each front piece with stitches inside 1 edge st - approx. 13-13-13-17-17-17 cm from bottom edge (try the jacket on for placement) – pattern on pocket should fit pattern repetition on front piece. BELT: Cast on 9 sts on needle size 5 mm and work in garter st back and forth until belt measures approx. 150-190 cm, cast off. |
|||||||||||||||||||||||||
Diagram explanations |
|||||||||||||||||||||||||
|
|||||||||||||||||||||||||
 |
|||||||||||||||||||||||||
 |
|||||||||||||||||||||||||
Have you finished this pattern?Tag your pictures with #dropspattern #birchleavesjacket or submit them to the #dropsfan gallery. Do you need help with this pattern?You'll find 19 tutorial videos, a Comments/Questions area and more by visiting the pattern on garnstudio.com. © 1982-2026 DROPS Design A/S. We reserve all rights. This document, including all its sub-sections, has copyrights. Read more about what you can do with our patterns at the bottom of each pattern on our site. |
|||||||||||||||||||||||||


With over 40 years in knitting and crochet design, DROPS Design offers one of the most extensive collections of free patterns on the internet - translated to 17 languages. As of today we count 324 catalogues and 12290 patterns translated into English (UK/cm). 12290
We work hard to bring you the best knitting and crochet have to offer, inspiration and advice as well as great quality yarns at incredible prices! Would you like to use our patterns for other than personal use? You can read what you are allowed to do in the Copyright text at the bottom of all our patterns. Happy crafting!
Post a comment to pattern DROPS 141-19
We would love to hear what you have to say about this pattern!
If you want to leave a question, please make sure you select the correct category in the form below, to speed up the answering process. Required fields are marked *.