
Popular categories
Looking for a yarn?


Comments / Questions (132)
![]() Louise wrote:
Louise wrote:
Je vois la correction apportée pour la taille XL qui n'est pas différente du patron original. Est-ce que le patron d'origine a été corrigé? Merci
11.08.2025 - 22:53DROPS Design answered:
Bonjour Louise, la correction ne s'applique que si vous aviez imprimé les explications auparavant, autrement, les explications en ligne ont déjà été corrigées. Bon tricot!
12.08.2025 - 09:03
![]() Corrie wrote:
Corrie wrote:
Het telpatroon begin je eke naald aan dezelfde kant van het patroon
01.08.2025 - 11:55DROPS Design answered:
Dag Corrie,
Bij heen en weer breien, lees je het telpatroon van rechts naar links als je aan de goede kant breit en weer terug van links naar rechts als je aan de verkeerde kant breit.
03.08.2025 - 09:29
![]() Joanne P wrote:
Joanne P wrote:
Further clarification to my first comment. I am decreasing on every row at neckline as follows: For 8 rows... Knit row last 5 stitches: (K2 tog) twice, K1 Purl row fiirst 5 stitches: P1, (P2 tog) twice (16 stitches decreased) Then for 5 rows the same, but only single decrease. (5 stitches decreased) Total stitches decreased is 21 in 13 rows.
12.04.2025 - 08:51
![]() Joanne P wrote:
Joanne P wrote:
I'm really struggling with the neckline. Please help! Are you really meant to dec 2 stitches on EVERY row, then 1 stitch thereafter? I'm doing the XL, so effectively that's decreasing 16 stitches at the neck in only 8 rows, then 5 in the next 5 rows. It is WAY too rouched up. Can you confirm if this is actually the pattern? Or assist with more precise row instructions, please? Am I decreasing wrong? (k 2 tog twice) Should I only be decreasing on alternate rows?
12.04.2025 - 08:41DROPS Design answered:
Dear Joanne, you cast off (not decrease) on every row from the neck, that is, on every row where you start from the neck. So, in a row that starts in the neck edge, cast off 2 stitches, work the rest of the row, work back (without decreases). On the next row from the neck cast off the first 2 stitches and work as before. After casting off 2 stitches 8 times you start casting off 1 stitch, but only on rows starting from the neck. You can read here how to cast off from the right side and from the wrong side Happy knitting!
13.04.2025 - 23:31
![]() Shelley Rosenberg wrote:
Shelley Rosenberg wrote:
I can’t figure out what the rib stitch is. Is it 2 by 2?
16.11.2022 - 18:22DROPS Design answered:
Hi Shelley, The rib is K1, P3. Happy knitting!
17.11.2022 - 06:52
![]() Daniely Souza wrote:
Daniely Souza wrote:
My name is Daniely, I’m 23 years old and I love to knit. As my love for knitting grew, I decided that I really want to make living knitting. I want to open a store (even if it’s simple) and have my financial income turned to knit, I want knitting to be my profession! Come to think of it, I have a question about your patterns. I would like to weave the pieces of your recipes, weave them and sell the pieces in my shop. Is this allowed? Will you allow me? Please let me know if I can
18.07.2021 - 00:18DROPS Design answered:
Dear Daniely, you will find all relevant informations at the bottom of the pattern under the copyright. Happy knitting!
19.07.2021 - 08:33
![]() Sofie Brøndum wrote:
Sofie Brøndum wrote:
Hej drops Skulle strikke 135-36 .vil spørge om jeg kan strikke den rund ikke frem og tilbage og hvor mange masker skal jeg så brug ? M.v.h.sofie
29.05.2021 - 14:31DROPS Design answered:
Hei Sofie. Vi har dessverre ikke mulighet til å omskrive/omregne, slik at denne modellen strikkes rundt. mvh DROPS design
31.05.2021 - 09:44
![]() TINE FRIIS JENSEN wrote:
TINE FRIIS JENSEN wrote:
Hvornår skal man starte på M3? Forstår intet af opskriften, når M3 ikke nævnes
28.05.2021 - 19:55DROPS Design answered:
Hei Tine. Når du strikker bakstykket og arbeidet måler ca 58-60-62-64-66-68 cm (avpass etter 1 halv eller 1 hel rapport av M.1 og M.2 i høyden), strikkes 2 pinner glattstrikk, deretter fortsettes det med diagram M.3 over alle masker (unntatt kantm), men husk å se pilen for din størrelse, denne markerer hvor det skal startes i diagrammet. mvh DROPS design
31.05.2021 - 08:58
![]() Fabienne HENRY wrote:
Fabienne HENRY wrote:
Bonjour Pour le devant au niveau l'encolure faut-il tricoter les 2 côtés séparément comme le dos ou la laine traverse l'encolure à chaque rang ? Peut-être faut-il utiliser une technique différente ? Merci d'avance pour votre aide. Fabienne Henry
02.05.2021 - 21:10DROPS Design answered:
Bonjour Mme Henry, lorsque vous avez rabattu les 4 mailles centrales, vous terminez chaque côté du devant séparément, en point fantaisie comme avant (ajustez sur le dos) en rabattant tous les rangs qui commencent par l'encolure (en début de rang sur l'endroit pour le côté droit du pull quand on le porte/ en début de rang sur l'envers pour le côté gauche du pull quand on le porte). Bon tricot!
03.05.2021 - 09:29
![]() Brigitte Chartier wrote:
Brigitte Chartier wrote:
Pour ce modèle, est-ce normal que le modèle soit très décentré. Personnellement, je fais le modèle Sir Lancelot en XXL et je commencerais le modèle avec la 2e moitié du Diagramme M1 et je mettrais la première moitié à la fin de la séquence pour que le modèle de torsades soit centré. Merci à l\'avance de votre réponse.
30.03.2021 - 03:33DROPS Design answered:
Bonjour Mme Chartier, en XXL, vous commencez M.1 par la 13ème maille à droite du diagramme, autrement dit, vous tricotez à partir de cette maille vers la gauche (= moitié gauche/fin du diagramme). et vous terminerez par les 12 premières mailles (= moitié droite/début du diagramme). Bon tricot!
07.04.2021 - 09:17
|
||||||||||
Sir Lancelot#sirlancelotsweater |
||||||||||
|
|
||||||||||
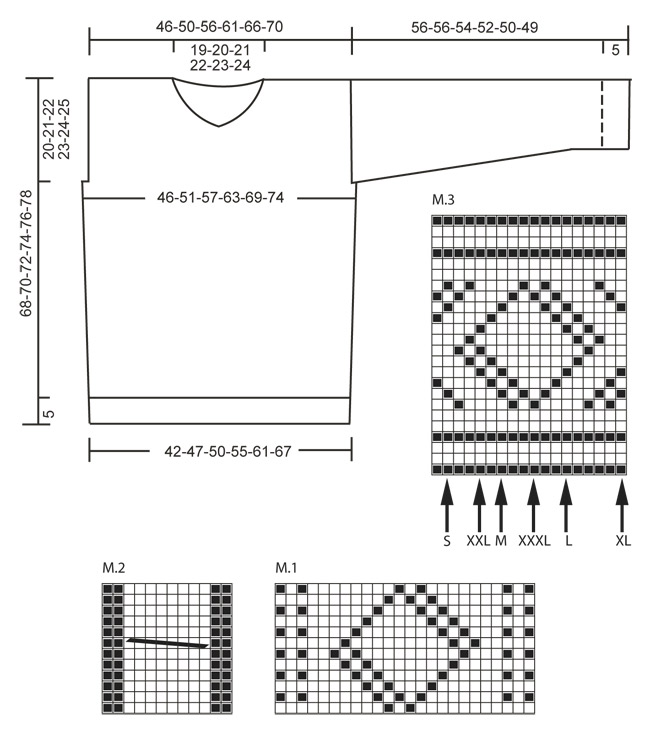
Men's knitted jumper with textured pattern and v-neck, in DROPS Karisma. Sizes S to XXXL
DROPS 135-36 |
||||||||||
|
GARTER ST (back and forth on needle): K all rows. PATTERN: See diagrams M.1 to M.3 – diagrams show pattern from RS. M.1 = 24 sts in width, M.2 = 12 sts in width and M.3 = 18 sts in width. -------------------------------------------------------- BACK PIECE: Worked back and forth on needle. Cast on 110-122-134-146-158-170 sts (incl 1 edge st in each side) on needle size 3 mm with Karisma. Work rib as follows (seen from from RS): 1 edge st in GARTER ST - see explanation above, * K 1, P 3 *, repeat from *-*, finish with 1 edge st in garter st. When rib measures approx. 5 cm (adjust so that next row is worked from WS), switch to needle size 4 mm. P 1 row from WS while at the same time dec 12 sts evenly = 98-110-122-134-146-158 sts. Work next row as follows (from RS): SIZE S: 1 edge st in garter st, diagram M.1, M.2, M.1, M.2, M.1 and 1 edge st in garter st. SIZE M: 1 edge st in garter st, 6 sts in stocking st, diagram M.1, M.2, M.1, M.2, M.1, 6 sts in stocking st and 1 edge st in garter st. SIZE L: 1 edge st in garter st, diagram M.2, M.1, M.2, M.1, M.2, M.1, M.2 and 1 edge st in garter st. SIZE XL: 1 edge st in garter st, 6 sts in stocking st, diagram M.2, M.1, M.2, M.1, M.2, M.1, M.2, 6 sts in stocking st and 1 edge st in garter st. SIZE XXL: 1 edge st in garter st, 12 sts of diagram M.1 – start in the 13th st from the right side in diagram, diagram M.2, M.1, M.2, M.1, M.2, M.1, M.2 and 12 sts of diagram M.1 – start in first st in diagram - and 1 edge st in garter st. SIZE XXXL: 1 edge st in garter st, 18 sts of diagram M.1 – start in the 7th st from the right side in diagram, diagram M.2, M.1, M.2, M.1, M.2, M.1, M.2 and 18 sts of diagram M.1 – start in first st in diagram - and 1 edge st in garter st. ALL SIZES: Continue to work the same way until piece measures 48-49-50-51-52-53 cm. REMEMBER THE KNITTING TENSION! Now cast off 1-2-2-3-4-5 sts in each side for armholes (i.e. cast off at the beg of the next 2 rows) = 96-106-118-128-138-148 sts. Continue the pattern as before with 1 edge st in garter st in each side. When piece measures approx. 58-60-62-64-66-68 cm (adjust after 1 half repetition or 1 whole repetition of diagram M.1 and M.2 vertically), work 2 rows in stocking st, then continue with diagram M.3 over all sts (except edge st) – see arrow for your size; this marks where to beg in the diagram. AT THE SAME TIME when 4 rows remain of diagram M.3, cast off the middle 36-38-40-42-44-46 sts for neck and finish each shoulder separately. Continue to cast off 2 sts on next row from neck = 28-32-37-41-45-49 sts remain on the shoulder. When diagram M.3 has been worked, work approx. 1 cm in stocking st, then cast off. Piece measures approx. 68-70-72-74-76-78 cm. FRONT PIECE: Cast on and work as back piece. Cast off for armhole as on back piece and continue until piece measures approx. 58-60-62-64-66-68 cm. Then work 2 rows in stocking st - while at the same time on 1st row casting off the middle 4 sts for neck and finish each shoulder separately. Work pattern as on back piece (make sure that diagram M.3 is worked the same way on each side of neck) – AT THE SAME TIME cast off on every row from neck: 2 sts 5-6-7-8-9-10 times and then 1 st 8-7-6-5-4-3 times = 28-32-37-41-45-49 sts remain on shoulder. Cast off when same no of rows has been worked as on back piece. SLEEVE: Worked back and forth on needle. Cast on 62 sts for all sizes (incl 1 edge st in each side) on needle size 3 mm with Karisma. Work rib as follows (seen from from RS): 1 edge st in garter st, * K 1, P 3 *, repeat from *-*, finish with 1 edge st in garter st. When piece measures approx. 5 cm (adjust so that next row is worked from WS), switch to needle size 4 mm. P 1 row from WS. Work next row as follows: 1 edge st in garter st, diagram M.1, M.2, M.1 and 1 edge st in garter st, continue like this. When piece measures 9 cm, inc 1 st in each side. Repeat inc every 9th-8th-6th-5th-4th-4th row a total of 12-14-16-18-20-21 times - work the inc sts in stocking st = 86-90-94-98-102-104 sts. When piece measures approx. 46-46-44-42-40-39 cm (adjust after 1 half or 1 whole repetition of diagram M.1 and M.2 vertically, inc should be finished), work 2 rows in stocking st, then continue with diagram M.3 – start in first st on right side of diagram (the pattern will not fit at the end of row). After diagram M.3 work (if there is room) in stocking st until piece measures 56-56-54-52-50-49 cm (shorter measurements in the larger sizes because of broader shoulder width), cast off. ASSEMBLY: Sew the shoulder seams. NECK: Knit up approx. 119 to 139 sts (divisible by 4 + 3) around the neck on circular needle size 3 mm with Karisma – beg mid front. Then the piece is worked back and forth from mid front. First row from WS is worked as follows: 1 edge st in garter st, * P 1, K 3 *, repeat from *-* and finish with P 1 and 1 edge st in garter st. Continue with K over K and P over P and edge st in garter st until neck edge measures approx. 6 cm. Cast off with K over K and P over P. Place the neck on top of each other mid front, left side over right, fasten with stitches from both WS and RS. Sew the sleeves inside 1 edge st. Sew sleeve and side seams in one inside 1 edge st. |
||||||||||
Diagram explanations |
||||||||||
|
||||||||||
 |
||||||||||
Have you finished this pattern?Tag your pictures with #dropspattern #sirlancelotsweater or submit them to the #dropsfan gallery. Do you need help with this pattern?You'll find 19 tutorial videos, a Comments/Questions area and more by visiting the pattern on garnstudio.com. © 1982-2026 DROPS Design A/S. We reserve all rights. This document, including all its sub-sections, has copyrights. Read more about what you can do with our patterns at the bottom of each pattern on our site. |
||||||||||


With over 40 years in knitting and crochet design, DROPS Design offers one of the most extensive collections of free patterns on the internet - translated to 17 languages. As of today we count 324 catalogues and 12290 patterns translated into English (UK/cm). 12290
We work hard to bring you the best knitting and crochet have to offer, inspiration and advice as well as great quality yarns at incredible prices! Would you like to use our patterns for other than personal use? You can read what you are allowed to do in the Copyright text at the bottom of all our patterns. Happy crafting!
Post a comment to pattern DROPS 135-36
We would love to hear what you have to say about this pattern!
If you want to leave a question, please make sure you select the correct category in the form below, to speed up the answering process. Required fields are marked *.