
Popular categories
Looking for a yarn?


Comments / Questions (14)
![]() John wrote:
John wrote:
I’m to the front piece instructions but am confused. It says to cast on 20 stitches after the left shoulder, but there are 35 gaps to cast on there leading into the stitches on the holder. Same for right side, so instead of 110 stitches it would be 160. This is what the video lesson shows to do but the instructions contradict that. Please clarify clearly what the front piece instructions actually are.
10.05.2026 - 03:22
![]() James wrote:
James wrote:
Another question: the pattern says to cast on at end of row for the shoulders, but the video shows increasing in the middle of the row using the same technique as the increase tip. Which is it?
06.05.2026 - 02:44DROPS Design answered:
Dear James, the videos are standard showing the general techniques, but there might be some changes from pattern to pattern; so remember to always follow the pattern you are working on; in that case, increase for neck on each shoulder on front piece casting on new stitches at the end of a row (and not inside some sts as in the increases in the video). Happy knitting!
06.05.2026 - 09:00
![]() James wrote:
James wrote:
Follow up for last question: so basically I would start with stockinette for those last 5, and then once I start increasing and have 6 in that section I would do the cable?
05.05.2026 - 14:59DROPS Design answered:
Hi James, Yes, when you have 6 stitches, you work another cable. Regards, Drops team.
06.05.2026 - 06:04
![]() James wrote:
James wrote:
For the shoulders, when you're doing A.2 for S/M/L you're left with only 5 stitches at the end of the row. Do you do the first 5 stitches of A.2 only to get the third cable?
04.05.2026 - 23:14DROPS Design answered:
Dear James, the new stitches are worked by and bay into A.2 so just continue pattern as before and work cable if you /when you have enough sts in the section with K6. Happy knitting!
05.05.2026 - 09:42
![]() Bente wrote:
Bente wrote:
Hej Findes denne opskrift i en vest? Hvis jeg bruger denne opskrift, hvad Skal jeg så undlade(ærme) Mvh Bente
20.04.2026 - 10:39DROPS Design answered:
Hei Bente. Beklager, denne fins ikke som vest. Design avd.har dessverre ikke muligheten til å tilpasse allerede publiserte oppskrifter til alle som ønsker det, men ta en titt på andre herre vester med samme strikkefasthet og se hvilket mål de har i den str. du ønsker å strikke og selv tilpass Walnut Dreams Sweater. mvh DROPS Design
20.04.2026 - 14:02
![]() Anni wrote:
Anni wrote:
Er nået til bærestykke, men kan ikke få diagram a4 og a5 til at passe når der strikkes rundt fra venstre mod højre) Eks linie 4 i a4 Ret, vrang, vrang , det kommer da ikke til at stemme med næste omgang
16.03.2026 - 09:01DROPS Design answered:
Hej Anni, når du strikker rundt fra retsiden fortsætter du ifølge diagrammerne fra højre mod venstre. Det vil sige at 4 pind i A4 er 2 ret, 1 vrang :)
08.04.2026 - 11:51
![]() Torsten wrote:
Torsten wrote:
Ich Stricke seit über 30 Jahren und sehr viel seit einigen Jahren die Anleitungen von Drops mit der Wolle von drops . Aber diese Anleitung finde ich zu Kompliziert und verwirrend. Schade.
27.02.2026 - 20:04DROPS Design answered:
Liebe Torsten, dieser Pullover wird etwas verschieden wie üblich gestrickt, haben Sie die Videos oben geschaut? Wir haben Videos, wo wir zeigen, wie man die verschieden Teile strickt/zusammenstrickt - (die Maschenanzahl/das Muster immer wie bei der Anleitung folgen, die Videos zeigen nur die Technik). Das kann Ihnen sicher etwas weiterhelfen. Viel Spaß beim Stricken!
02.03.2026 - 07:42
![]() Saucin wrote:
Saucin wrote:
Bonjour comment tricoter les rands 2 et 3 en même temps merci
26.02.2026 - 17:53DROPS Design answered:
Bonjour Mme Saucin, on ne tricote pas les rangs 2 et 3 en même temps, on tricote, pour l'épaule droite, comme avant comme au rang 2 sur l'endroit et comme au rang 3 sur l'envers, mais, à la fin de chaque rang sur l'endroit ( = à la fin de chaque rang 2), vous montez les mailles de l'encolure que vous tricotez en A.2 au rang suivant sur l'envers. Bon tricot!
27.02.2026 - 07:50
![]() Ute wrote:
Ute wrote:
Wo befindet sich der Markierer bei der Passe? Zwischen den beiden rechts gestrickten Maschen? Und warum steht bei der Kurzanleitung, dass zunächst nur an den Ärmeln zugenommen wird? In der Passe-Anleitung lese ich, dass alle Teile gleichzeitig, nämlich vor und nach den zwei rechten Maschen Zunahmen haben? Danke für die Antwort!
10.01.2026 - 15:51DROPS Design answered:
Liebe Ute, bei der 1. Runde der Passe werden die Markierer jeweils am Anfang/am Ende von jedem Ärmel, dh beidseitig von den 42 aufgefassenen maschen für beide Ärmel. Dann strickt man 1 andere Runde mit Zunahmen nur bei den Ärmeln = 44 M für jeden Ärmel. Dann wird man für beide Ärmel und Rumpteil zunehmne. Viel Spaß beim Stricken!
12.01.2026 - 10:11
![]() Catrin wrote:
Catrin wrote:
Seit fast 50 Jahren stricke ich mit Begeisterung auch die kompliziertesten und verschiedensten Anleitungen ohne Schwierigkeiten. Hier aber habe ich aufgegeben. Mir ist noch NIE eine derart unverständliche und übermäßig verschachtelte Anleitung untergekommen. Schade, denn der Pulli sieht sehr schön aus. Gratulation an alle, denen das gelungen ist.
05.01.2026 - 00:19
|
|||||||||||||||||||
Walnut Dreams Sweater#walnutdreamssweater |
|||||||||||||||||||
 |
 |
||||||||||||||||||
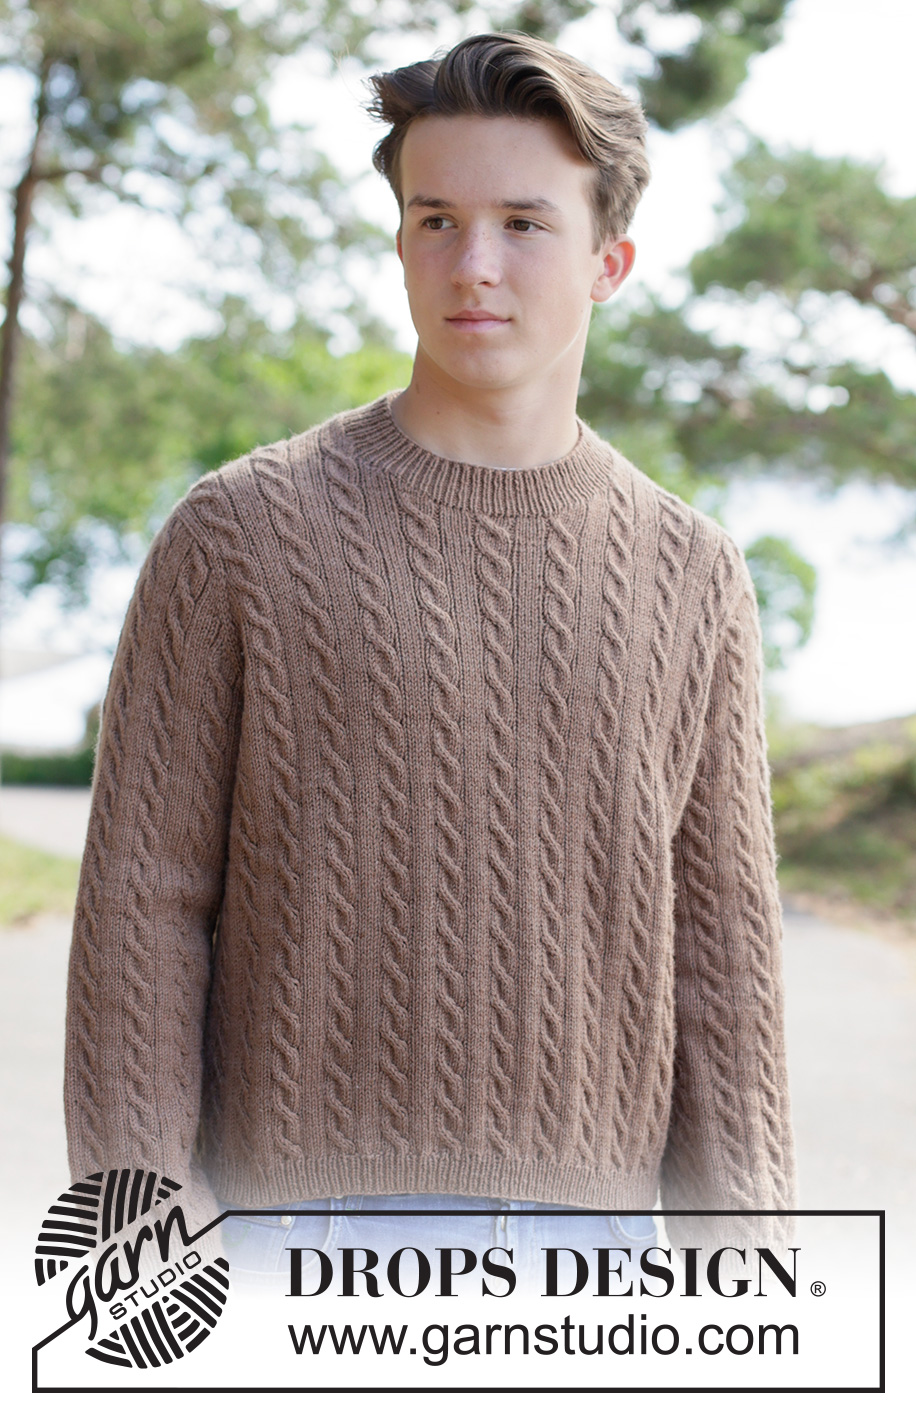
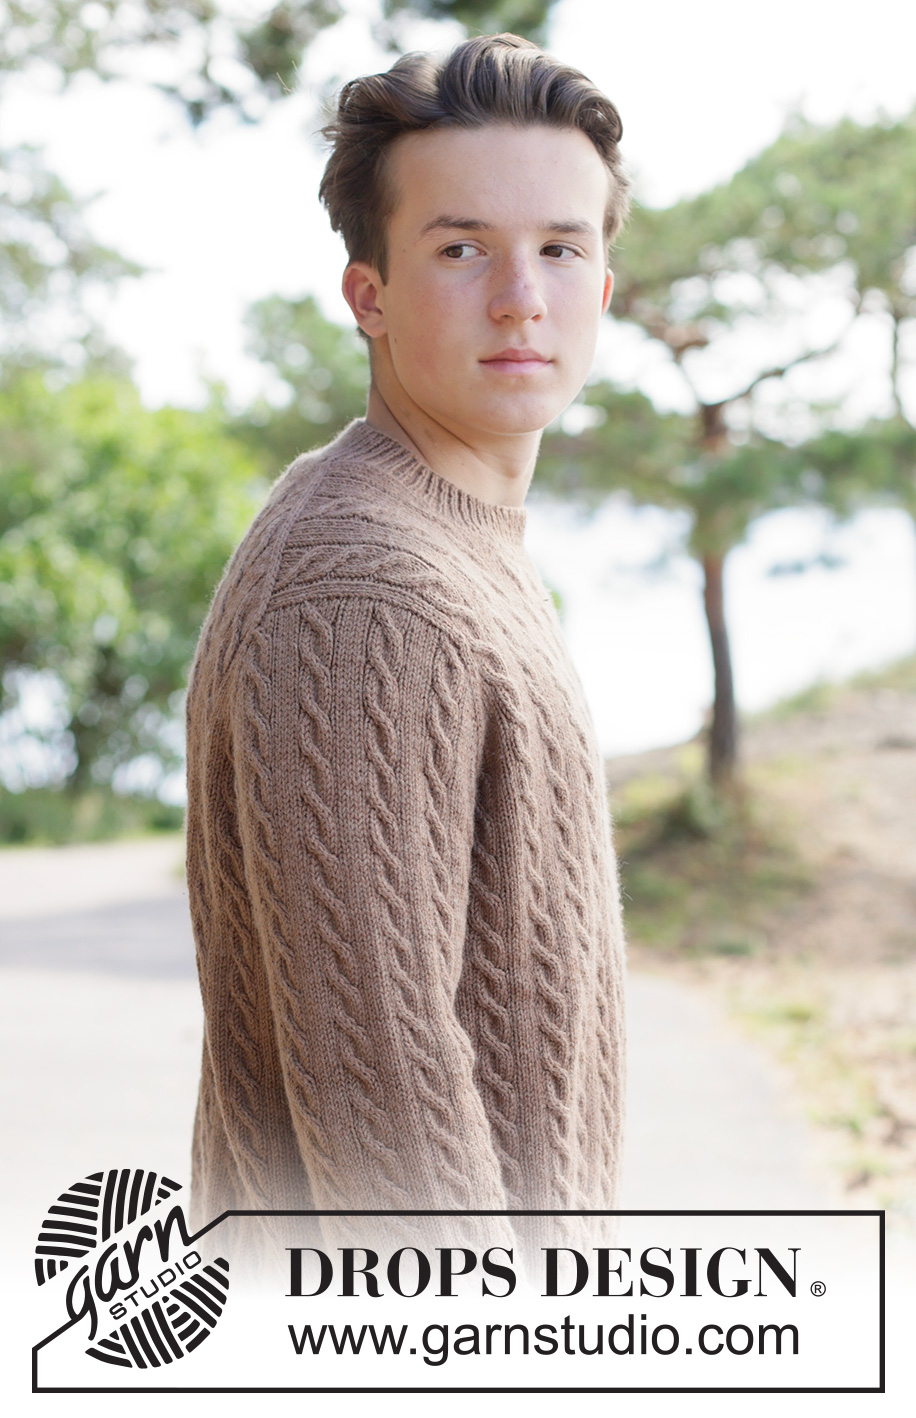
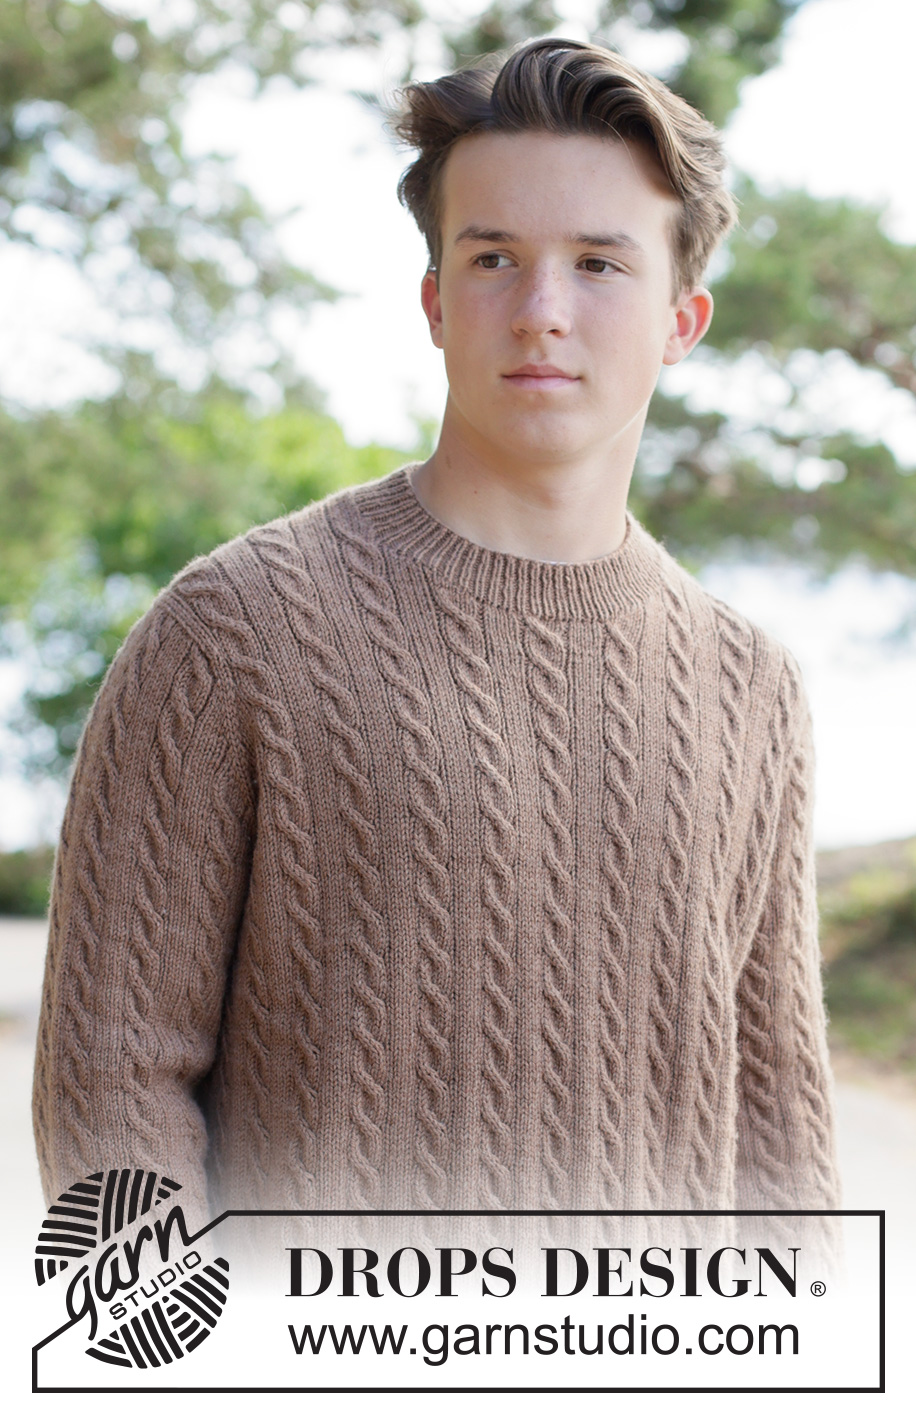
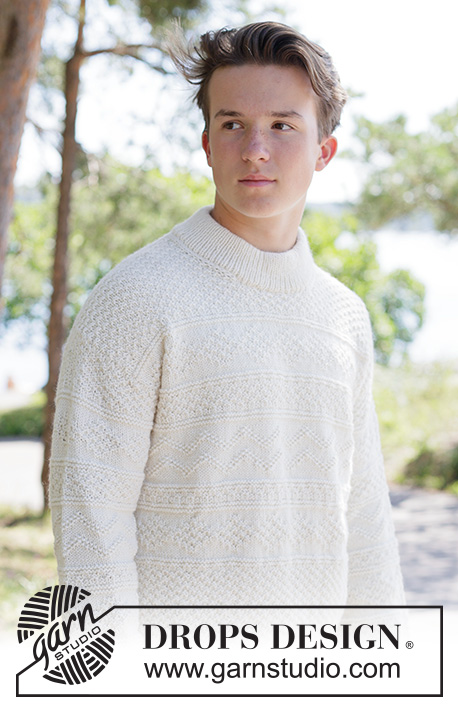
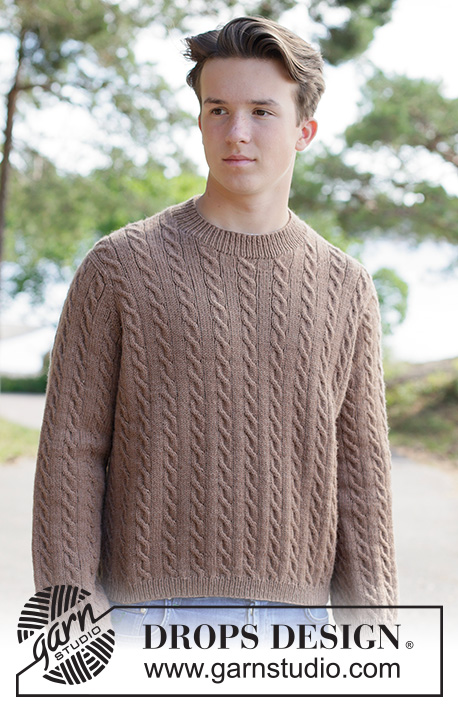
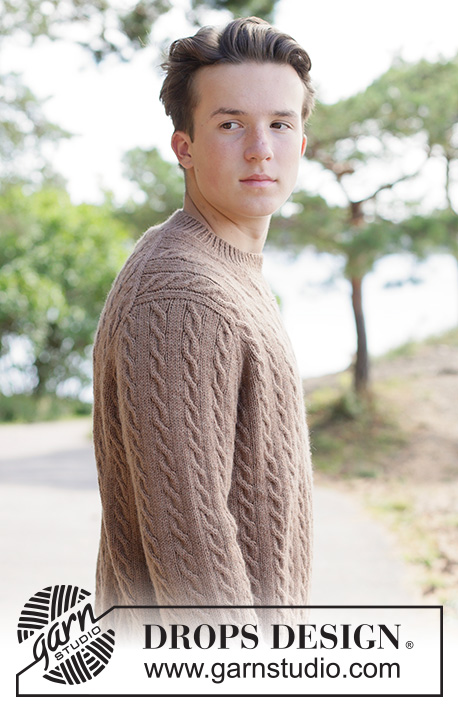
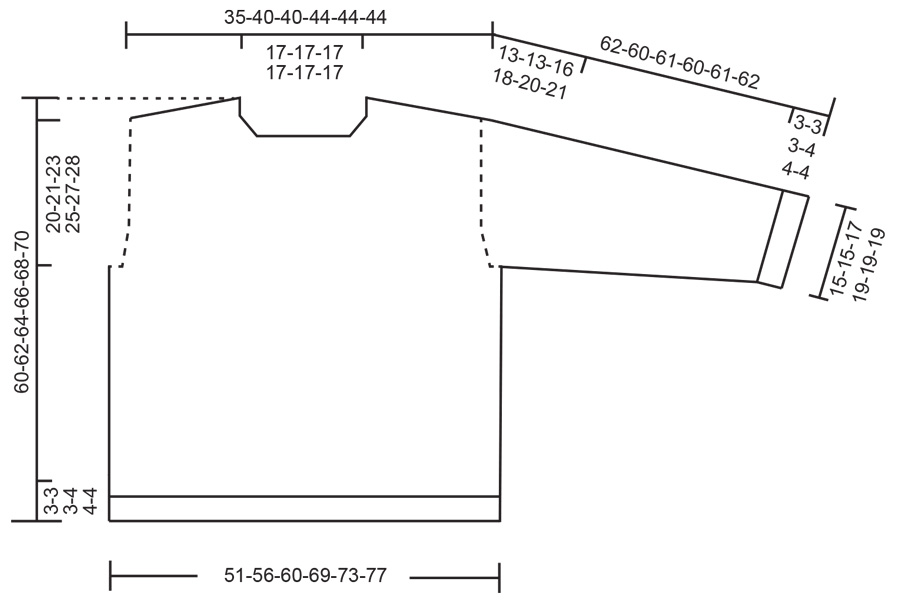
Knitted jumper for men in DROPS Daisy or DROPS Karisma. Piece is knitted top down with European yoke and cables. Size: S - XXXL
DROPS 260-14 |
|||||||||||||||||||
|
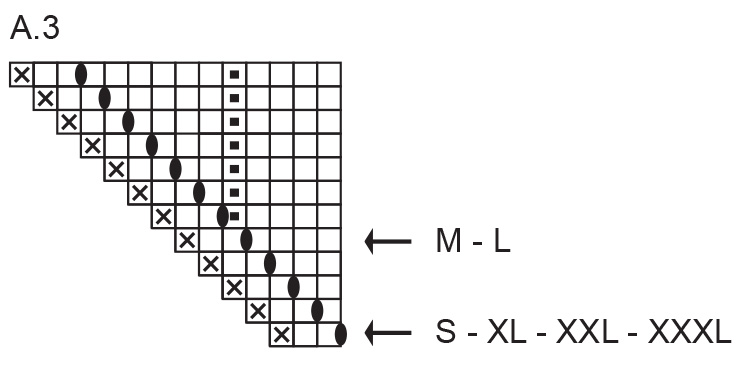
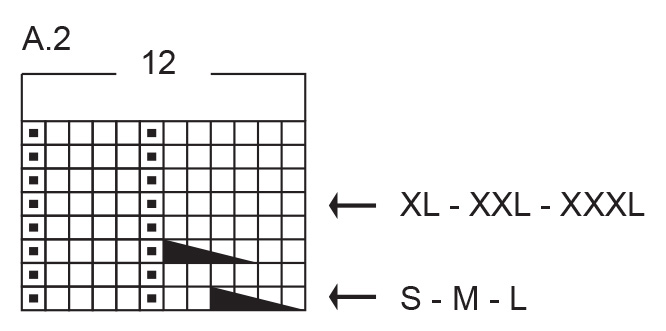
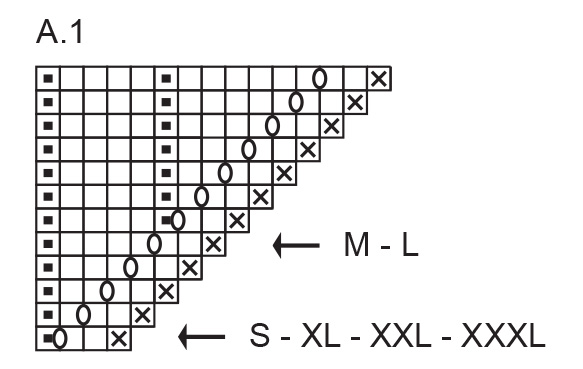
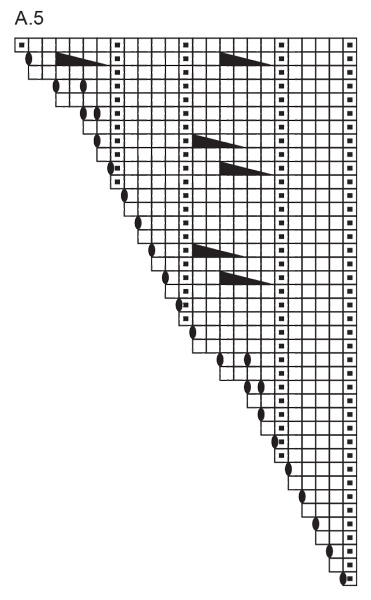
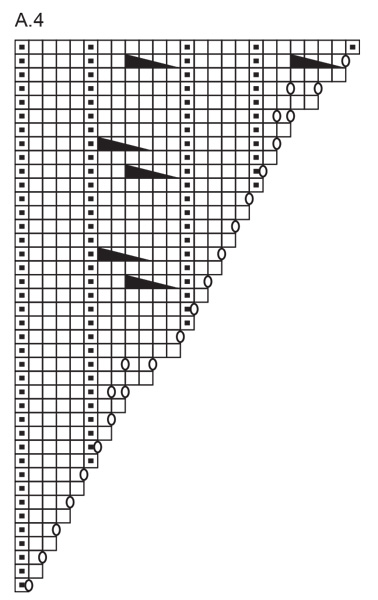
---------------------------------------------------------- EXPLANATION FOR THE PATTERN: ---------------------------------------------------------- PATTERN: See diagrams A.1 to A.5. Diagrams show all rows in pattern seen from the right side. Begin at arrow for correct size (applies to A.1, A.2 and A.3). If there are not enough stitches for cable work stitches in stocking stitch until there are enough stitches for cable. INCREASE TIP-1: INCREASE 1 STITCH TOWARDS THE LEFT - from RIGHT SIDE: Use left needle to pick up yarn between 2 stitches from row below, pick up yarn from the front and knit in the stitch loop that is on the back of the needle. INCREASE 1 STITCH TOWARDS THE RIGHT - from RIGHT SIDE: Use left needle to pick up yarn between 2 stitches from row below, pick up yarn from the back and knit in the stitch loop that is on the front side of the needle. Work the new stitches in pattern. . INCREASE TIP-2: INCREASE 1 STITCH TOWARDS THE RIGHT - from WRONG SIDE: Use left needle to pick up yarn between 2 stitches from row below, pick up yarn from the back and purl in the stitch loop that is on the front side of the needle. INCREASE 1 STITCH TOWARDS THE LEFT - from WRONG SIDE: Use left needle to pick up yarn between 2 stitches from row below, pick up yarn from the front and purl in the stitch loop that is on the back side of the needle. Work the new stitches in pattern. SLEEVE TIP: When picking up stitches mid under sleeve, there will be a small hole in the transition between stitches on body and sleeves. The holes can be closed by picking up the strand between two stitches - work this strand twisted together with the first stitch between body and sleeve to close the hole. DECREASE TIP: Decrease 1 stitch on each side of marker thread as follows: Work until 3 stitches remain before marker thread, knit 2 together, knit 2 (marker thread is between these 2 stitches), slip 1 stitch knitwise, knit 1, pass slipped stitch over stitch worked (= 2 stitches decreased). More stitches will be decreased over pattern, so make sure that the 2 middle stitches mid under sleeve are always worked in stocking stitch (i.e. first and last stitch on round). ---------------------------------------------------------- START THE PIECE HERE: ---------------------------------------------------------- JUMPER - SHORT OVERVIEW OF THE PIECE: In this pattern needles of different length have been used, begin with fitting length for number of stitches and switch as needed. If 0 is given for the chosen size, it means that you skip the information until next information. Garment is worked as point 1 - 5. 1 BACK PIECE: Cast on stitches in the back of neck and work back piece back and forth downwards while at the same time increasing in each side of piece until number of stitches for shoulder width is reached. Back piece has a slight diagonal shoulder. 2 FRONT PIECE: Worked in 2 parts (= each side of neck). Begin by picking up stitches along one shoulder from back piece, work front piece downwards while increasing towards the neck. Repeat on the other shoulder, then cast on new stitches for neck mid front = put front pieces together into one part. Work front piece back and forth until given measurements. 3 YOKE: On next round work all stitches on to same circular needle - work as follows: Work stitches on front piece, pick up stitches for sleeve along the side of front piece, work back piece, pick up stitches for sleeve along the other side of front piece = then work yoke in the round over all stitches. 4 INCREASES FOR BODY AND SLEEVES: When working the yoke, increase stitches for body and sleeves, first increase for sleeves and then increase for both body and sleeves. 5 BODY AND SLEEVES: When all stitches have been increased and yoke is knitted to given measurements, divide the piece for body and sleeves. Work body downwards in the round on needle while putting the sleeves aside. Then work sleeves downwards in the round on needle. Finish by picking up stitches around the neck and work a neck edge in the round. BACK PIECE: Work piece back and forth on circular needle. Cast on 38-37-37-38-38-38 stitches on circular needle size 4 mm with DROPS Daisy or DROPS Karisma. Purl 1 row from wrong side while increasing 12-9-9-12-12-12 stitches evenly = 50-46-46-50-50-50 stitches. Now increase in each side on every row inside 1 edge stitch and 2 stitches in stocking stitch, work the new stitches in pattern as shown in diagram. Work and increase for pattern as explained below - NOTE! Begin at arrow on 1st row - applies to A.1 (= 4-8-8-4-4-4 stitches), A.2 (= 12 stitches) and A.3 (= 3-7-7-3-3-3 stitches): ROW 1 (= right side): Read INCREASE TIP-1 and work A.1, work A.2 over the next 43-31-31-43-43-43 stitches (i.e. work A.2 3-2-2-3-3-3 times, then work the 7 first stitches in A.2), work A.3 (= 2 stitches increased). ROW 2 (= wrong side): Read INCREASE TIP-2 and work A.3, knit over knit and purl over purl over the next 43-31-31-43-43-43 stitches, work A.1 (= 2 stitches increased). Work 1st and 2nd ROW 12-16-16-18-18-18 times in total (= 24-32-32-36-36-36 rows worked and 48-64-64-72-72-72 stitches increased – A.2 is worked 3-4-4-4½-4½-4½ times vertically = 98-110-110-122-122-122 stitches. Remember to follow the knitting tension! The pattern is now established on back piece. There are 2 stitches in stocking stitch and 1 edge stitch in each side. Cut the yarn, and slip stitches on a thread. The established pattern on front pieces and on sleeves (= yoke) is worked separately of pattern on back piece. Later when the body is worked in the round, the pattern will fit over all stitches. Work the entire jumper in rib (= knit 4/purl 1/knit 6/purl 1 from right side) - cable in every stocking stitch section which consists of 6 stitches in stocking stitch. RIGHT SHOULDER: Find right shoulder on back piece as follows: Place back piece flat with right side up, place back piece so that stitches on thread/stitch holder is towards you, right side of piece = right shoulder. Now pick up stitches along right diagonal shoulder on back piece - begin from right side at the armhole and pick up stitches in towards the neck as follows: Begin by picking up 1 stitch at the outermost corner of shoulder (= edge stitch), then pick up 1 stitch in every row worked inside edge stitch (= 24-32-32-36-36-36 stitches) = 25-33-33-37-37-37 stitches. Insert 1 marker in piece in towards the neck. All length measurements are done from this marker, measured in stitch direction. Work as follows: ROW 1 (= wrong side): Purl 2-0-0-2-2-2, knit 1-0-0-1-1-1, purl 6-5-5-6-6-6, knit 1, work rib (= purl 4/knit 1/purl 6/knit 1) until 3 stitches remain, purl 2, finish with purl 1 (= edge stitch) – the pattern mirrors back piece. ROW 2 (= right side): Knit 1 edge stitch, knit 2, purl 1, work A.2 the rest of row. ROW 3 (= wrong side): Knit over knit and purl over purl. Work 2nd and 3rd row until piece measures 5-5-6-7-7-8 cm – last row is worked from wrong side. Note which row is last row worked in A.2 so that increases for neck on left shoulder begin on the same row in diagrams. Work 2nd and 3rd ROW while AT THE SAME TIME casting on stitches for neck at the end of every row from right side as follows: Cast on 1 stitch 4 times, then 2 stitches 4 times (= 16 rows worked) - work the increased stitches in A.2 = 37-45-45-49-49-49 stitches. When all increases are done, work last row from right side without increase. Piece now measures 11-11-12-13-13-14 cm from marker. Some of the neck depth will be over on back piece. Neck depth at the front = 9-10-11-12-12-13 cm. Neck depth at the back = 2-1-1-1-1-1 cm. Cut the yarn, slip stitches on a thread or stitch holder, now work left shoulder along the left diagonal shoulder on back piece as explained below. LEFT SHOULDER: Pick up stitches along left diagonal shoulder on back piece - begin from right side at the neck and pick up stitches out towards the armhole as follows: Pick up 1 stitch in every row worked inside edge stitch (= 24-32-32-36-36-36 stitches), finish by picking up 1 stitch at the outermost corner of the shoulder (= edge stitch) = 25-33-33-37-37-37 stitches for shoulder. Insert 1 marker in piece in towards the neck. All length measurements are done from this marker, measured in stitch direction. Work as follows: ROW 1 (= wrong side): Purl 1 (= edge stitch), purl 2, work rib (= knit 1/purl 6/knit 1/purl 4) the rest of row (finish row with purl 2-5-5-2-2-2) - pattern mirrors back piece. ROW 2 (= right side): Work A.2 until 3 stitches remain on row (adjust the pattern to cable over sections in stocking stitch with 6 stitches), knit 2, finish with knit 1 (= edge stitch). ROW 3 (= wrong side): Knit over knit and purl over purl. Work 2nd and 3rd row until piece measures approx. 5-5-6-7-7-8 cm – last row worked is from wrong side and should be worked the same length as worked on right shoulder before increase for neck. Work 2nd and 3rd ROW while AT THE SAME TIME casting on stitches for neck at the end of every row from wrong side as follows: Cast on 1 stitch 4 times, then 2 stitches 4 times (= 16 rows worked) – work the new increased stitches in A.2 by counting out from the shoulder to continue pattern over all stitches as before = 37-45-45-49-49-49 stitches. When all increases are done, work last row from right side. Make sure to work the same length on cable pattern on both shoulders - now put both shoulders together into one front piece where all cables are cabled on the same row onwards. Do not cut the yarn, work next row as explained below. FRONT PIECE: On next row (= wrong side) put shoulders together for front piece as follows: Work knit over knit and purl over purl over all stitches on left shoulder (= 37-45-45-49-49-49 stitches), cast on 24-20-20-24-24-24 new stitches at the end of row, knit over knit and purl over purl over all stitches from right shoulder from wrong side (= 37-45-45-49-49-49 stitches) = 98-110-110-122-122-122 stitches. Then work pattern as follows - do not cable over stitches cast on for neck on first row but always cable A.2 on same row as before over the entire front piece: ROW 1 (= right side): Knit 1 edge stitch, knit 2, purl 1, work A.2 until 3 stitches remains (finish pattern with the first 7 stitches in A.2), knit 2 and knit 1 edge stitch. ROW 2 (= wrong side): Knit over knit and purl over purl. Work back and forth in pattern as before until piece measures approx. 14 cm from marker - adjust so that last row worked is last row in A.2. Cut the yarn and leave stitches on a thread or stitch holder. Then slip front piece and back piece together, and pick up stitches for sleeves, work as explained below. YOKE: Begin by working over back piece from right side as follows: Knit the first 2 stitches from back piece together (= 1 edge stitch decreased), work pattern A.2 as before until 2 stitches remain on back piece, slip 1 stitch, knit 1, pass slipped stitch over stitch worked (= 1 edge stitch decreased), insert 1 marker on needle, pick up 42 stitches along the side on right front piece (= stitches for sleeve - pick up stitches inside outermost stitch), insert 1 marker, knit the first 2 stitches from front piece together (= 1 edge stitch decreased), work pattern A.2 as before until 2 stitches remain on front piece, slip 1 stitch, knit 1, pass slipped stitch over stitch worked (= 1 stitch decreased), insert 1 marker on needle, pick up 42 stitches along the side on left front piece (= stitches for sleeve - pick up stitches inside outermost stitch), insert 1 marker on needle = 276-300-300-324-324-324 stitches. Round begins between left sleeve and back piece - when yoke is worked in the round cable on same round both on sleeves and body around the entire piece. On first round establish pattern on sleeves while at the same time working in the round with pattern as before. ROUND 1: Work pattern as before over back piece, move marker on to right needle, increase 1 stitch towards the left, work rib over sleeve (= knit 6/purl 1/knit 4/purl 1) until 6 stitches remain before marker, knit 6, increase 1 stitch towards the right (= 44 stitches for sleeve), move marker on to right needle, work pattern as before over front piece, move marker on to right needle, increase 1 stitch towards the left, work rib over sleeve (= knit 6/purl 1/knit 4/purl 1) until 6 stitches remain before marker, knit 6, increase 1 stitch towards the right (= 44 stitches for sleeve), move marker on to right needle = 280-304-304-328-328-328 stitches. When increasing for pattern on both sleeves and body, increases are shown in diagram and increase on each side of 2 stitches in stocking stitch. Work as follows: * Work 2 stitches in stocking stitch, work A.4, work pattern (= A.2) as before over the next 90-102-102-114-114-114 stitches, work A.5, work 2 stitches in stocking stitch, move marker on to right needle, work A.4, work pattern (= A.2) as before over the next 42 stitches, work A.5 (= stitches for sleeve), move marker on to right needle, * work pattern in the round from *-* 1 more time. Work pattern in the round 36-36-44-50-56-60 rounds in total - when A.4 and A.5 have been worked vertically increases are done in size S and M, continue to increase for pattern with same diagram in the 4 largest sizes (= 168-168-208-232-264-288 stitches increased) = 448-472-512-560-592-616 stitches – there are 86-86-96-102-110-116 stitches on each sleeve and 138-150-160-178-186-192 stitches on front piece/back piece. Sleeve measures approx. 13-13-16-18-20-21 cm - when the jumper is folded double at the shoulder, piece 20-20-23-25-27-28 cm from the edge on shoulder and down along the armhole. Work without increasing until piece measures 20-21-23-25-27-28 cm from edge on shoulder and down along the armhole. Now divide yoke for body and sleeves. DIVIDING FOR BODY AND SLEEVES: AT THE SAME TIME as next round is worked divide yoke for body and sleeves as follows: Work the first 138-150-160-178-186-192 stitches as before (= back piece), slip the next 86-86-96-102-110-116 stitches on a thread for sleeve, cast on 6-6-8-14-18-24 new stitches on needle (= in the side mid under sleeve), work the next 138-150-160-178-186-192 stitches as before (= front piece), slip the next 86-86-96-102-110-116 stitches on a thread for sleeve, cast on 6-6-8-14-18-24 new stitches on needle (= in the side mid under sleeve). Finish body and sleeves separately. BODY: = 288-312-336-384-408-432 stitches. Work pattern A.2 as before in the round until piece measures 33-32-32-30-30-31 cm from division – the new stitches under sleeve fit the pattern around the body (= 24-26-28-32-34-36 repetitions). Switch to circular needles size 3 mm, work rib (= knit 1/purl 1) while AT THE SAME TIME decreasing 30-28-32-34-38-42 stitches evenly on 1st round = 258-284-304-350-370-390 stitches. When rib measures 3-3-3-4-4-4 cm, cast off with knit over knit and purl over purl. Jumper measures approx. 60-62-64-66-68-70 cm from the top of shoulder. SLEEVES: Slip 86-86-96-102-110-116 sleeve stitches from one thread on to circular needle size 4 mm and pick in addition up 1 stitch in each of the 6-6-8-14-18-24 stitches cast on under sleeve - read SLEEVE TIP = 92-92-104-116-128-140 stitches. Insert 1 marker thread in the middle of the 6-6-8-14-18-24 new stitches under sleeve - round begins at the marker thread. Work in the round in established pattern as before – work the new stitches in stocking stitch. When sleeve measures 3 cm from division, decrease mid under sleeve – read DECREASE TIP and decrease 2 stitches every 10-10-10-10-3-2 cm 4-4-4-4-10-16 times in total = 84-84-96-108-108-108 stitches on needle – when decreases are done, the pattern fits around the sleeve. Work until sleeve measures 46-44-42-38-37-37 cm from division. Switch to double pointed needles size 3 mm and work rib (= knit 1/purl 1) while AT THE SAME TIME decreasing 8-8-10-10-10-10 stitches evenly on 1st round = 76-76-86-98-98-98 stitches. When rib measures 3-3-3-4-4-4 cm, cast off with knit over knit and purl over purl. Sleeve measures approx. 49-47-45-42-41-41 cm from division. NECK EDGE: Use circular needle size 3 mm, pick up stitches around the neck from right side as follows: Begin at one shoulder seam and pick up approx. 108-108-112-114-114-116 stitches inside 1 stitch – number of stitches must be divisible by 2. Work rib (= knit 1/purl 1) in the round for 4-4-4-4½-4½-4½ cm. Cast off stitches with knit over knit and purl over purl. |
|||||||||||||||||||
Diagram explanations |
|||||||||||||||||||
|
|||||||||||||||||||
 |
|||||||||||||||||||
 |
|||||||||||||||||||
 |
|||||||||||||||||||
 |
|||||||||||||||||||
 |
|||||||||||||||||||
 |
|||||||||||||||||||
Have you finished this pattern?Tag your pictures with #dropspattern #walnutdreamssweater or submit them to the #dropsfan gallery. Do you need help with this pattern?You'll find 35 tutorial videos, a Comments/Questions area and more by visiting the pattern on garnstudio.com. © 1982-2026 DROPS Design A/S. We reserve all rights. This document, including all its sub-sections, has copyrights. Read more about what you can do with our patterns at the bottom of each pattern on our site. |
|||||||||||||||||||


With over 40 years in knitting and crochet design, DROPS Design offers one of the most extensive collections of free patterns on the internet - translated to 17 languages. As of today we count 325 catalogues and 12298 patterns translated into English (UK/cm). 12298
We work hard to bring you the best knitting and crochet have to offer, inspiration and advice as well as great quality yarns at incredible prices! Would you like to use our patterns for other than personal use? You can read what you are allowed to do in the Copyright text at the bottom of all our patterns. Happy crafting!
Post a comment to pattern DROPS 260-14
We would love to hear what you have to say about this pattern!
If you want to leave a question, please make sure you select the correct category in the form below, to speed up the answering process. Required fields are marked *.