
Popular categories
Looking for a yarn?


Comments / Questions (8)
![]() Kiki wrote:
Kiki wrote:
Hej, In der Anleitung steht, dass beim Rückenteil nach der Zunahme für die Schulter ein Markierer gesetzt wird und ab da (bei Größe L) 15 cm gestrickt werden bis die Hin- und Rückreihen enden. In der Zeichnung ist der Armausschnitt mit 22 cm bemessen. Wie passt das zusammen?? Vielen Dank
14.10.2025 - 09:32DROPS Design answered:
Liebe Kiki, das liegt an der Schulterkonstruktion - die Schulter"naht" liegt nicht oben mittig auf der Schulter, sondern nach hinten versetzt am Rückenteil. Die cm, die scheinbar beim Rückenteil fehlen, kommen beim Vorderteil zusätzlich hinzu. Die Angaben in der Anleitung sind also korrekt. Viel Spaß beim Stricken!
22.10.2025 - 21:30
![]() Ac wrote:
Ac wrote:
Do you knit this with just one strand or is it double stranded?
14.06.2025 - 15:44DROPS Design answered:
Hi Ac, this jumper is knitted with only one strand. Happy knitting!
14.06.2025 - 19:01
![]() Ingri wrote:
Ingri wrote:
Hei, skal det ikke strikkes frem og tilbake med forkortede pinner for en ermetopp, slik det står i beskrivelsen? Det står ikke noe om dette i selve oppskriften.
23.05.2025 - 11:54DROPS Design answered:
Hei Ingri. Oppskriften er oversendt Design avd. slik at de kan ta en dobbeltsjekk. mvh DROPS Design
26.05.2025 - 11:24
![]() Cassie wrote:
Cassie wrote:
If I want slimmer sleeves can I dcrease by 4 stitches (2 on each side) instead of two stitches?
12.05.2025 - 08:19DROPS Design answered:
Hi Cassie, it will be better to decrease 2 stitches per round but more often, e.g. decrease 2 stitches every 1 cm 5-5-6-6-7-7 times (instead of 1½ cm). You have to calculate that for your size and desired sleeve length. Happy knitting!
12.05.2025 - 09:54
![]() Ester Morén wrote:
Ester Morén wrote:
I den svenska översikten står det att ärmen ska stickas med förkortade varv för att skapa en ärmkulle, men sedan är det inga förkortade varv i själva mönstret. Kollade det engelska mönstret för att vara säker och där nämns inte förkortade varv alls. Kanske ett fel i det svenska mönstret?
05.05.2025 - 22:31
![]() Maribel Muñoz wrote:
Maribel Muñoz wrote:
Ahora sí aparece esa sección. Gracias por corregirlo.
04.03.2025 - 19:18
![]() Maribel Muñoz wrote:
Maribel Muñoz wrote:
Afortunadamente en la versión en inglés sí está la explicación, lo seguiré ahí. Pero por favor, corrijan la explicación en español, no todas las tejedoras podrán seguir un patrón en inglés. Muchas gracias.
28.02.2025 - 22:53
![]() Maribel Muloz wrote:
Maribel Muloz wrote:
¿No faltan explicaciones entre FRENTE DERECHO y CUERPO? No explica cómo unir los dos frentes ni cuánto tejer antes de unir frente y espalda. He llegado tejiendo a este punto y me encuentro con que no puedo continuar!!
28.02.2025 - 22:48DROPS Design answered:
Hola Maribel, las explicaciones para unir los dos delanteros están en la sección: FRENTE (sección derecha e izquierda juntas). Aquí se unen ambos delanteros: trabajas sobre los puntos del frente derecho, montas para el escote y trabajas sobre los puntos del frente izquierdo. En la 1ª fila del cuerpo te explican cómo unen el delantero y la espalda: trabajas sobre el delantero, montas puntos bajo la manga, trabajas la espalda, montas puntos bajo la segunda manga. Seguir trabajando el cuerpo en redondo, comenzando en el delantero.
02.03.2025 - 19:51
|
|||||||
Neptune Rings#neptuneringssweater |
|||||||
 |
 |
||||||
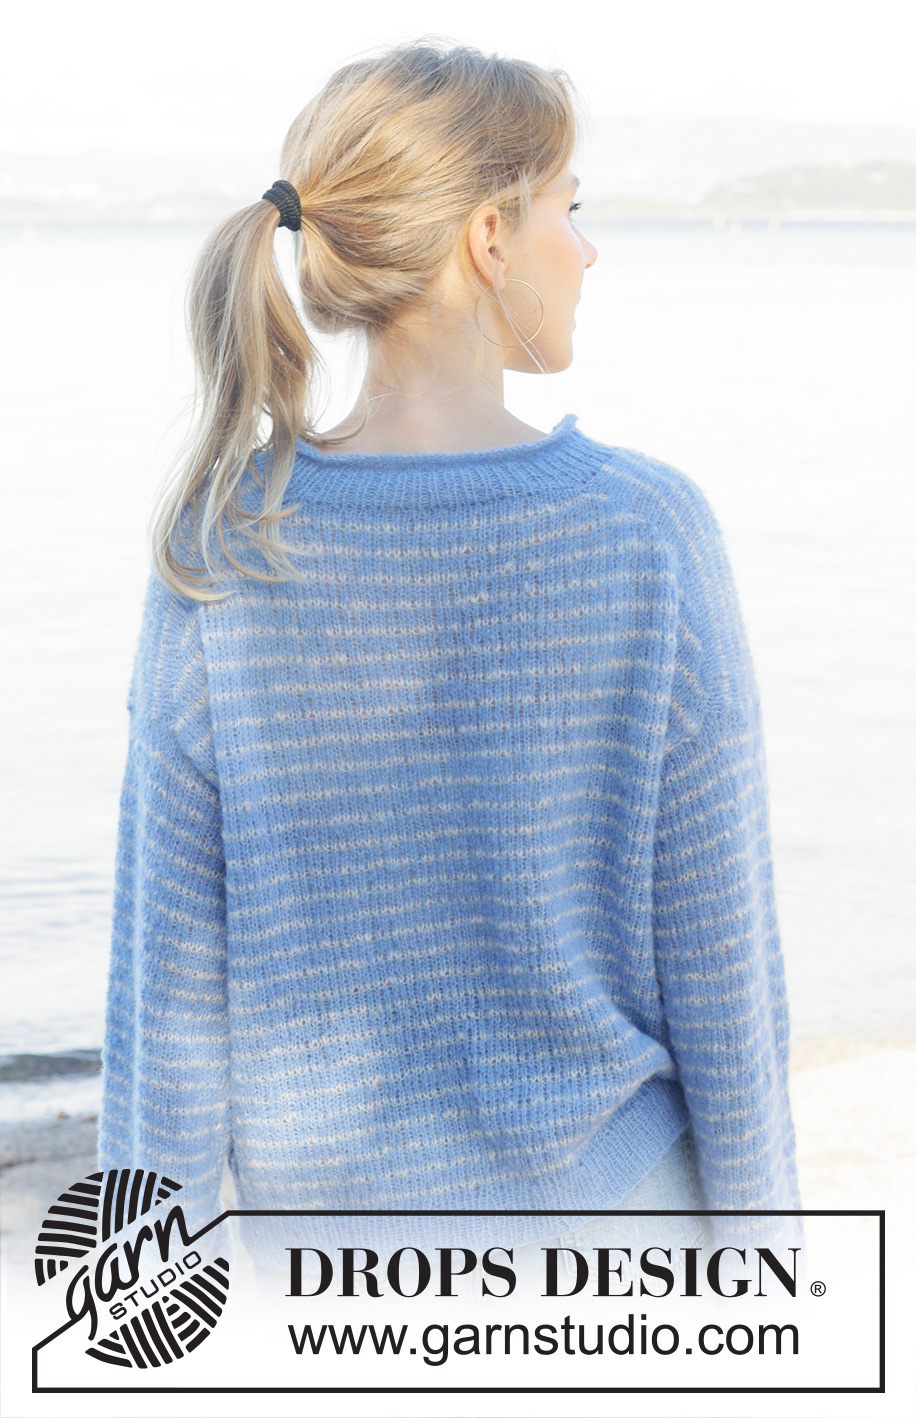
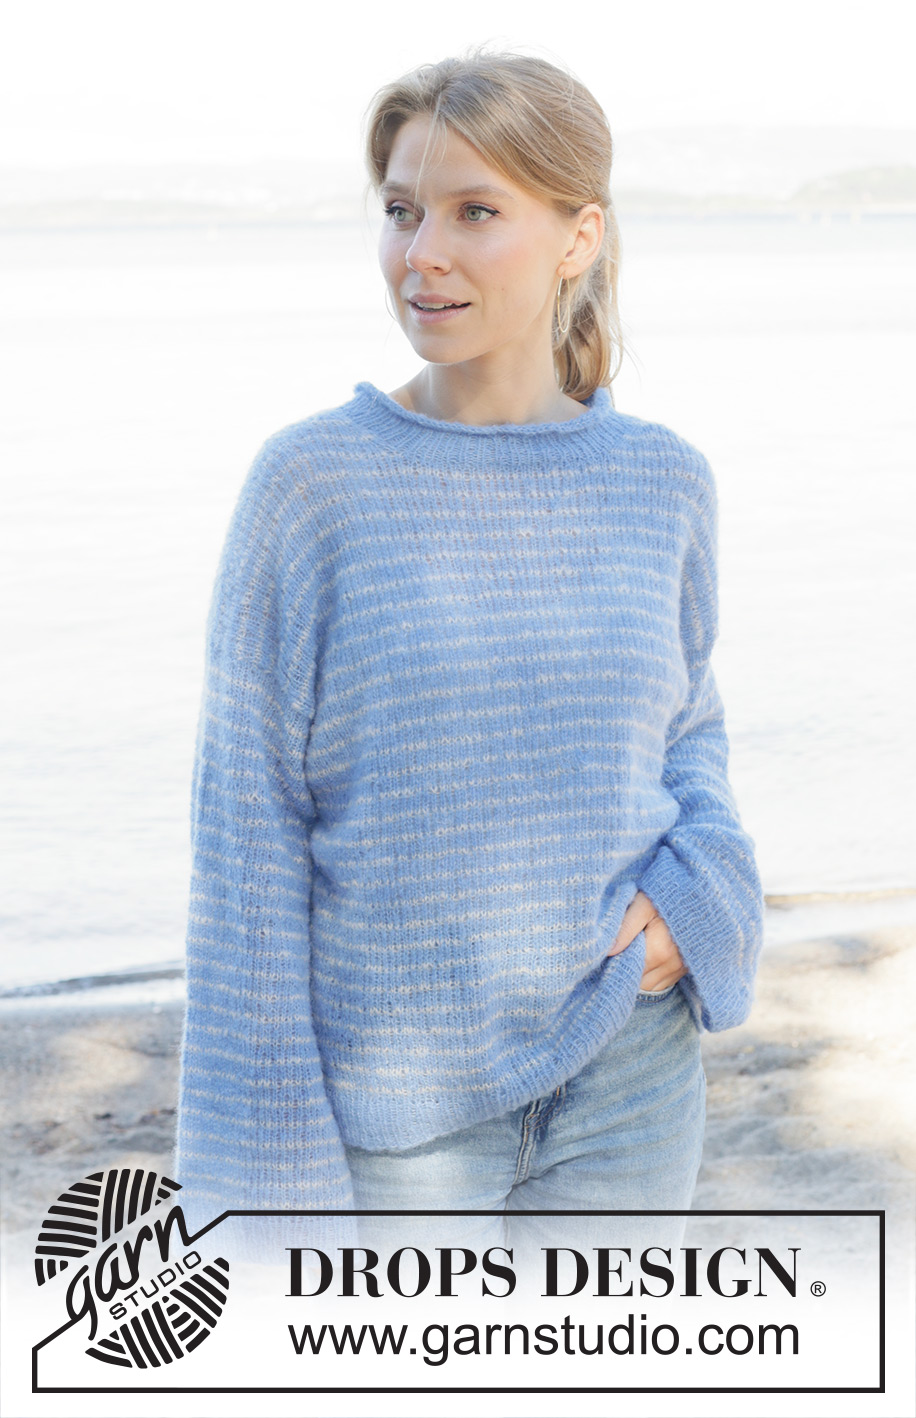
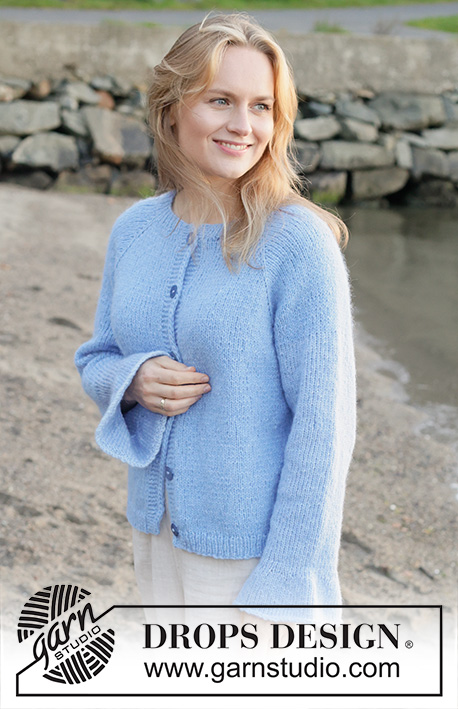
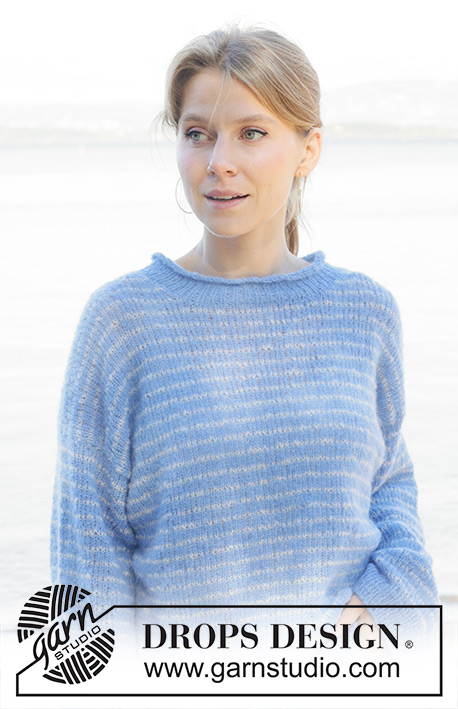
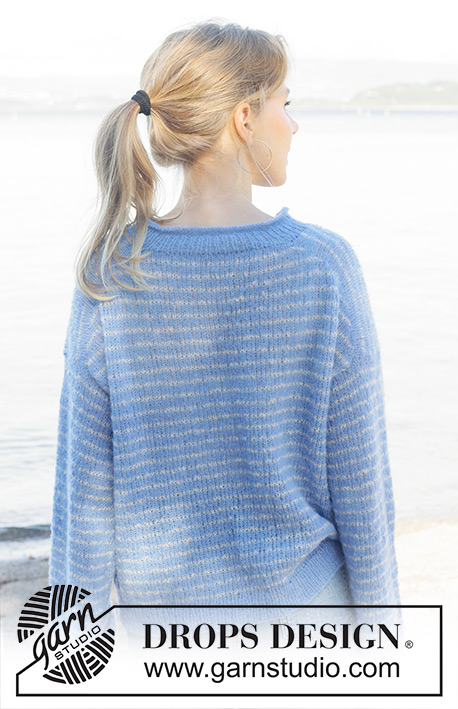
Knitted jumper in DROPS Brushed Alpaca Silk. The piece is worked top down with diagonal/European shoulders, stripes and rolled neck. Sizes S - XXXL.
DROPS 259-8 |
|||||||
|
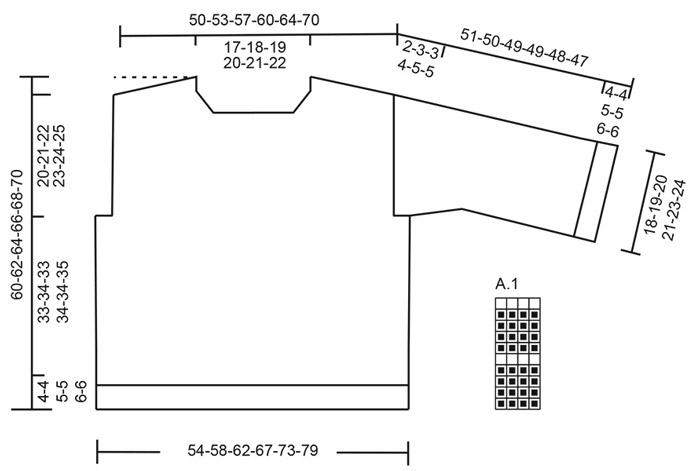
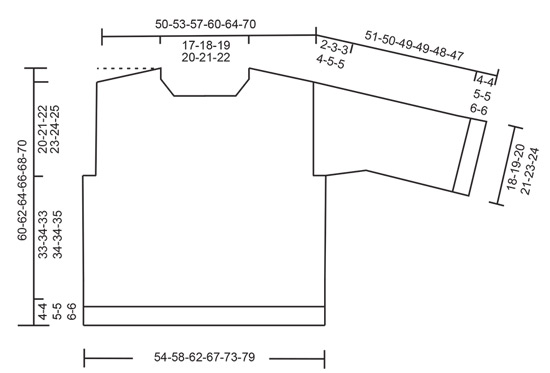
------------------------------------------------------- EXPLANATIONS FOR THE PATTERN: ------------------------------------------------------- STRIPES: See diagram A.1 – the pattern is worked in stocking stitch. NOTE: When working the stripes back and forth and the working strand is on the opposite side, push the stitches to the other end of the needle, working 2 rows from the same side to avoid cutting the strand. INCREASE TIP-1: INCREASE 1 STITCH TOWARDS THE LEFT - from RIGHT SIDE: Use left needle to pick up yarn between 2 stitches from row below, pick up yarn from the front and knit in the stitch loop that is on the back of the needle. INCREASE 1 STITCH TOWARDS THE RIGHT - from RIGHT SIDE: Use left needle to pick up yarn between 2 stitches from row below, pick up yarn from the back and knit in the stitch loop that is on the front side of the needle. . INCREASE TIP-2: INCREASE 1 STITCH TOWARDS THE RIGHT - from WRONG SIDE: Use left needle to pick up yarn between 2 stitches from row below, pick up yarn from the back and purl in the stitch loop that is on the front side of the needle. INCREASE 1 STITCH TOWARDS THE LEFT - from WRONG SIDE: Use left needle to pick up yarn between 2 stitches from row below, pick up yarn from the front and purl in the stitch loop that is on the back side of the needle. INCREASE TIP-3 (evenly spaced): To work out how to increase evenly, count the total number of stitches on the needle (e.g., 196 stitches) and divide by the number of increases to be made (e.g., 30) = 6.5. In this example, increase by making 1 yarn over after alternately each 6th and 7th stitch. On the next round knit the yarn overs twisted to avoid holes. DECREASE TIP: Decrease 1 stitch on each side of the marker-thread as follows: Work until there are 3 stitches left before the marker-thread, knit 2 together, knit 2 (marker-thread sits between these 2 stitches), slip 1 stitch knit-wise, knit 1 and pass the slipped stitch over the knitted stitch (2 stitches decreased). ------------------------------------------------------- START THE PIECE HERE: ------------------------------------------------------- JUMPER – SHORT OVERVIEW OF THE PIECE: The pattern uses both long and short needles; start with the length which fits the number of stitches and change when necessary. The piece is started back and forth, casting on stitches at the back of the neck and working the back piece top down, while increasing stitches on each side for the shoulders, which become slightly diagonal. The back piece is worked as far as the armholes, then set aside while the front piece is worked. The front piece is started in 2 sections, knitting up stitches along 1 back shoulder, working stripes and increasing for the neckline. This is repeated on the other shoulder, the 2 front sections are joined when the neckline is finished and the front piece is worked until the armholes are finished. The front and back pieces are joined on the same circular needle and the body is finished in the round. Stitches are knitted up around the armholes for the sleeves, which are worked in the round. Stitches are knitted up around the neckline and the neck is worked in the round to finish. BACK PIECE: The piece is worked back and forth with circular needle. Cast on 30-32-34-36-40-42 stitches a little loosely, with circular needle size 4.5 mm and colour pacific blue DROPS Brushed Alpaca Silk. ROW 1 (wrong side): Purl. Continue with STRIPES – read explanation above, AT THE SAME TIME increase as follows: ROW 2 (right side): Work A.1, read INCREASE TIP-1, knit 1, increase 1 stitch towards the left, knit until there is 1 stitch left on the row, increase 1 stitch towards the right, knit 1. ROW 3 (wrong side): Read INCREASE TIP-2, purl 1, increase 1 stitch towards the right, purl until there is 1 stitch left, increase 1 stitch towards the left, purl 1. Work ROWS 2 and 3 a total of 15-16-17-18-19-21 times (= 30-32-34-36-38-42 worked rows). After the last increase there are 90-96-102-108-116-126 stitches. Insert 1 marker outermost on one side; the piece is now measured from here! Continue with stocking stitch and stripes - remember to maintain the knitting tension - until the piece measures 14-15-15-16-17-18 cm measured along the armhole from the marker, finishing with a row from the wrong side. Cut the strand, place the stitches on a stitch holder and work the left front piece. LEFT FRONT PIECE: Find the left back shoulder as follows: Lay the back piece flat, right side up, with the stitch holder towards you; left side of piece = left shoulder. Knit up stitches along the left back shoulder, starting from the right side by the neck and knitting up stitches towards the armhole as follows: Use colour pacific blue and knit up 1 stitch in each worked row, inside the outermost stitch = 30-32-34-36-38-42 stitches. All length measurements on the front piece are taken from this knitted up row. Work A.1 back and forth (first row from the wrong side). When the piece measures 8-8-9-9-10-10 cm, increase stitches for the neck as follows: ROW 1 (right side): Remember INCREASE TIP-1. Knit 3, increase 1 stitch towards the left, work to end of row. ROW 2 (wrong side): Purl. Work ROWS 1 and 2 a total of 4 times (= 8 worked rows) = 34-36-38-40-42-46 stitches (next row from the right side). Cut the strand, place the stitches on a stitch holder and work the right front piece. RIGHT FRONT PIECE: Knit up stitches along the right back shoulder, starting from the right side by the armhole and knitting up towards the neck as follows: Use colour pacific blue and knit up 1 stitch in each worked row, inside the outermost stitch = 30-32-34-36-38-42 stitches. All length measurements on the front piece are taken from this knitted up row. Work A.1 back and forth (first row from the wrong side). When the piece measures 8-8-9-9-10-10 cm, increase stitches for the neck as follows: ROW 1 (right side): Work until there are 3 stitches left, increase 1 stitch towards the right, knit 3 - remember INCREASE TIP-1. ROW 2 (wrong side): Purl. Work ROWS 1 and 2 a total of 4 times (= 8 worked rows) = 34-36-38-40-42-46 stitches (next row from the right side). Now join the 2 front piece together as follows: FRONT PIECE (right and left section together): Work as follows from the right side: Work the 34-36-38-40-42-46 stitches from the right front piece, cast on 22-24-26-28-32-34 stitches for the neck (making sure the cast-on edge is not tight), work the 34-36-38-40-42-46 stitches from the left front piece = 90-96-102-108-116-126 stitches. Continue A.1 back and forth across all stitches until the piece measures 26-27-29-30-31-32 cm, finishing after a row from the wrong side – adjusting so the stripes match the back piece. Join the front and back pieces as follows; the piece is now measured from here! BODY: Continue working the 90-96-102-108-116-126 stitches from the front piece as before, cast on 8-8-10-12-16-16 stitches (in side mid-under sleeve), work the 90-96-102-108-116-126 stitches from the back piece, cast on 8-8-10-12-16-16 new stitches (in side mid-under sleeve) = 196-208-224-240-264-284 stitches. Continue A.1 in the round until the piece measures 33-34-33-34-34-35 cm from the armhole – finishing after a stripe with colour pacific blue. Change to circular needle size 3mm and work rib (knit 1, purl 1) with colour pacific blue. AT THE SAME TIME increase 30-36-36-42-42-48 stitches evenly on round 1– read INCREASE TIP-3 = 226-244-260-282-306-332 stitches. When the rib measures 4-4-5-5-6-6 cm cast off a little loosely with rib. The jumper measures approx. 60-62-64-66-68-70 cm, measured from the highest point towards neck. SLEEVES: The sleeves are worked top down. Lay the piece flat and insert 1 marker at the top of the armhole (NOTE! This is not the knitted-up row on the front piece but approx. 6-7 cm down the front piece). Use colour pacific blue and circular needle size 3 mm. Knit up stitches around the armhole, starting in the middle of the cast-on stitches under the sleeve – knit up 80-84-90-94-102-106 stitches, with equal numbers of stitches on each side of the marker. Change to circular needle size 4.5 mm. Insert 1 marker-thread mid-under the sleeve and allow it to follow your work onwards; it is used when decreasing under the sleeve. Work A.1 in the round. AT THE SAME TIME decrease as follows – read DECREASE TIP: When the sleeve measures 1 cm measured mid-under the sleeve, decrease 2 stitches every 2nd round 3 times, then decrease 2 stitches every 1½ cm 5-5-6-6-7-7 times = 64-68-72-76-82-86 stitches. Continue working until the sleeve measures 47-46-44-44-42-41 cm from mid-top of shoulder, finishing after a stripe with colour pacific blue. Change to double pointed needles size 3 mm and work rib (knit 1, purl 1) with colour pacific blue, increasing 12-12-12-12-14-14 stitches evenly on round 1 = 76-80-84-88-96-100 stitches. When the rib measures 4-4-5-5-6-6 cm, cast off a little loosely with rib. The sleeve measures approx. 51-50-49-49-48-47 cm from mid-top of shoulder. NECK: Use circular needle size 3 mm and colour pacific blue. Starting from the right side on one shoulder-line, knit up approx. 100 to 130 stitches inside 1 stitch – the stitch count must be divisible by 2. Work rib in the round (knit 1, purl 1) for 3-3-3-4-4-4 cm. Knit 4 rounds (= rolled edge). Change to circular needle size 4.5 mm and cast off a little loosely. |
|||||||
Diagram explanations |
|||||||
|
|||||||
 |
|||||||
 |
|||||||
Have you finished this pattern?Tag your pictures with #dropspattern #neptuneringssweater or submit them to the #dropsfan gallery. Do you need help with this pattern?You'll find 36 tutorial videos, a Comments/Questions area and more by visiting the pattern on garnstudio.com. © 1982-2026 DROPS Design A/S. We reserve all rights. This document, including all its sub-sections, has copyrights. Read more about what you can do with our patterns at the bottom of each pattern on our site. |
|||||||


With over 40 years in knitting and crochet design, DROPS Design offers one of the most extensive collections of free patterns on the internet - translated to 17 languages. As of today we count 324 catalogues and 12290 patterns translated into English (UK/cm). 12290
We work hard to bring you the best knitting and crochet have to offer, inspiration and advice as well as great quality yarns at incredible prices! Would you like to use our patterns for other than personal use? You can read what you are allowed to do in the Copyright text at the bottom of all our patterns. Happy crafting!
Post a comment to pattern DROPS 259-8
We would love to hear what you have to say about this pattern!
If you want to leave a question, please make sure you select the correct category in the form below, to speed up the answering process. Required fields are marked *.