
Popular categories
Looking for a yarn?


Comments / Questions (63)
![]() Peyton wrote:
Peyton wrote:
Hi! I'm about to divide for the body and sleeves for the size medium, and confused as to why the raglan seams aren't lining up with the number of stitches I'm supposed to set aside for the sleeves.
15.11.2025 - 17:55DROPS Design answered:
Hi Peyton, Your raglan lines are finished when you divide for the body and sleeves, so they do not necessarily line up with the divisions. Regards, Drops Team.
17.11.2025 - 07:21
![]() Rachael wrote:
Rachael wrote:
Hi, Where is the chest measurement for this item, this does not appear to be on the diagram provided or is it the number at the 'hem' of the jumper schematic? Thanks
04.11.2025 - 14:41DROPS Design answered:
Hi Rachael, There is a size chart at the bottom of the pattern with all the measurements for the different sizes. Regards, Drops team.
05.11.2025 - 06:47
![]() Pilar wrote:
Pilar wrote:
I am not sure I understand the second increases for the Yoke when it says 2nd round justBody and the 4th round shoulders, do shoulders mean increases in both Body and shoulders,?because it says 4 stitches and 8 stitches increase in each round Thanks Pilar
13.10.2025 - 20:33DROPS Design answered:
Hi Pilar, The first increase is only on the front and back pieces (4 increased stitches), the second increase is on the front and back pieces as well as the sleeves (8 increased stitches). Continue alternately like this for the specified number of times in your size. Regards, Drops Team.
15.10.2025 - 07:04
![]() Pen wrote:
Pen wrote:
Bezüglich der Zunahmen nurnoch für den Körper bzw. jede 4. Runed Ärmel. Nehme ich dann zb. vor dem 1. Markierer zu, dahinter aber nicht, also wie folgt? Vorderteil -> Ärmel l: Zunahme - 2 rechtstricken - KEINE zunahme Ärmel l - > Rückenteil: KEINE Zunahme - 2 rechtstricken - Zunahme Rückenteil -> Ärmel r: Zunahme - 2 rechtstricken - KEINE Zunahme Ärmel r -> Vorderteil: KEINE Zunahme - 2 rechtstrick - Zunahme Liebe Grüße
01.10.2025 - 19:39DROPS Design answered:
Hallo, entschuldigen Sie die späte Antwort. Sie nehmen in den Runden, in denen Sie nicht am Ärmel zunehmen, wie folgt zu: Nach dem 1. Markierer keine Zunahme und vor dem 2. Markierer keine Zunahme (= Ärmel). Nach dem 2. Markierer Zunahme und vor dem 3. Markierer Zunahme (Vorderteil). Nach dem 3. Markierer keine Zunahme und vor dem 4. Markierer keine Zunahme (= Ärmel). Nach dem 4. Markierer Zunahme und vor dem 1. Markierer Zunahme (Rückenteil).
04.11.2025 - 21:31
![]() Micheline wrote:
Micheline wrote:
Comment trouver un modèle qui commence par le bas merci
21.09.2025 - 21:48DROPS Design answered:
Bonjour Micheline, cherchez parmi les modeles ICI. Bon tricot!
21.09.2025 - 22:04
![]() Camela wrote:
Camela wrote:
Why are the numbers of stitches knitted to the center front different on the British pattern from the American? i.e., on the British it says 37 and on the American it says 48? (size XL).
14.09.2025 - 19:34DROPS Design answered:
Dear Camela, there is a typo in the US version of the pattern; the British version is correct. The marker is inserted after 37 stitches for size XL. Happy knitting!
15.09.2025 - 00:30
![]() Sofia wrote:
Sofia wrote:
Hej Om jag valt storlek L Raglan fördelningen blir 2,16,2,24,2,16,24 för 88 maskor Erat mönster så är raglan maskor alltid placerade vid räta maskor ifrån ribben. Problemet med om man har denna fördelning på 88 maskor så hamnar 2 av raglan fördelningarna vid Avi maskor från ribb. Maskantalet för storlek L 88 st vid indelning blir inte jämnt och det skapar en ful kant/ markering av raglan från ribb blir ojäm! Behöver erat mönster anpassas?
11.09.2025 - 14:39DROPS Design answered:
Hei Sofia. Skal være riktig slik det står, og da vil raglanlinjen komme over rettmaskene i vrangborden. Du har 88 masker, omgangens begynnelse er ved høyre skulder bak. tell 1 maske (= 1 rettmaske), sett 1. merke. Tell 16 masker (1r+2vr+2r+2vr+2r+2vr+2r+2vr+1r), sett 2. merke. Telle 28 masker (1r+2vr+2r+2vr+2r+2vr+2r+2vr+2r+2vr+2r+2vr+2r+2vr+1r), sett 3. merke. Tell 16 masker (1r+2vr+2r+2vr+2r+2vr+2r+2vr+1r), sett 4. merke. Det gjenstår 28 masker til starten av omgangen og de 4 merkene sitter mellom 2 rettmasker og er en fortsettelse fra rettmaskene i vrangborden. mvh DROPS design
15.09.2025 - 10:03
![]() DENISE wrote:
DENISE wrote:
Pour la division dos/devant manches Tricoter 1 maille endroit .ok Elle se situe dans le dos. ok elle se calcule à partir de où? du marqueur mis a la fin du col? merci de m'aider.
02.09.2025 - 15:25DROPS Design answered:
Bonjour Denise, la 1ère maille du tour est une des mailles du raglan et se trouve affectée au dos lors de la division de l'ouvrage; les tours commencent à la transition entre le dos et la manche droite. La division de l'empiècement se mesure à partir du marqueur placé après les côtes du col, pour les raglans, vous avez placé des fils marqueurs entre les mailles sur l'aiguille. Bon tricot!
02.09.2025 - 17:29
![]() Denise Kossler wrote:
Denise Kossler wrote:
Pour placer les 4fils marqueurs faut il compter une maille apres le 1er marqueur qui lui même a ete placé a 31 mailles soit 32 mailles, 1 fil marqueur? merci par avance pour votre réponse
02.09.2025 - 15:10DROPS Design answered:
Bonjour Mme Kossler, les fils marqueurs sont placés entre les mailles, ainsi: 1 maille, 1 fil marqueur, 20 mailles, 1 fil marqueur, 32 mailles, 1 fil marqueur, 20 mailles, 1 fil marqueur, il reste 32 mailles jusqu'au fil marqueur suivant (mais 31 mailles jusqu'à la fin du tour). Bon tricot!
02.09.2025 - 17:27
![]() Micheline wrote:
Micheline wrote:
Où peux t on trouver la taille correpondante par rapport à nos dimensions
29.08.2025 - 14:37DROPS Design answered:
Bonjour Micheline, mesurez un vêtement similaire que vous avez et dont vous aimez la forme et comparez ces mesures à celles du schéma pour trouver la taille correspondante. Retrouvez plus d'infos ici. Bon tricot!
29.08.2025 - 16:28
|
|
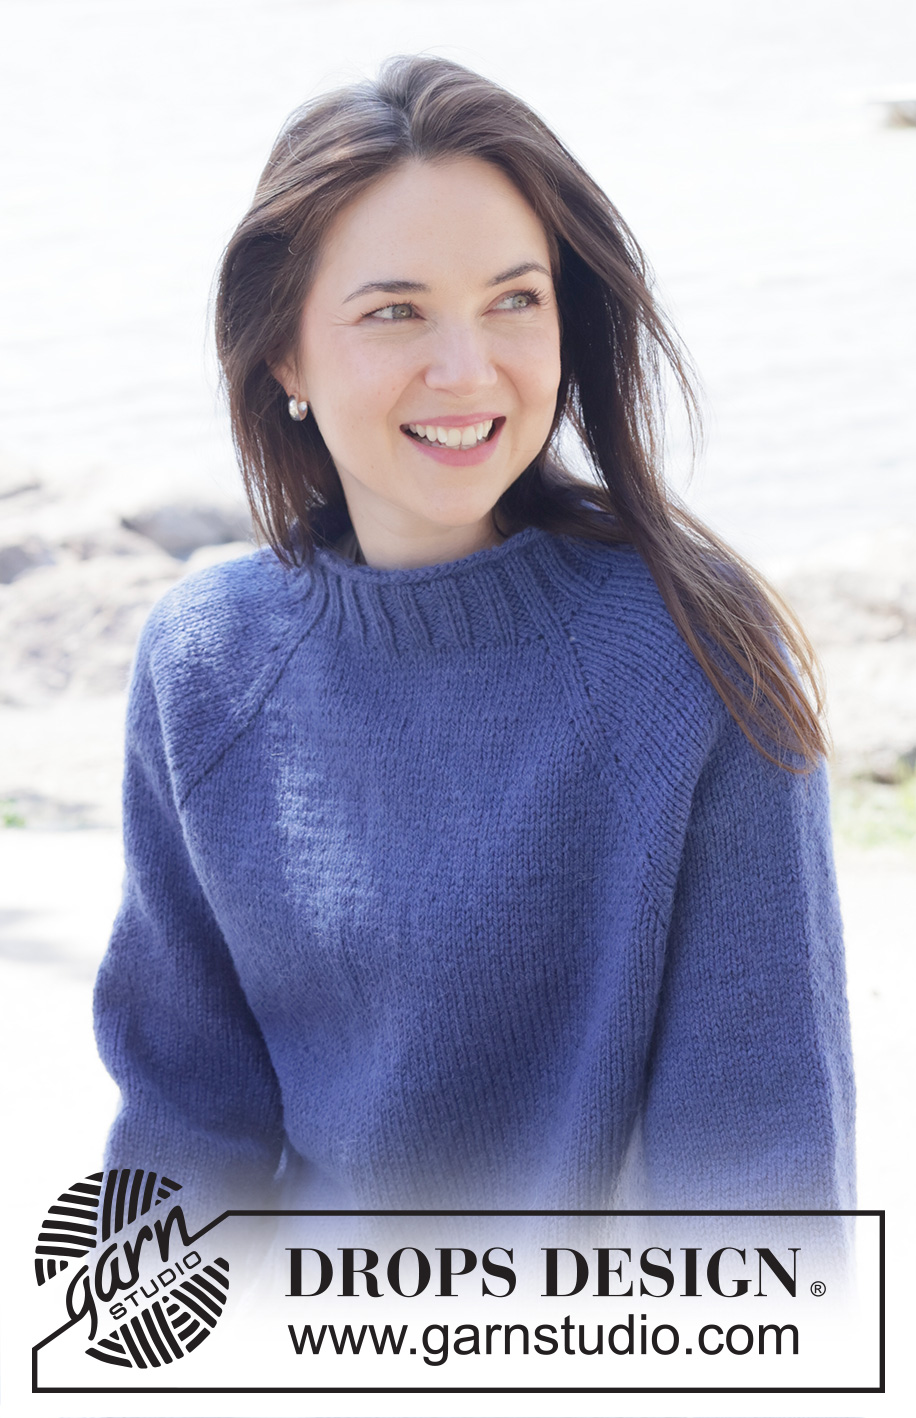
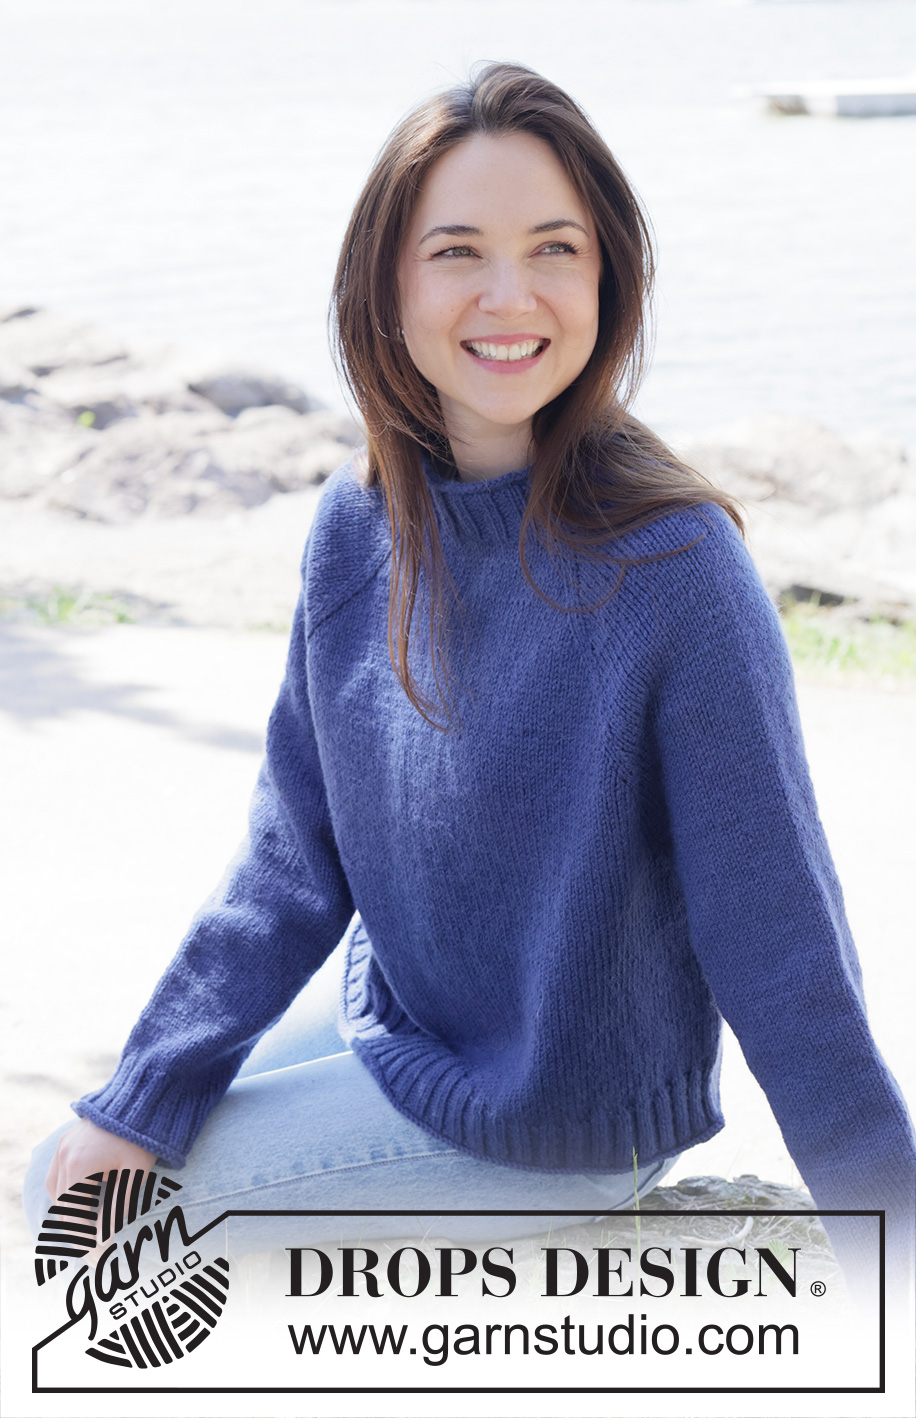
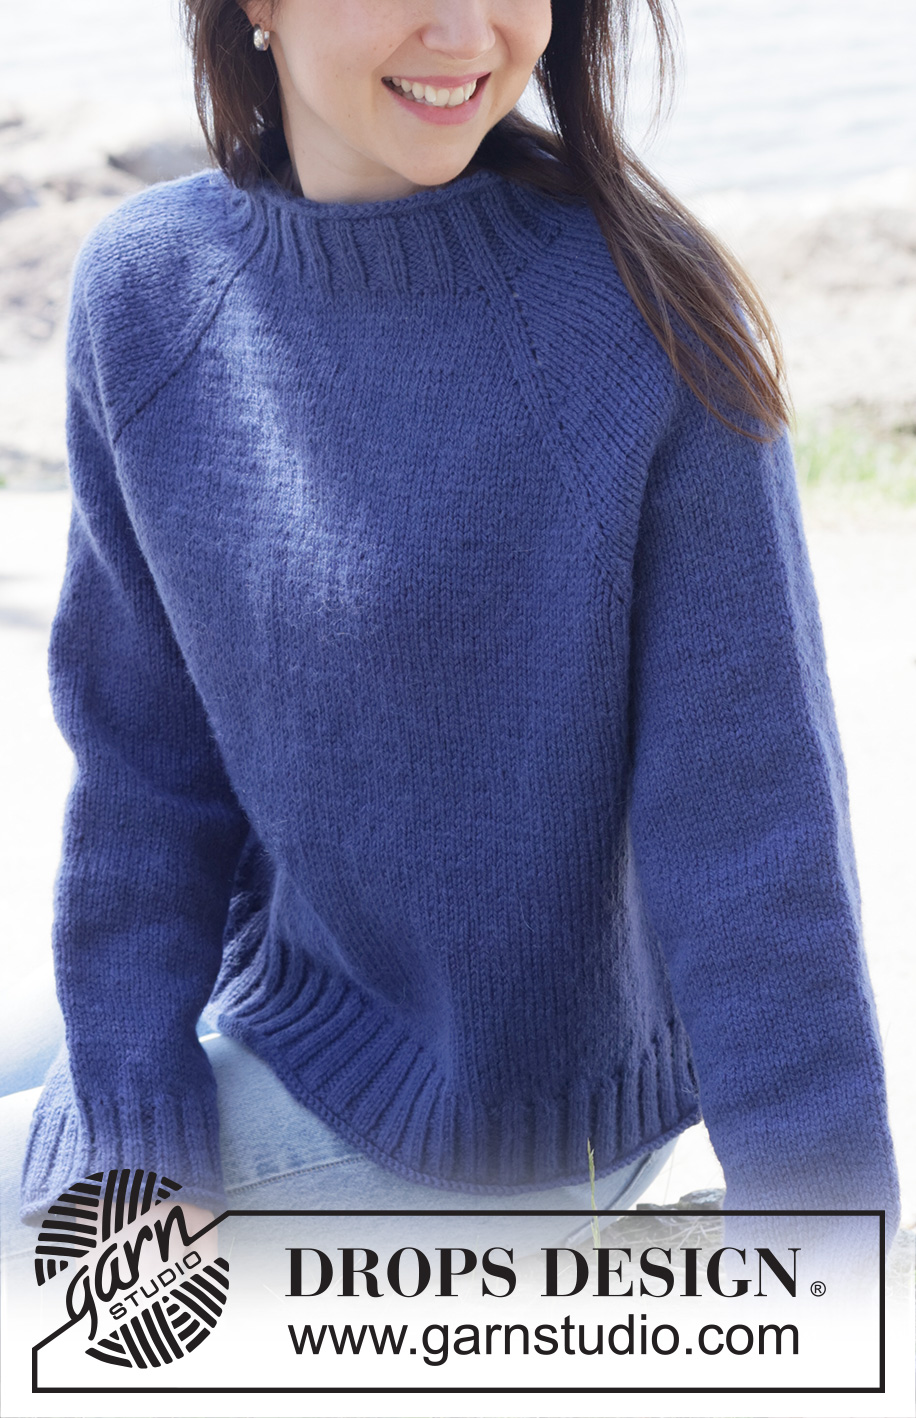
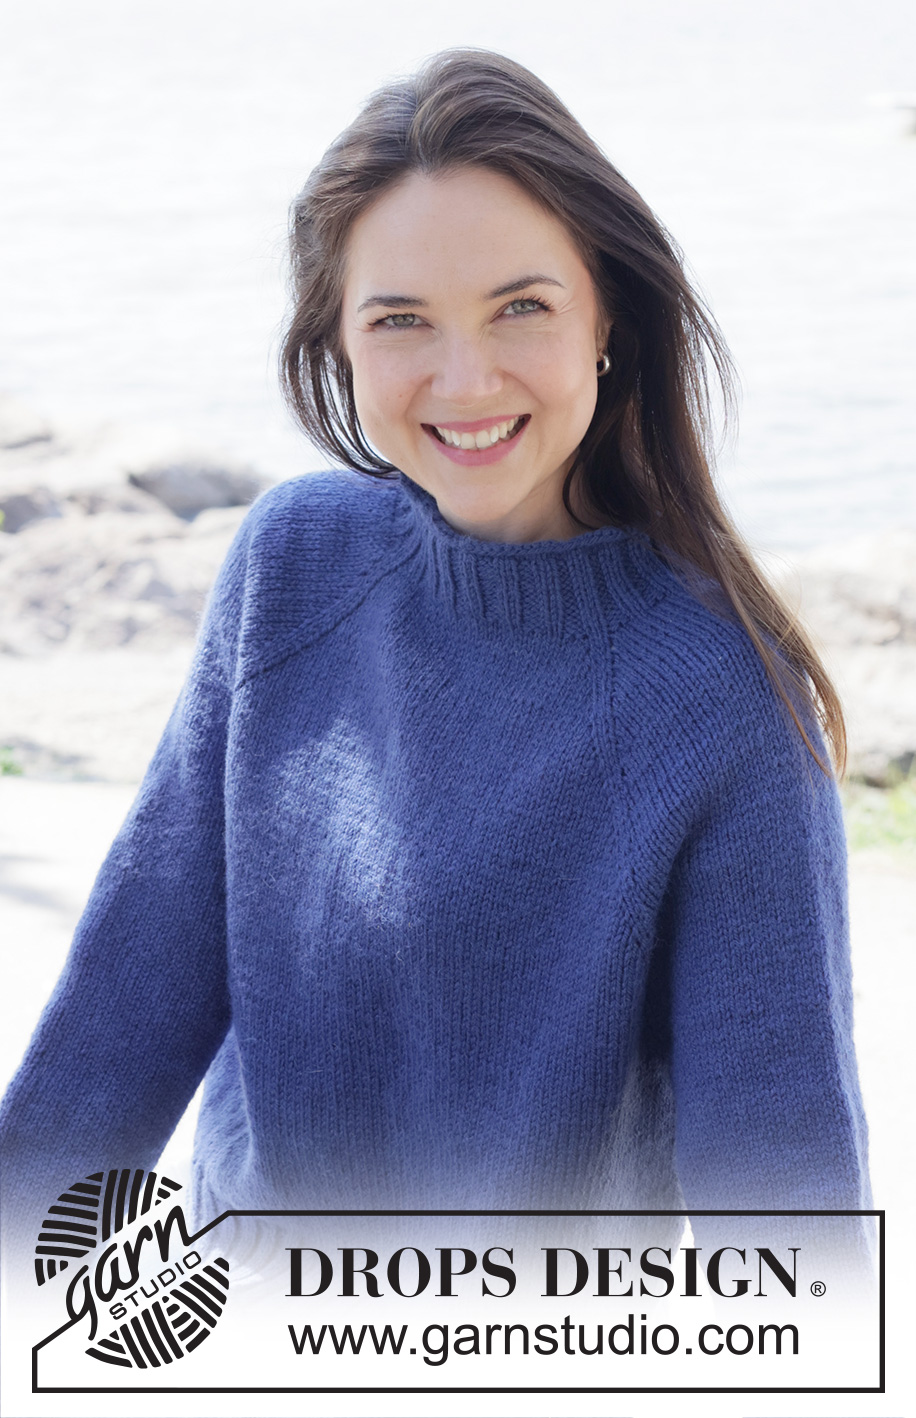
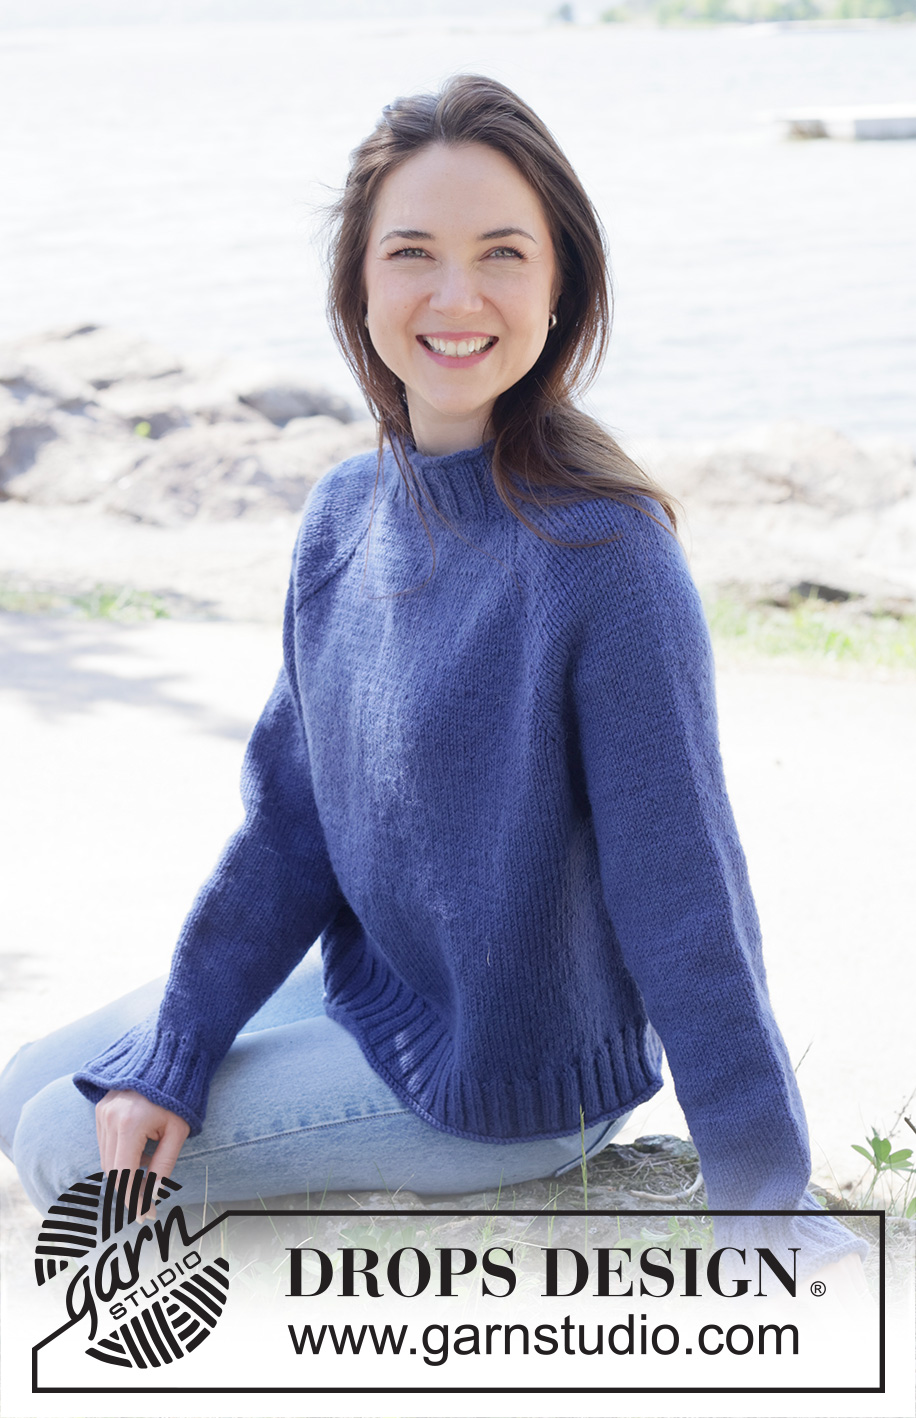
Midnight Glow#midnightglowsweater |
|
 |
 |
Knitted jumper in DROPS Nepal. The piece is worked top down with raglan and rolled edges. Sizes S - XXXL.
DROPS 254-39 |
|
|
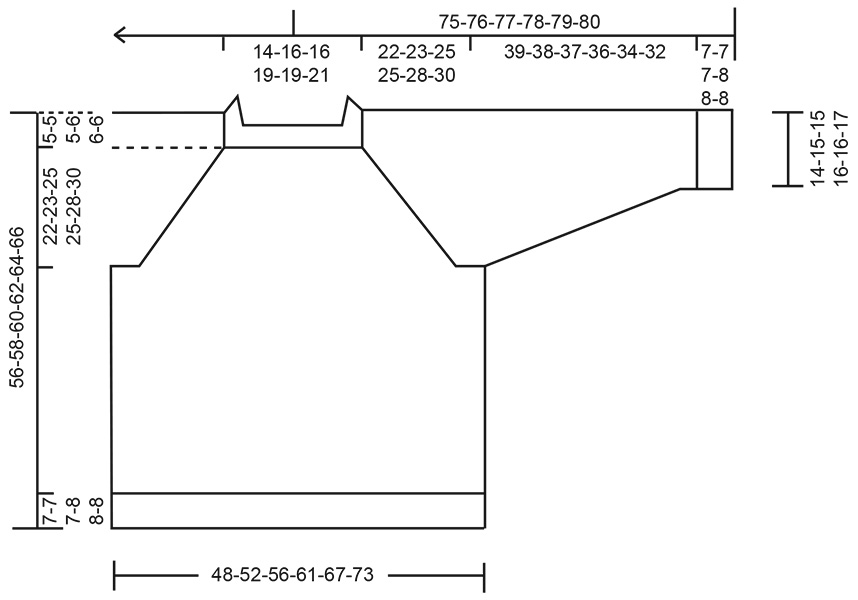
------------------------------------------------------- EXPLANATIONS FOR THE PATTERN: ------------------------------------------------------- RAGLAN: Increase 1 stitch by making 1 yarn over, which is then worked on the next round as follows: BEFORE MARKER-THREAD: Slip the yarn-over off the left needle and replace it twisted (insert the left needle through the back when replacing it). Knit the front loop of the yarn-over to avoid a hole. Then work the new stitch in stocking stitch. AFTER MARKER-THREAD: Knit the yarn-over through the back loop to avoid a hole. Then work the new stitch in stocking stitch. DECREASE TIP: Decrease 1 stitch on each side of the marker-thread as follows: Work until there are 3 stitches left before the marker-thread, knit 2 together, knit 2 (marker-thread sits between these 2 stitches), slip 1 stitch knit-wise, knit 1 and pass the slipped stitch over the knitted stitch (2 stitches decreased). INCREASE TIP-1 (evenly spaced): To work out how to increase evenly, count the total number of stitches on the needle (e.g., 164 stitches) and divide by the number of increases to be made (e.g., 20) = 8.2. In this example, increase by making 1 yarn-over after approx. each 8th stitch. On the next round work the yarn overs twisted to avoid holes. ------------------------------------------------------- START THE PIECE HERE: ------------------------------------------------------- JUMPER – SHORT OVERVIEW OF THE PIECE. The pattern uses both long and short needles; start with the length which fits the number of stitches and change when necessary. The neck and yoke are worked in the round with circular needle, from the right back shoulder, top down. When the yoke is finished, it is divided for the body and sleeves. The body is continued in the round, while the sleeves wait. The sleeves are worked in the round, top down. NECK: Cast on 80-88-88-104-104-112 stitches with circular needle size 5 mm and DROPS Nepal. Change to circular needle size 4 mm (casting on with a larger needle size makes the cast-on edge elastic) and knit 4 rounds. The beginning of the round is the right back shoulder. Work rib in the round (knit 2, purl 2) for 6-6-6-7-7-7 cm. Insert 1 marker after the first 29-31-31-37-37-39 stitches (approx. mid-front); the piece is now measured from here. YOKE: Insert 4 marker-threads, without working the piece and inserting each thread between 2 knitted stitches from the rib (these are raglan-stitches which are continued in stocking stitch). Count 1 stitch and insert 1 marker-thread before the next stitch, count 16-16-16-20-20-20 stitches (= sleeve), insert 1 marker-thread before the next stitch, count 24-28-28-32-32-36 stitches (= front piece), insert 1 marker-thread before the next stitch, count 16-16-16-20-20-20 stitches (= sleeve), insert 1 marker-thread before the next stitch, there are 24-28-28-32-32-36 stitches left (= back piece). Change to circular needle size 5 mm and work stocking stitch in the round. AT THE SAME TIME increase for RAGLAN – read description above, before/after the 2 raglan-stitches by each marker-thread (in each transition between the body and sleeves) every 2nd round a total of 8-8-11-9-7-7 times = 144-152-176-176-160-168 stitches (= 8 increased stitches on each increase-round). Remember to maintain the knitting tension. Then increase for raglan as follows: Every 2nd round on the front and back pieces and every 4th round on the sleeves (= alternately 4 and 8 increased stitches on each increase-round). Repeat these increases a total of 16-16-16-18-24-26 times on the front and back pieces (8-8-8-9-12-13 times on the sleeves). After the last increase there are 240-248-272-284-304-324 stitches and the yoke measures approx. 22-22-25-25-28-30 cm from the marker mid-front. Continue working without further increases until the yoke measures 22-23-25-25-28-30 cm from the marker. Now divide for the body and sleeves. DIVIDE FOR BODY AND SLEEVES: On the next round work as follows: Knit 1 (belongs to the back piece), place the next 48-48-54-56-58-60 stitches on a thread for the sleeve, cast on 10-12-14-18-20-22 stitches (in side mid-under sleeve), knit 72-76-82-86-94-102 (= front piece), place the next 48-48-54-56-58-60 stitches on a thread for the sleeve, cast on 10-12-14-18-20-22 stitches (in side mid-under sleeve), knit the last 71-75-81-85-93-101 stitches (= back piece). The body and sleeves are finished separately and the next round begins under the sleeve. BODY: = 164-176-192-208-228-248 stitches. Insert 1 marker in the middle of the 10-12-14-18-20-22 cast-on stitches under the sleeve. Work to the marker and continue stocking stitch in the round until the piece measures 44-46-48-48-50-52 cm from the marker mid-front. Change to circular needle size 4 mm and work rib (knit 2, purl 2), AT THE SAME TIME increasing 20-20-24-24-28-28 stitches evenly on the first round – read INCREASE TIP = 184-196-216-232-256-276 stitches. When the rib measures 6-6-6-7-7-7 cm, knit 4 rounds, then cast off a little loosely with knit. The jumper measures approx. 51-53-55-56-58-60 cm from the marker mid-front and approx. 56-58-60-62-64-66 cm from top of shoulder. SLEEVES: Place the 48-48-54-56-58-60 sleeve-stitches from the thread on one side of the piece on short circular needle size 5 mm and knit up 1 stitch in each of the 10-12-14-18-20-22 stitches cast on under the sleeve = 58-60-68-74-78-82 stitches. Insert a marker-thread in the middle of the 10-12-14-18-20-22 stitches under the sleeve. Start at the marker-thread and work stocking stitch in the round. When the sleeve measures 3 cm, decrease under the sleeve – read DECREASE TIP. Decrease 2 stitches every 7-7-4-3-2½-2 cm a total of 5-5-8-10-11-12 times = 48-50-52-54-56-58 stitches. Continue working until the sleeve measures 39-39-38-36-34-32 cm from the division. Change to double pointed needles size 4 mm. Work rib (knit 2, purl 2), AT THE SAME TIME increase 4-6-4-6-4-6 stitches evenly on the first round = 52-56-56-60-60-64 stitches. When the rib measures 6-6-6-7-7-7 cm, knit 4 rounds, then cast off a little loosely with knit. The sleeve measures approx. 46-46-45-44-42-40 cm from the division. |
|
 |
|
Have you finished this pattern?Tag your pictures with #dropspattern #midnightglowsweater or submit them to the #dropsfan gallery. Do you need help with this pattern?You'll find 28 tutorial videos, a Comments/Questions area and more by visiting the pattern on garnstudio.com. © 1982-2026 DROPS Design A/S. We reserve all rights. This document, including all its sub-sections, has copyrights. Read more about what you can do with our patterns at the bottom of each pattern on our site. |
|


With over 40 years in knitting and crochet design, DROPS Design offers one of the most extensive collections of free patterns on the internet - translated to 17 languages. As of today we count 324 catalogues and 12290 patterns translated into English (UK/cm). 12290
We work hard to bring you the best knitting and crochet have to offer, inspiration and advice as well as great quality yarns at incredible prices! Would you like to use our patterns for other than personal use? You can read what you are allowed to do in the Copyright text at the bottom of all our patterns. Happy crafting!
Post a comment to pattern DROPS 254-39
We would love to hear what you have to say about this pattern!
If you want to leave a question, please make sure you select the correct category in the form below, to speed up the answering process. Required fields are marked *.