
Popular categories
Looking for a yarn?


Comments / Questions (16)
![]() Wendy Eckman wrote:
Wendy Eckman wrote:
The double neck section, where you set markers for raglan, the number of stitches between markers doesn't add up. How many stitches should be between each marker to get to 64 total. I'm making an XL.
04.02.2026 - 17:45DROPS Design answered:
Hi Wendy, You knit across 10 stitches (decreasing these stitches to 8 stitches) and insert marker-1 in the now 9th stitch, knit across 17 stitches and decrease these to 13 stitches, then insert the marker in the now 23rd stitch, knit across 21 stitches and decrease these to 17 stitches, insert the marker in the 41st stitch, knit across the next 17 stitches and decrease to 13, insert the last marker in the 55th stitch. This leaves you with the last 11 stitches which are decreased to 9. 8 + 1 + 13 + 1 + 17 + 1 + 13 + 1 + 9 = 64 stitches. Regards, Drops Team.
05.02.2026 - 06:23
![]() Amy wrote:
Amy wrote:
So I’m doing a size M and when it comes to doing the short rows I’m confused. My starting point is mid back but it says start from mid back up to the second marker I have on, making the increases happen on the size where we knitted 17 stitches (before decrease) does that make it the back/front because I thought when dividing that the ones with less stitches is the sleeves, is that not correct? I’m confused on where I should start the short rows after the neck
14.09.2025 - 13:28
![]() Pia wrote:
Pia wrote:
Hallo, ich bin bei der Halsblende und den Abnahmen bei Größe XXL. Nach dem Setzen des 4. Markierers habe ich aber nun 24 statt 11 Maschen übrig. Ich weiß nicht was ich falsch gemacht habe. Danke!
15.03.2025 - 18:16DROPS Design answered:
Liebe Pia, so werden diese 84 Maschen gestrickt: 12 M (- 2 M) + 1 M (Markierer) + 17 M (-4 M) + 1 M (Markierer) + 23 M (- 4 M) + 1 M (Markierer) + 17 M (-4 M) + 1 M (Markierer) + 11 M (- 2 M) = 12+1+17+1+23+1+17+1+11=84 M mit (2+4+4+4+2)=16 Abnahmen sind 68 M übrig. Viel Spaß beim Stricken!
17.03.2025 - 08:27
![]() Elena wrote:
Elena wrote:
Ciao! Nelle diminuzioni per la manica nella taglia S, per passare da 41 a 31 maglie occorre diminuire 2m per 5 volte, non 7 come indicato (diminuire 10m in tutto). Diminuendo 7 volte otterrei 27m. Mi sbaglio? Grazie
14.02.2025 - 17:05DROPS Design answered:
Buongiorno Elena, grazie per la segnalazione, abbiamo corretto il testo. Buon lavoro!
17.02.2025 - 16:18
![]() Jacquie Williams wrote:
Jacquie Williams wrote:
Do you realize that there is no actual instructions for increase, only instructions on how to knit and purl the increase?
06.01.2025 - 15:43DROPS Design answered:
Dear Mrs Williams, you will find under paragraph RAGLAN how to work the yarn overs worked to increase and under paragraph NECKLINE / YOKE how/where to increase. Happy knitting!
07.01.2025 - 10:09
![]() Linnea wrote:
Linnea wrote:
Kun olen poiminut takakappaleen silmukat apulangalta, aloitanko heti joustinneuleen tekemisen vai neulonko ensin 1 kerroksen oikein ja teen lisäykset ja vasta sitten teen joustinneuletta kuten etukappaleessa?
26.11.2024 - 10:46DROPS Design answered:
Hei, neulo aluksi 1 kerros oikein ja tee lisäykset kuten etukappaleessa. Neulo sitten joustinneuletta kuten edessä.
27.11.2024 - 18:05
![]() Linnea wrote:
Linnea wrote:
Kun olen poiminut takakappaleen silmukat apulangalta, aloitanko heti joustinneuleen tekemisen vai neulonko ensin 1 kerroksen oikein ja teen lisäykset ja vasta sitten teen joustinneuletta kuten etukappaleessa?
24.11.2024 - 10:14
![]() Camie wrote:
Camie wrote:
Für die Teilung im Rumpf: Ich arbeite die Runden ja beginnend in der hinteren Mitte. Da sind die ersten 63 M (bei Gr. L) ja nicht die Vorderseite sondern ein Teil hinten, unterm Arm und ein Teil vorne.. Muss man da erst die Runde zu Ende stricken und dann den Faden unter dem Arm neu ansetzen? Vielen Dank! :)
28.09.2024 - 22:19DROPS Design answered:
Liebe Camie, stricken Sie einfach bis die 1. Markierung in der Seite, und ab hier beginnen jetzt die Runden. Viel Spaß beim Stricken!
30.09.2024 - 08:52
![]() Clara wrote:
Clara wrote:
I have a question about the decreasing after the ribbing for the neck. What does the pattern mean when it says to “knit ten and decrease 2 stitches evenly over these stitches” do I decrease 2 times? I’ve done that and when I finish the whole entire row it overlaps with what I have already knit and it doesn’t make sense to me. There is no video explaining how to do it. So how do it do it?? I’m doing a size small. How do I make it all line up correctly?
14.01.2024 - 19:56DROPS Design answered:
Dear Clara, work as follows: knit 10 and decrease 2 sts evenly (so, knit 3, decrease, knit 3, decrease), insert marker-1 in next stitch (there should be 8 stitches before this stitch), knit 17 stitches and decrease 4 sts evenly (approx. knit 2, decrease, knit 2, decrease, knit 2, decrease, knit 2, decrease, knit 1), insert marker-2 in next stitch (there should be 13 stitches between markers 1 and 2), knit 19-19-21-21-23-23 and decrease 4 stitches evenly (approx. knit 3, decrease, knit 3, decrease, knit 3 decrease, knit 2, decrease) insert marker-3 in the next stitch (there are 15 stitches between markers 1 and 2). Continue in the same way up to the end of the round. Happy knitting!
14.01.2024 - 23:44
![]() Ella wrote:
Ella wrote:
Gäller stickfastheten stickor nr. 6 eller nr. 8? För mig funkar stickfastheten på nr. 6 men vet då inte vilken annan sticka jag ska använda
04.01.2024 - 12:23DROPS Design answered:
Hej Ella, det som är viktigt är att du får 11 m (slätstickat) på 10 cm (vi får det på st 8), men om du får det på st 6, vill även måttet stämma med måttet på den storleken du stickar, enligt måttskissen nederst i mönstret :)
09.01.2024 - 15:16
|
|
Under the Moon#underthemoonsweater |
|
 |
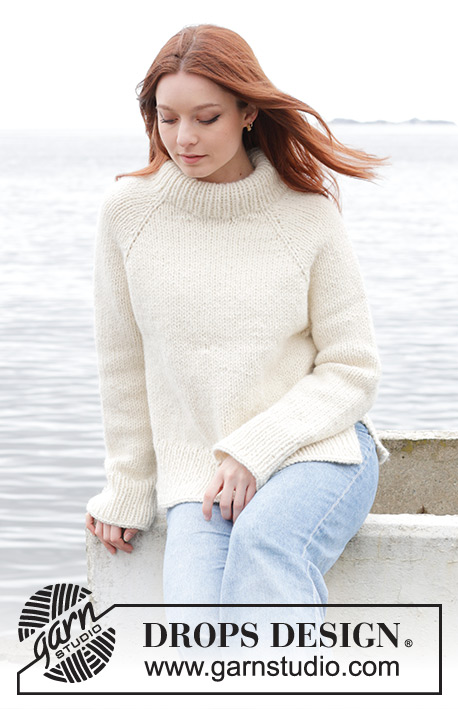 |
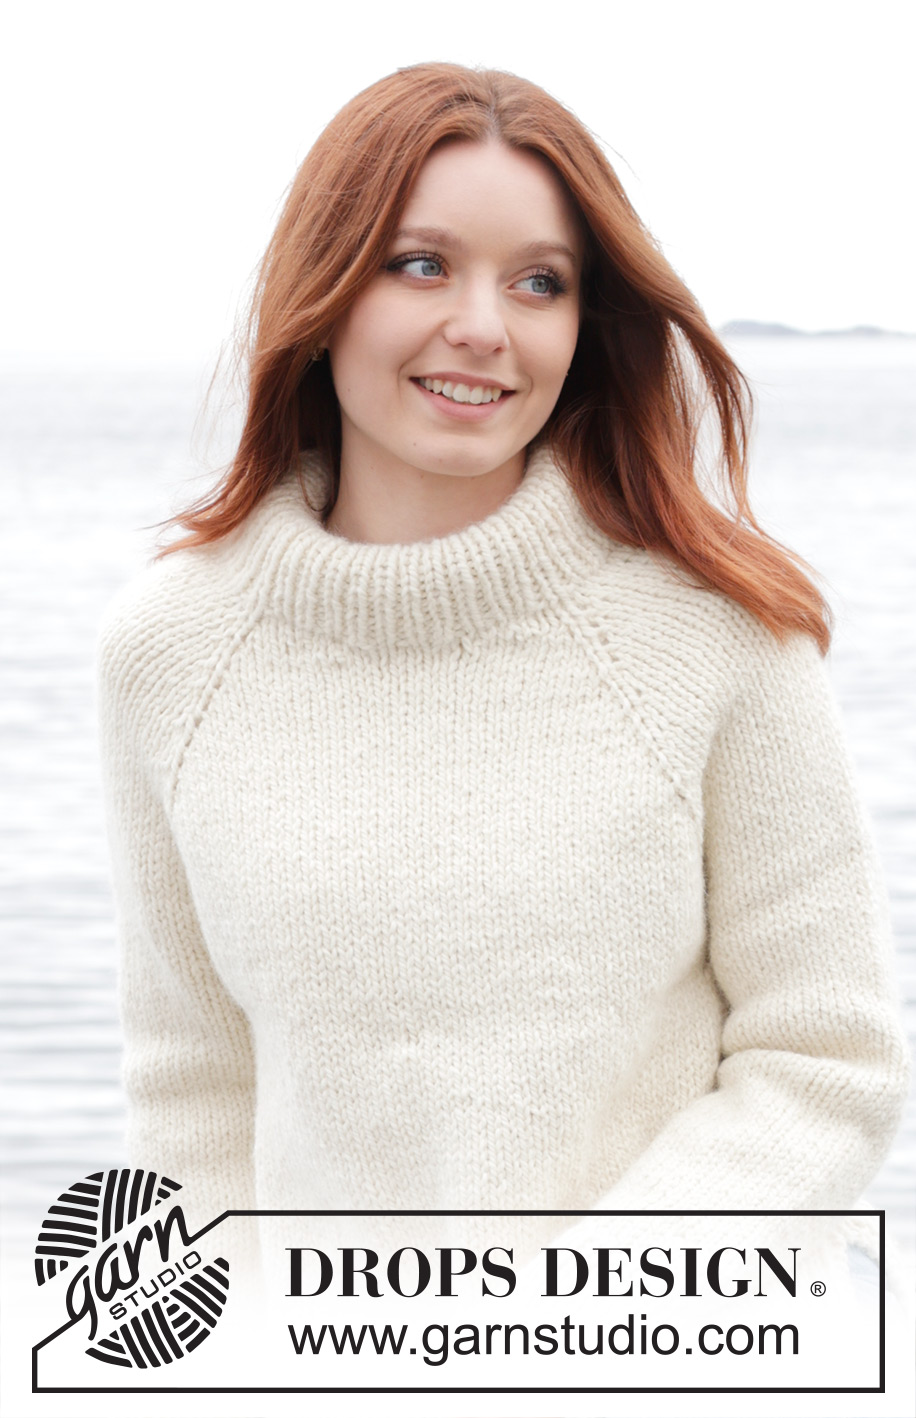
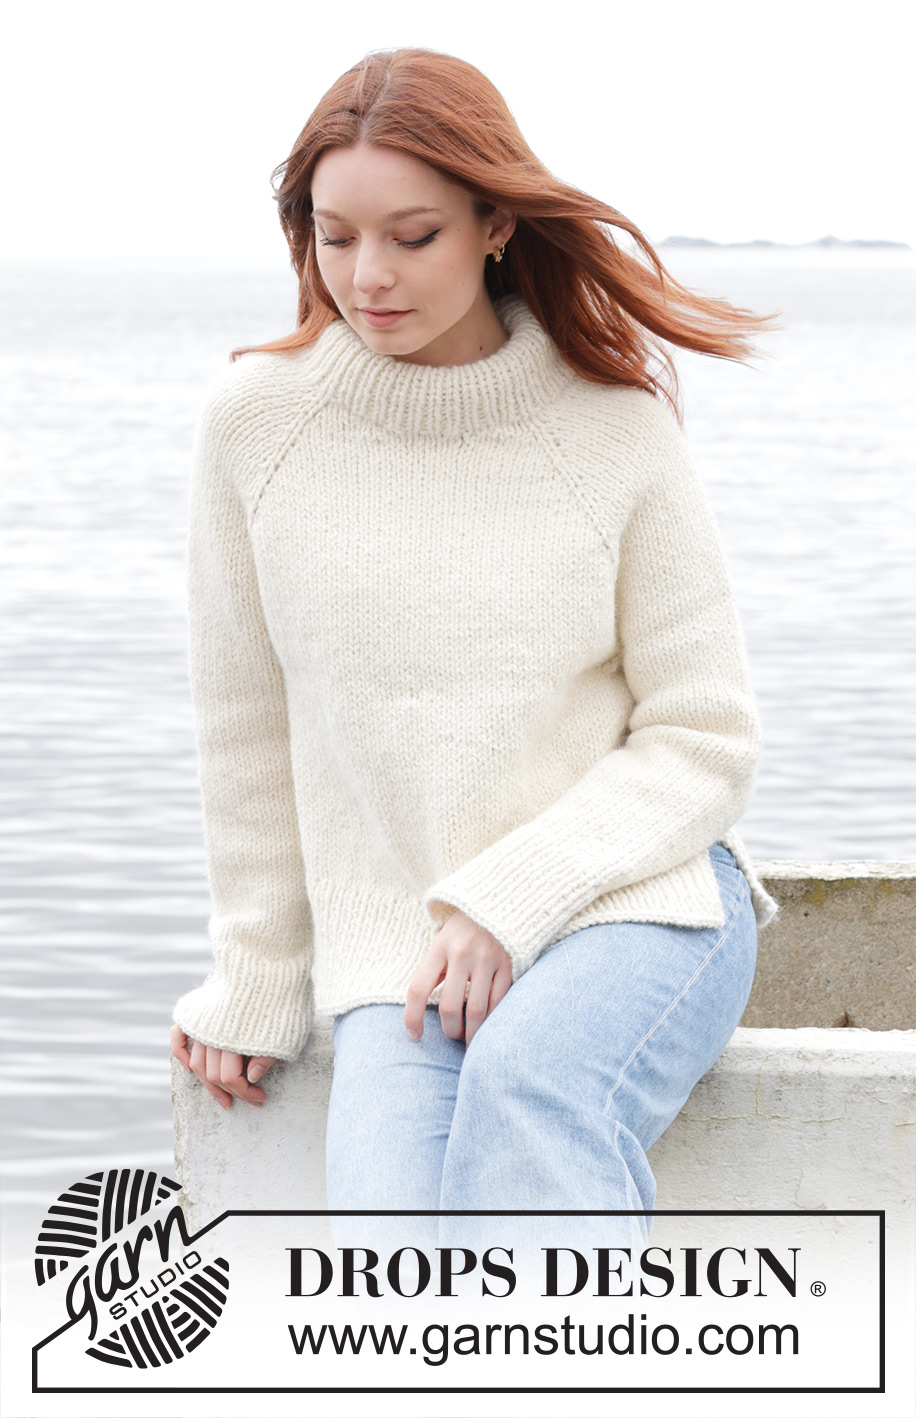
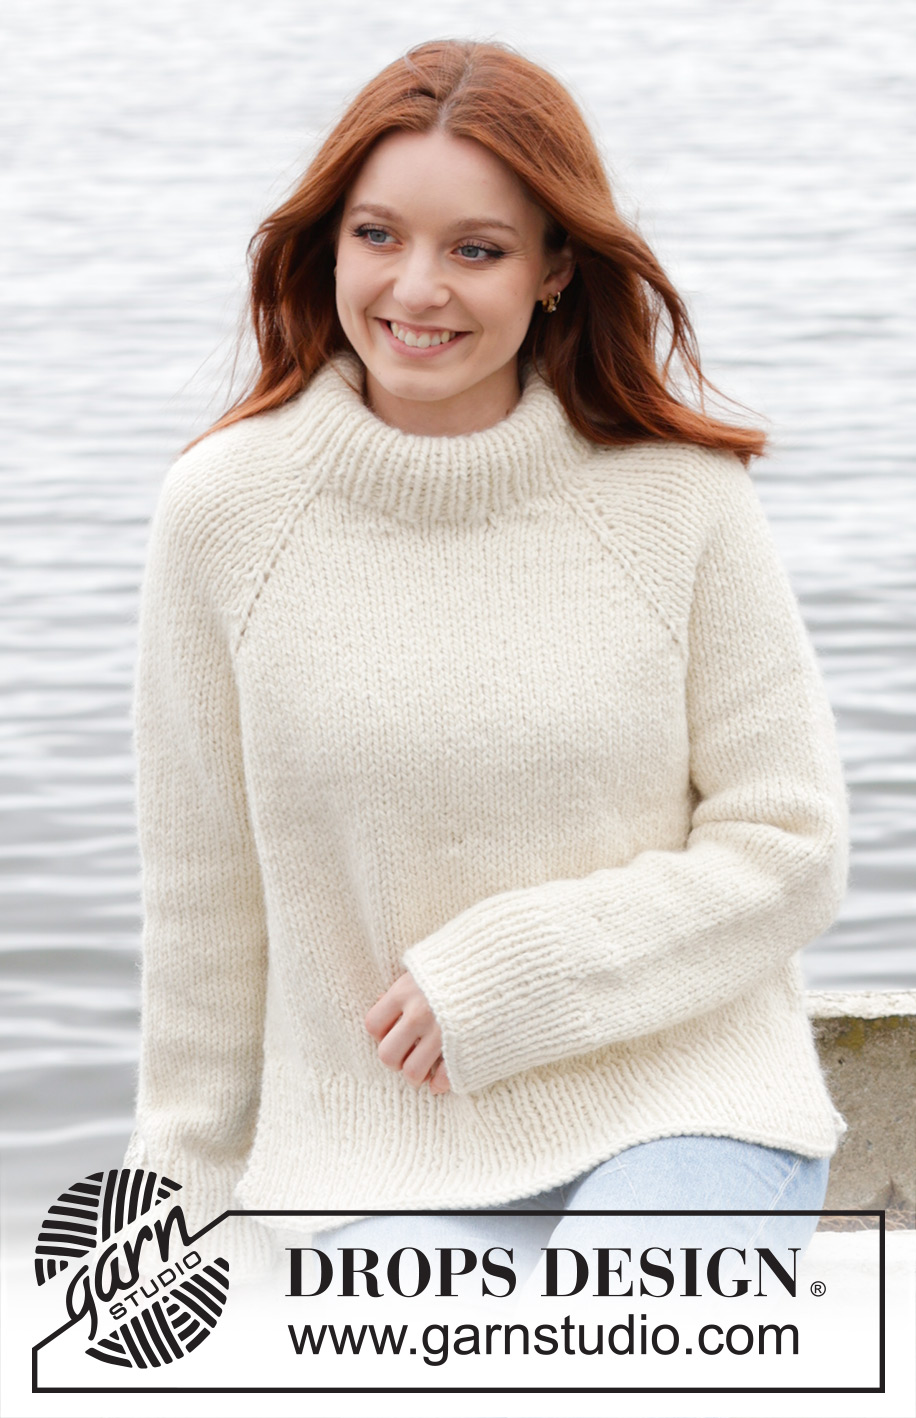
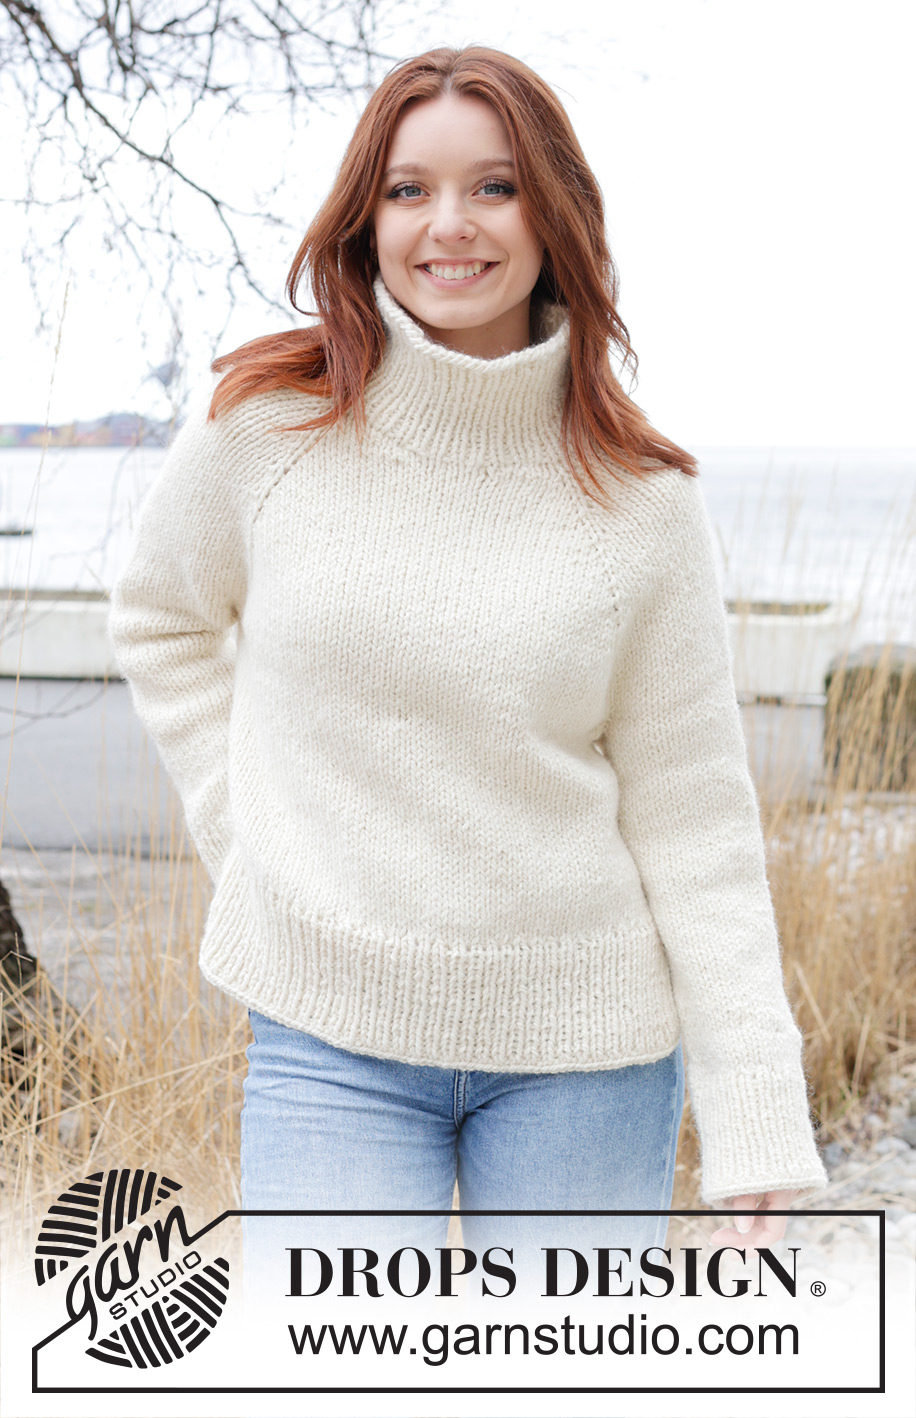
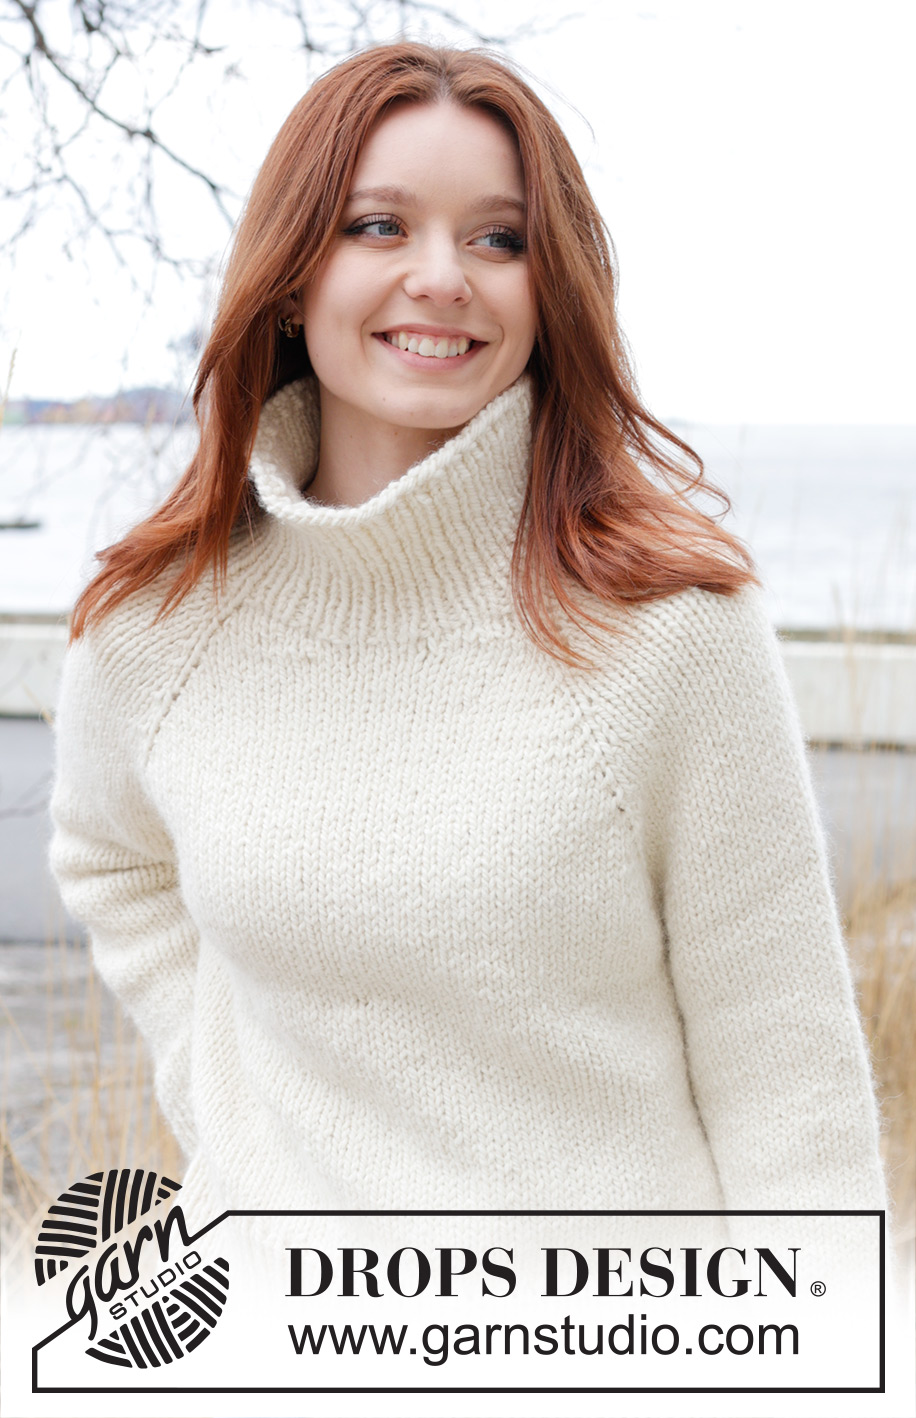
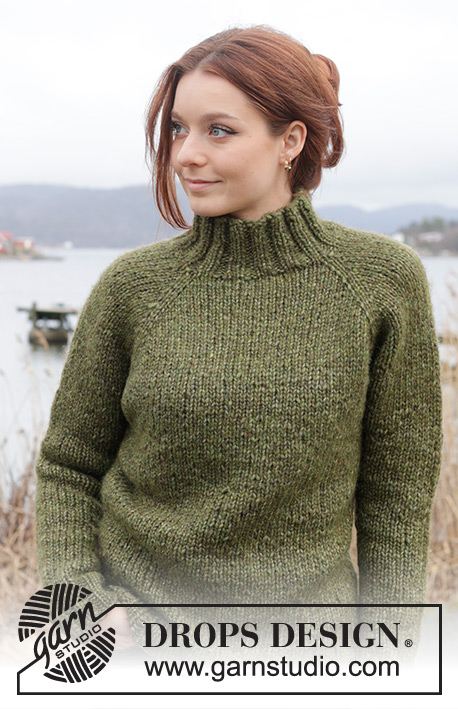
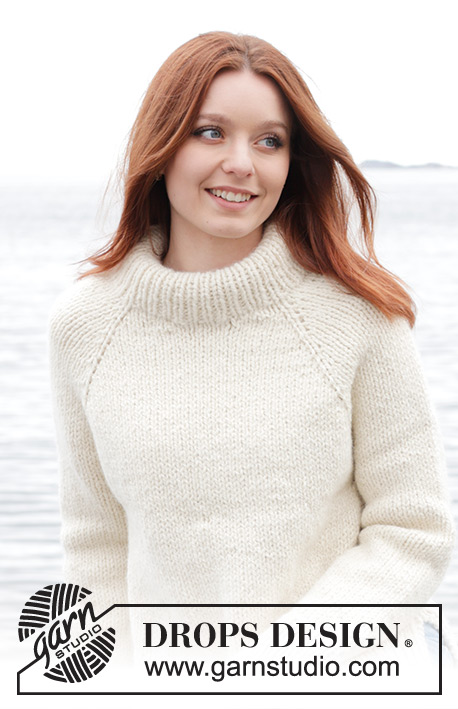
Knitted jumper in DROPS Andes. The piece is worked top down with raglan and split in sides. Sizes S - XXXL.
DROPS 245-25 |
|
|
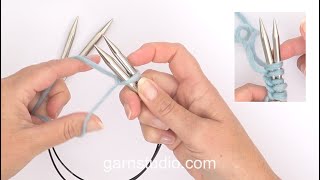
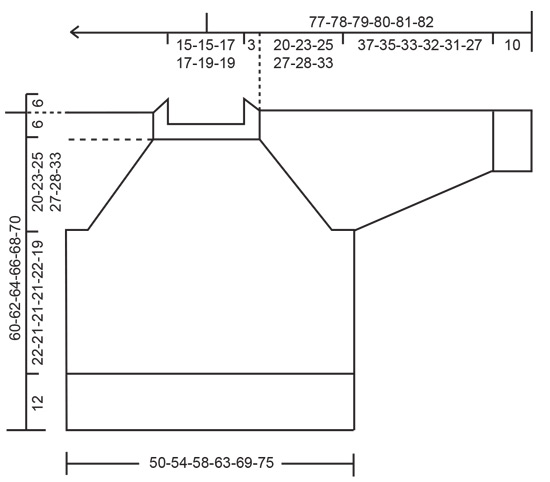
------------------------------------------------------- EXPLANATIONS FOR THE PATTERN: ------------------------------------------------------- GARTER STITCH (worked back and forth): Knit all rows. 1 ridge = knit 2 rows. RAGLAN: When working back and forth, work the yarn overs as follows from the wrong side: BEFORE MARKER: Purl the back loop. No hole AFTER MARKER: Slip the yarn-over off the left needle and replace it the other way around (insert the left needle into the back when replacing it). Purl the yarn over in the front loop. No hole. When working in the round, work the yarn overs as follows on the next round: BEFORE MARKER: Slip the yarn-over off the left needle and replace it the other way around (insert the left needle into the back when replacing it). Knit the front loop (yarn over twists to the right). No hole. AFTER MARKER: Knit the back loop (yarn over twists to the left). No hole. DECREASE TIP (for sleeves): Start 3 stitches before the marker-thread, knit 2 together, knit 2 (marker-thread sits between these 2 stitches), slip 1 stitch knit-wise, knit 1 and pass the slipped stitch over the knitted stitch. ------------------------------------------------------- START THE PIECE HERE: ------------------------------------------------------- JUMPER – SHORT OVERVIEW OF THE PIECE: The neck and yoke are worked in the round with circular needle, from mid back and top down. The yoke is divided for body and sleeves and the body is continued in the round with circular needle, before dividing for the split in each side. The sleeves are worked in the round with short circular needle/double pointed needles. DOUBLE NECK: Cast on 76-76-80-80-84-84 stitches with DROPS Andes, using short circular needles size 6 and 8 mm held together. Remove the needle size 8 mm keeping stitches on the needle size 6 mm (this gives you an elastic cast-on edge). Knit 1 round then work rib in the round (knit 1, purl 1) for 14 cm. Change to circular needle size 8 mm. Insert 4 markers which are used for raglan and are each inserted in a knitted stitch, at the same time as decreasing stitches evenly as follows: Knit 10-10-10-10-12-12 and decrease 2 stitches evenly over these stitches, insert marker-1 in the next stitch, knit 17 and decrease 4 stitches evenly over these stitches, insert marker-2 in the next stitch, knit 19-19-21-21-23-23 and decrease 4 stitches evenly over these stitches, insert marker-3 in the next stitch, knit 17 and decrease 4 stitches evenly over these stitches, insert marker-4 in the next stitch, knit the last 9-9-11-11-11-11 stitches and decrease 2 stitches evenly over these stitches = 60-60-64-64-68-68 stitches. NECKLINE: Now work short rows for the neckline, starting mid-back: ROW 1 (right side): Knit and increase for RAGLAN – read description above, on each side of the first 2 markers (4 increased stitches), turn when you have worked 3 stitches past marker-2. ROW 2 (wrong side): Purl and turn when you have worked 3 stitches past marker-4 (front right of neck when the garment is worn). ROW 3 (right side): Knit and increase for raglan on each side of all 4 markers, (8 stitches increased), turn when you have worked 2 stitches past the previous turn. ROW 4 (wrong side): Purl and turn when you have worked 2 stitches past the previous turn. ROW 5 (right side): Knit and increase for raglan on each side of markers 3 and 4 (4 increased stitches), knit to mid-back. Knit 1 round over all stitches. The short rows are finished and you have increased for raglan 2 times at each marker = 76-76-80-80-84-84 stitches. Continue in the round from mid-back. YOKE: REMEMBER THE KNITTING TENSION! Continue with stocking stitch and increase for raglan every 2nd round 3-3-5-4-3-1 more times = 100-100-120-112-108-92 stitches. Continue to increase for raglan every 2nd round but every 2nd increase is only on the body, i.e., every 2nd round on the body and every 4th round on the sleeves, alternately increasing 4 and 8 stitches. Increase like this 10-12-10-14-16-22 times on the body (5-6-5-7-8-11 times on the sleeves). You have increased a total of 15-17-17-20-21-25 times on the body and 10-11-12-13-13-14 times on the sleeves (including the increases on the short rows). After the last increase there are 160-172-180-196-204-224 stitches. Continue working until the yoke measures 20-23-25-27-28-33 cm, measured mid-back, after the neck. Now divide for the body and sleeves as follows: Work the first 24-26-26-29-32-36 stitches (approx. half back piece), place the next 33-35-37-39-39-41 stitches on a thread for the sleeve, cast on 8-8-10-10-12-12 stitches (in side under sleeve), work 47-51-53-59-63-71 stitches (front piece), place the next 33-35-37-39-39-41 stitches on a thread for the sleeve, cast on 8-8-10-10-12-12 stitches (in side under sleeve), work the remaining 23-25-27-30-31-35 stitches (approx. half back piece). BODY: = 110-118-126-138-150-166 stitches. Insert 1 marker-thread in the middle of the new stitches under each sleeve, these marker-threads are used later when working the split in each side. Work stocking stitch in the round for a further 22-21-21-21-22-19 cm. Place the last 55-59-63-69-75-83 stitches on a thread, then work the first 55-59-63-69-75-83 stitches (front piece). Knit 1 row and increase 24-26-28-30-32-34 stitches evenly spaced = 79-85-91-99-107-117 stitches. Change to circular needle size 6 mm. Work rib as follows from the wrong side: 2 GARTER STITCHES – see description above, * purl 1, knit 1 *, work from *-* until there are 3 stitches left, purl 1, 2 garter stitches. Continue this rib back and forth for 12 cm. Cast off. The jumper measures approx. 60-62-64-66-68-70 cm from the shoulder. Work the back piece in the same way. SLEEVES: Place the 33-35-37-39-39-41 stitches from the thread on one side of the piece on short circular needle/double pointed needles size 8 mm and knit up 1 stitch in each of the 8-8-10-10-12-12 stitches cast on under the sleeve = 41-43-47-49-51-53 stitches. Insert a marker-thread in the middle of the new stitches under the sleeve. Work stocking stitch in the round. When the sleeve measures 4 cm, decrease 2 stitches under the sleeve – read DECREASE TIP. Decrease like this every 7-5½-4-3-3-2½ cm a total of 5-6-7-8-8-8 times = 31-31-33-33-35-37 stitches. Continue working until the sleeve measures 37-35-33-32-31-27 cm. Knit 1 round and increase 13-15-13-15-15-15 stitches evenly spaced = 44-46-46-48-50-52 stitches. Change to double pointed needles size 6 mm and work rib (knit 1, purl 1) for 10 cm. Cast off. The sleeve measures approx. 47-45-43-42-41-37 cm from the division. Work the other sleeve in the same way. ASSEMBLY: The neck can be folded double and sewn down with a couple of stitches on each side. |
|
 |
|
Have you finished this pattern?Tag your pictures with #dropspattern #underthemoonsweater or submit them to the #dropsfan gallery. Do you need help with this pattern?You'll find 31 tutorial videos, a Comments/Questions area and more by visiting the pattern on garnstudio.com. © 1982-2026 DROPS Design A/S. We reserve all rights. This document, including all its sub-sections, has copyrights. Read more about what you can do with our patterns at the bottom of each pattern on our site. |
|


With over 40 years in knitting and crochet design, DROPS Design offers one of the most extensive collections of free patterns on the internet - translated to 17 languages. As of today we count 324 catalogues and 12290 patterns translated into English (UK/cm). 12290
We work hard to bring you the best knitting and crochet have to offer, inspiration and advice as well as great quality yarns at incredible prices! Would you like to use our patterns for other than personal use? You can read what you are allowed to do in the Copyright text at the bottom of all our patterns. Happy crafting!
Post a comment to pattern DROPS 245-25
We would love to hear what you have to say about this pattern!
If you want to leave a question, please make sure you select the correct category in the form below, to speed up the answering process. Required fields are marked *.