
Popular categories
Looking for a yarn?


Comments / Questions (43)
![]() Birgitta Björkman wrote:
Birgitta Björkman wrote:
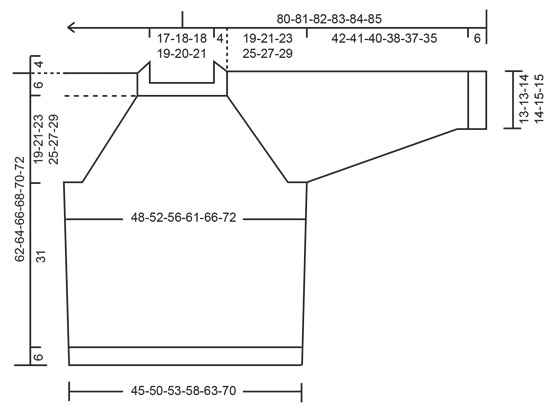
Hej ! På diagram modellen är ärmlängden längre på den mindre storleken och kortare på den största storleken . Är det rätt eller borde det inte var tvärt om ? Vänligen Birgitta
04.01.2025 - 12:54DROPS Design answered:
Hei Birgitta. Er riktig slik det står. I større størrelse er overvidden bredere, slik at ermene blir kortere i de største størrelsene. mvh DROPS Design
07.01.2025 - 14:31
![]() Helmiina wrote:
Helmiina wrote:
Missä kohdissa tarkalleen lisäykset tulee tehdä, kun lisäykset tehdään hihoihin joka toinen lisäyskierros ja etu-ja takakappaleessa joka lisäyskierroksella?
12.12.2024 - 16:15
![]() Sandra wrote:
Sandra wrote:
Hei. Jeg synes at halskanten ser litt for vid ut. Hvordan kan jeg få den strammere/mindre? Strikke den lengre før jeg bretter den?
10.12.2024 - 16:14DROPS Design answered:
Hej Sandra, hvis du har færre masker, eller strikker på mindre pinde, vil halskanten blive smallere :)
11.12.2024 - 13:41
![]() Kukka wrote:
Kukka wrote:
Hei, minkä koon tekisi kapealle 193cm pituiselle?
02.12.2024 - 21:42DROPS Design answered:
Hei, voit tarkistaa mitat mittapiirroksesta. Esim. koon L puseron pituus on 66 cm ja rinnanympärys on 112 cm.
03.12.2024 - 17:52
![]() Alice wrote:
Alice wrote:
Bonjour, Au début de l'empiècement il est écrit qu'il faut "augmenter en plus 2 mailles à intervalles réguliers au-dessus du devant et du dos", je ne comprends pas ce que signifie "au-dessus" ni combien de mailles doit avoir cet intervalle ? Il découle donc que je ne comprends pas comment placer mes marqueurs par la suite, ni combien de mailles doivent se retrouver dans les manches et le devant et le dos. Je vous remercie par avance pour votre aide.
02.11.2024 - 14:04DROPS Design answered:
Bonjour Alice, tricotez les 33-35-37-39-41-43 mailles du devant en augmentant 2 mailles à intervalles réguliers et répétez pour les 33-35-37-39-41-43 mailles du dos. Les marqueurs doivent être placés avant de tricoter le rang des augmentations; vous devez avoir chacun des 4 marqueur dans une maille (pas entre les mailles), comptez ensuite le nombre de mailles indiqué pour la taille. Bon tricot!
04.11.2024 - 08:15
![]() Jenny wrote:
Jenny wrote:
Hallo, Bei der Passe soll man ja zu Beginn die raglanzunahme bei jeder zweiten Runde machen bis für Größe S 208 Maschen auf der Nadel sind. Dazwischen strickt man immer eine Runde glatt rechts. Danach soll bei jedem zweiten Mal wenn zugenommen wird nur am Vorder-/ bzw. Rückenteil zugenommen werden. Muss dazwischen auch jeweils eine Runde nur glatt rechts gestrickt werden, oder fällt das in diesem Schritt weg und es werden nur abwechselnd die Zunahmen gestrickt?
31.10.2024 - 18:43DROPS Design answered:
Liebe Jenny, am Anfang haben Sie so zugenommen: (1 Runde mit 8 Zunahmen, 1 Runde ohne Zunahmen) x 10= 208 Maschen. Jetzt nehmen Sie so zu: (1 Runde mit Zunahmen nur am Vorder. + Rückenteil = 4 Zunahmen, 1 Runde ohne Zunahmen, 1 Runde mit 8 Zunahmen wie zuvor (Vorder, Rückenteil und Ärmel), 1 Runde ohne Zunahmen), diese 4 Runden stricken Sie insgesamt 8 Mal = 16 weitere Zunahmen für Vorder/Rückenteil und 8 für die Ärmel. Viel Spaß beim Stricken!
01.11.2024 - 08:20
![]() Ada wrote:
Ada wrote:
Dzień dobry. Właśnie zakończyłam dolny ściągacz swetra. Niestety lekko się faluje. Czy jest to normalne i ułoży się po prani, czy trzeba pruć? Ewentualnie jaki błąd mogłam popełnić?
23.10.2024 - 20:50DROPS Design answered:
Witaj Ado, jeśli dodałaś właściwą liczbę oczek przed rozpoczęciem ściągacza na dole swetra i użyłaś odpowiednich drutów na ściągacz to po praniu wszystko powinno się wyrównać. Jeśli to nie nastąpi polecam sprucie ściągacza i dodanie przed nim mniejszej liczby oczek niż w opisie. Pozdrawiamy!
24.10.2024 - 10:21
![]() Paul Goldberg wrote:
Paul Goldberg wrote:
Is it possible to knit this with a rolled collar instead of the one shown here? Thank you.
27.08.2024 - 21:23DROPS Design answered:
Dear Mr Goldberg, probably, you just have then to work the rib until the desired height (remember to adjust yarn amount). Happy knitting!
28.08.2024 - 09:03
![]() Viou wrote:
Viou wrote:
Bonjour ,pourquoi augmenter vous apres le jersey des manches avant les cotes ?merci
29.07.2024 - 18:09DROPS Design answered:
Bonjour Mme Viou, pour la même largeur/circonférence, il faut plus de mailles avec des aiguilles 3 en côtes qu'en jersey avec des aiguilles 4, raison pour laquelle on va augmenter avant de tricoter les côtes. Bon tricot!
30.07.2024 - 08:30
![]() Kessareff Danièle wrote:
Kessareff Danièle wrote:
Bonjour, Je ne comprends pas où je dois placer le repère de début du rang. Pouvez vous m’aider svp. Je suis en train de faire les augmentations de l’empiècement. Merci beaucoup.
08.04.2024 - 17:49DROPS Design answered:
Bonjour Mme Kessaref, le marqueur du début des tours se met avant la 1ère maille du tour, le 1er marqueur du raglan se met dans la 1ère maille du tour (utilisez 2 sortes de marqueurs si besoin). Bon tricot!
09.04.2024 - 08:32
|
|
Misty Day#mistyday |
|
 |
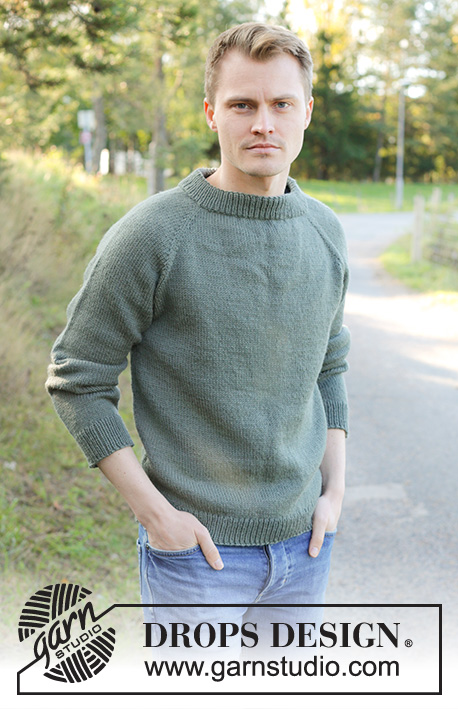 |
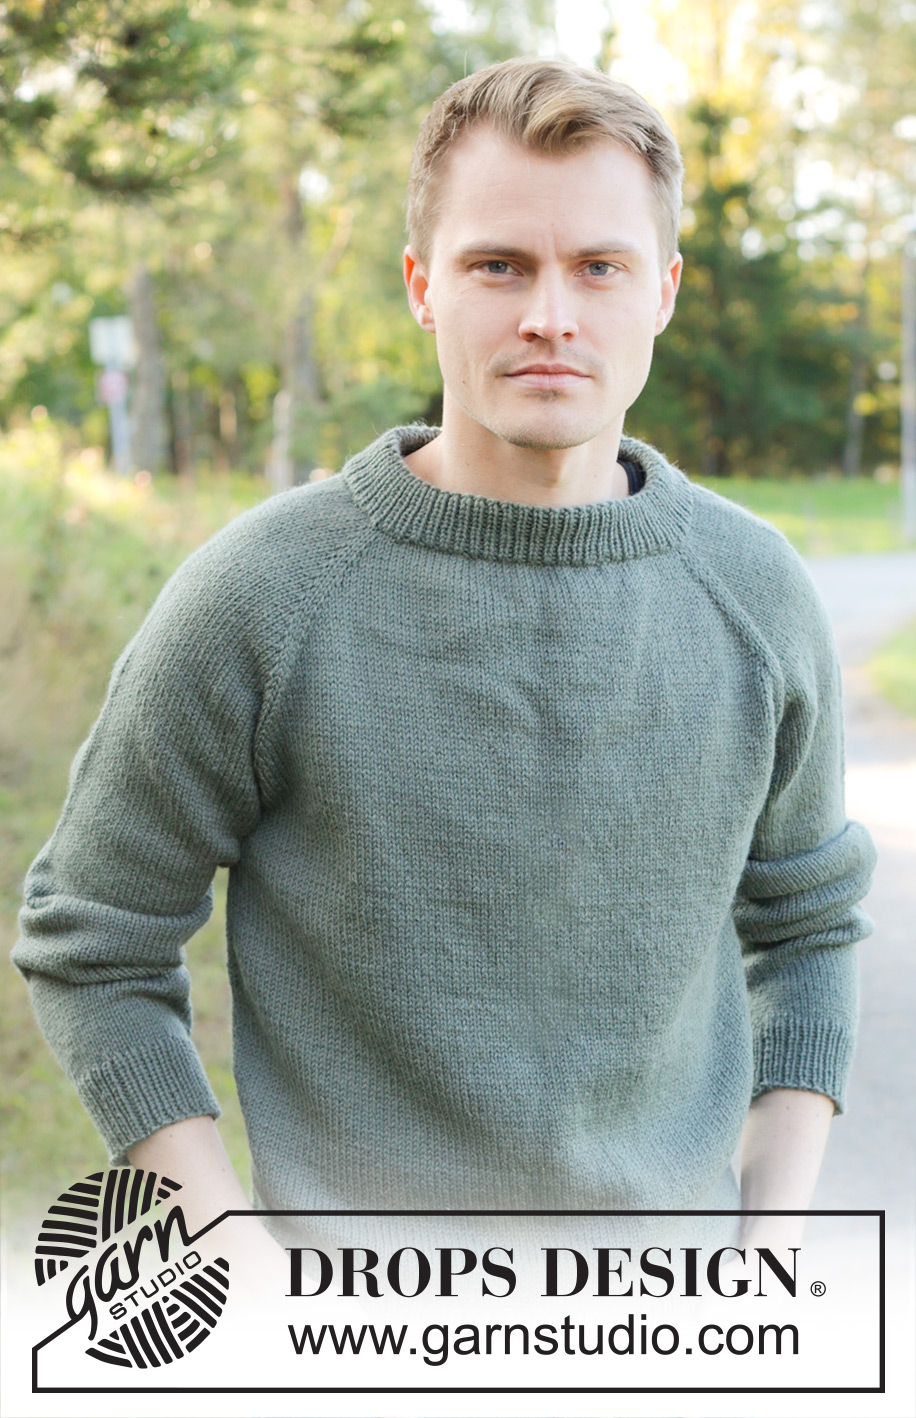
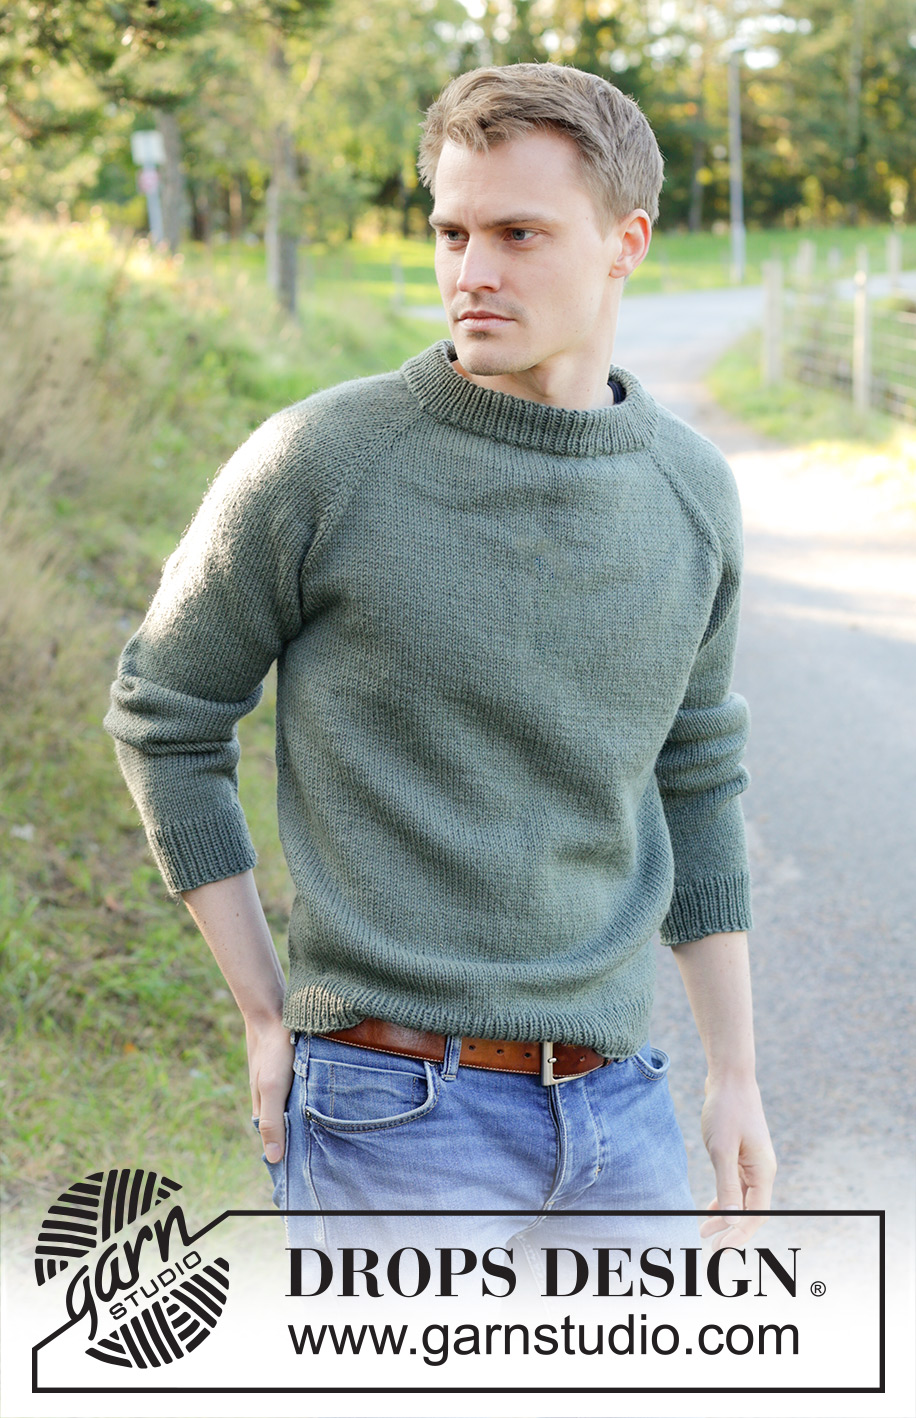
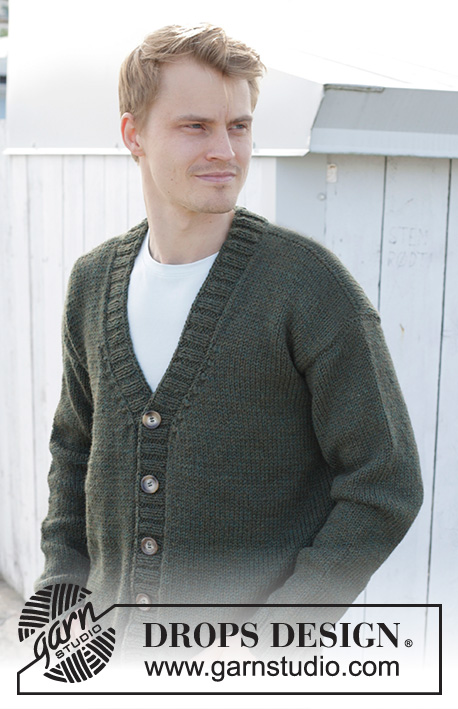
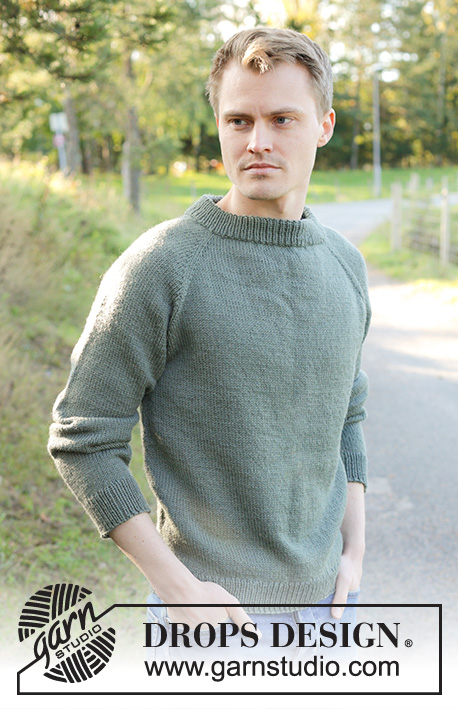
Knitted jumper for men in DROPS Lima. The piece is worked top down with stocking stitch, raglan and double neck. Sizes S - XXXL.
DROPS 246-8 |
|
|
------------------------------------------------------- EXPLANATIONS FOR THE PATTERN: ------------------------------------------------------- RAGLAN: Increase 1 stitch after/before 2 knitted stitches, in each transition between body and sleeves (the markers sit between these 2 stitches which are called raglan-stitches in the text). Increase by making 1 yarn over which is worked on the next round as described below. The new stitches are then worked in stocking stitch Yarn overs worked as follows: BEFORE 2 raglan-stitches: Slip the yarn over from left needle and replace it the other way around (insert the left needle from behind when replacing it). Knit the front loop (stitch twists to the right). No hole. AFTER 2 raglan-stitches: Knit the back loop (stitch twists to the left). No hole. INCREASE TIP: Increase by making 1 yarn over which is worked twisted on the next round to avoid a hole. DECREASE TIP (for sleeves and sides on body): Decrease 1 stitch on each side of the marker-thread as follows: Work until there are 3 stitches left before the marker-thread, knit 2 together, knit 3 (marker-thread sits in the middle stitch), slip 1 stitch knit-wise, knit 1 and pass the slipped stitch over the knitted stitch (2 stitches decreased). ------------------------------------------------------- START THE PIECE HERE: ------------------------------------------------------- JUMPER – SHORT OVERVIEW OF THE PIECE: The neck and yoke are worked in the round with circular needle from the right back shoulder, top down. The yoke is divided for the body and sleeves and the body is continued in the round with circular needle. The sleeves are worked in the round with short circular needle/double pointed needles. DOUBLE NECK: Cast on 120-124-128-132-136-140 stitches with DROPS Lima, using short circular needles size 3 and 4 mm held together. Remove the needle size 4 mm keeping stitches on needle size 3 mm (this gives you an elastic cast-on edge). Work rib in the round (knit 1, purl 1) for 4½ cm. Purl 1 round (folding edge), then continue the rib as before until the neck measures 9 cm from the cast-on edge. Fold the neck double to the inside and work 1 more round of rib, working every 2nd stitch together with its corresponding stitch on the cast-on edge. You now have a double neck. YOKE: Change to circular needle size 4 mm. Insert 4 markers without working the stitches. These are used when increasing for raglan: Insert marker-1 in the first stitch (a knitted stitch), count 25 stitches (sleeve), insert marker-2 in the next stitch, count 33-35-37-39-41-43 stitches (front piece), insert marker-3 in the next stitch, count 25 stitches (sleeve), insert marker-4 in the next stitch. There are 33-35-37-39-41-43 stitches left after the last marker (back piece). Knit 1 round, AT THE SAME TIME, increase 1 stitch in each of the 4 marker-stitches by knitting 1 in both the front and back loop. In addition, increase 2 stitches evenly over each of the front and back pieces – read INCREASE TIP (do not increase over the sleeves) = 128-132-136-140-144-148 stitches. Move the 4 markers so they sit between the marker-stitch and the increased stitch in each transition between the body and sleeves. Work the next round as follows: Start after the marker at the beginning of the round, knit 1, increase 1 stitch for RAGLAN – read description above, knit to 1 stitch before marker-2, increase 1 stitch on each side of the raglan-stitches, knit to 1 stitch before marker-3, increase 1 stitch on each side of the raglan-stitches, knit to 1 stitch before marker-4, increase 1 stitch on each side of the raglan-stitches, knit to 1 stitch before marker-1, increase 1 stitch for raglan, knit 1 (8 increased stitches). Continue with stocking stitch and increase for raglan on each side of the raglan-stitches every 2nd round a total of 10-16-20-19-18-13 times (including the increase described here) = 208-260-296-292-288-252 stitches. REMEMBER THE KNITTING TENSION! Continue with stocking stitch and increase for raglan but now every 2nd increase is only on the front and back pieces (4 increased stitches on the round). I.e., increase on the front and back pieces every 2nd round and on the sleeves every 4th round, alternately 4 and 8 increased stitches. Increase like this 16-14-12-16-20-28 times on the body (8-7-6-8-10-14 times on the sleeves). You have increased a total of 26-30-32-35-38-41 times on the body and 18-23-26-27-28-27 times on the sleeves. After the last increase there are 304-344-368-388-408-420 stitches. Continue with stocking stitch, without further increases, until the yoke measures 19-21-23-25-27-29 cm from the neck, mid-front. Divide for the body and sleeves: Knit 1, place the next 61-71-77-79-81-79 stitches on 1 thread for the sleeve, cast on 9-9-11-13-15-21 stitches (in side under sleeve), knit 91-101-107-115-123-131 (front piece), place the next 61-71-77-79-81-79 stitches on 1 thread for the sleeve, cast on 9-9-11-13-15-21 stitches (in side under sleeve), knit the last 90-100-106-114-122-130 stitches (back piece). The body and sleeves are finished separately. The piece is now measured from here! BODY: = 200-220-236-256-276-304 stitches. Insert 1 marker in each side – in the middle stitch cast on under each sleeve. Work stocking stitch to the first marker; the round now starts here. Continue with stocking stitch in the round for a further 8 cm. Now decrease 2 stitches each side of the body – read DECREASE TIP. Decrease like this every 8 cm, 2 more times = 188-208-224-244-264-292 stitches. Continue working until the body measures 31 cm from the division. Knit 1 round and increase 20-22-22-22-26-30 stitches evenly spaced = 208-230-246-266-290-322 stitches. Change to circular needle size 3 mm. Work rib (knit 1, purl 1) for 6 cm. Cast off a little loosely. The jumper measures approx. 62-64-66-68-70-72 cm from the shoulder. SLEEVES: Place the 61-71-77-79-81-79 stitches from the thread on the one side of the piece on short circular needle/double pointed needles size 4 mm and knit up 1 stitch in each of the new stitches cast on under the sleeve = 70-80-88-92-96-100 stitches. Insert a marker in the middle of the new stitches under the sleeve. Start at the marker and work stocking stitch in the round. When the sleeve measures 4-4-3-3-3-3 cm, decrease 2 stitches under the sleeve – read DECREASE TIP. Decrease like this every 5-3-2½-2-2-1½ cm a total of 8-12-15-16-17-18 times = 54-56-58-60-62-64 stitches. Continue working until the sleeve measures 42-41-40-38-37-35 cm from the division (or to desired length. There is approx. 6 cm left). Knit 1 round and increase 6 stitches evenly spaced = 60-62-64-66-68-70 stitches. Change to double pointed needles size 3 mm and work rib (knit 1, purl 1) for 6 cm. Cast off a little loosely. The sleeve measures approx. 48-47-46-44-43-41 cm from the division. Work the other sleeve in the same way. |
|
 |
|
Have you finished this pattern?Tag your pictures with #dropspattern #mistyday or submit them to the #dropsfan gallery. Do you need help with this pattern?You'll find 29 tutorial videos, a Comments/Questions area and more by visiting the pattern on garnstudio.com. © 1982-2026 DROPS Design A/S. We reserve all rights. This document, including all its sub-sections, has copyrights. Read more about what you can do with our patterns at the bottom of each pattern on our site. |
|


With over 40 years in knitting and crochet design, DROPS Design offers one of the most extensive collections of free patterns on the internet - translated to 17 languages. As of today we count 324 catalogues and 12290 patterns translated into English (UK/cm). 12290
We work hard to bring you the best knitting and crochet have to offer, inspiration and advice as well as great quality yarns at incredible prices! Would you like to use our patterns for other than personal use? You can read what you are allowed to do in the Copyright text at the bottom of all our patterns. Happy crafting!
Post a comment to pattern DROPS 246-8
We would love to hear what you have to say about this pattern!
If you want to leave a question, please make sure you select the correct category in the form below, to speed up the answering process. Required fields are marked *.