
Popular categories
Looking for a yarn?


Comments / Questions (9)
![]() Lee wrote:
Lee wrote:
Thank you Would 6 balls each of 2 colors of group C be the correct amount of yarn?
16.02.2026 - 07:43DROPS Design answered:
Hi again, Group C yarns are sold in 50 g balls, so a total of 12 balls would be 600g. This is correct for the larger sizes (XL_XXXL). Regards, Drops Team.
17.02.2026 - 07:30
![]() Lee wrote:
Lee wrote:
Thank you, I understand now Is it also possible to do this pattern with 2 strands from yarn group C instead of 4 from group A?
15.02.2026 - 20:36DROPS Design answered:
Hi Lee, Yes that is also possible. Regards, Drops Team.
16.02.2026 - 06:36
![]() Lee wrote:
Lee wrote:
Hi I don’t understand from the pattern how many grams or sheins of each color are needed for this pattern. It says 100g of each but that doesn’t seem right. Thank you
17.01.2026 - 15:12DROPS Design answered:
Dear Mrs Lee, in first, second and third size you will require 100 g DROPS Kid-Silk in each of the 4 colours, this means 100/25 g one ball Kid-Silk = 4 balls in each of the 4 colours (16 balls in total). Happy knitting!
19.01.2026 - 09:04
![]() Maddalena wrote:
Maddalena wrote:
Per la taglia L (72 maglie) quando indica come posizionare i marcapunti , sulla spiegazione dice di contare 21 maglie per il davanti . In realtà sono 19. ( 9+1+15+1+19+1+15+1+10=72)
05.11.2025 - 10:45DROPS Design answered:
Buonasera Maddalena, grazie per la segnalazione. Abbiamo corretto il testo. Buon lavoro!
05.11.2025 - 23:13
![]() Britt wrote:
Britt wrote:
Je tricote le modèle large avec 72 mailles pour faire le col. Je pose les marqueurs tel qu’indiqué, mais les marqueurs ne sont pas répartis sur le pourtour. 9/15/19/15 et en dernier je devrais avoir 10 mailles , or j’en ai 14. Commen ajuster au mieux ?
08.05.2025 - 07:34DROPS Design answered:
Bonjour Britt, notez que chacun des marqueurs doivent être placés dans une maille (et pas entre 2 mailles), vous aurez ainsi: 9+1+15+1+19+1+15+1+10=72 mailles. Bon tricot!
08.05.2025 - 09:53
![]() Malin Sundqvist wrote:
Malin Sundqvist wrote:
Det hänvisas till ett diagram A1 - men jag kan inte hitta något diagram. Vänligen skicka det till mig tack Med vänlig hälsning, Malin
26.10.2023 - 06:32DROPS Design answered:
Hej Malin. Du hittar diagrammet längst ner på mönstret, till höger om måttskissen. Mvh DROPS Design
26.10.2023 - 13:32
![]() Mina wrote:
Mina wrote:
The pattern does look like pinecone scales with this lovely yarn color as Vinksvinks suggested in her comment if my translator is right. "Pinecone glow" would be my suggestion.
07.08.2023 - 12:30
![]() Vinksvinks wrote:
Vinksvinks wrote:
Huurteiset helmet
05.08.2023 - 05:42
![]() Sandra Darlene Gray wrote:
Sandra Darlene Gray wrote:
Pebbles
03.08.2023 - 19:09
|
|||||||
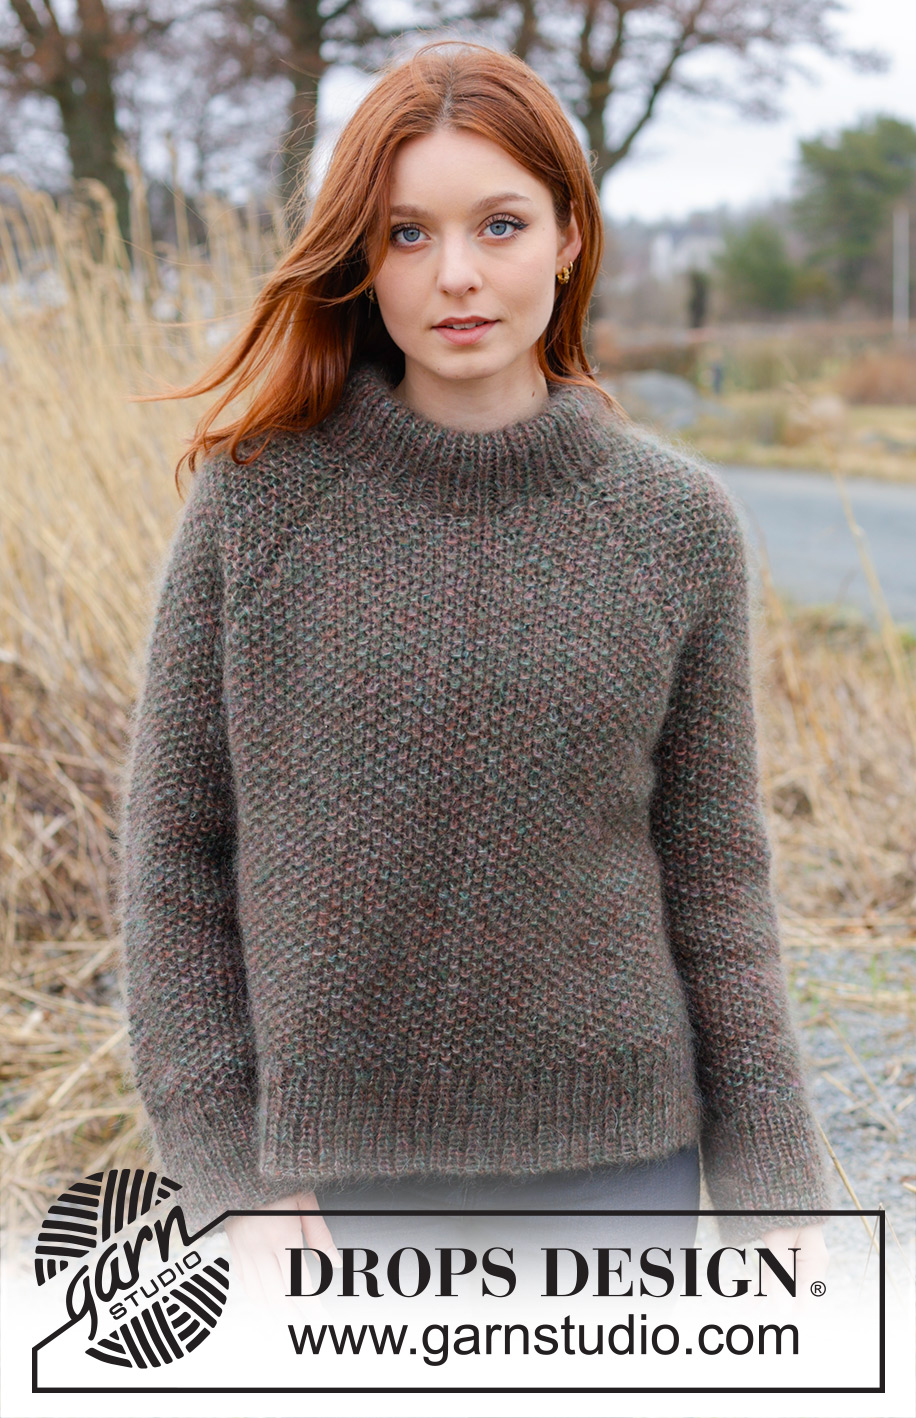
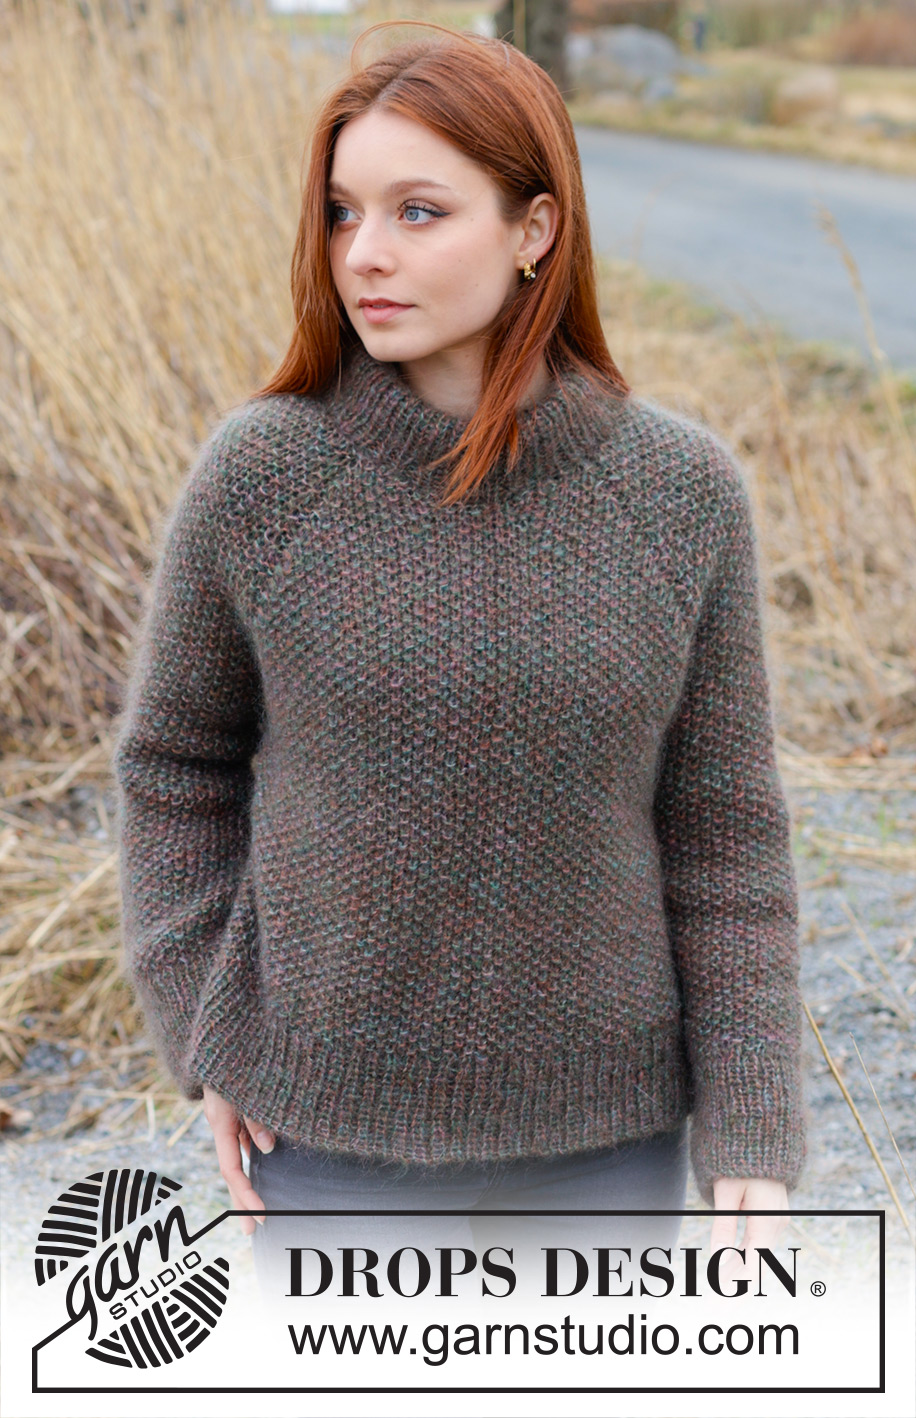
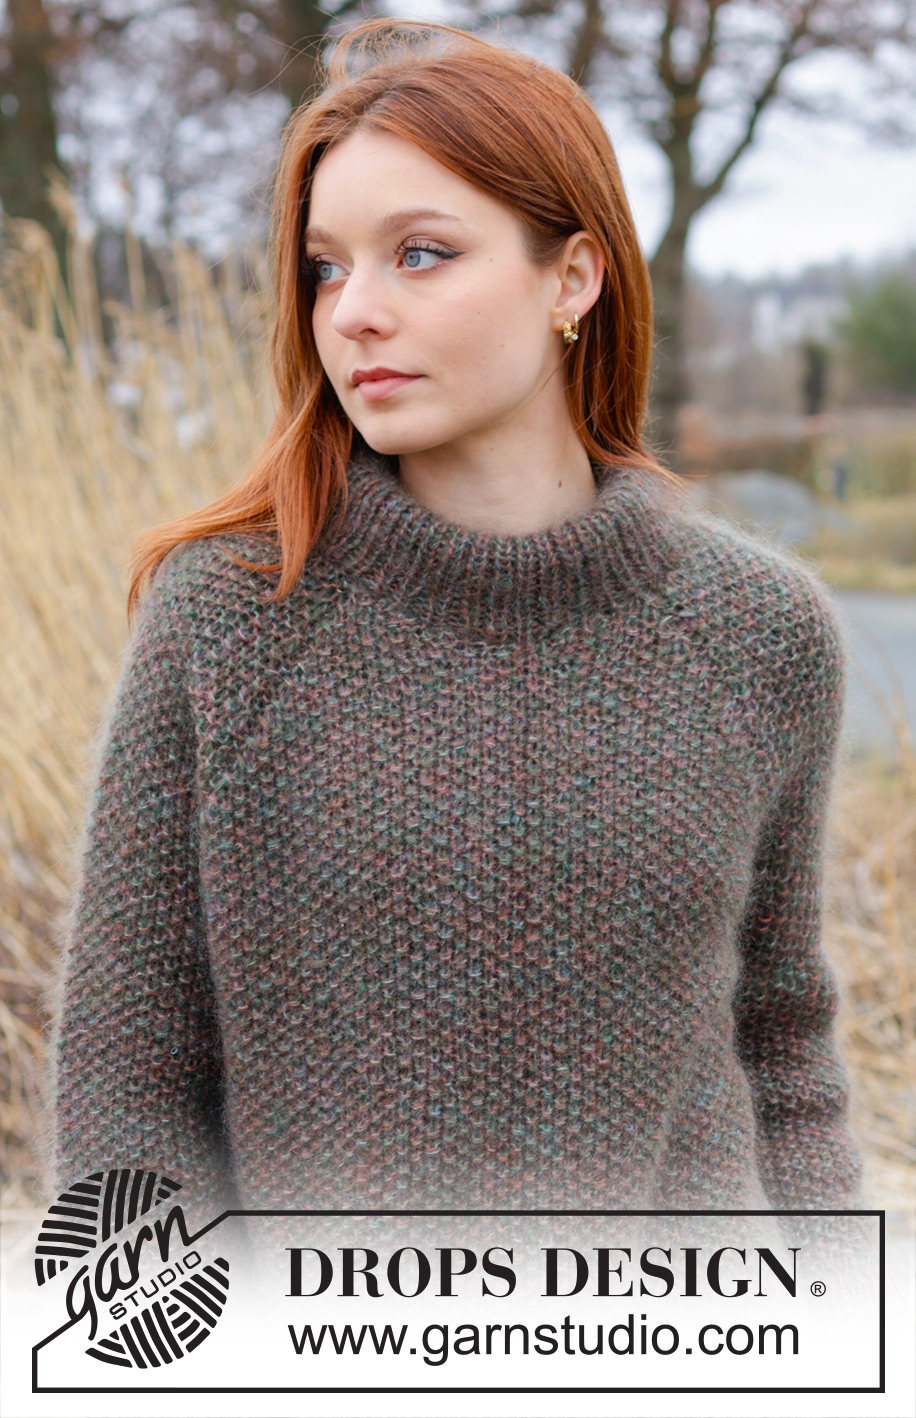
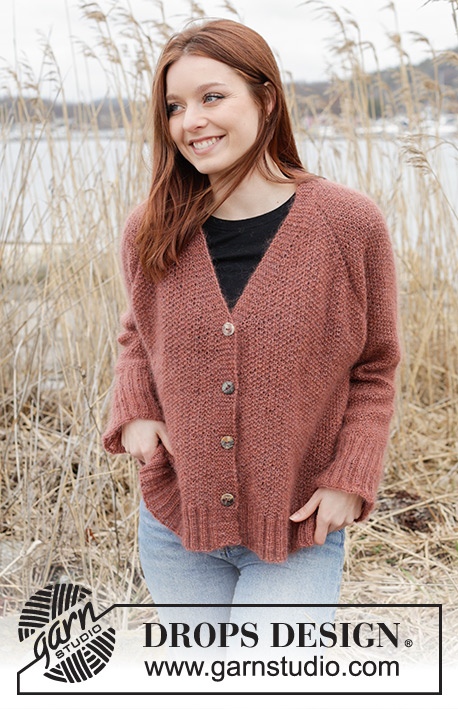
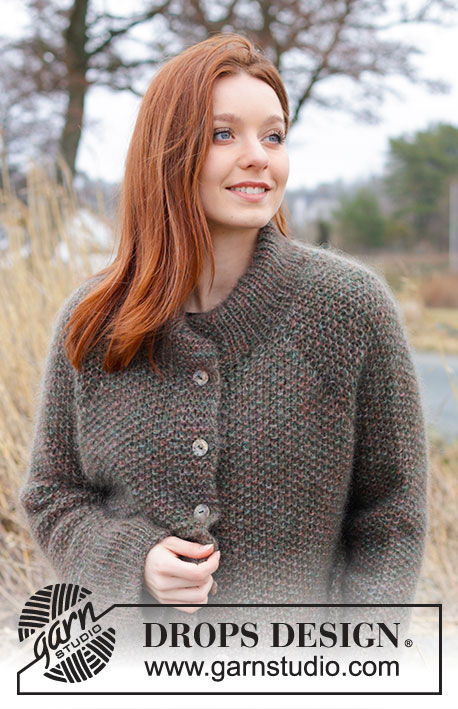
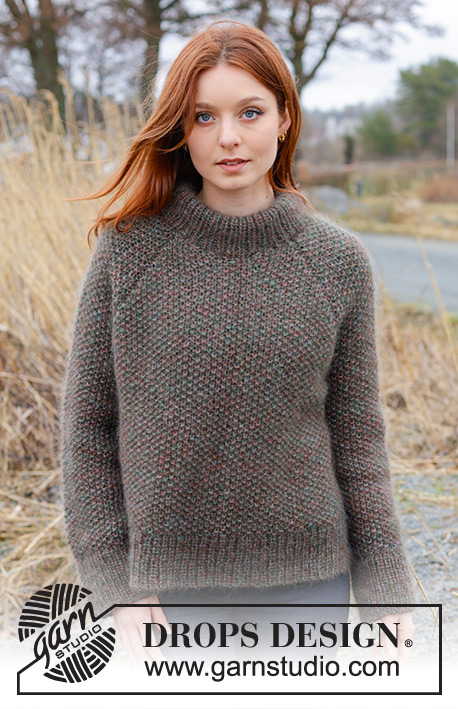
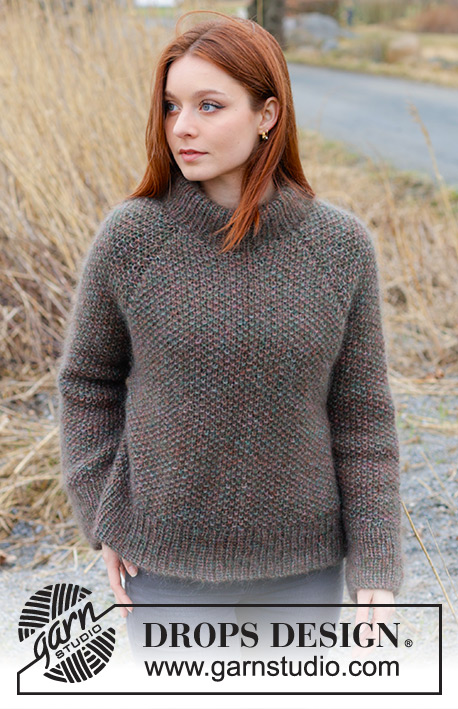
Forest Trails Sweater#foresttrailssweater |
|||||||
 |
 |
||||||
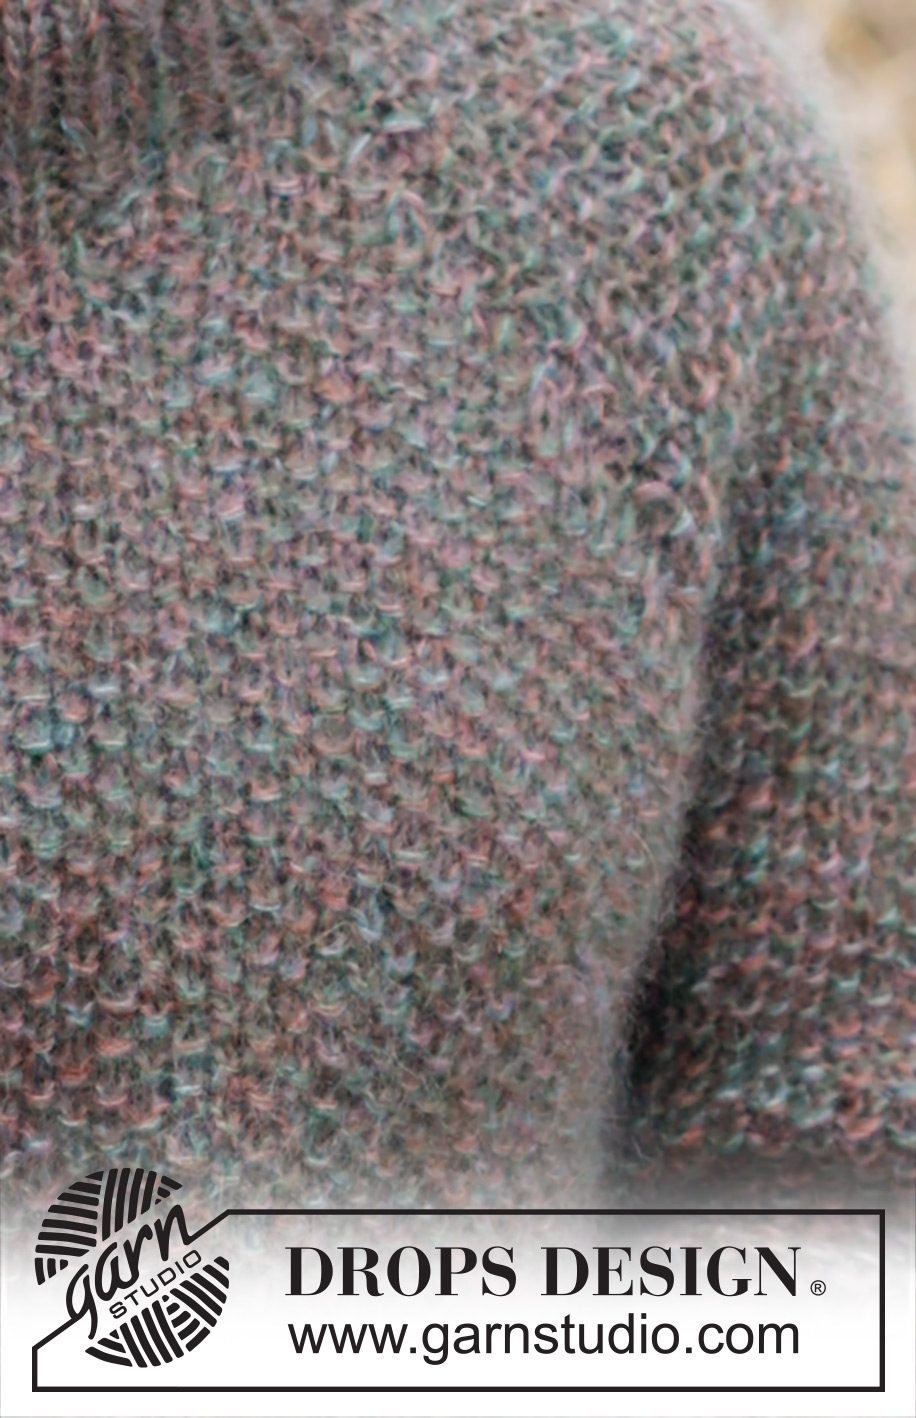
Knitted jumper in 4 strands DROPS Kid-Silk. The piece is worked top down with moss stitch, double neck, raglan and split in sides. Sizes S - XXXL.
DROPS 244-4 |
|||||||
|
------------------------------------------------------- EXPLANATIONS FOR THE PATTERN: ------------------------------------------------------- GARTER STITCH (worked back and forth): Knit all rows. 1 ridge = knit 2 rows. PATTERN: See diagram A.1. The diagram shows all rows in the pattern from the right side. RAGLAN: All increases are worked from the right side! Increase 1 stitch before/after the 4 marker-stitches – hereafter called raglan-stitches. The raglan-stitches are purled from the right side/knitted from the wrong side. Increase 1 stitch by making 1 yarn over, which is then worked into A.1. The yarn overs are worked as follows from the wrong side: BEFORE raglan-stitch: Purl the yarn over twisted if the last stitch before the yarn over was knitted, or knit the yarn over twisted if the last stitch before the yarn over should was purled, there should be no hole. AFTER raglan-stitch: Slip the yarn over knit-wise, insert the left needle in the yarn over and place it back on the left needle (twisted), purl the yarn over if the next stitch is to be knitted or knit the yarn over if the next stitch is to be purled, there should be no hole. The yarn overs are worked as follows from the right side: BEFORE raglan-stitch: Slip the yarn over knit-wise, insert the left needle in the yarn over and place it back on the left needle (twisted), knit yarn over if the last stitch before yarn over was purled, or purl the yarn over if the last stitch before yarn over was knitted, there should be no hole. AFTER raglan-stitch: Knit the yarn over twisted if the next stitch is to be purled, or purl the yarn over twisted if the next stitch is to be knitted, there should be no hole. INCREASE TIP (evenly spaced): Increase 1 stitch by making 1 yarn over. On the next row/round work the yarn over twisted to avoid a hole. DECREASE TIP (mid-under sleeve): Decrease 1 stitch alternately before and after the marker-stitch by knitting/purling 2 together, depending on the pattern. ------------------------------------------------------- START THE PIECE HERE: ------------------------------------------------------- JUMPER – SHORT OVERVIEW OF THE PIECE: The neck is worked in the round with circular needle, from mid back and top down. Then a neckline is worked with short rows. The yoke is continued in the round from mid back before being divided for body and sleeves. The body is continued in the round with circular needle. The sleeves are worked in the round with short circular needle/double pointed needles. The neck is folded double and sewn down to finish. DOUBLE NECK: Cast on 68-68-72-80-80-84 stitches with short circular needle size 7 mm and 1 strand of DROPS Kid-Silk in each colour (4 strands). Change to needle size 5.5 mm and work rib (knit 1, purl 1) for 11-11-11-13-13-13 cm. Insert 4 markers without working the stitches. NOTE: Each marker is inserted in a purled stitch – hereafter called raglan-stitches. Count 7-7-9-9-9-11 stitches (approx. half back piece), insert marker-1 in the next stitch, count 17-17-15-19-19-17 stitches (sleeve), insert marker-2 in the next stitch, count 15-15-19-19-19-23 stitches (front piece), insert marker-3 in the next stitch, count 17-17-15-19-19-17 stitches (sleeve), insert marker-4 in the next stitch. There are 8-8-10-10-10-12 stitches left after the last marker (approx. half back piece). Knit 1 round and decrease 4-4-0-4-4-0 stitches as follows: Knit to past marker-1, decrease 2-2-0-2-2-0 stitches evenly between markers 1 and 2 (do not decrease the raglan-stitches), knit to past marker-3, decrease 2-2-0-2-2-0 stitches evenly between markers 3 and 4, knit to end of round = 64-64-72-76-76-84 stitches. There are 15-15-15-17-17-17 stitches between markers 1 and 2 and between markers 3 and 4 (sleeves) and 15-15-19-19-19-23 stitches between markers 2 and 3 (front piece) and markers 4 and 1. Cut the strand. NECKLINE: Change to circular needle size 7 mm and work a neckline with short rows AT THE SAME TIME as you increase for raglan as described below. REMEMBER THE KNITTING TENSION. ROW 1 (right side): Start 2 stitches before raglan-stitch 3 (front left of neck when the garment is worn). Work A.1, (remember each raglan-stitch is purled from the right side/knitted from the wrong side) and increase for RAGLAN on each side of all 4 raglan-stitches – read description above, to 2 stitches past raglan-stitch 2 (front right of neck = 8 stitches increased). Turn, tighten the strand. ROW 2 (wrong side): Work A.1 (yarn overs worked as described under Raglan), to 2 stitches past the previous turn by raglan-stitch 3. Turn, tighten the strand. ROW 3 (right side): Work A.1 and increase for raglan on each side of all 4 raglan-stitches, to 2 stitches past the previous turn by raglan-stitch 2 (8 stitches increased). Turn, tighten the strand. ROW 4 (wrong side): Work A.1 to 2 stitches past the previous turn by raglan-stitch 3. Turn, tighten the strand. ROW 5 (right side): Work A.1 and increase for raglan on each side of all 4 raglan-stitches, to 2 stitches past the previous turn by raglan-stitch 2 (8 stitches increased). Turn, tighten the strand. ROW 6 (wrong side): Work A.1 to 2 stitches past the previous turn by raglan-stitch 3. Cut the strand. The short rows are finished and you have increased 3 times for raglan on each side of all 4 raglan-stitches = 88-88-96-100-100-108 stitches. YOKE: Start mid-back and continue A.1 in the round (raglan-stitches purled on every round). AT THE SAME TIME, continue increasing for raglan as follows: Increase every 2nd round but every other increase is only on the front/back pieces, i.e., increase on the front/back pieces every 2nd round and on the sleeves every 4th round (alternately 4 and 8 increased stitches). Increase like this 12-14-18-18-20-20 times on the front/back pieces and 6-7-9-9-10-10 times on the sleeves = 160-172-204-208-220-228 stitches. The sleeve increases are finished. Continue increasing on the front/back pieces 3-4-0-1-2-3 more times = 172-188-204-212-228-240 stitches. All increases are now finished. Continue working until the yoke measures 19-21-22-22-25-26 cm, measured after the neck mid-back. Divide for the body and sleeves as follows: Work the first 26-29-31-32-35-38 stitches as before (half back piece), place the next 33-35-39-41-43-43 stitches on 1 thread for the sleeve, cast on 7-7-7-9-11-13 stitches (in side under sleeve), work 53-59-63-65-71-77 stitches (front piece), place the next 33-35-39-41-43-43 stitches on 1 thread for the sleeve, cast on 7-7-7-9-11-13 stitches (in side under sleeve), work the last 27-30-32-33-36-39 stitches (half back piece). The body and sleeves are finished separately. The piece is now measured from here! BODY: = 120-132-140-148-164-180 stitches. Insert 1 marker in the middle of the 7-7-7-9-11-13 stitches cast on under each sleeve. Allow them to follow your work onwards; they are used when dividing for the split in each side. Continue A.1 in the round over all stitches for a further 21-21-22-23-22-23 cm. Divide the piece at both markers and finish each piece separately. One marker-stitch belongs to the front piece the other to the back piece. BACK PIECE: = 60-66-70-74-82-90 stitches. Knit 1 row from the right side and increase 17-19-19-23-23-25 stitches evenly spaced – read INCREASE TIP = 77-85-89-97-105-115 stitches. Change to needle size 5.5 mm. Work as follows from the wrong side: 1 stitch in GARTER STITCH – see explanation above, * purl 1, knit 1 *, work from *-* until there are 2 stitches left, purl 1 and 1 garter stitch. Continue this rib for 8 cm. Cast off. You can use Italian casting-off if you wish – see video under Tips and Help on our web page. FRONT PIECE: = 60-66-70-74-82-90 stitches. Work in the same way as the back piece. SLEEVES: Place the 33-35-39-41-43-43 stitches from the thread on the one side of the piece on short circular needle/double pointed needles size 7 mm and knit up 1 stitch in each of the 7-7-7-9-11-13 new stitches cast on under the sleeve = 40-42-46-50-54-56 stitches. Insert a marker-thread in the middle of the new stitches under the sleeve. Start at the thread and continue A.1 in the round over all stitches. When the sleeve measures 4-4-4-4-3-3 cm from division, decrease 1 stitch before the marker-thread – read DECREASE TIP. When the sleeve measures 12-12-8-7-5-5 cm from division, decrease 1 stitch after the marker-thread – remember DECREASE TIP. Decrease alternately before and after the marker-thread every 8-8-4-3-2-2 cm a total of 4-4-8-10-14-14 times (2-2-4-5-7-7 times before and 2-2-4-5-7-7 times after the marker-thread) = 36-38-38-40-40-42 stitches. Continue working until the sleeve measures 37-36-35-35-33-33 cm from the division. Knit 1 round and increase 14-14-16-16-18-18 stitches evenly spaced = 50-52-54-56-58-60 stitches. Change to double pointed needles size 5.5 mm and work rib (knit 1, purl 1) for 10 cm. Cast off. You can use Italian casting-off if you wish. The sleeve measures approx. 47-46-45-45-43-43 cm from the division. Work the other sleeve in the same way. ASSEMBLY: Fold the neck double to the inside and sew down. To avoid the neck being tight and rolling outwards, it is important that the seam is elastic. |
|||||||
Diagram explanations |
|||||||
|
|||||||
 |
|||||||
 |
|||||||
Have you finished this pattern?Tag your pictures with #dropspattern #foresttrailssweater or submit them to the #dropsfan gallery. Do you need help with this pattern?You'll find 31 tutorial videos, a Comments/Questions area and more by visiting the pattern on garnstudio.com. © 1982-2026 DROPS Design A/S. We reserve all rights. This document, including all its sub-sections, has copyrights. Read more about what you can do with our patterns at the bottom of each pattern on our site. |
|||||||


With over 40 years in knitting and crochet design, DROPS Design offers one of the most extensive collections of free patterns on the internet - translated to 17 languages. As of today we count 324 catalogues and 12290 patterns translated into English (UK/cm). 12290
We work hard to bring you the best knitting and crochet have to offer, inspiration and advice as well as great quality yarns at incredible prices! Would you like to use our patterns for other than personal use? You can read what you are allowed to do in the Copyright text at the bottom of all our patterns. Happy crafting!
Post a comment to pattern DROPS 244-4
We would love to hear what you have to say about this pattern!
If you want to leave a question, please make sure you select the correct category in the form below, to speed up the answering process. Required fields are marked *.