
Popular categories
Looking for a yarn?


Comments / Questions (57)
![]() Clain Michel Et Josiane wrote:
Clain Michel Et Josiane wrote:
Bonsoir , je ne comprend pas *= 1 motif à répéter en hauteur ???????????????? comment faire merci
09.09.2024 - 20:47
![]() Birgit wrote:
Birgit wrote:
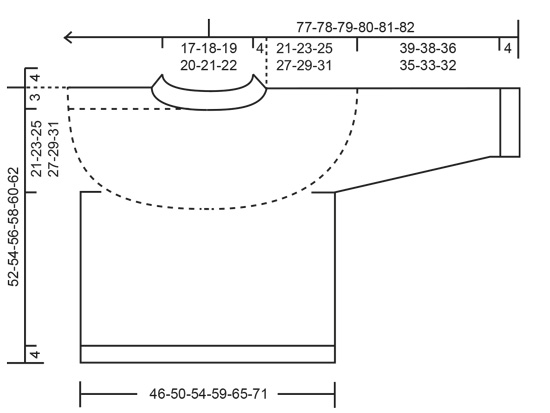
Jeg kan ikke få A3 til at passe. Strikker XXL. Dvs jeg skal have 6 rækker med knuder, men når jeg skal tage 24 masker ud efter 3 rækker knuder, passer det jo ikke længere med 5 masker imellem knuderne. Håber I lige kan forklare hvordan det skal gøres. Vh Birgit
02.09.2024 - 18:50DROPS Design answered:
Hej Birgit, når du har taget 24 masker ud har du 520 masker 520/8=65 dvs du skal strikke de 8 masker i diagrammet 65 gange rundt på pinden :)
06.09.2024 - 09:44
![]() Abonyi Krisztina wrote:
Abonyi Krisztina wrote:
Rossz a fordítás a jelmagyarazatban a 8 jelnél
25.07.2024 - 21:47
![]() Eva Horáková wrote:
Eva Horáková wrote:
Dobrý den, není mi jasné upletení uzlíku: když spletu tři oka obrace, vznikne jedno oko, a pak už není co znovu dvakrát splétat. Svetr je moc hezký, ráda bych ho zkusila, ale s uzlíkem si nevím rady. Děkuji a zdravím.
24.07.2024 - 14:11DROPS Design answered:
Dobrý den Evo, máme pro vás názorné video, jak takový uzlík uplést, podívejte se. Ať se vám daří!
24.07.2024 - 15:03
![]() Louise Møller wrote:
Louise Møller wrote:
Jeg vil rigtig gerne se hvad de forskellige størrelser måler, nogle gange er jeg en M, nogle gange en L eller XL. Og hvor meget positive ease er der på opskriften?? Synes ikke jeg kan finde det. 😊
13.07.2024 - 08:44DROPS Design answered:
Hej Louise. Du finner hvad de forskellige størrelser måler länsgt ned på oppskriften. Mvh DROPS Design
17.07.2024 - 13:19
![]() Mylène wrote:
Mylène wrote:
SOS J'avais fini ce magnifique pull mais il a été passé par erreur à la machine : il a rétréci et la laine a feutré. J'ai essayé de le récupérer en le faisant tremper une journée et une nuit dans de l'eau avec de l'après-shampooing puis une journée et une nuit dans de l'eau avec de la glycérine (180 ml pour environ 5 litres d'eau) mais cela n'a pas fonctionné... L'ai-je fait tremper trop ou pas assez longtemps ? Avez-vous une solution miracle ? D'avance merci.
24.05.2024 - 13:49DROPS Design answered:
Bonjour Mylène, nous ne connaissons malheureusement pas d'astuce pour défeutrer, contactez votre magasin (même par mail ou téléphone), ils auront peut être une astuce que nous n'avons pas.
24.05.2024 - 15:53
![]() Martine Tomasi wrote:
Martine Tomasi wrote:
Bonjour, comment faire pour que les motifs ne soient pas décalés au moment du changement de rang (en plein milieu du dos)? Merci d'avance
01.05.2024 - 12:19DROPS Design answered:
Bonjour Mme Tomasi, vous aurez automatiquement un décalage plus ou moins visible en fonction du point fantaisie; vous pouvez essayez de resserrer le fil juste au début du tour/à la fin du tour pour rapprocher la 1ère et la dernière maille, cette technique fonctionne bien pour certains points. Bon tricot!
02.05.2024 - 07:52
![]() Hanne Vinther wrote:
Hanne Vinther wrote:
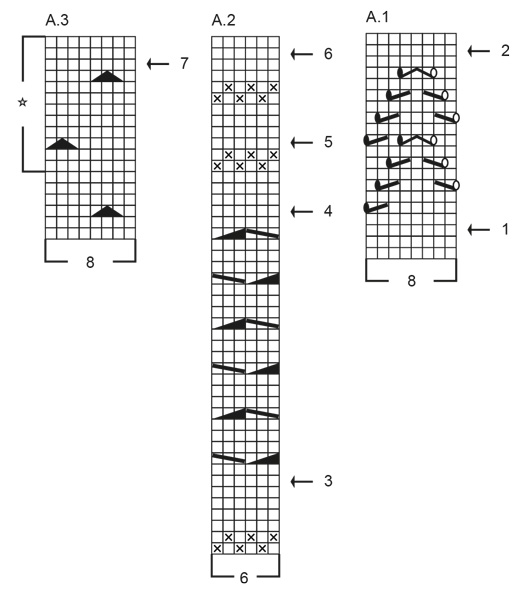
Opskrift 236-2 størrelse XXL Mønster A3 strikkes 3 masker sammen. Skulle der ikķe laves et omslag før og efter? Ellers tages 62 masker ind på en omgang. Der skal ikke tages 14 masker ud før ribkant på ærme. Tværtimod skal man tage 10 masker ind, ellers bliver kanten alt for vid. Mvh Hanne
01.01.2024 - 16:35
![]() Beverly Schuman wrote:
Beverly Schuman wrote:
Thank you for your timely response. I see in my original question that I said Pattern 263-1 in error. I am working on Pattern 263-2. Regarding Diagram A.1, Row 11, you explained it as: 2k, 1p, 3yhop = 1m, 1p, 1k and 2yhop = 1m, 1p. I have no idea what that means and need clarification, please. I am very sorry for referencing the wrong pattern number initially. I need help on Pattern 236-2, Diagram A.1, Row 11. I appreciate you assistance. Thank you
22.11.2023 - 17:09Bev Schuman answered:
Good Lord, I think I got it!!!! Was not reading the chart correctly but thanks to your help I believe I figured it out. If not, I'll be back. Very best regards.
22.11.2023 - 21:48
![]() Bev Schuman wrote:
Bev Schuman wrote:
Help please. Pattern 236-1, Diagram A.1, Row 11, I see your answer of:DROPS Design answered: Hi Susanne, you knit the 8 sts like this: 2k, 1p, 3yhop=1m, 1p, 1k, 2yhop=1m, 1p I am sorry, but I do not understand it. I have no idea what "3yhop or 2yhop means. Can you please help me understand how to proceed.? Thank you in advance.
22.11.2023 - 00:12DROPS Design answered:
Hi Bev, You knit 3, purl 1, make 1 yarn over (see diagram instructions on how to work the yarn over on the next round), slip 1 stitch knit-wise, knit 2 togetherand pass the slipped stitch over the knitted-together stitches, make 1 yarn over (see diagram instructions on how to work the yarn over on the next round as it is different from the previous yarn over), knit 1, knit 2 together and make 1 yarn over (see diagram instructions on how to work the yarn over on the next round). Hope this helps and happy knitting!
22.11.2023 - 06:33
|
|||||||||||||||||||||||||||||||||||||
Miss Summerbee Sweater#misssummerbeesweater |
|||||||||||||||||||||||||||||||||||||
 |
 |
||||||||||||||||||||||||||||||||||||
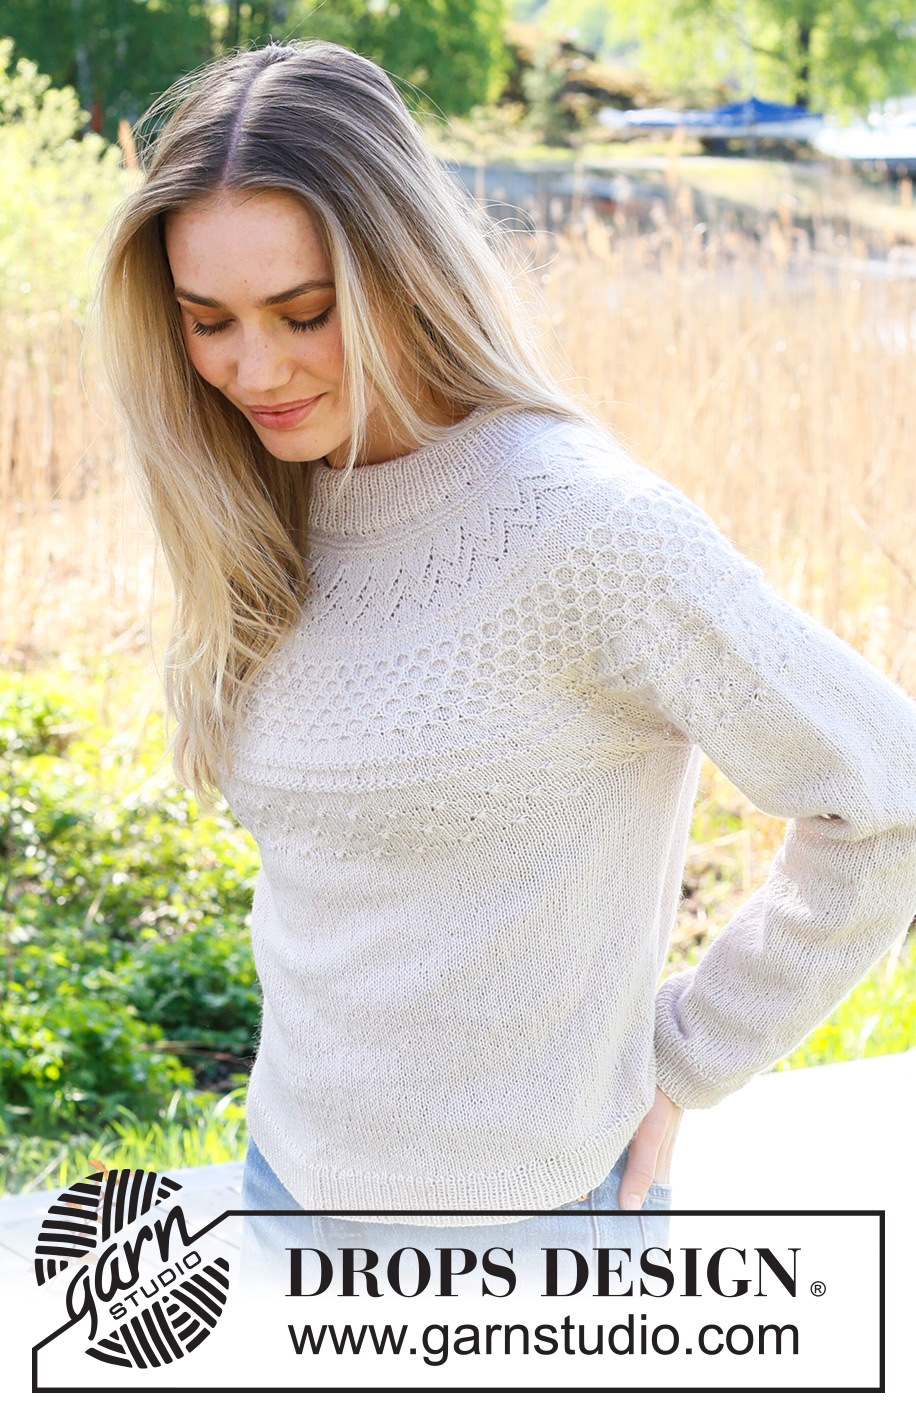
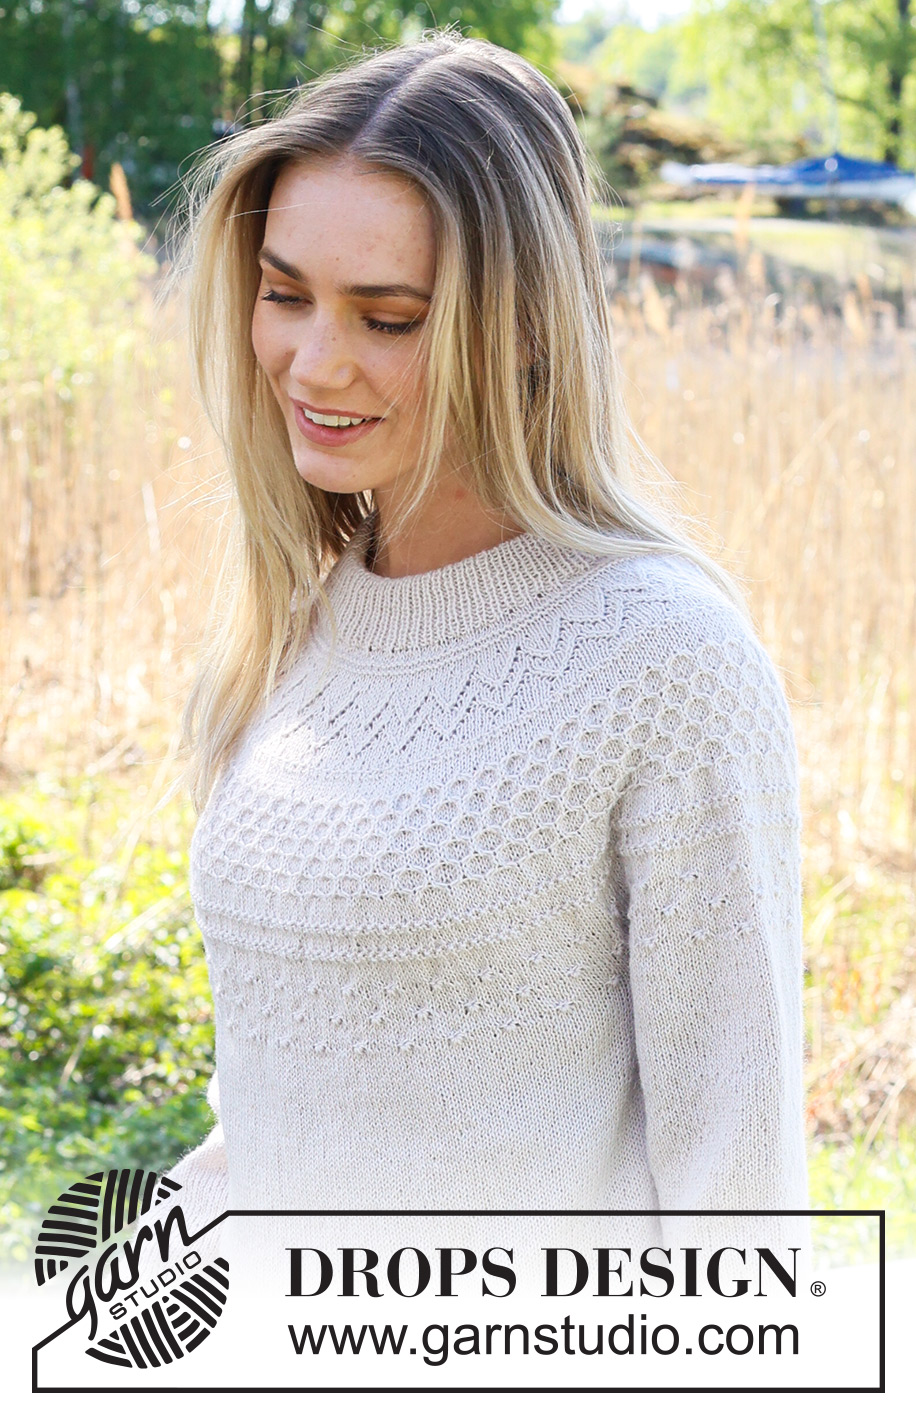
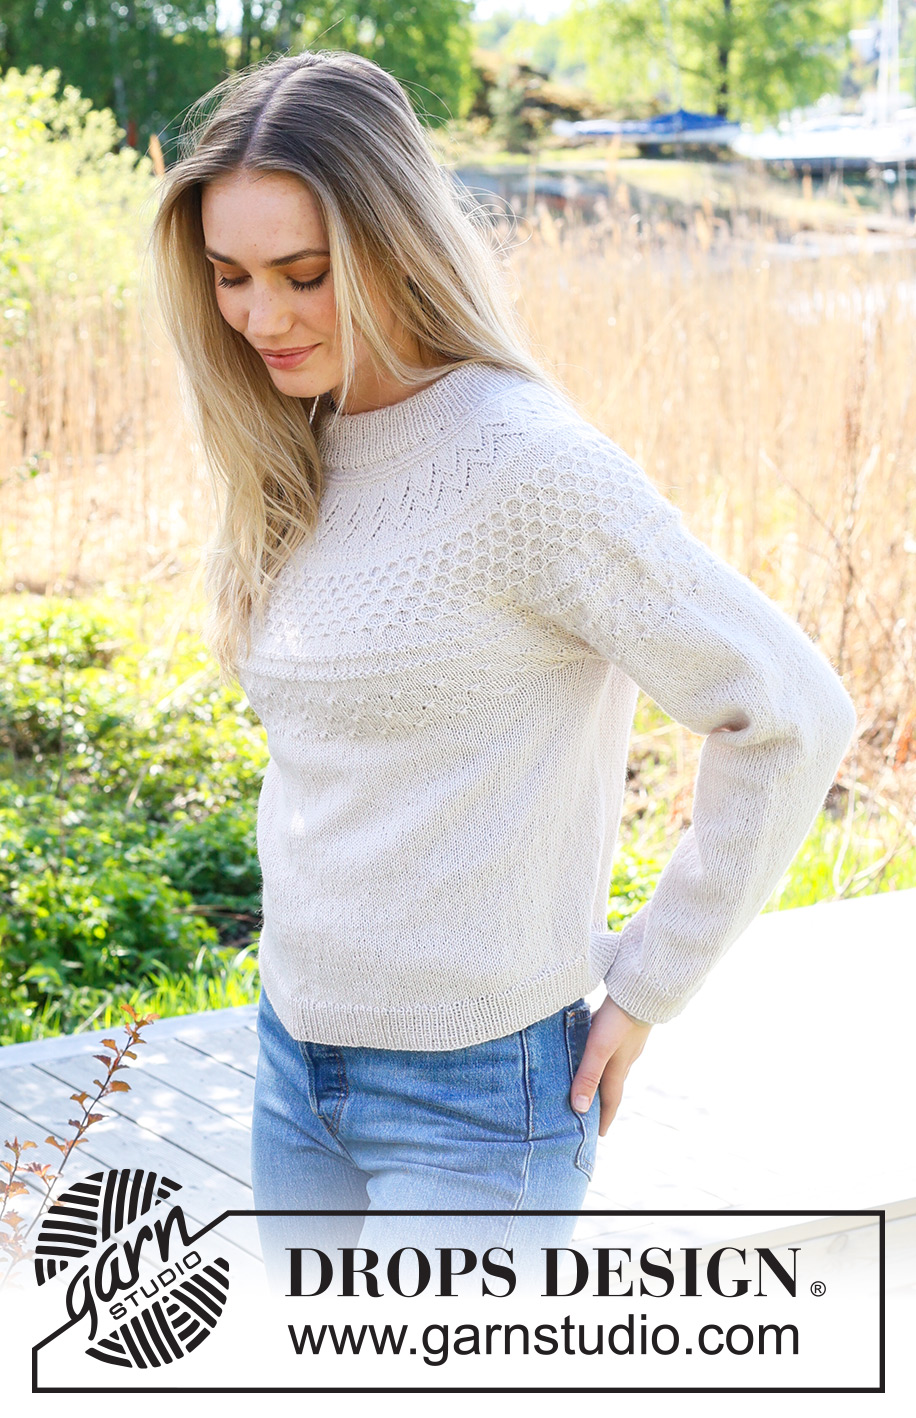
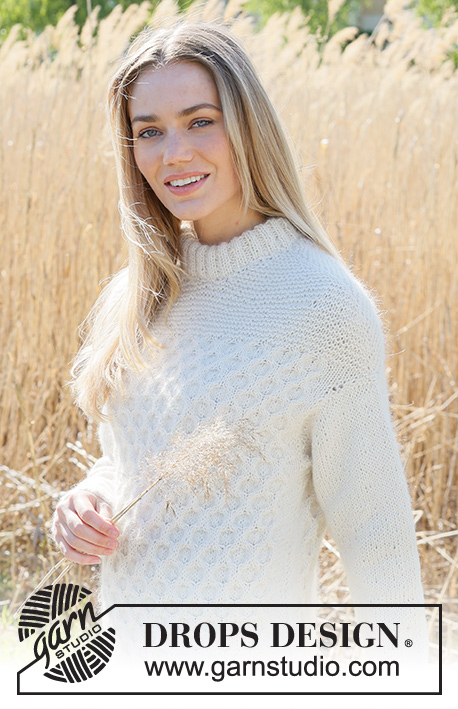
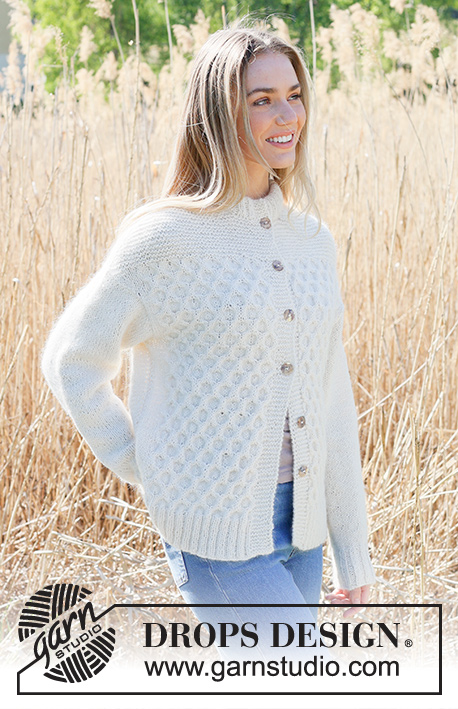
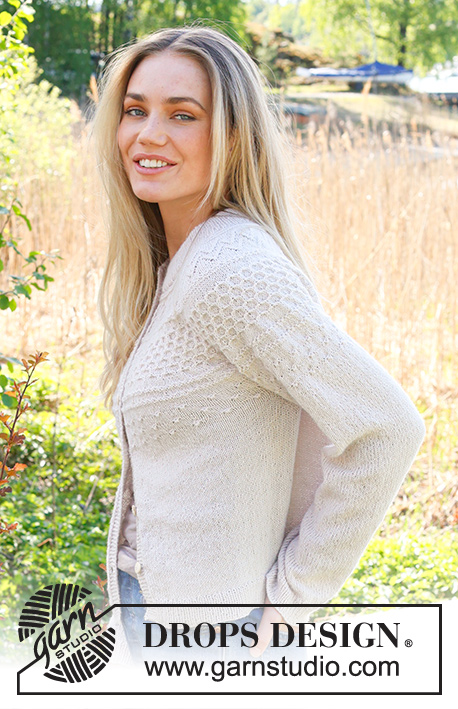
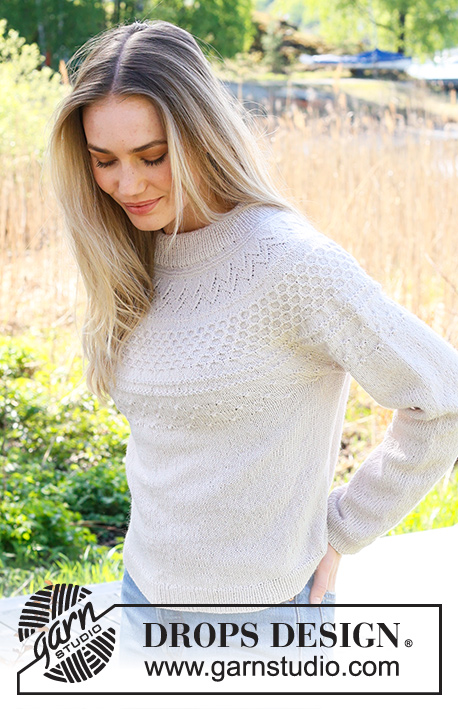
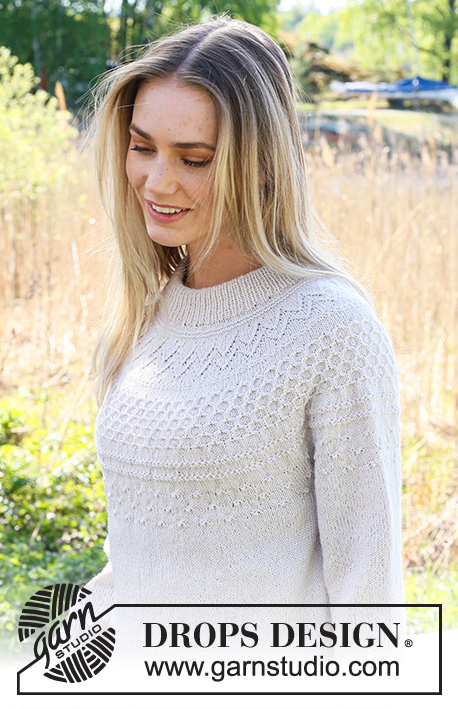
Knitted jumper in DROPS Flora. The piece is worked top down with double neck, round yoke and relief-pattern on the yoke. Sizes S - XXXL.
DROPS 236-2 |
|||||||||||||||||||||||||||||||||||||
|
------------------------------------------------------- EXPLANATIONS FOR THE PATTERN: ------------------------------------------------------- RIDGE/GARTER STITCH (worked in the round): 1 ridge in height = 2 rounds; Knit 1 round and purl 1 round. ELEVATION (back of neck): To make the back of the neck slightly higher when working the yoke, you can work an elevation as described here. Skip this section if you do not want an elevation. Insert 1 marker at the beginning of the round (mid-back). Start from the right side and knit 14-15-16-16-17-18 stitches past the marker, turn, tighten strand and purl 28-30-32-32-34-36 stitches back. Turn, tighten strand and knit 42-45-48-48-51-54 stitches, turn, tighten strand and purl 56-60-64-64-68-72 stitches back. Turn, tighten strand and knit 70-75-80-80-85-90 stitches, turn, tighten strand and purl 84-90-96-96-102-108 stitches back. Turn, tighten strand and knit 98-105-112-112-119-126 stitches, turn, tighten strand and purl 112-120-128-128-136-144 stitches back. Turn, tighten the strand and knit to mid-back. Then work YOKE as described in the text. PATTERN: See diagrams A.1 to A.3. INCREASE/DECREASE TIP (evenly spaced): To work out how to increase/decrease evenly, count the total number of stitches on needle (e.g. 120 stitches), and divide by the number of increases/decreases to be made (e.g. 32) = 3.8. In this example, increase by making 1 yarn over after approx. each 4th stitch. On the next row work the yarn overs twisted to avoid holes. When decreasing, knit together approx. each 3rd and 4th stitch. DECREASE TIP (for sleeves): Start 3 stitches before the marker, knit 2 together, knit 2 (marker sits between these 2 stitches), slip 1 stitch as if to knit, knit 1 and pass the slipped stitch over the knitted stitch. ------------------------------------------------------- START THE PIECE HERE: ------------------------------------------------------- JUMPER – SHORT OVERVIEW OF THE PIECE: The neck and yoke are worked in the round with circular needle, from mid back and top down. The yoke is divided for body and sleeves and the body is continued in the round. The sleeves are worked with short circular needle/double pointed needles. DOUBLE NECK: Cast on 120-124-130-136-140-146 stitches with DROPS Flora using 2 short circular needles size 2.5 mm and 3 mm held together. Remove the needle size 3 mm (doing this gives you an elastic cast-on edge) keeping the stitches on the needle size 2.5 mm. Work rib in the round (knit 1, purl 1) for 9 cm. Fold the neck double to the inside and work 1 more round of rib, working every 2nd stitch together with its corresponding stitch on the cast-on edge. You now have a double neck. Change to circular needle size 3 mm. Knit 1 round and increase 32-36-38-40-44-46 stitches evenly spaced - read INCREASE/DECREASE TIP = 152-160-168-176-184-192 stitches. Insert 1 marker in the middle of the round (mid-front) – this is used when measuring the yoke. You can now work an ELEVATION at the back – read description above. If you do not want an elevation go straight to YOKE. YOKE: Work 2-2-6-6-8-10 rounds of stocking stitch, then work 2 RIDGES over all stitches – read description above. REMEMBER THE KNITTING TENSION! Work A.1 in the round over all stitches, increasing as follows at each arrow: Arrow-1: Increase 40-40-48-56-64-64 stitches evenly spaced = 192-200-216-232-248-256 stitches. Arrow-2: Increase 48-52-60-68-64-74 stitches evenly spaced = 240-252-276-300-312-330 stitches. When A.1 is finished work A.2 over all stitches, increasing as follows at each arrow: Arrow-3: Increase 102-108-114-126-126-138 stitches evenly spaced = 342-360-390-426-438-468 stitches (you increase more stitches here as the pattern tightens the piece slightly). Arrow-4: Decrease 6-6-6-12-12-12 stitches evenly spaced – remember INCREASE/DECREASE TIP = 336-354-384-414-426-456 stitches. Arrow-5: Increase 24-30-30-30-36-42 stitches evenly spaced = 360-384-414-444-462-498 stitches. Arrow-6: Increase 16-24-26-28-34-38 stitches evenly spaced = 376-408-440-472-496-536 stitches. The increases are finished in sizes S, M and L. When A.2 is finished work A.3 over all stitches. Increase as follows at the arrow (applies only to XL, XXL and XXXL): Arrow-7 (XL, XXL and XXXL): Increase 16-24-24 stitches evenly spaced = 488-520-560 stitches. OVERVIEW OF THE NEXT SECTION: Continue with A.3 as described below. In addition the yoke is divided for the body and sleeves. Read PATTERN and DIVIDING FOR BODY AND SLEEVES before continuing. PATTERN: S and M: When A.3 is finished (a total of 3 rows of knots), continue with stocking stitch. NOTE: The yoke is divided for the body and sleeves before A.3 is finished. L: When A.3 is finished, work the first 6 rounds in the repeat marked with a star (a total of 4 rows of knots), then continue with stocking stitch. NOTE: The yoke is divided for the body and sleeves before A.3 is finished. XL, XXL and XXXL: When A.3 is finished, work the repeat marked with a star until you have a total of 5-6-6 rows of knots, then continue with stocking stitch. NOTE: The yoke is divided for the body and sleeves before A.3 is finished. DIVIDING FOR BODY AND SLEEVES: When the yoke measures 21-23-25-27-29-31 cm from the marker, divide for the body and sleeves as follows: Work 56-61-65-72-79-86 stitches as before (½ back piece), place the next 76-82-90-100-102-108 stitches on a thread for the sleeve, cast on 8-8-10-10-12-12 stitches (in side under sleeve), work 112-122-130-144-158-172 stitches (front piece), place the next 76-82-90-100-102-108 stitches on a thread for the sleeve, cast on 8-8-10-10-12-12 stitches (in side under sleeve), work the last 56-61-65-72-79-86 stitches (½ back piece). The body and sleeves are finished separately. The piece is now measured from here! BODY: = 240-260-280-308-340-368 stitches. Finish A.3 as described above – NOTE: After the division, the pattern will not fit under the sleeves; work pattern as far as possible with the remaining stitches under the sleeve in stocking stitch (the pattern is continued neatly from the yoke on the front and back pieces). When A.3 is finished (a total of 3-3-4-5-6-6 rows of knots), continue with stocking stitch until the body measures 24 cm from the division. Knit 1 round and increase 48-52-56-62-68-74 stitches evenly spaced = 288-312-336-370-408-442 stitches. Change to circular needle size 2.5 mm and work rib (knit 1, purl 1) for 4 cm. Cast off a little loosely. The jumper measures approx. 52-54-56-58-60-62 cm from the shoulder down. SLEEVES: Place the 76-82-90-100-102-108 stitches from the thread on the one side of the piece on short circular needle/double pointed needles size 3 mm and knit up 1 stitch in each of the new stitches cast on under the sleeve = 84-90-100-110-114-120 stitches. Insert a marker in the middle of the new stitches under the sleeve. Finish A.3 in the round as described above. NOTE: After the division, the pattern will not fit under the sleeve; work pattern as far as possible and then the stitches under the sleeve in stocking stitch. When A.3 is finished continue with stocking stitch until the sleeve measures 4-4-4-2-3-2 cm from the division. Now decrease 2 stitches under the sleeve – read DECREASE TIP. Decrease like this every 4½-3½-2-2-1½-1½ cm a total of 8-10-14-17-18-20 times = 68-70-72-76-78-80 stitches. Continue working until the sleeve measures 39-38-36-35-33-32 cm from the division. There is 4 cm left to finished length; try the jumper on and work to desired length.. Knit 1 round where you increase 12-14-14-14-14-16 stitches evenly spaced = 80-84-86-90-92-96 stitches. Change to double pointed needles size 2.5 mm and work rib (knit 1, purl 1) for 4 cm. Cast off a little loosely. The sleeve measures approx. 43-42-40-39-37-36 cm from the division. Work the other sleeve in the same way. |
|||||||||||||||||||||||||||||||||||||
Diagram explanations |
|||||||||||||||||||||||||||||||||||||
|
|||||||||||||||||||||||||||||||||||||
 |
|||||||||||||||||||||||||||||||||||||
 |
|||||||||||||||||||||||||||||||||||||
Have you finished this pattern?Tag your pictures with #dropspattern #misssummerbeesweater or submit them to the #dropsfan gallery. Do you need help with this pattern?You'll find 31 tutorial videos, a Comments/Questions area and more by visiting the pattern on garnstudio.com. © 1982-2026 DROPS Design A/S. We reserve all rights. This document, including all its sub-sections, has copyrights. Read more about what you can do with our patterns at the bottom of each pattern on our site. |
|||||||||||||||||||||||||||||||||||||


With over 40 years in knitting and crochet design, DROPS Design offers one of the most extensive collections of free patterns on the internet - translated to 17 languages. As of today we count 324 catalogues and 12290 patterns translated into English (UK/cm). 12290
We work hard to bring you the best knitting and crochet have to offer, inspiration and advice as well as great quality yarns at incredible prices! Would you like to use our patterns for other than personal use? You can read what you are allowed to do in the Copyright text at the bottom of all our patterns. Happy crafting!
Post a comment to pattern DROPS 236-2
We would love to hear what you have to say about this pattern!
If you want to leave a question, please make sure you select the correct category in the form below, to speed up the answering process. Required fields are marked *.