
Popular categories
Looking for a yarn?


Comments / Questions (12)
![]() Sofia Broborg wrote:
Sofia Broborg wrote:
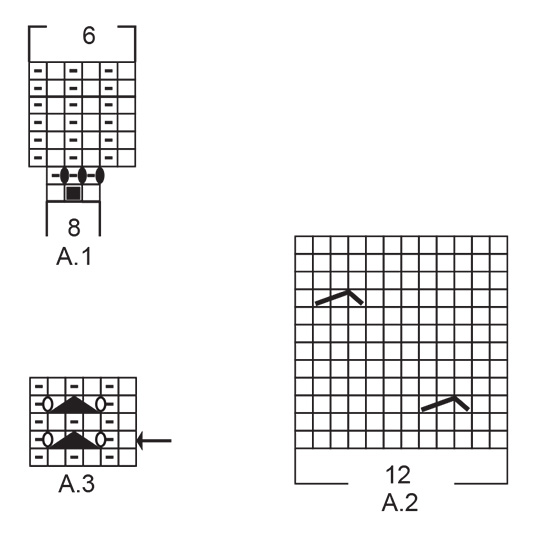
I beskrivningen för ÄRM står att man ska "Sticka resår (= 1 rätmaska, 1 avigmaska) runt i 4½ cm. Nu stickas det från varvet med pil i A.2 runt på varvet. När A.2 är färdigt, stickas det resår till resåren mäter totalt 10 cm." MEN i A2 finns ingen pil, bara vid A3, och på bilder ser det mer ut som att det är diagram A3 som ska användas - fel i beskrivningen? Det står på samma sätt i svensk, dansk, norsk, engelsk och tysk beskrivning, kanske övriga språk oxå.
07.05.2025 - 17:17DROPS Design answered:
Hei Sofia. Ja, du har rett. Det skal være A.3. Feilen er/blir rettet opp asap. Takk for at du gjorde oss oppmerksom på dette. mvh DROPS Design
12.05.2025 - 11:43
![]() Eveline wrote:
Eveline wrote:
Hallo, in de beschrijving van de mouw, bij de boordsteek staat dat je vanaf de pijl A2 moet breien. Maar moet dit niet A3 zijn? Om gaatjes te breien? Hartelijk dank voor je reactie.
23.03.2025 - 08:25DROPS Design answered:
Dag Eveline,
Ja, dit staat er inderdaad verkeerd, dit moet A.3 zijn.
30.03.2025 - 20:14
![]() Isabella wrote:
Isabella wrote:
Buongiorno, quando faccio 27 punti per il ferro accorciato devo tornare indietro, ma gli aumenti per la manica a sella come faccio a farli se torno indietro
10.03.2025 - 10:28
![]() Cornelia Kirchner wrote:
Cornelia Kirchner wrote:
Hallo, irgendwie fehlt die Information, wann und wie nach den Noppen (3 Maschen zusammengestrickt) entsprechend 2 Maschen wieder zugenommen werden, denn die Gesamtanzahl der Maschen soll doch gleich bleiben???
06.02.2025 - 18:19DROPS Design answered:
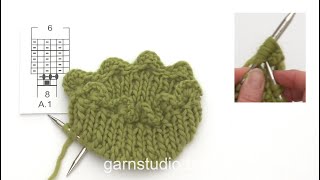
Liebe Frau Kirchner, diese 3 Maschen werden 3 Mal zusammengestrickt, so sind es immer noch 3 Maschen - in diesem Video, können Sie mal sehen, wie man diese Noppen in A.2 strickt. Viel Spaß beim Stricken!
07.02.2025 - 08:19
![]() Chris wrote:
Chris wrote:
Je ne comprends pas les rangs raccourcis. On commence au milieu du dos , on va jusqu'à 29m avant le marqueur et on trouve. On ne fait donc qu'une épaule, un demi devant et un demi dos. Quand fait'on l'autre côté ? C'est pas bien expliqué, pas très compréhensible Merci de m'éclairer
03.04.2024 - 22:27DROPS Design answered:
Bonjour Chris, au 1er rang vous tricotez juste la 1ère épaule - il reste 29 m avant le marqueur du milieu devant, tournez et tricotez le tour suivant sur l'envers jusqu'à ce qu'il reste 29 m avant le marqueur du milieu devant et tournez (vous avez laissé 29 m non tricotées de chaque côté du marqueur du milieu devant), et vous avez tricoté les rangs 1 et 2. Tricotez maintenant les rangs 3 et 4 de la même façon jusqu'à ce qu'il reste cette fois 26 m de chaque côté du marqueur du milieu devant (sur l'endroit et sur l'envers) et continuez ainsi en suivant le nombre de mailles indiqué. Terminez par 1 rang sur l'endroit jusqu'au milieu dos et continuez en rond. Bon tricot!
04.04.2024 - 08:30
![]() Sylviane Ruet wrote:
Sylviane Ruet wrote:
Comment faire les augmentations pour les manches marteau en même temps que les rangs raccourcis puisqu'on s'arrête avant le marqueur de l'épaule ? Une vidéo serait bienvenue... Merci
16.02.2024 - 19:35DROPS Design answered:
Bonjour Mme Ruet, tricotez les rangs raccourcis comme indiqué (le nombre de mailles indiqué pour chaque rang est celui qu'il doit rester non tricoté à la fin de chaque rang pour chacun d'eux), et, en même temps, augmentez avant/après la maille avec un marqueur (de chaque côté de la maille de l'épaule) tous les rangs (= sur l'endroit et sur l'envers), cf AUGMENTATIONS-2; lorsque vous aurez tricoté les 17 rangs raccourcis, vous aurez augmenté 16 fois (8 fois pour l'épaule droite et 8 fois pour l'épaule gauche), coupez le fil et reprenez au milieu dos pour continuer en rond. Bon tricot!
19.02.2024 - 07:41
![]() Arnault Jocelyne wrote:
Arnault Jocelyne wrote:
Je ne comprends pas comment commencer les rangs raccourcis en aller retour et EN MEME TEMPS les augmentations. Il y aura un "trou" milieu dos ? La vidéo pour les augmentations est parfaite, mais je ne comprends pas les aller retours.... Merci si vous avez des explications supplémentaires ou une vidéo. Cordialement
12.05.2023 - 09:57DROPS Design answered:
Bonjour Mme Arnault, les rangs raccourcis se tricotent en allers et retours car ce sont des rangs (autrement dit, on ne tricote pas en rond) tricotés alternativement sur l'endroit et sur l'envers: rang 1: sur l'endroit, rang 2 sur l'envers, rang 3 sur l'endroit et rang 4 sur l'envers et ainsi de suite. Vous tricoterez ensuite de nouveau en rond sur toutes les mailles quand le rang 17 est terminé. Bon tricot!
12.05.2023 - 11:24
![]() Cornelia wrote:
Cornelia wrote:
Ich verstehe leider A1 nicht. Wann sollen denn 6 Maschen zusammengestrickt werden?
27.03.2023 - 20:00DROPS Design answered:
Liebe Cornelia, bei der 1. Reihe in A.1 wird man so stricken: *1 M re, 6 M re zusammen, 1 M re*, und von *-* insgesamt 17 bis 20 Mal (siehe Größe) bzw die ganze Runde wiederholen. Bei der 2. Runde strickt man dann: *1 Umschlag, 1 M li, 1 Umschlag, 1 M li, 1 Umschlag, 1 M li*, von *-* wiederholen = es sind jetzt 6 M in jedem A.1 und insgesamt 102 bis 120 M übrig. Die letzten Reihen A.1 (1 M re, 1 M links) stricken. dieses Video zeigt, wie man das Diagram strickt. Viel Spaß beim stricken!
28.03.2023 - 09:58
![]() Nurse_Jitka wrote:
Nurse_Jitka wrote:
Nějak nestíhám...70 ok rukáv...ubereme 7x2 oka...máme 42ok? Asi OPRAVDU jsem blondýna a neumím počítat,ale ať se snažím jak se snažím,pod 56 ok se nedostanu...
12.01.2023 - 19:49DROPS Design answered:
Dobrý den, Jitko, blondýnka možná jste, ale blondýna určitě ne :-) U tohoto modelu je na rukávu fígl, který bohužel není z textu zcela zřejmý (opravíme!): na rukávu jsou 2 značky a ujímat je třeba 1 oko na obou stranách OBOU značek. Tedy v 1 kruh.řadě ujmeme 4 oka, nikoli (jak je obvyklé) 2. Pak už počty sedí. Díky za podnět k návodu a přeji mnoho zdaru při pletení, Hana
13.01.2023 - 12:18
![]() Myriam De Meyer wrote:
Myriam De Meyer wrote:
Bij beschrijving van de mouwen staat er vanaf de boorsteek: met een pijl in A.2 . Moet dit niet A.3 zijn?
06.09.2022 - 22:10
|
|||||||||||||||||||||||||
Open Windows#openwindowssweater |
|||||||||||||||||||||||||
 |
 |
||||||||||||||||||||||||
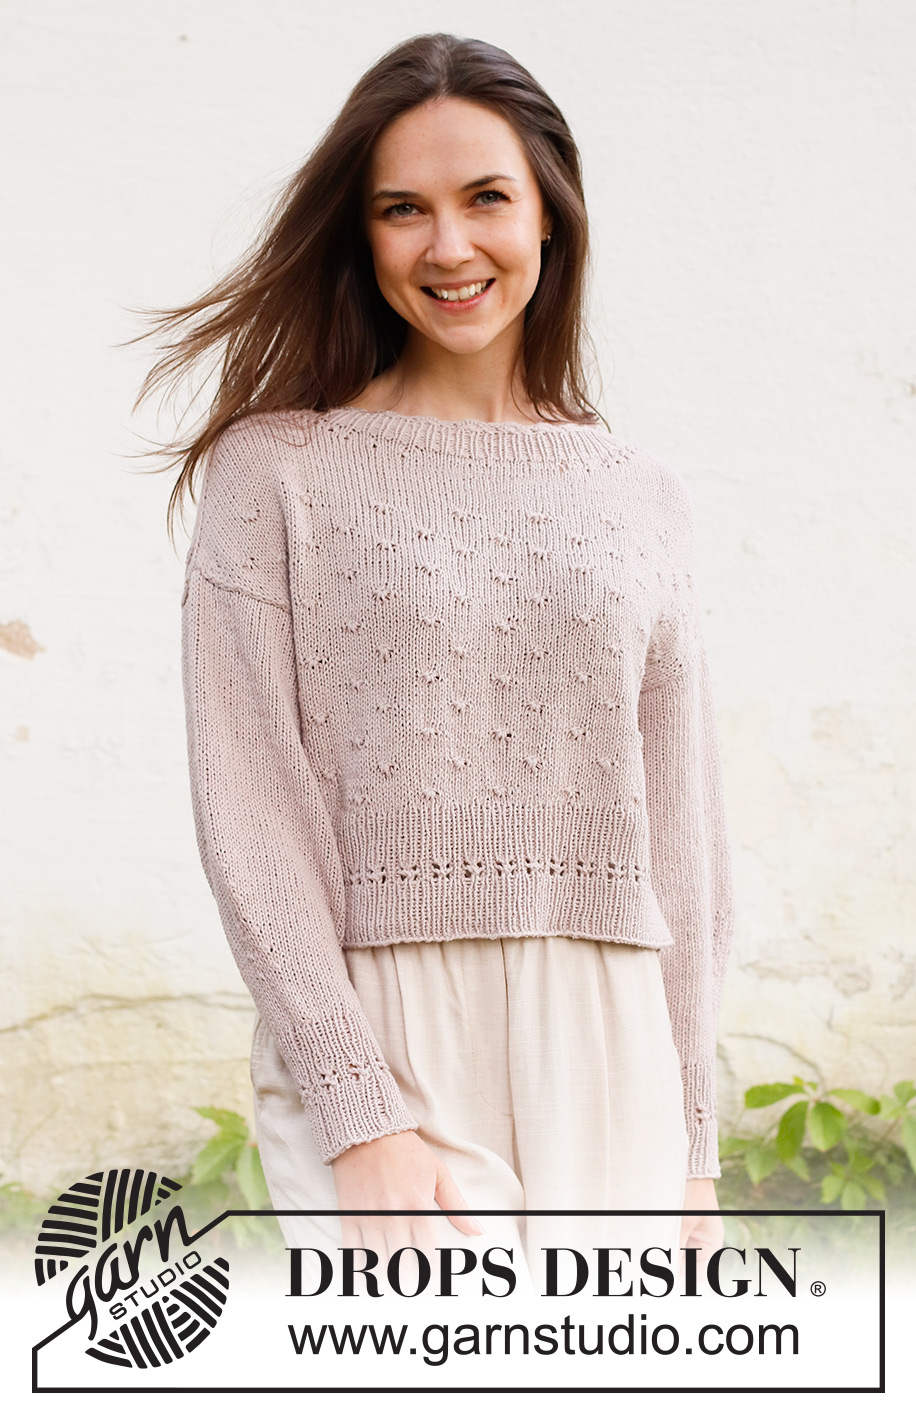
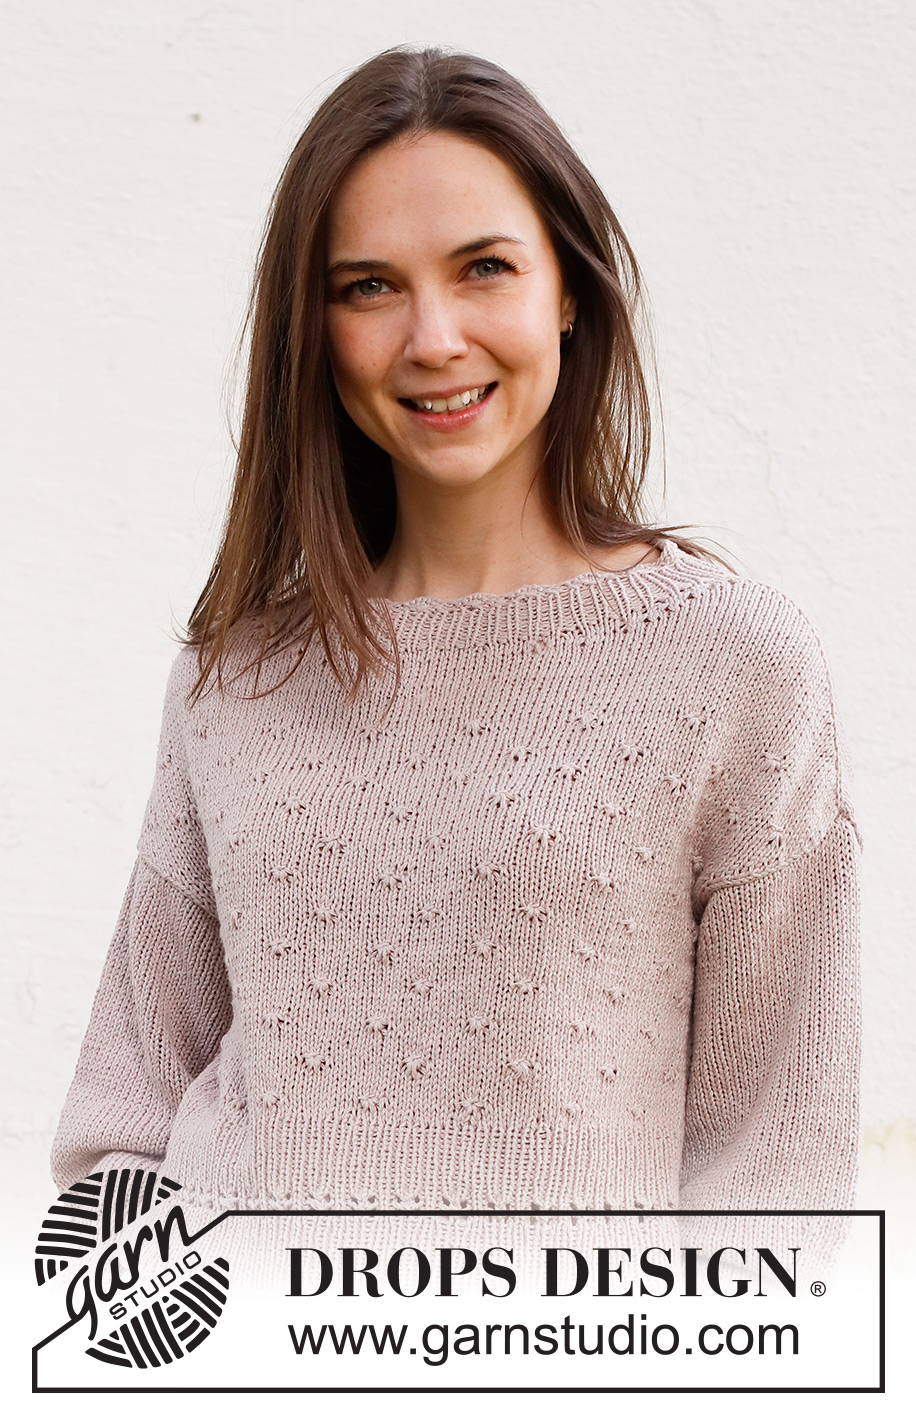
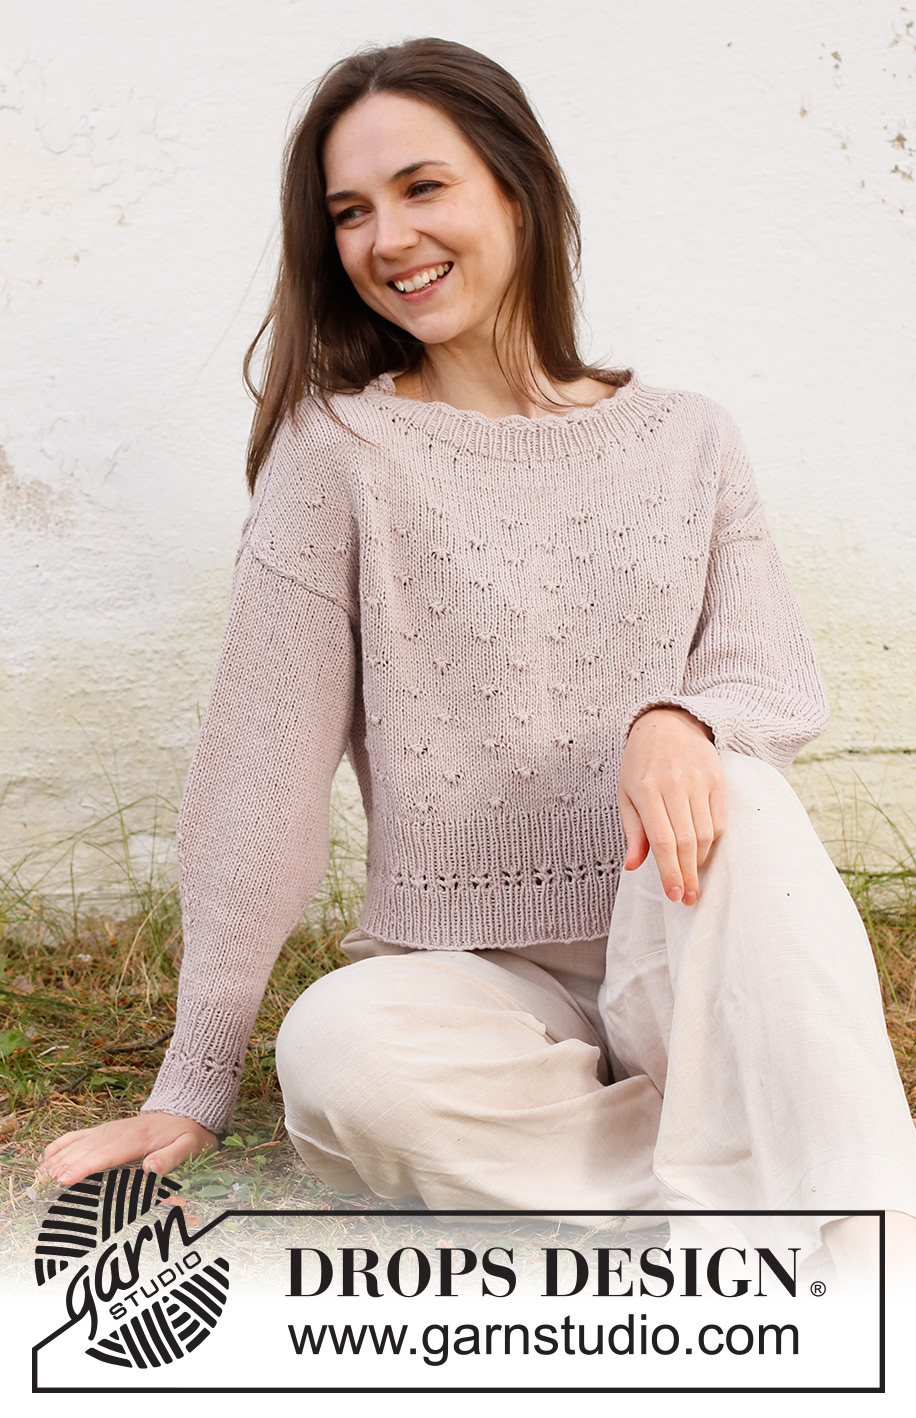
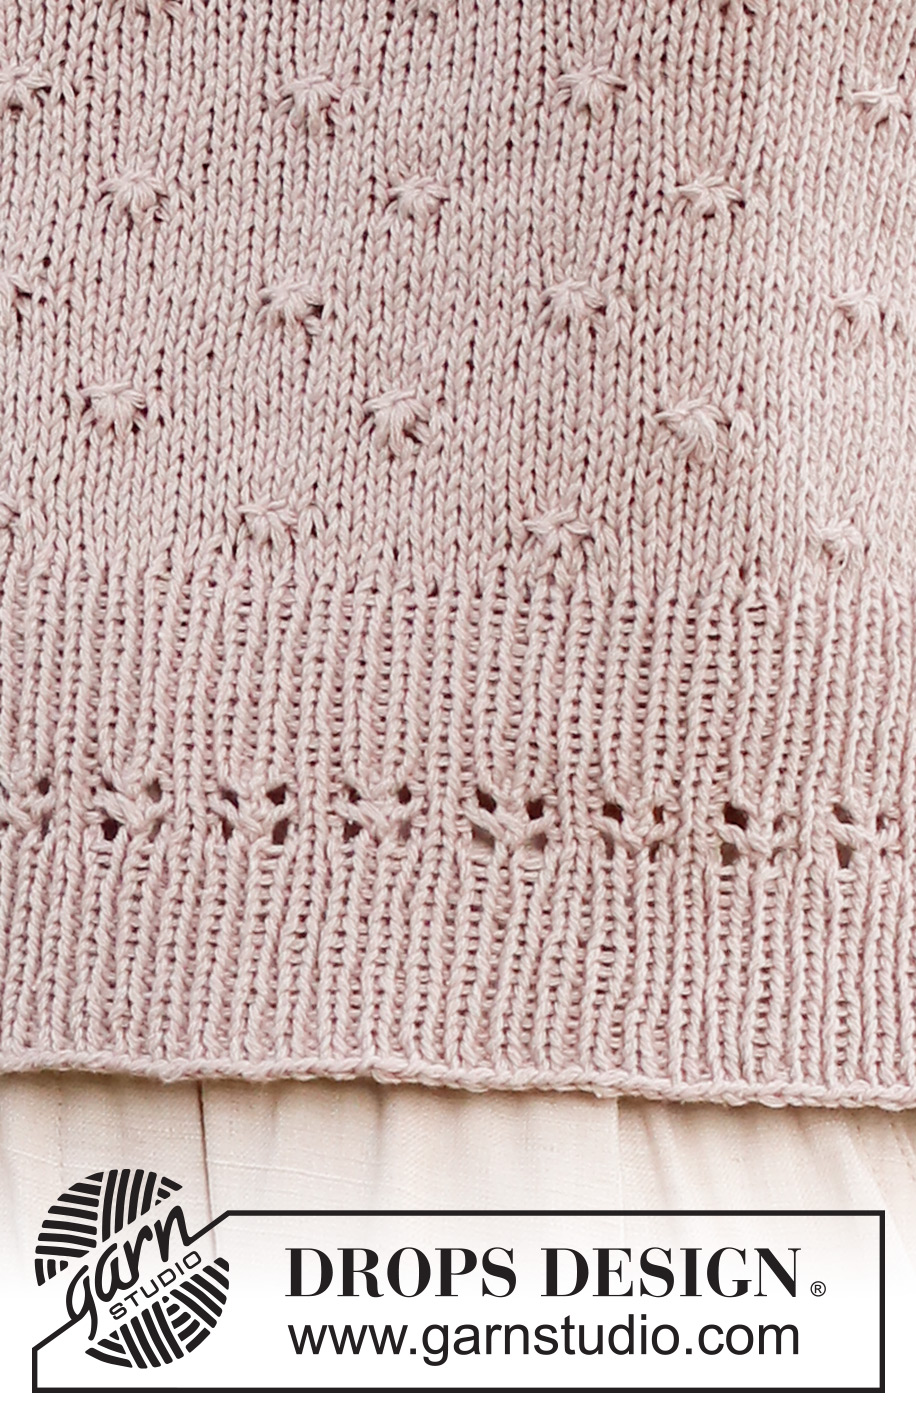
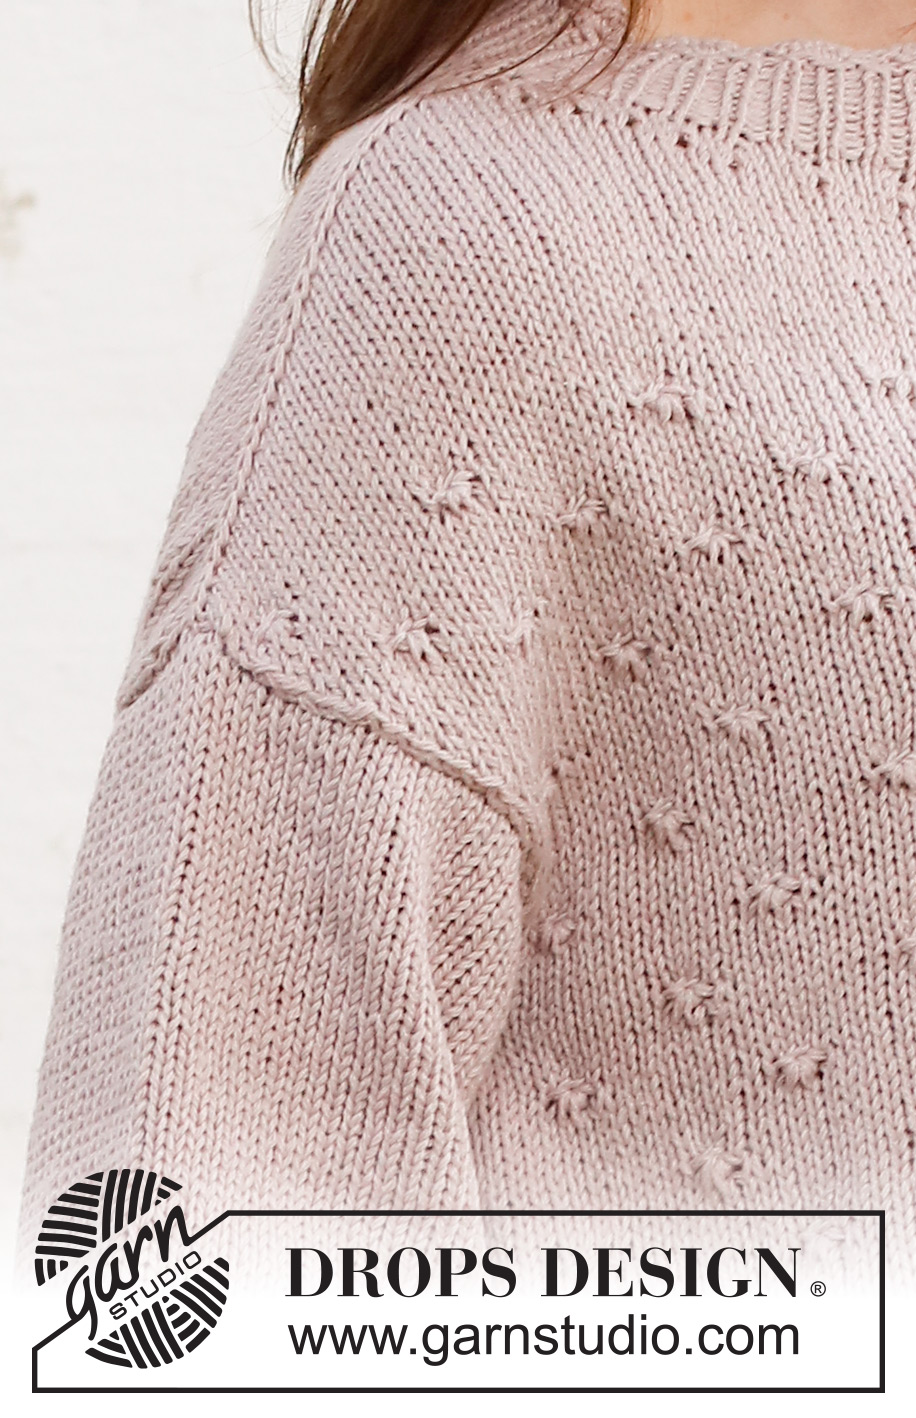
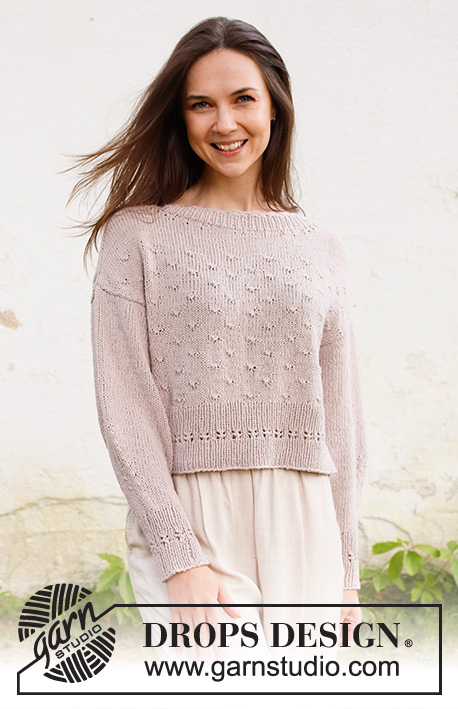
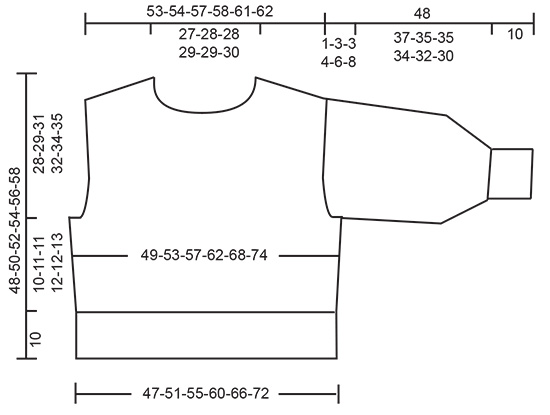
Knitted jumper in DROPS Belle or DROPS Daisy. Piece is knitted top down in stocking stitch with saddle shoulders and bobbles. Size: S - XXXL
DROPS 232-43 |
|||||||||||||||||||||||||
|
---------------------------------------------------------- EXPLANATION FOR THE PATTERN: ---------------------------------------------------------- GARTER STITCH (back and forth): Knit all rows. 1 ridge vertically = knit 2 rows. PATTERN: See diagrams A.1 to A.3. Diagrams show all rows in pattern seen from the right side. INCREASE TIP-1 (evenly): To calculate how to increase evenly, use the total number of stitches on row (e.g. 102 stitches) and divide stitches by number of increases to be done (e.g. 12) = 8.5. In this example increase by making 1 yarn over after alternately every 8th and 9th stitch. On next round work yarn overs twisted to avoid holes. INCREASE TIP-2: INCREASE TIP FROM RIGHT SIDE: BEFORE MARKER: Work until stitch with marker, The new stitch is twisted towards the right. Use left needle to pick up yarn between 2 stitches from round below, pick up yarn from the back and knit stitch in front loop of stitch. AFTER MARKER: The new stitch is twisted towards the left. Use left needle to pick up yarn between 2 stitches from round below, pick up yarn from the front and knit stitch in back loop of stitch. INCREASE TIP FROM WRONG SIDE: BEFORE MARKER: The new stitch is twisted towards the right. Use left needle to pick up yarn between 2 stitches from round below, pick up yarn from the front and purl stitch in back loop of stitch. AFTER MARKER: The new stitch is twisted towards the left. Use left needle to pick up yarn between 2 stitches from round below, pick up yarn from the back and purl stitch in front loop of stitch. KNITTING TIP: On the first short row increase only on one shoulder, because you are only working past the one stitch with marker (= 2 stitches increased on needle). Then increase 4 stitches on every row, until last row is worked from wrong side until mid back while increasing on the other shoulder (= 2 stitches increased on row). DECREASE TIP-1(applies to front and back piece): All decreases are done from the right side. Work 1 edge stitch in garter stitch, slip 1 stitch knitwise, knit 1, pass slipped stitch over stitch worked(= 1 stitch decreased), work until 3 stitches remain, knit 2 together(= 1 stitch decreased), work 1 edge stitch in garter stitch. DECREASE TIP-2 (applies to body and sleeves): Work until 3 stitches remain before marker thread, knit 2 together (= 1 stitch decreased), knit 2 stitches (marker thread is between these stitches), slip 1 stitch knitwise, knit 1, pass slipped stitch over stitch worked (= 1 stitch decreased). CAST-OFF TIP: To avoid a tight cast-off edge when casting off, you may use a larger needle. If this still is too tight make 1 yarn over after approx. every 4th stitch while casting off (cast off yarn overs as stitches). ---------------------------------------------------------- START THE PIECE HERE: ---------------------------------------------------------- JUMPER - SHORT OVERVIEW OF THE PIECE: Work neck edge in the round on a circular needle. First work yoke back and forth with short rows until neck line is done. Work in the round until increase for saddle shoulder is done. Then finish back piece and front piece back and forth on circular needle separately until increase for armholes are done. Then slip front piece and back piece on to same circular needle and work body in the round on circular needle until finished measurements. Work sleeves first back and forth until sleeve cap is done, then work in the round on a short circular needle/double pointed needles the top and down. Sew in the sleeves as explained in pattern. NECK EDGE: Cast on 136-144-144-152-152-160 stitches on circular needle size 3 mm with DROPS Belle or DROPS Daisy. Knit 1 row from wrong side, turn piece and work in the round as follows: Work A.1 (= 17-18-18-19-19-20 repetitions of 8 stitches). When entire A.1 has been worked, there are 102-108-108-114-114-120 stitches on round. Then work knit over knit and purl over purl until piece measures 4 cm at the shortest (where arches in the edge turns inwards in rib). Knit 1 round while increasing 12-10-10-8-8-6 stitches evenly - read INCREASE TIP-1 = 114-118-118-122-122-126 stitches. YOKE: Switch to circular needle size 4 mm. Now insert 2 marker threads and 2 markers in the piece. Insert marker threads between 2 stitches and markers in a stitch as follows: Insert 1 marker thread at beginning of round (= mid back), yoke should be measured from this marker thread, skip the next 28-29-29-30-30-31 stitches, insert a marker in next stitch (= shoulder stitch), skip the next 28-29-29-30-30-31 stitches, insert a marker thread here(= mid front), skip the next 28-29-29-30-30-31 stitches, insert a marker in next stitch (= shoulder stitch), 28-29-29-30-30-31 stitches remain on round after last marker. OVERVIEW OF NEXT SECTION: Now work short rows back and forth to make a neck line, AT THE SAME TIME on first row increase for saddle shoulder - read SHORT ROWS AND SADDLE SHOULDER INCREASE before continuing. REMEMBER THE KNITTING TENSION! SHORT ROWS: Begin at marker mid back and work short rows in stocking stitch, back and forth as follows: ROWS 1 and 2: Work until 27-28-28-29-29-30 stitches remain before marker mid front, turn and tighten yarn. ROWS 3 and 4: Work until 26-27-27-28-28-29 stitches remain before marker mid front, turn and tighten yarn. ROWS 5 and 6: Work until 24-25-25-26-26-27 stitches remain before marker mid front, turn and tighten yarn. ROWS 7 and 8: Work until 22-23-23-24-24-25 stitches remain before marker mid front, turn and tighten yarn. ROWS 9 and 10: Work until 20-21-21-22-22-23 stitches remain before marker mid front, turn and tighten yarn. ROWS 11 and 12: Work until 18-19-19-20-20-21 stitches remain before marker mid front, turn and tighten yarn. ROWS 13 and 14: Work until 14-15-15-16-16-17 stitches remain before marker mid front, turn and tighten yarn. ROWS 15 and 16: Work until 10-11-11-12-12-13 stitches remain before marker mid front, turn and tighten yarn. ROW 17: Work until mid back. Now continue in the round. SADDLE SHOULDER INCREASE: Work in stocking stitch, first work back and forth until short rows are done, then work in the round. AT THE SAME TIME on first row increase on each side of stitch with marker as follows: Increase on each side of stitch with marker - read INCREASE TIP-2. Increase on front piece and back piece, and number of shoulder stitches (= 1 stitch) stays the same. On next row from right side increase 4 stitches for saddle shoulder as follows: Increase on each side of stitch with marker on each shoulder - remember INCREASE TIP-2. Increase on front piece and back piece, and number of shoulder stitches (= 1 stitch) stays the same. I.e. Increase on EVERY row, and increase differently from right side and wrong side so that the stitches lay nicely - read KNITTING TIP! Increase on every row (i.e. both from right and wrong side) until short rows are done = 16 stitches increased on each side of stitches with marker. Now work piece in the round, and continue increase on every round 12-12-15-15-18-18 more times (= 28-28-31-31-34-34 stitches increased in total on each side of stitch with marker on each shoulder) = 226-230-242-246-258-262 stitches. After last increase piece measures approx. 10-10-11-11-12-12 cm from marker by the neck Work next round as follows from mid back: Work the first 56-57-60-61-64-65 stitches before slipping them on a thread (= half back piece), cast off stitch in the middle of shoulder, work the next 112-114-120-122-128-130 stitches (= front piece), cast off stitch in the middle of shoulder, work the last 56-57-60-61-64-65 stitches before slipping them on a thread (= half back piece). Cut the yarn. FRONT PIECE: Insert a marker here - NOW MEASURE PIECE FROM HERE! Now work pattern as follows: Work 1 edge stitch in GARTER STITCH – read explanation above, work 0-1-2-0-0-1 stitches in stocking stitch, A.2 until 3-4-9-1-7-8 stitches remain, work the first 0-0-6-0-6-6 stitches in A.2, 2-3-2-0-0-1 stitches in stocking stitch, 1 edge stitch in garter stitch. Then work as many knots as there is room for towards the armholes - work the remaining stitches in stocking stitch. Continue back and forth like this. When 2 cm have been worked from division, decrease 1 stitch in each side of piece - read DECREASE TIP-1. Decrease like this every other row 8-7-6-5-5-4 times in total = 96-100-108-112-118-122 stitches. Continue to work until piece measures 17-17-18-19-18-17 cm. Now cast on stitches at the end of every row in each side as follows: Cast on 1 stitch 1-3-3-3-5-9 times = 98-106-114-118-128-140 stitches. Work the increased stitches in A.2 (with 1 edge stitch in garter stitch in each side, and if there is no room for a whole knot towards the armhole, work stitches in stocking stitch). Piece now measures 18-19-20-21-22-23 cm from marker. Cut the yarn, put piece aside and work the back piece. BACK PIECE: Slip stitches from threads back on circular needle size 4 mm = 112-114-120-122-128-130 stitches. Work the same way as on front piece. When increases for armholes are done, there are 98-106-114-118-128-140 stitches on the needle. BODY: Now work next row from right side as follows: Work pattern as before over all stitches on back piece, cast on 4-6-6-12-14-16 new stitches on needle (= in the side under sleeve), work in pattern as before over stitches on front piece, cast on 4-6-6-12-14-16 new stitches on needle = 204-224-240-260-284-312 stitches for body. Move the marker here – NOW MEASURE PIECE FROM HERE! Insert a marker thread in the middle of the new stitches cast-on in the side under the sleeves (= 2-3-3-6-7-8 new stitches on each side of marker thread). Move the marker threads upwards when working; they are used for decreases in the sides later. Continue in the round with pattern as before and work in stocking stitch over the new stitch cast on in the side under sleeves (i.e. pattern does not fit the entire way on round). When piece measures 3 cm, decrease 1 stitch on each side of marker threads – read DECREASE TIP-2. Repeat decrease when piece measures 8-9-9-10-10-11 cm = 196-216-232-252-276-304 stitches. Work until piece measures 10-11-11-12-12-13 cm from marker. Try the jumper on and work until desired length (approx. 10 cm with rib remain before finished measurements) - adjust to work at least 2 round with stocking stitch after a knot in pattern. To stop the rib from contracting increase 32-36-38-42-48-50 stitches evenly = 228-252-270-294-324-254 stitches. Switch to circular needle size 3 mm. Now work rib (= knit 1/purl 1) for 4½ cm. Then work from arrow in diagram A.3. When A.3 has been worked vertically, continue with knit over knit and purl over purl until rib measures 10 cm in total. Cast off with knit over knit and purl over purl - read CAST-OFF TIP. Jumper measures approx. 48-50-52-54-56-58 cm (measured on the inside at the neck edge) and down. SLEEVES: Sleeve is worked top down. Cast on 62-62-64-60-54-50 stitches on circular needle size 4 mm with DROPS Belle / DROPS Daisy (cast on fewer stitches in the larger sizes because of more increases in each side for sleeve cap). Work stocking stitch back and forth, at the same time cast on stitches at the end of every row in each side as follows: Cast on 3-1-1-1-1-1 stitches 1-4-4-5-8-11 times, then on next row from right side, cast on 4-6-6-12-14-16 stitches = 72-76-78-82-84-88 stitches. Insert a marker thread in the middle of the 4-6-6-12-14-16 stitches that were cast on under sleeve (= mid under sleeve). Move marker thread upwards when working. Use it later when decreasing under sleeve. NOW MEASURE PIECE FROM HERE! Begin round at the marker thread and work stocking stitch in the round on a short circular needle/double pointed needles size 4 mm. When sleeve measures 4 cm, decrease 1 stitch on each side of marker thread – remember DECREASE TIP-2. In size M, L and XXXL, repeat decrease when piece measures 10 cm = 70-72-74-80-82-84 stitches. Continue to work in stocking stitch until sleeve measures 27-25-25-23-21-19 cm. Now insert a new marker thread in the middle of sleeve so that there are 35-36-37-40-41-42 stitches between the 2 marker threads. Work stocking stitch in the round, at the same time decrease 1 stitch on each side of both marker threads - remember DECREASE TIP-2. Decrease like this every 4th round 7-7-7-8-8-8 times = 42-44-46-48-50-52 stitches. Work in stocking stitch until sleeve measures approx. 37-35-35-34-32-30 cm – or desired length (approx. 10 cm now remain with rib until finished measurements and shorter measurements in the larger sizes because of wider shoulders). Knit 1 round while increasing 6-4-8-6-10-8 stitches evenly = 48-48-54-54-60-60 stitches. Switch to double pointed needles size 3 mm. Work rib (knit 1/purl 1) in the round for 4½ cm. Now work from round with arrow in A.3 in the round. When A.3 has been worked, work rib until rib measures 10 cm in total. Cast off with knit over knit and purl over purl - remember CAST-OFF TIP. Sleeve measures approx. 48 cm from cast-on edge in all sizes. Work the other sleeve the same way. ASSEMBLY: Sew sleeves in body inside 1 edge stitch in garter stitch on body and inside cast-on edge on sleeves. |
|||||||||||||||||||||||||
Diagram explanations |
|||||||||||||||||||||||||
|
|||||||||||||||||||||||||
 |
|||||||||||||||||||||||||
 |
|||||||||||||||||||||||||
Have you finished this pattern?Tag your pictures with #dropspattern #openwindowssweater or submit them to the #dropsfan gallery. Do you need help with this pattern?You'll find 39 tutorial videos, a Comments/Questions area and more by visiting the pattern on garnstudio.com. © 1982-2026 DROPS Design A/S. We reserve all rights. This document, including all its sub-sections, has copyrights. Read more about what you can do with our patterns at the bottom of each pattern on our site. |
|||||||||||||||||||||||||


With over 40 years in knitting and crochet design, DROPS Design offers one of the most extensive collections of free patterns on the internet - translated to 17 languages. As of today we count 325 catalogues and 12298 patterns translated into English (UK/cm). 12298
We work hard to bring you the best knitting and crochet have to offer, inspiration and advice as well as great quality yarns at incredible prices! Would you like to use our patterns for other than personal use? You can read what you are allowed to do in the Copyright text at the bottom of all our patterns. Happy crafting!
Post a comment to pattern DROPS 232-43
We would love to hear what you have to say about this pattern!
If you want to leave a question, please make sure you select the correct category in the form below, to speed up the answering process. Required fields are marked *.