
Popular categories
Looking for a yarn?


Comments / Questions (70)
![]() Getzabel wrote:
Getzabel wrote:
Hola me podrías ayudar nuevamente por favor!! Estoy haciendo el delantero izquierdo, cuáles son los 15 pts que debo poner en la aguja auxiliar? Los primeros 15 pts? Para el escote, cuántas vueltas son en total? 6 vueltas?
14.05.2025 - 05:15DROPS Design answered:
Hola Getzabel, hacia el centro del delantero = en el escote. Deberías tener 6 pts en pt musgo en el centro del delantero; esos 6 pts + 11 pts en pt jersey siguientes se colocan en un hilo para el cuello, todos a la vez. Después comienzas a disminuir para el escote: 3 pts en la 1ª fila que empieza desde el escote/centro del delantero. En la siguiente fila desde el escote cerrar 2 pts. En las siguientes 4 filas desde el escote cerrar 1 pt. En las filas por el lado revés/desde la sisa no cierras puntos. Por lo tanto, trabajas 12 filas en total (6 filas por el lado derecho cerrando pts y 6 filas con el lado revés sin cerrar pts).
18.05.2025 - 14:16
![]() Getzabel wrote:
Getzabel wrote:
Hola!!! Me podrías ayudar por favor!! No entiendo bien la parte de los hombros en diagonal. Teji 96 pts (talla XL) para la espalda, debo tejer, 32pts, cerrar 32 y luego tejer 32 pts? Debo dejar 7 pts en una aguja auxiliar, por qué dice 3 veces? Luego pasar 9 puntos a una aguja auxiliar? Pasar 30 pts desde la aguja auxiliar?
06.05.2025 - 02:34DROPS Design answered:
Hola Getzabel, en la talla XXL tienes 96 pts al inicio. Cierras 32 pts y te quedan 64 pts (32 pts para cada hombro). Disminuyes 2 pts en cada hombro para el cuello; al mismo tiempo, deslizas puntos a una aguja auxiliar para que el hombro tenga forma diagonal/escalonada. En la 1ª fila desde el hombro trabajas y deslizas los primeros 7 pts, terminas la fila, trabajas de vuelta y en la siguiente fila desde el hombro deslizas los siguientes 7 pts. Repite esto 1 vez más y, la última vez, deslizas los 9 pts restantes (= 30 pts en cada hombro, los 32 pts menos los 2 cerrados en el cuello). Pero estos puntos no están cerrados y se pasan de vuelta a la aguja para trabajar la siguiente parte.
10.05.2025 - 23:17
![]() Nadia wrote:
Nadia wrote:
Bonjour, mon trou se situe au niveau des 3 + 2 diminutions. Ma lecture est la suivante à 42 cm : 13 m en attente, 3 dim, 2 dim, 4 x 1 dim, reste de l'épaule. Si cela est correct, comment gérer le trou des 5 mailles rabattues? Désolée à nouveau
10.04.2025 - 11:19DROPS Design answered:
Bonjour Nadia, lorsque vous tricoterez le col à la fin, vous reprendrez les 13 m en attente et vous relèverez des mailles le long de l'encolure = dans les mailles rabattues pour l'encolure (autrement dit dans ces 1x3 m + 1 x 2 m rabattues + le long des rangs jusqu'à l'épaule. Bon tricot!
10.04.2025 - 16:36
![]() Nadia wrote:
Nadia wrote:
Bonjour Toujours sur l'encolure gauche, les 13 mailles en attente font un trou quand je reprend toutes les mailles a la fin, c'est normal?
09.04.2025 - 21:31DROPS Design answered:
Bonjour Nadia, pour éviter un trou aux transitions des rangs raccourcis, relevez le fil entre 2 "groupes" de mailles en attente et posez-le torse sur l'aiguille gauche puis tricotez ce fil et la maille suivante ensemble, ainsi les trous disparaîtront. Bon tricot!
10.04.2025 - 09:58
![]() Nadia wrote:
Nadia wrote:
Ce n'est toujours pas très clair, Pouvez vous décrire men précisant le nombre de mailles par lignes, les étapes de l'encolure et de l'épaule gauche? Merci d'avance
08.04.2025 - 22:17DROPS Design answered:
Bonjour Nadia, à 42 cm, vous tricotez les 13 premières m sur l'envers et vous les mettez en attente (encolure), vous terminez le rang, tricotez le rang suivant sur l'endroit puis, vous allez rabattre au début de chaque rang sur l'envers: 1 x 3 m et 1 x 2 m puis vous diminuez 4x1 m en fin de rang sur l'endroit. EN MÊME TEMPS, à 44 cm, tricotez le rang sur l'endroit en mettant les 5 premières m en attente, terminez le rang, tournez (formez l'encolure sur l'envers si besoin), tricotez le rang sur l'envers, tournez, tricotez ces 2 rangs encore 2 fois puis mettez les 4 dernières m en attente. Reprenez toutes les mailles de l'épaule et rabattez-les. Bon tricot!
09.04.2025 - 08:31
![]() Nadia wrote:
Nadia wrote:
Bonjour Je tricote en taille S et je ne comprends pas comment tricoter l'encolure et l'épaule du devant gauche. Pouvez vous détailler pas à pas les diminutions à réaliser? Merci pour votre aide
07.04.2025 - 19:45DROPS Design answered:
Bonjour Nadia, pour le devant gauche, vous allez rabattre les mailles en début de rang sur l'envers pour l'encolure et, en même temps l'encolure commence à 42 cm et le biais des épaules 2 cm après), tricoter et mettre en attente les mailles du début de rang sur l'endroit pour le biais de l'épaule, comme vous l'avez fait pour le dos. Pour le devant droit, vous rabattrez les mailles de l'encolure en début de rang sur l'endroit et vous mettrez les mailles de l'épaule en attente en début de rang sur l'envers. Bon tricot!
08.04.2025 - 09:29
![]() SNG wrote:
SNG wrote:
Hello I am now working on the sleeves however I don’t know what is meant by: Now continue back and forth with stocking stitch from mid-under the sleeve until the sleeve measures 52-50-50-49-48-47 cm (a split of 1-1-1-2-4-5 cm). Cast off. Work the other sleeve in the same way. How many undersleeve stitches are we supposed to ‘not’ knit? I just don’t understand this part at all.
13.03.2025 - 23:16DROPS Design answered:
Hi SNG, You work stocking stitch back and forth across all the stitches (knit from right side and purl from wrong side), leaving a split at the top of the sleeve (mid-back) which will be sewn to the armhole to finish. You turn after you have finished the last round, knit back across all stitches from the right side, turn and purl from the wrong side all the way to the split that is now forming. Turn and repeat until you have reached the correct length. Hope this helps and happy knitting!
14.03.2025 - 07:36
![]() Basia wrote:
Basia wrote:
Cześć! Mam włóczki z grupy A (Safran) oraz C (Alpaca Silk) i chciałabym z tych włóczek zrobić ten sweter. Czy mogę prosić o pomoc jak dopasować rozmiar drutów oraz swetra?
12.02.2025 - 15:07DROPS Design answered:
Witaj Basiu, zobacz podobne połączenie włóczek TUTAJ. Tak czy inaczej pamiętaj, aby wykonać swoją próbkę. Pozdrawiamy!
12.02.2025 - 15:40
![]() SNG wrote:
SNG wrote:
When shaping the shoulders are the decreases before the 3 stitches supposed to happen at the same time? This part is very confusing.
22.01.2025 - 18:15DROPS Design answered:
Dear SNG, in the back piece the neck decreases and shoulder sections are worked simultaneously. First you cast off the middle stitches for the neck, then divide for each shoulder. On the first row from the right side decrease 1 stitch at the neck, work the row to the end. Turn the piece and work and slip the first stitches for the shoulder shaping, work until the end of the piece turn and decrease the first stitch for the neck. Continue working the shoulder shaping as before, but don't decrease any more neck stitches. In the front piece the shoulder shaping is started after the neck decreases start but before they end, so they will also be worked at the same time. Happy knitting!
25.01.2025 - 18:09
![]() Vittoria wrote:
Vittoria wrote:
La spiegazione non è chiara. Ad esempio, spiegazione del collo. Perché non specificare collo del dietro o del davanti?
09.11.2024 - 09:44DROPS Design answered:
Buonasera Vittoria, il collo viene lavorato alla fine dopo la cucitura del capo e quindi lavorato su tutto il capo. Buon lavoro!
09.11.2024 - 18:48
|
||||
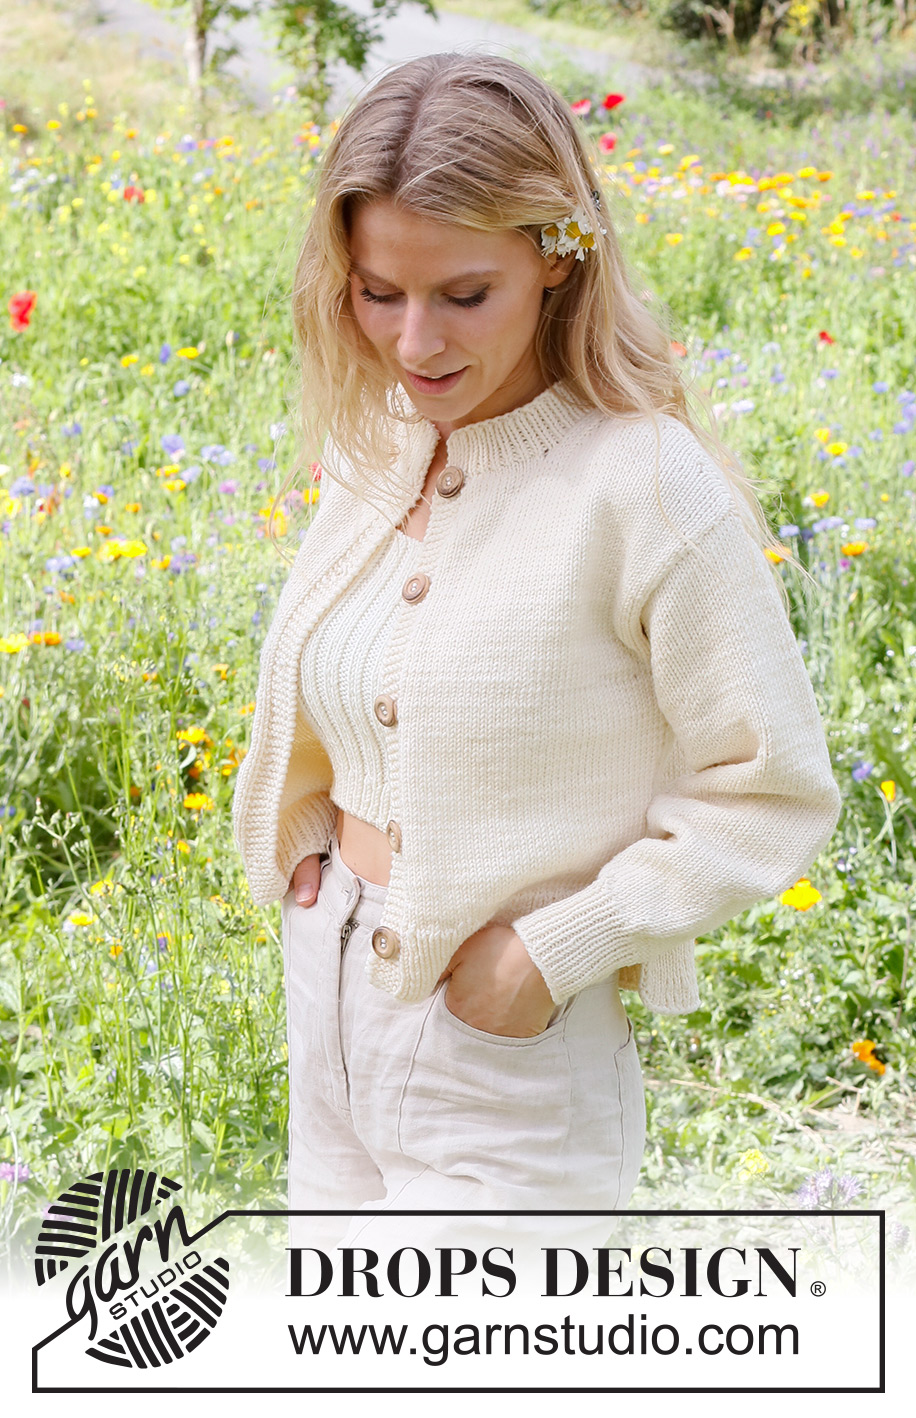
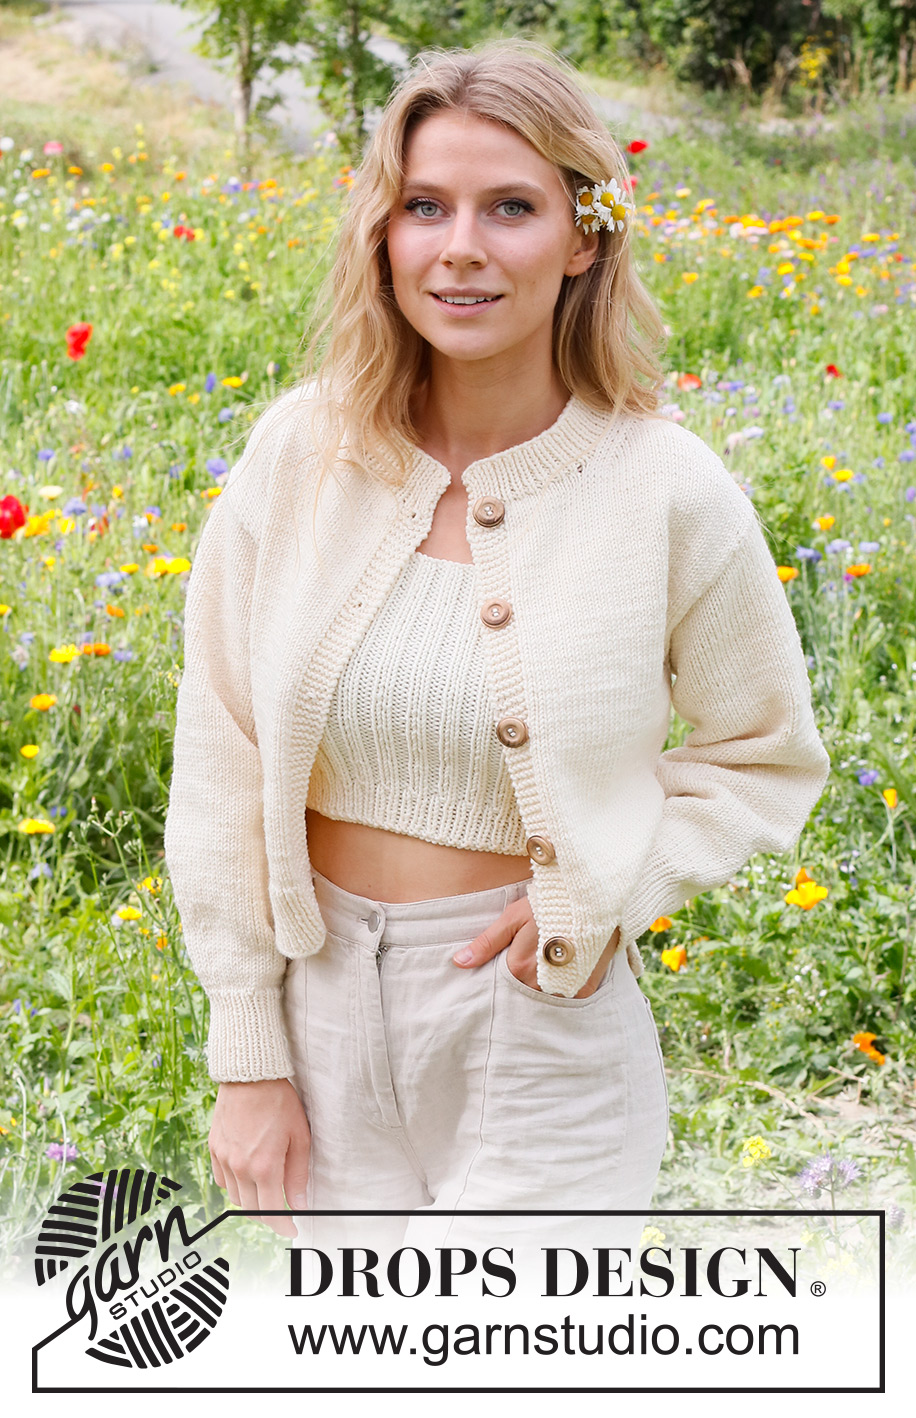
Prairie Rose Cardigan#prairierosecardigan |
||||
 |
 |
|||
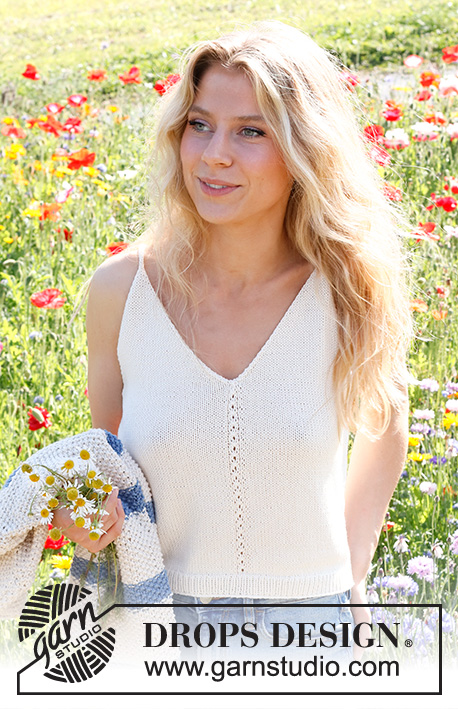
Knitted jacket in DROPS Big Merino. The piece is worked bottom up, with split in the sides. Sizes S - XXXL.
DROPS 230-4 |
||||
|
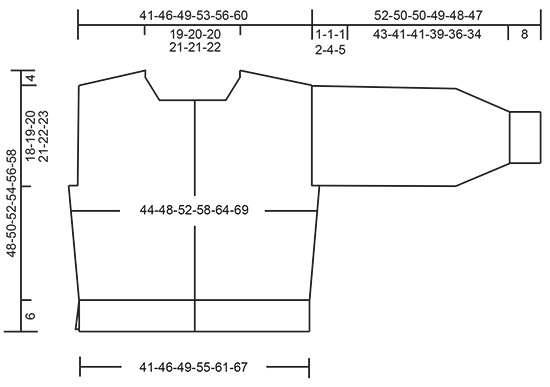
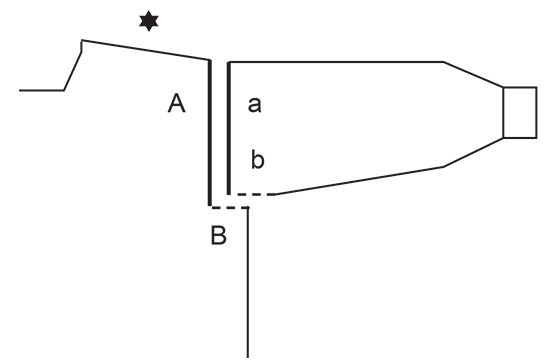
------------------------------------------------------- EXPLANATIONS FOR THE PATTERN: ------------------------------------------------------- RIDGE/GARTER STITCH (worked back and forth): Knit all rows. 1 ridge = knit 2 rows. INCREASE TIP (for body and sleeves): All increases are worked from the right side! Work until there are 2 stitches left before the marker, 1 yarn over, knit 4 (marker sits between these 4 stitches), 1 yarn over. On the next row/round work the yarn overs twisted to avoid holes. Then work the new stitches in stocking stitch. DECREASE TIP (decrease 1 stitch by the neck): Decrease from the right side, inside the 3 stocking stitches. AFTER THE 3 STOCKING STITCHES: Slip 1 stitch as if to knit, knit 1 and pass the slipped stitch over the knitted stitch (= 1 stitch decreased). BEFORE THE 3 STOCKING STITCHES: Work until there are 5 stitches left mid-front, knit 2 together, work the last 3 stitches in stocking stitch (= 1 stitch decreased). BUTTONHOLES: Work the buttonholes on the right band. 1 BUTTONHOLE = 1 yarn over inside the outermost 3 stitches on the row (from the right side). On the next row (wrong side) knit the yarn over together with the 3rd to last stitch on the row. Work the buttonholes when the piece measures: S: 5, 14, 24, 33 and 43 cm. M: 5, 15, 25, 35 and 45 cm. L: 6, 16, 26, 36 and 46 cm. XL: 6, 14, 23, 31, 40 and 48 cm. XXL: 6, 15, 23, 32, 40 and 49 cm. XXXL: 6, 15, 24, 33, 42 and 51 cm. ------------------------------------------------------- START THE PIECE HERE: ------------------------------------------------------- JACKET – SHORT OVERVIEW OF THE PIECE: The back and front pieces are worked separately, back and forth and bottom up until the split is finished. The pieces are joined and the body continued back and forth as far as the armholes. The back and front pieces are then finished separately, back and forth. The sleeves are worked in the round, bottom up. The neck is worked to finish. BACK PIECE: Cast on 95-105-113-127-141-153 stitches with circular needle size 4 mm and DROPS Big Merino. Purl 1 row from the wrong side. Then work rib (knit 1, purl 1) over all stitches – NOTE: The first and last stitches on the row are knitted from the right side and purled from the wrong side. Work this rib for 6 cm, finishing after a row from the wrong side. Lay the piece to one side. LEFT FRONT PIECE: Cast on 55-61-65-71-79-85 stitches with circular needle size 4 mm and DROPS Big Merino. Purl 1 row from the wrong side. Then work rib (knit 1, purl 1) until there are 6 stitches left, finish with 6 band stitches in GARTER STITCH – read description above. Work this rib for 6 cm, finishing after a row from the wrong side. Lay the piece to one side. RIGHT FRONT PIECE: Cast on 55-61-65-71-79-85 stitches with circular needle size 4 mm and DROPS Big Merino. Purl 1 row from the wrong side. Then work rib from the right side as follows: 6 band stitches in garter stitch, work rib (knit 1, purl 1) to the end of the row. Work this rib for 6 cm – remember the BUTTONHOLES on the band and finishing after a row from the wrong side. BODY: Place the right front piece, the back piece and the left front piece on the same circular needle size 5 mm = 205-227-243-269-299-323 stitches. Knit 1 row from the right side and decrease 53-59-63-69-79-83 stitches evenly spaced (do not decrease over the bands) = 152-168-180-200-220-240 stitches. Insert 1 marker 41-45-48-53-58-63 stitches in from each side (= 70-78-84-94-104-114 stitches between the markers on the back piece). Allow the markers to follow your work onwards; they are used when increasing in the sides. Work stocking stitch back and forth with 6 band stitches in garter stitch on each side. REMEMBER THE KNITTING TENSION! When the piece measures 10 cm, increase 1 stitch on each side of both markers – read INCREASE TIP (= 4 stitches increased). Repeat the increase when the piece measures 18-18-19-19-20-20 cm = 160-176-188-208-228-248 stitches. When the piece measures 26-27-28-29-30-31 cm, work the armholes as follows: Work 41-45-48-51-54-57 stitches as before (front piece), cast off 4-4-4-8-12-16 stitches, work 70-78-84-90-96-102 stitches (back piece), cast off 4-4-4-8-12-16 stitches, work 41-45-48-51-54-57 stitches (front piece). The back and front pieces are finished separately. BACK PIECE: = 70-78-84-90-96-102 stitches. Continue with stocking stitch back and forth until the piece measures 44-46-48-50-52-54 cm. On the next row cast off the middle 28-30-30-32-32-34 stitches for the neck and finish each shoulder separately. OVERVIEW OF THE NEXT SECTION: Decrease for the neck and place stitches on a thread for the shoulder as follows. Read NECK and DIAGONAL SHOULDER before continuing. NECK: Decrease 1 stitch for the neck, on each row from the right side, 2 times – read DECREASE TIP. DIAGONAL SHOULDER: Place the outermost stitches by the armhole on a thread, but to avoid cutting the strand, work the stitches before placing them on the thread. Place 5-5-6-7-7-8 stitches on the thread 3 times, then place the last 4-7-7-6-9-8 stitches on the thread. All stitches are now either decreased or placed on the thread. Place the 19-22-25-27-30-32 stitches from the thread back on circular needle size 5 mm. Purl 1 row from the wrong side but, to avoid a hole where you turned in the middle of the piece, pick up the strand between 2 stitches and purl it twisted together with the first stitch on the left needle. Then cast off loosely with knit from the right side. The piece measures approx. 48-50-52-54-56-58 cm from the cast-on edge to the top of the shoulder. Work the other shoulder in the same way. LEFT FRONT PIECE: = 41-45-48-51-54-57 stitches. Work stocking stitch back and forth with 6 band stitches in garter stitch towards mid-front. When the piece measures 42-44-45-47-48-50 cm, place the 13-14-14-15-15-16 stitches towards mid-front on a thread for the neck; to avoid cutting the strand, work the stitches before placing them on the thread. OVERVIEW OF THE NEXT SECTION: Cast off for the neck and place stitches on a thread for the shoulder as follows. Read NECK and DIAGONAL SHOULDER before continuing. NECK: Cast off for the neck at the beginning of each row from the neck as follows: Cast off 3 stitches 1 time and 2 stitches 1 times. Then decrease 1 stitch on each row from the right side 4 times - remember DECREASE TIP. DIAGONAL SHOULDER: AT THE SAME TIME, when the piece measures 44-46-48-50-52-54 cm, place the outermost stitches towards the armhole on a thread for the shoulder in the same way as on the back piece. When all the stitches are either decreased or placed on a thread, place the 19-22-25-27-30-32 stitches from the thread back on circular needle size 5 mm. Purl 1 row from the wrong side in the same way as on the back piece, then cast off loosely with knit from the right side. The piece measures approx. 48-50-52-54-56-58 cm from the cast-on edge to the top of the shoulder. RIGHT FRONT PIECE: Work in the same way as the left front piece. SLEEVES: Cast on 36-38-38-40-42-42 stitches with double pointed needles size 4 mm and DROPS Big Merino. Knit 1 round. Then work rib (knit 1, purl 1) in the round for 8 cm. Knit 1 round and increase 2-2-2-4-4-4 stitches evenly spaced = 38-40-40-44-46-46 stitches. Change to double pointed needles size 5 mm. Insert 1 marker at the beginning of the round and 1 marker after 19-20-20-22-23-23 stitches. These markers mark mid-under and mid-top of the sleeve. Allow the markers to follow your work onwards; they are used when increasing. Work stocking stitch. When you have worked 3 rounds, increase 1 stitch on each side of both markers – read INCREASE TIP (= 4 stitches increased). Increase like this every 4th round a total of 6-6-7-7-7-8 times = 62-64-68-72-74-78 stitches (change to short circular needle size 5 mm when you have enough stitches). Continue with stocking stitch until the sleeve measures 51-49-49-47-44-42 cm. Now continue back and forth with stocking stitch from mid-under the sleeve until the sleeve measures 52-50-50-49-48-47 cm (a split of 1-1-1-2-4-5 cm). Cast off. Work the other sleeve in the same way. ASSEMBLY: Sew the shoulder seams. Sew the sleeve cap to the armhole inside the outermost stitch on the body. Then sew the split to the bottom of the armhole – see sketch. Sew the buttons onto the left band. NECK: Start from the right side and knit up 86 to 100 stitches around the neck (including the stitches from the threads in front) with short circular needle size 4 mm. Purl 1 row from the wrong side where you increase to 103-107-109-111-115-119 stitches (do not increase over the bands). Work rib (knit 1, purl 1) back and forth, with 1 edge stitch in garter stitch on each side, for 4 cm. Cast off a little loosely. |
||||
Diagram explanations |
||||
|
||||
 |
||||
 |
||||
Have you finished this pattern?Tag your pictures with #dropspattern #prairierosecardigan or submit them to the #dropsfan gallery. Do you need help with this pattern?You'll find 29 tutorial videos, a Comments/Questions area and more by visiting the pattern on garnstudio.com. © 1982-2026 DROPS Design A/S. We reserve all rights. This document, including all its sub-sections, has copyrights. Read more about what you can do with our patterns at the bottom of each pattern on our site. |
||||


With over 40 years in knitting and crochet design, DROPS Design offers one of the most extensive collections of free patterns on the internet - translated to 17 languages. As of today we count 324 catalogues and 12290 patterns translated into English (UK/cm). 12290
We work hard to bring you the best knitting and crochet have to offer, inspiration and advice as well as great quality yarns at incredible prices! Would you like to use our patterns for other than personal use? You can read what you are allowed to do in the Copyright text at the bottom of all our patterns. Happy crafting!
Post a comment to pattern DROPS 230-4
We would love to hear what you have to say about this pattern!
If you want to leave a question, please make sure you select the correct category in the form below, to speed up the answering process. Required fields are marked *.