
Popular categories
Looking for a yarn?


Comments / Questions (21)
![]() Silvia wrote:
Silvia wrote:
Non mi trovo a mio agio con i ferri circolari. Come devo fare per eseguire questo modello con 2 ferri?
19.03.2022 - 11:22DROPS Design answered:
Buonasera Silvia, può adattare il modello alla lavorazione in piano e aggiungere una maglia per lato per la cucitura. Buon lavoro!
20.03.2022 - 15:25
![]() Marie wrote:
Marie wrote:
Mám dotaz na ukončení raglánu. V návodu je psáno přidáváme v každé 2. kruhové řadě, dokud nebudu mít určitý počet ok. A pak se píše, že se má pokračovat do určité výše od značky. Při tom pokračování se tedy již nepřidává? Je tady cílem dosáhnout určitého počtu ok a pak je uplést do dané výšky? Děkuji
29.01.2022 - 12:05DROPS Design answered:
Dobrý den, Marie, je to tak, jak píšete. Přidáváte oka v každé 2. řadě a jakmile je dosažen požadovaný počet ok, pokračujete v pletení bez dalšího přidávání do dané výšky - měříte od značky, kterou jste do pleteniny vložila po upletení průkrčníku. Hodně zdaru!
29.01.2022 - 17:01
![]() Christine Z wrote:
Christine Z wrote:
Hallo.... das ist ein sehr schöner Pullover. Aber warum macht Ihr kein Foto von den seitlichen Schlitzen?! Das ist doch der Clou an diesem Modell. Verstehe ich nicht ..... Grüße Christine
18.01.2022 - 11:20
![]() Marie wrote:
Marie wrote:
Nejsme si jistá, jak si počínat u raglánu. V obecném návodu označujete mezeru mezi oky a zde označujete čtyřmi žnačkami jednotlivá oka. Jak to pak konkrétně vypadá u přidávání? Nahodím 1 oko, upletu označené oko a opět 1 oko nahodím nebo je mezi na nahozeným okem a označeným okem ještě z každé strany jedno?
14.01.2022 - 22:21DROPS Design answered:
Dobrý den, Marie, u raglánového přidávání nahodíte 1 oko, upletete označené oko a opět 1 oko nahodíte. Mnoho zdaru!
15.01.2022 - 12:02
![]() Sophia wrote:
Sophia wrote:
What is the size in the picture? I made my own size but it is not oversized like in the picture. It would be nice if you can write the size of the model to the pattern.
08.01.2022 - 18:12DROPS Design answered:
Dear Sophia, to find out the size to work, measure a similar garment you have and like the shape and compare these measurements to those in the chart. This is the best way to find out your size. Read more here. Happy knitting!
10.01.2022 - 08:13
![]() Kehitysidea wrote:
Kehitysidea wrote:
Olisi kiva jos ohjeissa olisi ilmoitettu myös kuvassa mallilla päällä oleva koko. Tein tästä oman kokoni, mutta se on täysin erinäköinen kuin mallikuvassa. Mallikuvan työ taitaa olla ainakin kokoa M?
01.01.2022 - 01:09
![]() Vanessa wrote:
Vanessa wrote:
In der Anleitung wird Anfangs auf eine Maßskizze hinewiesen. Wo finde ich diese? Woher weis ich welche Maße ich brauche?
29.12.2021 - 12:43DROPS Design answered:
Liebe Vanessa, Maßskizze finden Sie ganz am Ende der Anleitung - hier wird es erklärt, wie man die Maßskizze liest und die Größe wählt. Viel Spaß beim stricken!
03.01.2022 - 09:40
![]() Kathi Kluiber wrote:
Kathi Kluiber wrote:
In der Anleitung zum Rumpf hat sich ein Fehler eingeschlichen... beim Abketten der Maschen für die Seitenschlitze müssen die letzten 27 Maschen des Rückenteils nicht abgekettet sondern gestrickt werden..
16.11.2021 - 07:54DROPS Design answered:
Liebe Frau Kluiber, danke für den Hinweis, Anleitung wurde korrigiert. Viel Spaß beim stricken!
16.11.2021 - 13:30
![]() Guðrún wrote:
Guðrún wrote:
þegar fitjað er upp er þá fitað upp samkvæmt máli eða á að reikna með viðbótar cm. miðað við ummál?
07.11.2021 - 14:38DROPS Design answered:
Sæl Guðrún, það verður að fitja upp þann fjölda lykkja sem samsvara stærðinni sem þú ætla að prjóna. Ef þú prjónar til dæmis stærð M þá fitjar þú upp 48 lykkjur eins og er í 3. stærðin í uppskriftinni.
08.11.2021 - 10:12
![]() Sílvia wrote:
Sílvia wrote:
Cuando estará el patrón en Español?
05.11.2021 - 14:30DROPS Design answered:
Hola Silvia, estos patrones son de la nueva colección y estamos trabajando para traducirlos al español lo antes posible.
07.11.2021 - 13:52
|
|
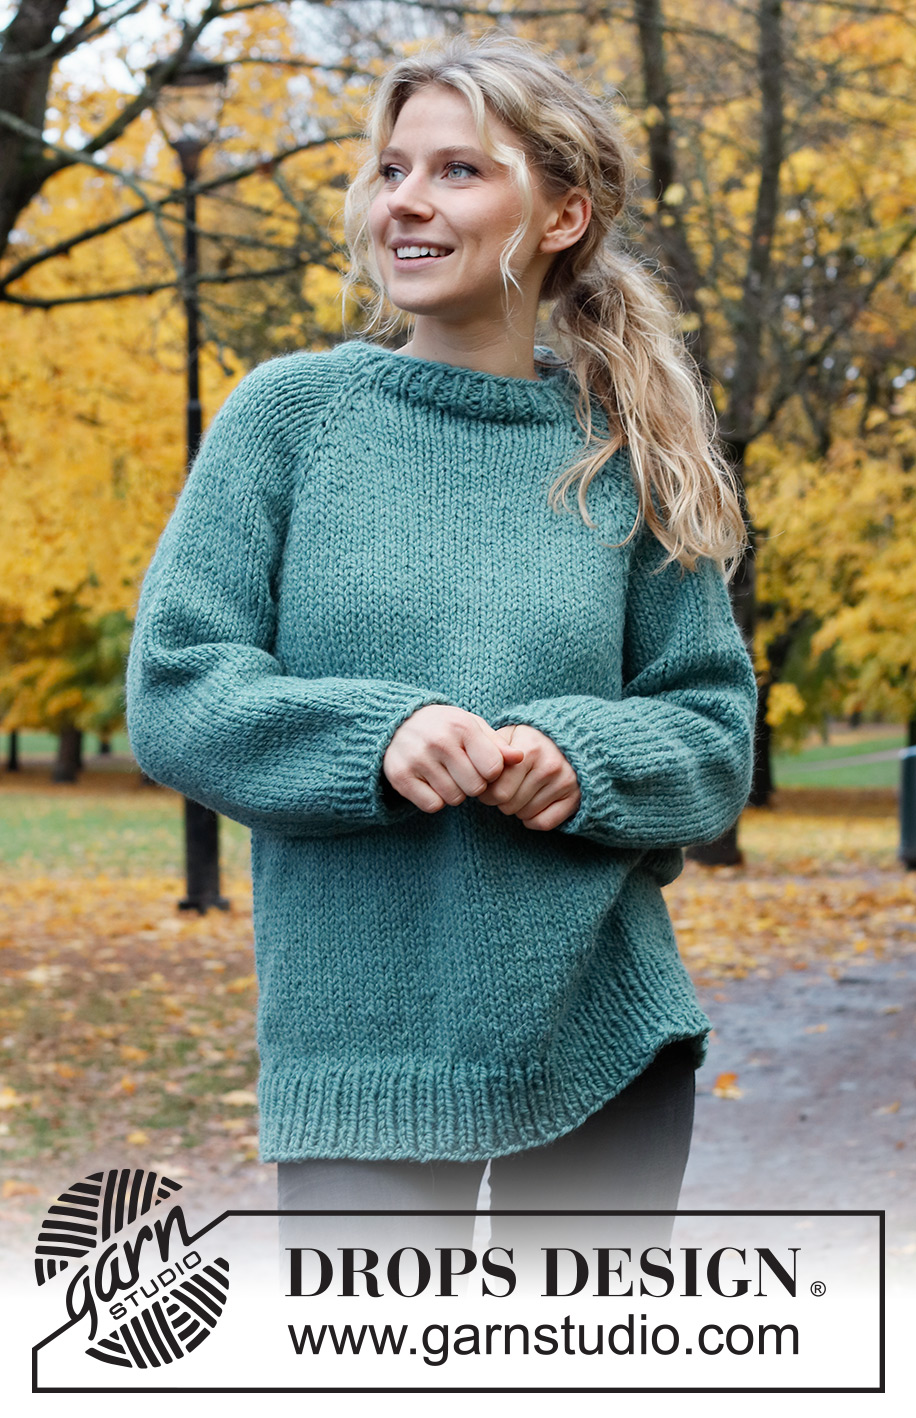
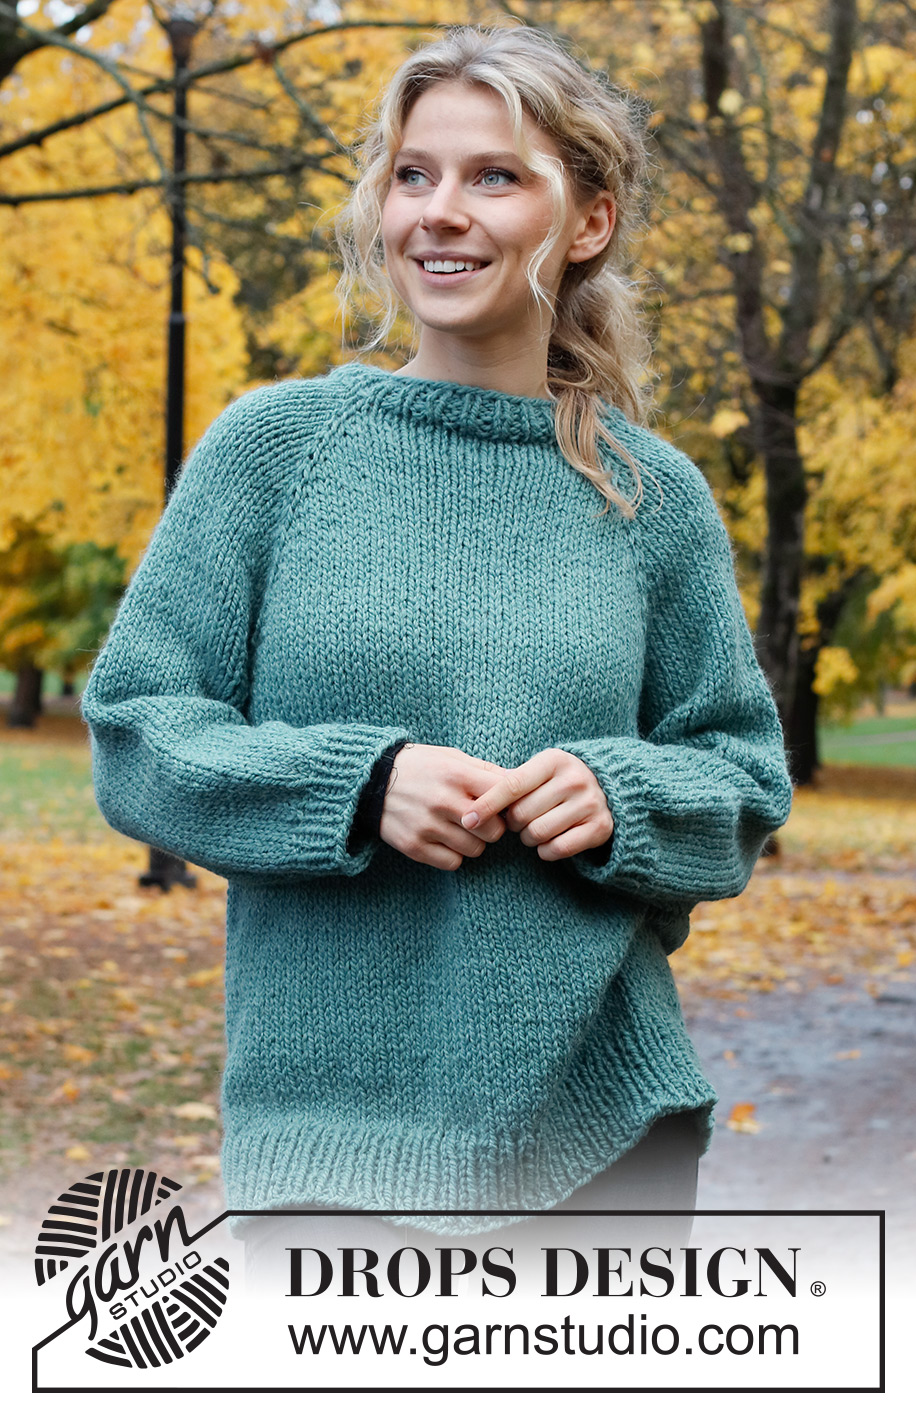
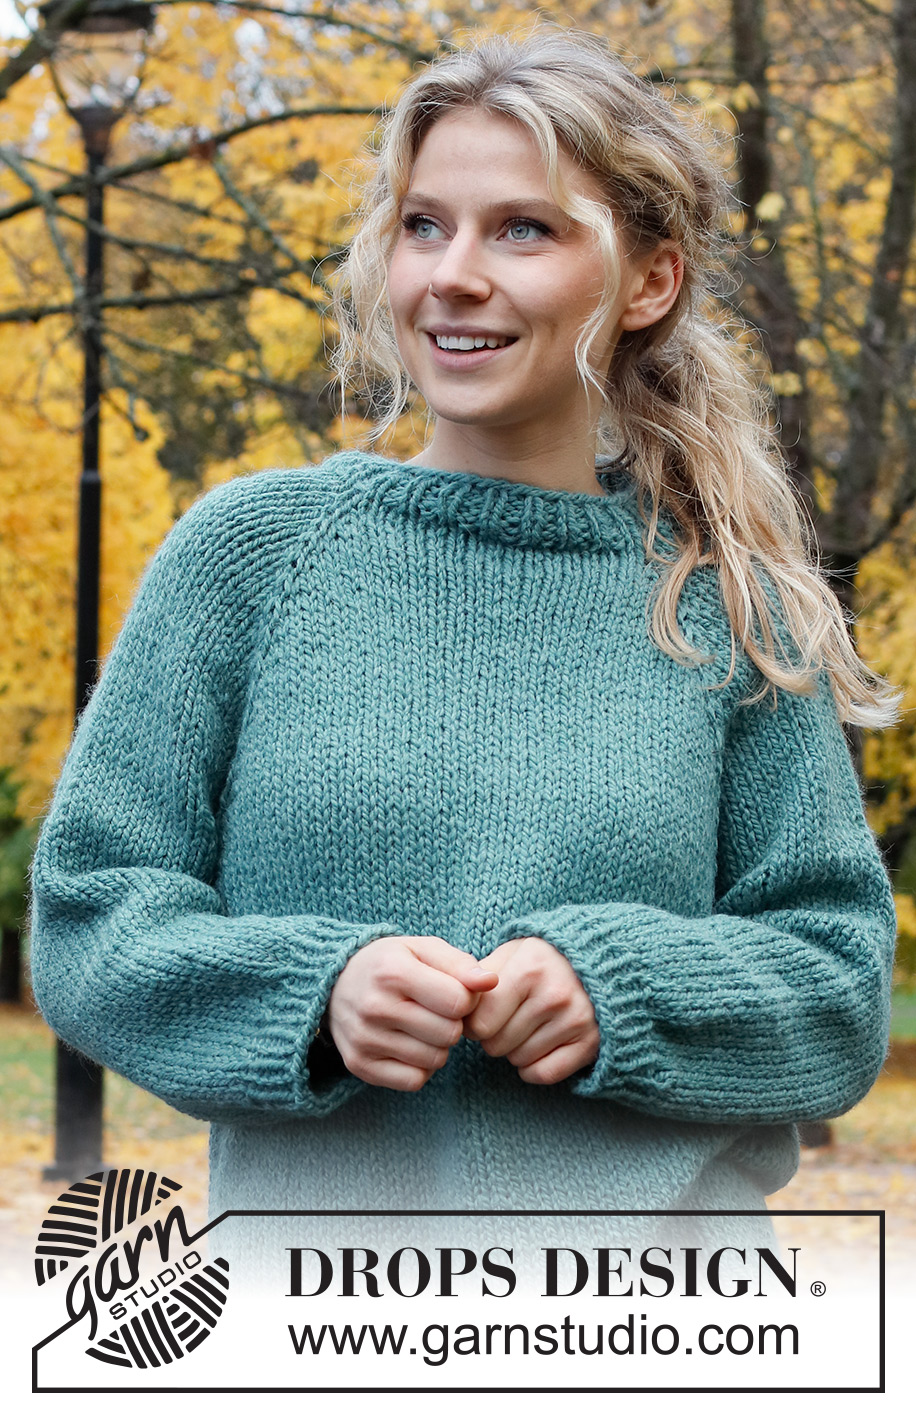
Water Point Sweater#waterpointsweater |
|
 |
 |
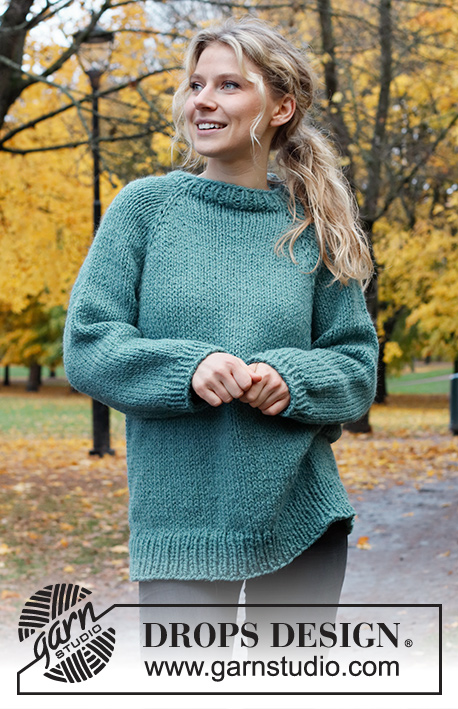
Knitted jumper in DROPS Andes. Piece is knitted top down with raglan and vents in the sides. Size XS – XXL.
DROPS 226-43 |
|
|
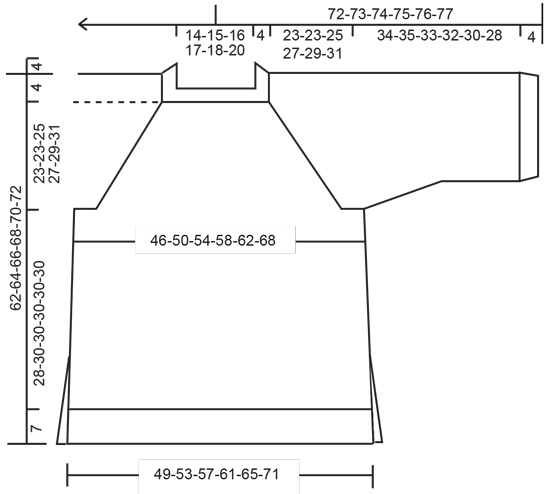
---------------------------------------------------------- EXPLANATION FOR THE PATTERN: ---------------------------------------------------------- GARTER STITCH (back and forth): Knit all rows. 1 ridge vertically = knit 2 rows. INCREASE TIP-1 (evenly): To calculate how to increase evenly, use the total number of stitches on row (e.g. 46 stitches) , and divide stitches by number of increases to be done (e.g. 2) = 23. In this example increase by making 1 yarn over after approx. every 23rd stitch. On next round work yarn overs twisted to avoid holes. INCREASE TIP-2 (applies to sides of body): Work until 2 stitches remain before marker thread, make 1 yarn over, knit 4 (marker thread is in the middle of these 4 stitches), make 1 yarn over. On next round knit yarns over twisted to avoid holes. Then work the new stitches in stocking stitch. RAGLAN: Increase 1 stitch on each side of stitch with marker (= a total of 8 stitches increased on round): Increase 1 stitch by making 1 yarn over. On next round knit yarns over twisted to avoid holes. Then work the new stitches in stocking stitch. DECREASE TIP (applies to mid under sleeves): Decrease 1 stitch on each side of marker thread as follows: Work until 3 stitches remain before marker thread and knit 2 together, knit 2 (marker thread is between these 2 stitches), slip 1 stitch knitwise, knit 1, pass slipped stitch over stitch worked. CAST-OFF TIP: To avoid a tight cast-off edge when casting off, you may use a larger needle. If this still is too tight make 1 yarn over after approx. every 6th stitch while casting off (cast off yarn overs as stitches). ---------------------------------------------------------- START THE PIECE HERE: ---------------------------------------------------------- JUMPER - SHORT OVERVIEW OF THE PIECE: Work neck edge and yoke in the round on circular needle from mid back, top down. Now divide yoke for body and sleeves. Work body in the round on circular needle down to vent, then divide the piece for front piece and back piece and finish each part separately. Work sleeves in the round on double pointed needles/short circular needle, top down. NECK EDGE: Cast on 44-46-48-50-52-56 stitches on circular needle size 7 mm with DROPS Andes. Knit 1 round. Work rib (knit 1/purl 1) in the round for 4 cm. Knit 1 round while adjusting number of stitches to 44-48-48-52-52-56 – i.e. increase 0-2-0-2-0-0 stitches evenly on round – read INCREASE TIP-1. Switch to circular needle size 9 mm. Insert 1 marker after rib mid back, measure yoke from this marker! YOKE: Now insert 4 markers in the piece without working the stitches. Insert markers in a stitch between body and sleeves: Skip the 6-7-7-8-8-9 first stitches, insert a marker in next stitch, skip the next 8 stitches, insert a marker in next stitch, skip the next 12-14-14-16-16-18 stitches, insert a marker in next stitch, skip the next 8 stitches, insert a marker in next stitch. 6-7-7-8-8-9 stitches remain on round after last marker. Now work in stocking stitch in the round, at the same time on next round begin increase for RAGLAN – read explanation above. Increase like this every other round 15-15-17-18-19-21 times in total = 164-168-184-196-204-224 stitches. REMEMBER THE KNITTING TENSION! Work until piece measures 23-23-25-27-29-31 cm from marker after rib. Now divide piece for body and sleeves as follows: Work the first 21-22-24-26-27-30 stitches (= ½ back piece), slip the next 40-40-44-46-48-52 stitches on a stitch holder for sleeve, cast on 4-6-6-6-8-8 new stitches on needle (= in the side under sleeve), work the next 42-44-48-52-54-60 stitches (= front piece), slip the next 40-40-44-46-48-52 stitches on a stitch holder for sleeve, cast on 4-6-6-6-8-8 new stitches on needle (= in the side under sleeve) and work the last 21-22-24-26-27-30 stitches (= ½ back piece). Now finish body and sleeves separately. NOW MEASURE PIECE FROM HERE! BODY: = 92-100-108-116-124-136 stitches. Insert 1 marker thread in the middle of the new stitches cast-on in the side under the sleeves (= 2-3-3-3-4-4 new stitches on each side of marker thread). Move the marker threads upwards when working; they should be used for increase later in the sides. Continue in the round in stocking stitch. When piece measures 5 cm from division, increase 1 stitch on each side of marker thread in each side - read INCREASE TIP-2. Repeat increase when piece measures 15 cm = 100-108-116-124-132-144 stitches. Work until piece measures 20-22-22-22-22-22 cm from division. Now knit a round while casting off 1 stitch in each side of piece as follows: Work the first 24-26-28-30-32-35 stitches (= ½ back piece), cast off next stitch (= vent in the side), work the next 49-53-57-61-65-71 stitches (= front piece), cast off next stitch (= vent in the side), work the last 25-27-29-31-33-36 stitches (= ½ back piece). There are now 49-53-57-61-65-71 stitches on back piece and 49-53-57-61-65-71 stitches on front piece. Cut the yarn. Then work back and forth over back piece and front piece separately. BACK PIECE: Begin in the side and work as follows from right side: 1 edge stitch in GARTER STITCH - read explanation above, knit 1,purl 1, knit until 3 stitches remain, purl 1, knit 1, 1 edge stitch in garter stitch. Continue back and forth with knit over knit and purl over purl, and 1 edge stitch in garter stitch in each side until piece measures 8 cm from where 1 stitch was cast off in each side. Switch to circular needle size 7 mm. Work rib as follows: 1 edge stitch in garter stitch, work rib (= knit 1/purl 1) until 2 stitches remain, knit 1, 1 edge stitch in garter stitch. When rib measures 7 cm, cast off with knit over knit and purl over purl and garter stitch over garter stitch - read CAST-OFF TIP. Jumper measures approx. 62-64-66-68-70-72 cm from shoulder and down. FRONT PIECE: Slip stitches from stitch holder on circular needle size 9 mm. Work as back piece. SLEEVES: Slip the 40-40-44-46-48-52 stitches from stitch holder in one side on a short circular needle/double pointed needles size 9 mm and pick in addition up 1 stitch in each of the 4-6-6-6-8-8 new stitches cast on in the side under sleeve = 44-46-50-52-56-60 stitches. Insert a marker thread in the middle of the new stitches under sleeve (= 2-3-3-3-4-4 new stitches on each side of marker thread). Move the marker thread upwards when working - marker threads should be used for decrease mid under sleeve. Continue in the round in stocking stitch. When piece measures 2 cm, decrease 1 stitch on each side of marker thread under sleeve - read DECREASE TIP. Decrease like this every other round 6-6-8-8-10-11 times in total, then every 4th row 1 time in total in all sizes = 30-32-32-34-34-36 stitches. Work until sleeve measures 34-35-33-32-30-28 cm (shorter measurements in the larger sizes because of longer yoke). Switch to double pointed needles size 7 mm. Work rib (knit 1/purl 1) in the round for 4 cm. Cast off stitches with knit over knit and purl over purl. Sleeve measures 38-39-37-36-34-32 cm from division. Work the other sleeve the same way. |
|
 |
|
Have you finished this pattern?Tag your pictures with #dropspattern #waterpointsweater or submit them to the #dropsfan gallery. Do you need help with this pattern?You'll find 33 tutorial videos, a Comments/Questions area and more by visiting the pattern on garnstudio.com. © 1982-2026 DROPS Design A/S. We reserve all rights. This document, including all its sub-sections, has copyrights. Read more about what you can do with our patterns at the bottom of each pattern on our site. |
|


With over 40 years in knitting and crochet design, DROPS Design offers one of the most extensive collections of free patterns on the internet - translated to 17 languages. As of today we count 324 catalogues and 12290 patterns translated into English (UK/cm). 12290
We work hard to bring you the best knitting and crochet have to offer, inspiration and advice as well as great quality yarns at incredible prices! Would you like to use our patterns for other than personal use? You can read what you are allowed to do in the Copyright text at the bottom of all our patterns. Happy crafting!
Post a comment to pattern DROPS 226-43
We would love to hear what you have to say about this pattern!
If you want to leave a question, please make sure you select the correct category in the form below, to speed up the answering process. Required fields are marked *.