
Popular categories
Looking for a yarn?


Comments / Questions (16)
![]() Isabella wrote:
Isabella wrote:
Hvor meget giver sweateren sig, når den bliver vasket?
21.05.2022 - 22:07DROPS Design answered:
Hei Isabella. Følg vaskeanvisningen, se enten på etikkenten eller les mer under Tips&Hjelp - Vaskeanvisning - Generelle Tips. Plagget skal formes etter vask og tørkes liggende, men husk legg aldri et dryppende vått plagg til tørk. Unngå å tørke plagget på underlag som suger til seg fuktighet, som for eksempel frottéhåndklær. I begge tilfeller kan plagget misfarges eller miste sin naturlige elastisitet. Følges disse rådene, skal plagget holde seg ganske likt slik det først var. mvh DROPS Design
23.05.2022 - 09:29
![]() Katarzyna wrote:
Katarzyna wrote:
Robię rozmiar XL. Po oddzieleniu dekoldu i umieszczeniu markerów nie znajdują się one pomiędzy dwoma oczkami prawymi (2 razy między prawymi i 2 razy między lewymi). Jak w takim razie wyrabiać reglan skoro w środku maja być 2 prawe oczka
14.04.2022 - 20:51DROPS Design answered:
Witaj Kasiu, po wykonaniu golfu, dalsza część swetra jest już przerabiana dżersejem prawym, wykonujesz reglan w wyznaczonych miejscach (wg wzoru). I może się zdarzyć, że linia reglanu nie jest przedłużeniem oczek prawych ściągacza (patrz zdjęcie). Miłej pracy!
15.04.2022 - 09:24
![]() Fabiana wrote:
Fabiana wrote:
Come fisso i fili che sono rimasti liberi dopo aver ripreso le maniche?
22.12.2021 - 08:12DROPS Design answered:
Buonasera Fabiana, i fili liberi verranno fissati come gli altri fili alla fine del lavoro. Buon lavoro!
26.12.2021 - 22:57
![]() Fausto wrote:
Fausto wrote:
Alla fine del corpo c'è scritto di fare degli aumenti su un solo giro, prima di iniziare le coste. Ma nella spiegazione gli aumenti si fanno su due giri ( gettati sul primo e dritti ritorti sul secondo). Come devo fare? Grazie
18.12.2021 - 23:58DROPS Design answered:
Buongiorno Fausto, si eaatto, su un ferro lavora gli aumenti e su quello successivo li lavora a ritorto: gli aumenti servono per preparare la lavorazione del bordo a coste. Buon lavoro!
20.12.2021 - 08:18
![]() Rosita wrote:
Rosita wrote:
Buonasera, vorrei realizzare questo modello (tg.l)ma con un filato diverso, il filato karisma, che però si lavora con i ferri più piccoli,quindi non so come regolarmi sia per la taglia a cui fare riferimento,sia per la quantità necessaria di filato che mi occorrerebbe, grazie
16.11.2021 - 21:17DROPS Design answered:
Buonasera Rosita, provi a guardare questa lezione su come maneggiare i filati alternativi. Buon lavoro!
16.11.2021 - 22:03
![]() MAURA wrote:
MAURA wrote:
Non so lavorare con i ferri circolari, sarebbe possibile avere una breve spiegazione per lavorare con i ferri dritti?
29.09.2021 - 18:07DROPS Design answered:
Buonasera Maura, questo modello è stato progettato per essere lavorato in tondo: può adattarlo se preferisce, alla lavorazione in piano aggiungendo una maglia di vivagno per la cucitura. Buon lavoro!
07.10.2021 - 00:16
|
|
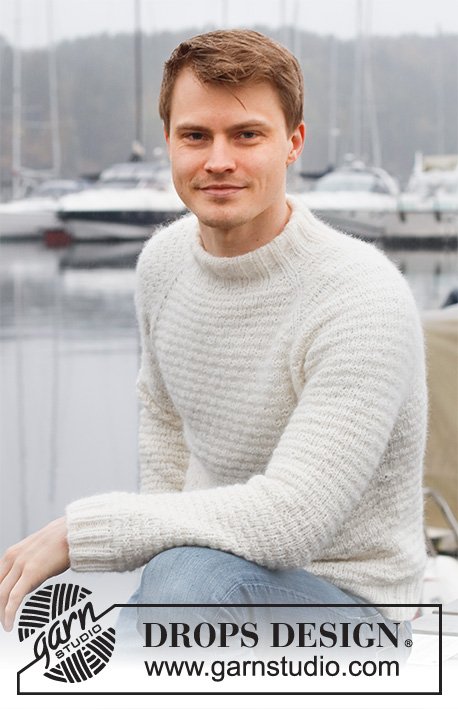
River Moss#rivermosssweater |
|
 |
 |
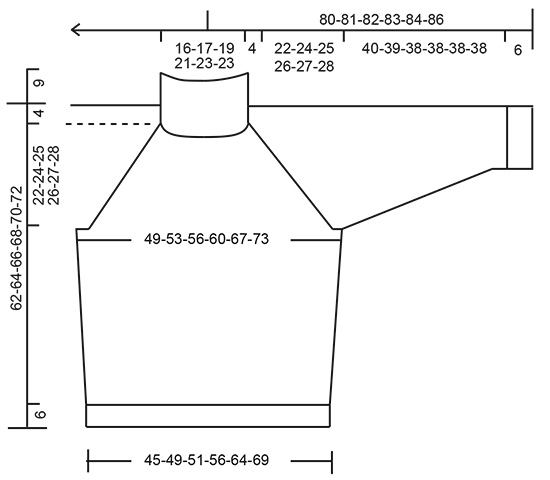
Knitted jumper for men in DROPS Wish. The piece is worked top down with high neck and raglan. Sizes S - XXXL.
DROPS 224-3 |
|
|
------------------------------------------------------- EXPLANATIONS FOR THE PATTERN: ------------------------------------------------------- INCREASE/DECREASE TIP (evenly spaced): To work out how to increase/decrease evenly, count the total number of stitches on needle (e.g. 60 stitches), and divide by the number of increases/decreases to be made (e.g. 8) = 7.5. In this example, increase by making 1 yarn over after alternately each 7th and 8th stitch. On the next row work the yarn overs twisted to avoid holes. When decreasing, knit together alternately each 6th and 7th stitch and each 7th and 8th stitch. RAGLAN: Increase 1 stitch on each side of 2 knitted stitches, in the transitions between body and sleeves (= 8 stitches increased on the round). Increase 1 stitch by making 1 yarn over. On the next round knit the yarn overs twisted to avoid holes. Then work the new stitches in stocking stitch. DECREASE TIP (for sleeves and sides of body): Decrease 1 stitch on either side of the marker thread as follows: Work until there are 3 stitches left before the marker thread, knit 2 together, knit 2 (marker thread sits between these 2 stitches), slip 1 stitch as if to knit, knit 1 and pass the slipped stitch over the knitted stitch (2 stitches decreased). CASTING-OFF TIP: To avoid the cast-off edge being tight you can cast off with a larger size needle. If the edge is still tight, make 1 yarn over after approx. each 4th stitch at the same time as casting off; the yarn overs are cast off as normal stitches. ------------------------------------------------------- START THE PIECE HERE: ------------------------------------------------------- JUMPER – SHORT OVERVIEW OF THE PIECE: The piece is worked in the round with circular needle, top down. The yoke is divided for the body and sleeves and the body continued in the round with circular needle. The sleeves are worked with short circular needle/double pointed needles. NECK: Cast on 60-60-64-64-68-72 stitches with short circular needle size 7 mm and DROPS Wish. Work rib in the round (knit 2, purl 2) for 9 cm. YOKE: Change to circular needle size 8 mm. Knit 1 round and decrease 8-4-4-0-0-4 stitches evenly spaced - read INCREASE/DECREASE TIP = 52-56-60-64-68-68 stitches. Insert 1 marker – the yoke is measured from here. Insert 4 marker threads, without working the stitches, as follows: Count 8-9-10-11-12-12 stitches (= half back piece), insert marker thread, count 10 stitches (= sleeve), insert marker thread, count 16-18-20-22-24-24 stitches (= front piece) insert marker thread, count 10 stitches (= sleeve), insert marker thread. There are 8-9-10-11-12-12 stitches left after the last thread (= half back piece). Continue with stocking stitch and increase to RAGLAN – read description above. Increase to raglan every 2nd round 14-16-17-17-19-21 times = 164-184-196-200-220-236 stitches. REMEMBER THE KNITTING TENSION! Continue with stocking stitch, without further increases, until the piece measures 22-24-25-26-27-28 cm from the marker on the neck. On the next round divide for the body and sleeves as follows: Work the first 25-27-29-30-34-37 stitches (= half back piece), place the next 32-38-40-40-42-44 stitches on a thread for the sleeve, cast on 4-4-4-6-6-6 stitches (= in side under sleeve), work the next 50-54-58-60-68-74 stitches (= front piece), place the next 32-38-40-40-42-44 stitches on a thread for the sleeve, cast on 4-4-4-6-6-6 stitches (= in side under sleeve), work the last 25-27-29-30-34-37 stitches (= half back piece). The body and sleeves are finished separately. BODY: = 108-116-124-132-148-160 stitches. Insert 1 marker thread in the middle of the new stitches cast on under each sleeve. Allow the threads to follow your work onwards; they are used when decreasing in the sides. Continue in the round with stocking stitch for 5 cm. Then decrease 1 stitch on each side of both marker threads – read DECREASE TIP. Decrease like this every 9-9-5-10-5-7 cm a total of 2-2-3-2-2-2 times = 100-108-112-124-140-152 stitches. Work until the piece measures 30-30-31-32-33-34 cm from the division (6 cm left to finished length; try the jumper on and work to desired length). Knit 1 round where you increase 8-12-12-12-12-12 stitches evenly spaced - remember INCREASE/DECREASE TIP = 108-120-124-136-152-164 stitches. Change to circular needle size 7 mm and work rib (knit 2, purl 2) for 6 cm. Read CASTING-OFF TIP and cast off with knit over knit and purl over purl. The jumper measures approx. 62-64-66-68-70-72 cm from the shoulder down. SLEEVES: Place the 32-38-40-40-42-44 stitches from the thread on the one side of the piece on double pointed needles/short circular needle size 8 mm and knit up 1 stitch in each of the 4-4-4-6-6-6 stitches cast on under the sleeve = 36-42-44-46-48-50 stitches. Continue with stocking stitch in the round for 2 cm. Then decrease 2 stitches under the sleeve – read DECREASE TIP. Decrease like this every 6-4-4-3½-4-5 cm a total of 4-6-6-7-6-5 times = 28-30-32-32-36-40 stitches. Continue working until the sleeve measures 40-39-38-38-38-38 cm from the division (6 cm left to finished length; try the jumper on and work to desired length). Knit 1 round where you increase 4-2-4-4-4-4 stitches evenly spaced = 32-32-36-36-40-44 stitches. Change to double pointed needles size 7 mm and work rib (knit 2, purl 2) for 6 cm. The sleeve measures approx. 46-45-44-44-44-44 cm from the division. Remember CASTING-OFF TIP and cast off with knit over knit and purl over purl. Work the other sleeve in the same way. |
|
 |
|
Have you finished this pattern?Tag your pictures with #dropspattern #rivermosssweater or submit them to the #dropsfan gallery. Do you need help with this pattern?You'll find 27 tutorial videos, a Comments/Questions area and more by visiting the pattern on garnstudio.com. © 1982-2026 DROPS Design A/S. We reserve all rights. This document, including all its sub-sections, has copyrights. Read more about what you can do with our patterns at the bottom of each pattern on our site. |
|


With over 40 years in knitting and crochet design, DROPS Design offers one of the most extensive collections of free patterns on the internet - translated to 17 languages. As of today we count 324 catalogues and 12290 patterns translated into English (UK/cm). 12290
We work hard to bring you the best knitting and crochet have to offer, inspiration and advice as well as great quality yarns at incredible prices! Would you like to use our patterns for other than personal use? You can read what you are allowed to do in the Copyright text at the bottom of all our patterns. Happy crafting!
Post a comment to pattern DROPS 224-3
We would love to hear what you have to say about this pattern!
If you want to leave a question, please make sure you select the correct category in the form below, to speed up the answering process. Required fields are marked *.