
Popular categories
Looking for a yarn?


Comments / Questions (46)
![]() Maija Maija wrote:
Maija Maija wrote:
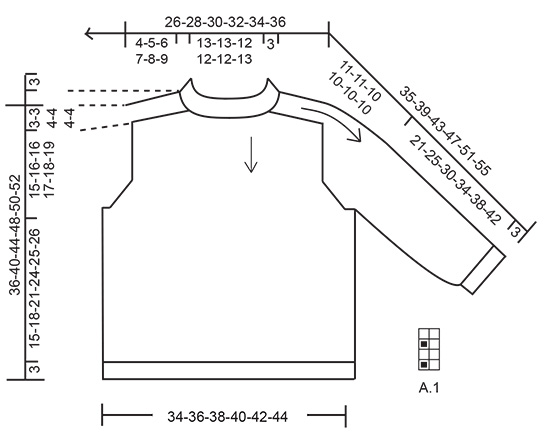
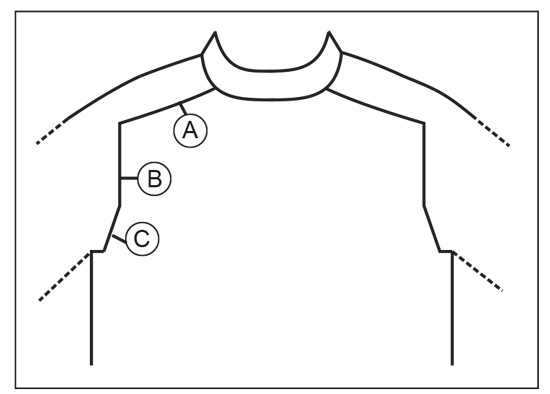
Hei! Tästä ohjeesta puuttuu piirros (A.1) mallineuleesta.
25.02.2026 - 21:38DROPS Design answered:
Hei, piirros löytyy mittapiirroksen oikealta puolelta.
26.02.2026 - 19:14
![]() Alicia wrote:
Alicia wrote:
Hola, podría explicarme la separación de los marcadores en los aumentos del canesú, no entiendo a qué se refiere con la parte más alejada. Gracias
29.12.2025 - 17:32DROPS Design answered:
Hola Alicia, el punto más externo es el punto en cada extremo de la labor. Puedes ver un ejemplo de cómo se mueven los marcapuntos para el canesú en este tipo de hombro en este video.
04.01.2026 - 22:51
![]() Dominique wrote:
Dominique wrote:
Bonjour Pour l empiècement je ne comprends le décalage des marqueurs et les 37 mailles entre les manches
05.11.2025 - 17:43DROPS Design answered:
Bonjour Dominique, après les augmentations des manches, vous avez 37 mailles pour les manches (en 5/6 ans - soit 15 m + 11 x 2 mailles augmentées); vous devez maintenant mettre les marqueurs dans la 1ère et dans la dernière maille du devant et du dos, auparavant vos marqueurs étaient entre 2 mailles, ils doivent être maintenant dans une maille, vous augmenterez pour l'empiècement (comme pour un raglan) de chaque côté de cette maille avec un marqueur. Bon tricot!
06.11.2025 - 09:13
![]() Dominique wrote:
Dominique wrote:
Pour les augmentations des épaules et manches marteau au début je dois faire 14 tours en augmentant et seulement après je fais les autres augmentations
11.10.2025 - 14:04DROPS Design answered:
Bonjour Dominique, vous augmentez effectivement d'abord 14 fois (4 m) tous les tours pour les épaules/manches marteau, vous aurez alors 156 m; vous augmentez ensuite pour les manches seulement (11 fois (4 m) tous les 2 tours = 188 m); puis pour l'empiècement (pensez juste à décaler les marqueurs dans une maile et plus entre les mailles), 5 fois (8 m) tous les 2 tours = 240 m. Bon tricot!
15.10.2025 - 07:44
![]() Dominique wrote:
Dominique wrote:
Bonjour Je fais d abord 14 tours en augmentant 4 fois avant et après les marqueurs et après seulement je fais les autres augmentations
10.10.2025 - 08:40DROPS Design answered:
Bonjour Dominique, en taille 5/6 ans vous devez augmenter 14 fois tous les tours pour le dos/le devant seulement soit 4 maille au total: vous augmentez 1 m avant les marqueurs -1 et 3 et après les marqueurs -2 et -4; le dos se trouve entre les marqueurs. N'augmentez pas pour les manches (après les marqueurs -1 et -3 ni avant les marqueurs -2 et -4). Bon tricot!
10.10.2025 - 17:04
![]() Dominique wrote:
Dominique wrote:
Bonjour Augmentation épaules manches marteau Je dois faire 14 tours en augmentant 4 fois d une maille (avant et après les marqueurs) Mais mon dessin de côtes va être décalé Les augmentations manches je les fais apres
09.10.2025 - 18:10DROPS Design answered:
Bonjour Dominique, au début du dos/devant, tricotez la nouvelle maille en lisant le diagramme de gauche à droite et à la fin du dos/devant, tricotez la nouvelle maille en lisant le diagramme de droite à gauche, vous devez toujours avoir 1 m jersey, 1 m point mousse en alternance. Bon tricot!
10.10.2025 - 08:04
![]() Noella wrote:
Noella wrote:
Bonjour , je tricote le modèle en 5/6 ans quand vous dites tricoter les augmentations enA1 ça veut dire que le rang précédent est tricoté tout à l’endroit ? Si j’ai compris !Merci
01.10.2025 - 21:06DROPS Design answered:
Bonjour Noella, le nombre de mailles en point fantaisie A.1 va progressivement s'élargir sur les côtés, si la 1ère maille après l'augmentation est la 1ère maille de A.1 vous tricoterez la maille augmentée avant cette 1ère maille comme la 2ème maille du diagramme, puis, l'augmentation suivante sera tricotée comme la 1ère et ainsi de suite. De même, si la dernière maille avant l'augmentation est la 1ère m de A.1 vous tricoterez l'augmentation comme la 2ème maille de A.1, puis l'augmentation suivante comme la 1ère et ainsi de suite. Bon tricot!
02.10.2025 - 08:41
![]() Elaine wrote:
Elaine wrote:
I love the feature that circles the stitch numbers/counts according to the size selected (and that those circles also print with the pattern)! This is the first time I've noticed that feature -- it's a great addition.
25.09.2025 - 16:32
![]() Ljiljana wrote:
Ljiljana wrote:
I found it!
15.08.2025 - 15:43
![]() Ljiljana wrote:
Ljiljana wrote:
Hello, I don't see this diagram A1 anywhere. You said through the comments it is just to the right of the measurement chart, under the sleeve, it is knitted over 2 stitches and 4 rows. But I can't see it anywhere. Help!!!
15.08.2025 - 15:41DROPS Design answered:
Dear Ljiljana, that's right, you will find the diagram A.1 next to the measurement chart; it's a small diagram over 2 sts and 4 rows that you have to repeat as explained in the written pattern,. Happy knitting!
15.08.2025 - 15:50
|
|||||||||||||||||||
Weekend Games Jumper#weekendgamesjumper |
|||||||||||||||||||
 |
 |
||||||||||||||||||
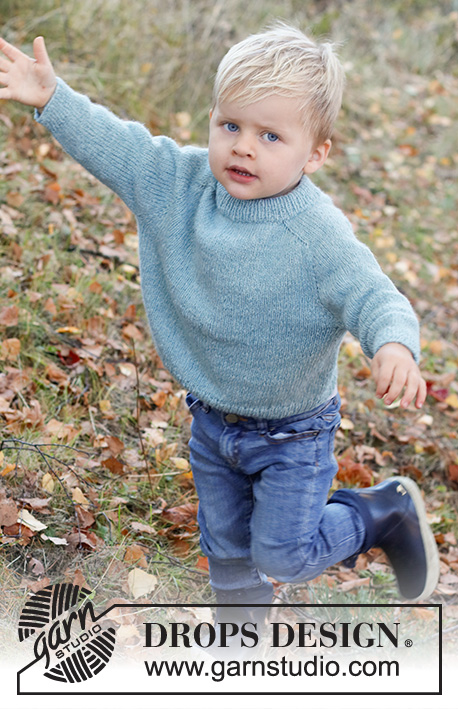
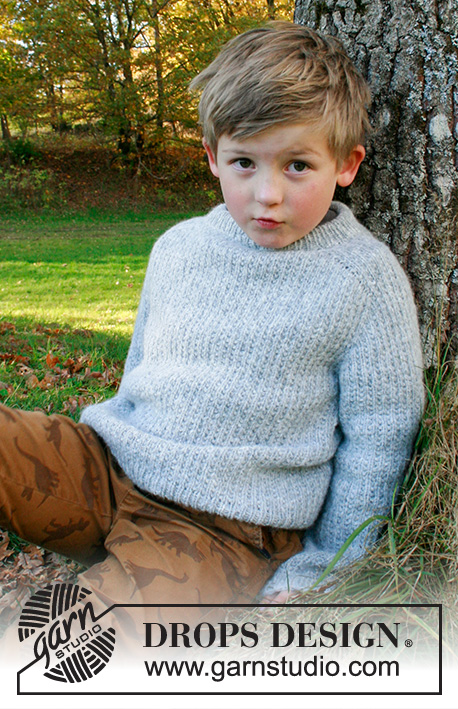
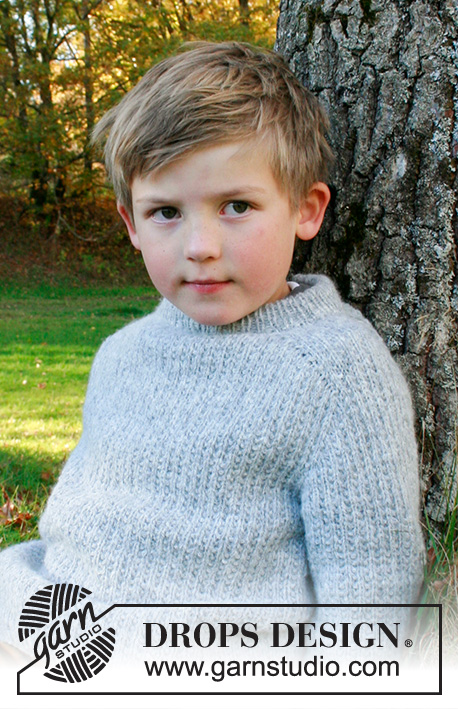
Knitted jumper for children in DROPS Sky. The piece is worked top down with double neck, textured pattern and saddle shoulders. Sizes 3 – 14 years.
DROPS Children 40-20 |
|||||||||||||||||||
|
------------------------------------------------------- EXPLANATIONS FOR THE PATTERN: ------------------------------------------------------- PATTERN: See diagram A.1. INCREASE TIP-1 (evenly spaced): To work out how to increase evenly, count the total number of stitches on the needle (e.g. 78 stitches) and divide by the number of increases to be made (e.g. 18) = 4.3. In this example, increase by making 1 yarn over after approx. each 4th stitch. On the next round work the yarn overs twisted to avoid holes. INCREASE TIP-2 (for saddle shoulders, sleeves and yoke): BEFORE MARKER: The new stitch twists to the right. Use the left needle to pick up the strand between 2 stitches from the previous round, pick up the back strand and knit in the front loop. AFTER MARKER: The new stitch twists to the left. Use the left needle to pick up the strand between 2 stitches from the previous round, pick up the front strand and knit in the back loop. DECREASE TIP (for sleeves): Start 2 stitches before the marker thread, knit 2 together, work the marker-stitch as before, slip 1 stitch as if to knit, knit 1 and pass the slipped stitch over the knitted stitch (2 stitches decreased). CASTING-OFF TIP: To avoid the cast-off edge being tight you can cast off with a larger size needle. If the edge is still tight, make 1 yarn over after approx. each 6th stitch at the same time as casting off; the yarn overs are cast off as normal stitches. ------------------------------------------------------- START THE PIECE HERE: ------------------------------------------------------- JUMPER – SHORT OVERVIEW OF THE PIECE: The neck and yoke are worked in the round with circular needle, from the right shoulder and top down. Stitches are increased for the saddle shoulders, then for the sleeves and finally for the yoke. The yoke is divided for the body and sleeves and the body continued in the round. The sleeves are worked in the round with double pointed needles, top down. DOUBLE NECK: Cast on 78-80-82-84-86-88 stitches with short circular needle size 3 mm and Sky. Knit 1 round. Work rib in the round (knit 1, purl 1) for 7 cm. When the rib is finished, knit 1 round where you increase 18-20-22-24-22-24 stitches evenly spaced – read INCREASE TIP-1 = 96-100-104-108-108-112 stitches. Knit 1 round (yarn overs knitted twisted). Now work the yoke as described below. YOKE: Change to circular needle size 4 mm. Insert 1 marker after the first 32-33-35-37-37-38 stitches on the round = mid-front. The yoke is measured from this marker! In addition insert 4 other markers, without working the stitches, as follows – each marker is inserted between 2 stitches, is used when increasing for the saddle shoulders and should have a different colour to the marker on the neck. Marker 1: Insert the marker before the first stitch on the round = back of right shoulder. Marker 2: Count 15-15-17-19-19-19 stitches from marker 1 (= shoulder), insert the marker before the next stitch. Marker 3: Count 33-35-35-35-35-37 stitches from marker 2 (= front piece), insert the marker before the next stitch. Marker 4: Count 15-15-17-19-19-19 stitches from marker 3 (= shoulder), insert the marker before the next stitch. There are 33-35-35-35-35-37 stitches left on the round after marker 4 (= back piece). Allow these 4 markers to follow your work onwards. SADDLE-SHOULDER INCREASES: Read the whole section before continuing! Work A.1 in the round. AT THE SAME TIME, on the first round, increase 4 stitches for the shoulders as follows: Increase BEFORE markers 1 and 3 and AFTER markers 2 and 4 – read INCREASE TIP-2. You are only increasing on the front and back pieces, the number of shoulder stitches remains the same. Increase like this EVERY round a total of 12-14-16-20-22-26 times = 144-156-168-188-196-216 stitches – the increased stitches are worked into A.1. REMEMBER THE KNITTING TENSION! After the last increase the piece measures approx. 4-5-6-7-8-9 cm from the marker mid-front. Now increase for the sleeves as follows. SLEEVE INCREASES: Continue A.1 in the round. AT THE SAME TIME on the next round increase 4 stitches for the sleeves as follows: Increase AFTER markers 1 and 3 and BEFORE markers 2 and 4. You increase only on the sleeves and the number of stitches on the front and back pieces remains the same. The new stitches are worked into A.1. Increase like this every 2nd round a total of 11-11-7-9-10-10 times = 188-200-196-224-236-256 stitches. The piece measures approx. 12-13-11-13-15-16 cm from the marker mid-front. Now increase for the yoke as described below. YOKE INCREASES: Move each marker so they are inserted in the outermost stitch on each side of the front and back pieces. There are 37-37-31-37-39-39 stitches between the marker-stitches on each sleeve. On the next round increase 8 stitches, by increasing both before and after all 4 marker-stitches – remember INCREASE TIP-2. You are now increasing on the front/back pieces and on the sleeves; the increased stitches are worked into A.1. Increase like this every 2nd round a total of 5-5-7-4-4-3 times = 228-240-252-256-268-280 stitches. When all the increases are finished, the piece measures approx. 15-16-16-16-18-18 cm from the marker mid-front. Continue working, without further increases, until the piece measures 15-16-16-17-18-19 cm from the marker mid-front – finish the last round when there are 0-1-3-3-3-5 stitches left on the round. Now divide the yoke for the body and sleeves as follows: Place the first 47-49-51-51-53-55 stitches on 1 thread for the sleeve, cast on 5-5-5-7-7-7 new stitches (= in side under sleeve), work the next 67-71-75-77-81-85 stitches as before (= front piece), place the next 47-49-51-51-53-55 stitches on 1 thread for the sleeve, cast on 5-5-5-7-7-7 new stitches (= in side under sleeve), work the last 67-71-75-77-81-85 stitches (= back piece). Cut the strand. The body and sleeves are finished separately. THE PIECE IS NOW MEASURED FROM HERE. BODY: = 144-152-160-168-176-184 stitches. Start on the one side of the piece, in the middle of the 5-5-5-7-7-7 stitches cast on under the sleeve and continue A.1 in the round until the piece measures 15-18-21-24-25-26 cm from the division. There is approx. 3 cm left to finished length; try the jumper on and work to desired length. Change to circular needle size 3 mm and work rib (knit 1, purl 1) for 3 cm - make sure the rib fits neatly over A.1, with knit over knit and purl over garter stitch. Cast off with knit over knit and purl over purl – read CASTING-OFF TIP! The jumper measures approx. 36-40-44-48-50-52 cm from the shoulder down. SLEEVES: Place the 47-49-51-51-53-55 stitches from the thread on the one side of the piece on double pointed needles size 4 mm and knit up 1 stitch in each of the 5-5-5-7-7-7 stitches cast on under the sleeve = 52-54-56-58-60-62 stitches. Insert a marker thread in the middle of the 5-5-5-7-7-7 new stitches under the sleeve. Start at the marker thread and work A.1 in the round – make sure the pattern continues the pattern on the yoke. When the sleeve measures 3 cm from the division, decrease 2 stitches mid-under the sleeve – read DECREASE TIP. Decrease like this every 2½-2½-3½-3½-4-4 cm a total of 7-8-8-9-9-10 times = 38-38-40-40-42-42 stitches. Continue working without further decreases until the sleeve measures 21-25-30-34-38-42 cm from the division. There is approx. 3 cm left to finished length; try the jumper on and work to desired length. Change to double pointed needles size 3 mm and work rib (knit 1, purl 1) for 3 cm, making sure the rib matches neatly over A.1. Cast off with knit over knit and purl over purl – remember CASTING-OFF TIP! The sleeve measures approx. 24-28-33-37-41-45 cm from the division. Work the other sleeve in the same way. ASSEMBLY: Fold the neck double to the wrong side and sew down. To avoid the neck being tight and rolling outwards, it is important the seam is elastic. |
|||||||||||||||||||
Diagram explanations |
|||||||||||||||||||
|
|||||||||||||||||||
 |
|||||||||||||||||||
 |
|||||||||||||||||||
Have you finished this pattern?Tag your pictures with #dropspattern #weekendgamesjumper or submit them to the #dropsfan gallery. Do you need help with this pattern?You'll find 32 tutorial videos, a Comments/Questions area and more by visiting the pattern on garnstudio.com. © 1982-2026 DROPS Design A/S. We reserve all rights. This document, including all its sub-sections, has copyrights. Read more about what you can do with our patterns at the bottom of each pattern on our site. |
|||||||||||||||||||


With over 40 years in knitting and crochet design, DROPS Design offers one of the most extensive collections of free patterns on the internet - translated to 17 languages. As of today we count 324 catalogues and 12290 patterns translated into English (UK/cm). 12290
We work hard to bring you the best knitting and crochet have to offer, inspiration and advice as well as great quality yarns at incredible prices! Would you like to use our patterns for other than personal use? You can read what you are allowed to do in the Copyright text at the bottom of all our patterns. Happy crafting!
Post a comment to pattern DROPS Children 40-20
We would love to hear what you have to say about this pattern!
If you want to leave a question, please make sure you select the correct category in the form below, to speed up the answering process. Required fields are marked *.