
Popular categories
Looking for a yarn?


Comments / Questions (11)
![]() Ina wrote:
Ina wrote:
Waarom bij de dubbele halsboord 1 recht , 2 averecht. De andere boorden zijn 1 recht, 1 averecht
21.05.2024 - 15:48
![]() Lara wrote:
Lara wrote:
Guten Tag, ich würde gerne dieses Top als eher winterlichten Pullunder stricken. Dazu habe ich zwei Fragen: 1.) Kann ich die Halsblende auch noch höher stricken und umschlagen? (als hoher Kragen/Rollkragen) 2.) Kann ich das Top insgesamt länger machen? Wie verfahre ich dann mit den Zunahmen, soll ich sie einfach "strecken", d.h. z.B. statt alle 4cm, alle 6cm? Vielen Dank!
21.04.2023 - 22:41DROPS Design answered:
Liebe Lara, sicher können Sie dieses Top als winterlichten Pullunder stricken, aber leider können wir nicht jede Anleitung nach jeder Anfrage anpassen bzw umrechnen; gerne kann Ihnen aber Ihr DROPS Händler damit (auch per Telefon oder per E-Mail) weiterhelfen. Danke im voraus für Ihr Verständnis. Viel Spaß beim stricken!
24.04.2023 - 09:32
![]() Talia D'Angiò wrote:
Talia D'Angiò wrote:
Molto bello. Da fare
04.06.2022 - 16:07
![]() Dori wrote:
Dori wrote:
Hola.Este patron lo he realizado con agujas rectas,tengo que empezar a cerrar para las sisas a partir de cuando ya estan separados el delantero y la espalda o cerrar tambien 3 puntos a cada lado? Gracias.
06.04.2022 - 00:52DROPS Design answered:
Hola Dori, supongo que al trabajar las partes por separado has añadido un punto extra a cada lado para la costura. Por lo tanto, tienes que cerrar 4 puntos a cada lado (si no, cierra 3). Cerrar para las sisas se hace tanto en redondo como con agujas rectas, como indica el patrón.
06.04.2022 - 20:14
![]() Kathryn wrote:
Kathryn wrote:
Hi, I have just separated for the armholes and working on the back with 100 sts (size L), if I cast off at the beginning of each row I am only casting off 18 sts, where I should only be left with 64 sts. Should I be decreasing at the start and end of each row for the armholes rather than casting off at the beginning only. Thanks so much.
31.01.2022 - 11:08DROPS Design answered:
Dear Kathryn, you should cast off at the beginning of every row on each side, ie both from RS and from WS: 3 sts at the beg of next 4 rows (= 3 sts 2 times on each side), 2 sts at the beg of next 8 rows (= 2 sts 4 times on each side) and 1 st at the beg of next 8 rows (= 1 st 4 times on each side) = 6+8+4 = 18 sts on each side. Happy knitting!
31.01.2022 - 17:34
![]() Inge Grete Kern wrote:
Inge Grete Kern wrote:
Jeg vil gerne vide vedr. Sammensygning af skulder hvor de sidste to pinde er ret, og I skriver “sy skuldersømmene indenfor aflukningskanten hvordan det gøres. Mvh.
08.11.2021 - 13:40DROPS Design answered:
Hej Inge, du finder en video som viser hvordan du kan sy skuldersømmen nederst i opskriften :)
09.11.2021 - 15:34
![]() Luciana Pignatelli wrote:
Luciana Pignatelli wrote:
Nella versione italiana, nella descrizione per il collo doppio c'è scritto che il n. delle maglie deve essere divisibile per 2 ma il punto indicato per le coste (1 maglia diritta, 2 maglie rovescio) è divisibile per 3... Nel davanti, alla fine delle spalle, c'è scritto di lavorare 1 ferro diritto sul diritto e di intrecciare a diritto sul diritto mentre nel dietro è indicato di lavorare 1 ferro diritto sul rovescio e di intrecciare a diritto sul diritto.
30.08.2021 - 01:03DROPS Design answered:
Buongiorno Luciana, per le coste sul collo abbiamo segnalato al settore design (c'era un errore nella traduzione inglese) e abbiamo corretto il testo italiano. mentre per quanto riguarda il davanti, abbiamo corretto il testo italiano. Grazie per la segnalazione! Buon lavoro!
30.08.2021 - 11:53
![]() Els wrote:
Els wrote:
Bij het opzetten van het genoemde aantal van 252 steken met Drops cotton light op pen 3,5 , krijg ik een veel grotere omvang dan die staat in het patroon (2×58). Kunt u mij laten weten of het aantal van 252 steken wel correct is? Bij voorbaat hartelijk dank. Met vriendelijke groet , Els
13.07.2021 - 19:07DROPS Design answered:
Dag Els,
Ja, het aantal p te zetten steken zoals aangegeven in het patroon is juist. Heb je een proeflapje gemaakt om te controleren of de stekenverhouding overeenkomt met het patroon? Er worden trouwens vanwege de kabel wel iets meer steken opgezet, omdat de kabels ervoor zorgen dat het werk samentrekt in de breedte.
20.07.2021 - 15:38
![]() IG Kerrn wrote:
IG Kerrn wrote:
Jeg strikker opskriften Swept Away Top, jeg er i tvivl vedr. Mønstret om den første linie som tilsyneladende er glatstrikning hele vejen rundt om den skal gentages (repeteres) for hver 8. Gang?
06.07.2021 - 11:25DROPS Design answered:
Hej, den første omgang i glatstrik, strikker du kun én gang. Men i diagrammet gentager du alle 8 pinde (hvor 1. og 5.omgang også er glatstrik) :)
06.07.2021 - 15:25
![]() Erica wrote:
Erica wrote:
Wunderschön und auch die Farbe :-)
08.01.2021 - 10:47
|
|||||||||||||||||||
Swept Away Top#sweptawaytop |
|||||||||||||||||||
 |
 |
||||||||||||||||||
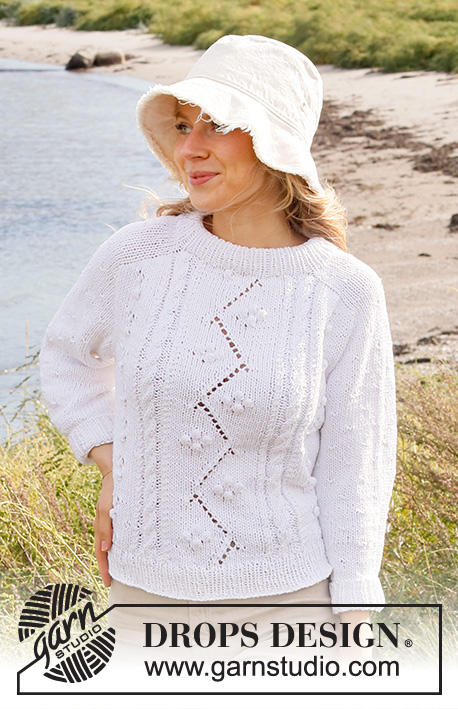
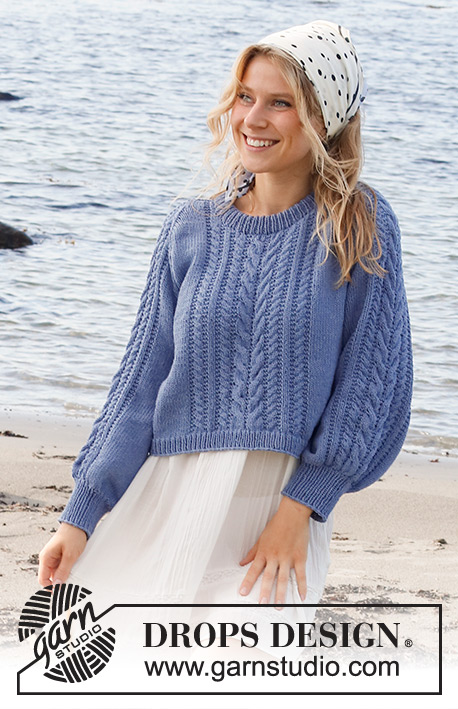
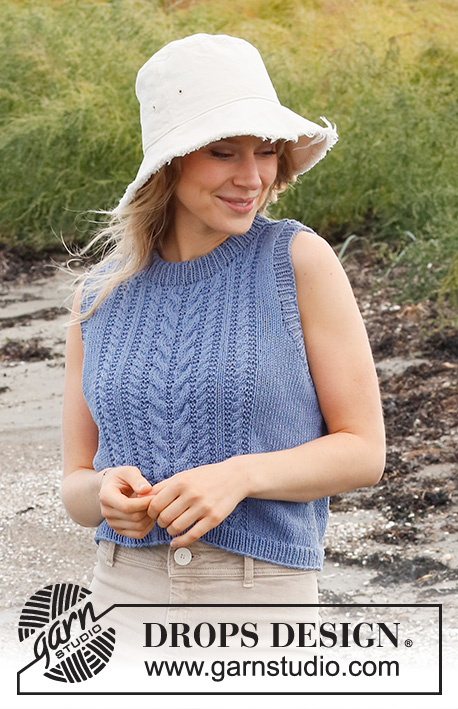
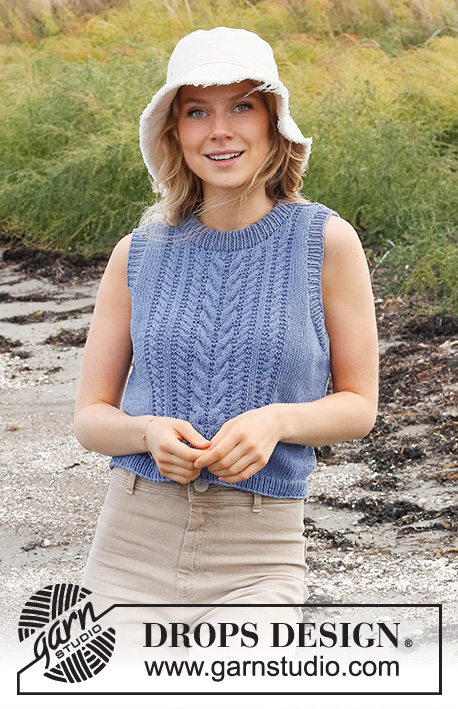
Knitted top in DROPS Cotton Light. The piece is worked with cables and double neck. Sizes S - XXXL.
DROPS 221-11 |
|||||||||||||||||||
|
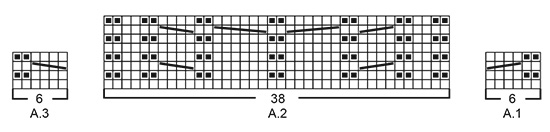
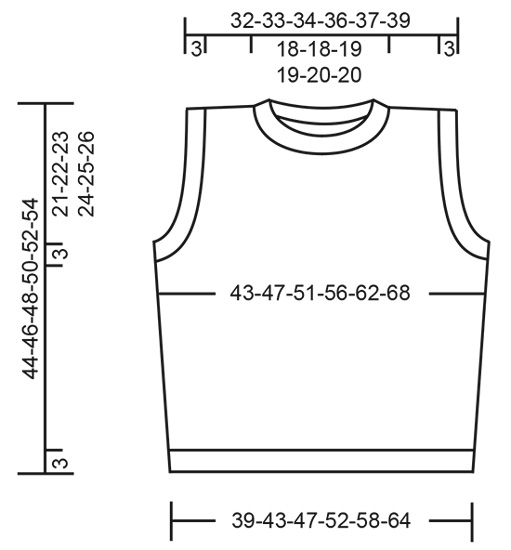
------------------------------------------------------- EXPLANATIONS FOR THE PATTERN: ------------------------------------------------------- RIDGE/GARTER STITCH (worked back and forth): Knit all rows. 1 ridge in height = Knit 2 rows. PATTERN: See diagrams A.1 to A.3. The diagrams show all rows in the pattern from the right side. INCREASE TIP-2 (for sides of body): Work until there are 3 stitches left before the marker thread, make 1 yarn over, knit 6 (marker thread sits between these 6 stitches) make 1 yarn over (= 2 stitches increased at each marker thread; 4 stitches increased on round). On the next round knit the yarn overs twisted to avoid holes. Then work the new stitches in stocking stitch. DECREASE TIP (evenly spaced): To work out how to decrease evenly, count the total number of stitches to be decreased over (e.g. 24 stitches) and divide by the number of decreases to be made (e.g. 8) = 3. In this example decrease by knitting together each 2nd and 3rd stitch. CASTING-OFF TIP: To avoid the cast-off edge being tight you can cast off with a larger size needle. If the edge is still tight, make 1 yarn over after approx. each 4th stitch at the same time as casting off; the yarn overs are cast off as normal stitches. ------------------------------------------------------- START THE PIECE HERE: ------------------------------------------------------- TOP – SHORT OVERVIEW OF THE PIECE: The body is worked in the round with circular needle, bottom up as far as the armholes. Then the front and back pieces are finished separately, back and forth on the needle. The shoulder seams are sewn and, finally, a ribbed edge is worked around the armholes and a ribbed double-neck. BODY: Cast on 172-188-204-228-252-276 stitches with circular needle size 3.5 mm and Cotton Light. Work 1 round of stocking stitch, then work rib in the round (knit 1, purl 1) for 3 cm. Change to circular needle size 4.5 mm. Insert 1 marker thread at the beginning of the round and 1 marker thread after 86-94-102-114-126-138 stitches (= sides of body). Allow the threads to follow your work onwards; they are used when increasing in the sides. Work 1 round of stocking stitch. The next round is worked as follows: * Work 18-22-26-26-32-38 stitches in stocking stitch, A.1 over the next 6-6-6-12-12-12 stitches (= 1-1-1-2-2-2 repeats of 6 stitches), work A.2 (= 38 stitches), A.3 over the next 6-6-6-12-12-12 stitches (= 1-1-1-2-2-2 repeats of 6 stitches), work 18-22-26-26-32-38 stitches in stocking stitch, marker thread *, work from *-* 1 more time. Continue this pattern. REMEMBER THE KNITTING TENSION! When the piece measures 5 cm increase 1 stitch on each side of both marker threads – read INCREASE TIP (= 4 stitches increased). Increase like this every 4-4-4½-5-5-5½ cm a total of 4 times on each side = 188-204-220-244-268-292 stitches. When the piece measures approx. 20-21-22-23-24-25 cm, cast off for each armhole as described below – adjust so the next round is an odd round in the diagrams (this is important to avoid cabling from the wrong side when the front and back pieces are worked back and forth): Start 3-4-5-6-7-8 stitches before the marker thread at the beginning of the round, cast off 6-8-10-12-14-16 stitches for the armhole, work as before until there are 3-4-5-6-7-8 stitches left before the next marker thread (= front piece), cast off 6-8-10-12-14-16 stitches for the armhole, work as before to the end of the round (= back piece). Then continue the front and back pieces separately, back and forth on the needle. BACK PIECE: = 88-94-100-110-120-130 stitches. Continue the pattern back and forth with 1 edge stitch in GARTER STITCH (read description above) on each side, and cast off for the armholes at the beginning of each row on both sides as follows: Cast off 3 stitches 1-1-2-2-2-3 times, 2 stitches 3-4-4-4-6-6 times and 1 stitch 5-5-4-6-6-6 times = 60-62-64-70-72-76 stitches. Continue working until the piece measures 41-43-45-47-49-51 cm. On the next row decrease 8 stitches evenly over the middle 26 stitches – read DECREASE TIP = 52-54-56-62-64-68 stitches. On the next row cast off the middle 34-34-36-36-38-38 stitches for the neck and each shoulder is finished separately. Continue by casting off 1 stitch on the next row from the neck = 8-9-9-12-12-14 stitches left. Continue working until there is 1 row left before the piece measures 44-46-48-50-52-54 cm. Knit 1 row from the wrong side where you decrease 0-0-0-1-1-1 stitch = 8-9-9-11-11-13 stitches. Cast off with knit from the right side. Work the other shoulder in the same way. FRONT PIECE: = 88-94-100-110-120-130 stitches. Continue the pattern back and forth with 1 edge stitch in garter stitch on each side, and cast off for the armholes at the beginning of each row on both sides as follows: Cast off 3 stitches 1-1-2-2-2-3 times, 2 stitches 3-4-4-4-6-6 times and 1 stitch 5-5-4-6-6-6 times = 60-62-64-70-72-76 stitches. When the piece measures 36-38-39-41-42-44 cm, decrease 6 stitches evenly over the middle 26 stitches – remember DECREASE TIP = 54-56-58-64-66-70 stitches. On the next row place the middle 18-18-20-20-22-22 stitches on 1 thread for the neck and each shoulder is finished separately. Continue by casting off at the beginning of each row from the neck as follows: Cast off 3 stitches 1 time, 2 stitches 2 times and 1 stitch 3 times = 8-9-9-12-12-14 stitches. Continue working until there is 1 row left before the piece measures 44-46-48-50-52-54 cm. Knit 1 row from the wrong side where you decrease 0-0-0-1-1-1 stitch = 8-9-9-11-11-13 stitches. Cast off with knit from the right side. Work the other shoulder in the same way. ASSEMBLY: Sew the shoulder seams inside the cast-off edge. ARMHOLE-EDGE: Start from the right side at the bottom of the armhole and knit up approx. 96 to 116 stitches with short circular needle size 3.5 mm and Cotton Light – the number of stitches must be divisible by 2. Work rib in the round (knit 1, purl 1) for 3 cm. Cast off with knit over knit and purl over purl – read CASTING-OFF TIP! Work the other armhole in the same way. DOUBLE NECK: Start from the right side, on one of the shoulders and knit up approx. 88 to 100 stitches around the neck ( including the stitches on the thread in front) with short circular needle size 3.5 mm and Cotton Light – the number of stitches must be divisible by 2. Work rib in the round (knit 1, purl 1) for 7 cm. Loosely cast off with knit over knit and purl over purl – remember CASTING-OFF TIP! Fold the neck double to the inside and sew down. To avoid the neck being tight and rolling outwards, it is important the seam is elastic. |
|||||||||||||||||||
Diagram explanations |
|||||||||||||||||||
|
|||||||||||||||||||
 |
|||||||||||||||||||
 |
|||||||||||||||||||
Have you finished this pattern?Tag your pictures with #dropspattern #sweptawaytop or submit them to the #dropsfan gallery. Do you need help with this pattern?You'll find 30 tutorial videos, a Comments/Questions area and more by visiting the pattern on garnstudio.com. © 1982-2026 DROPS Design A/S. We reserve all rights. This document, including all its sub-sections, has copyrights. Read more about what you can do with our patterns at the bottom of each pattern on our site. |
|||||||||||||||||||


With over 40 years in knitting and crochet design, DROPS Design offers one of the most extensive collections of free patterns on the internet - translated to 17 languages. As of today we count 324 catalogues and 12290 patterns translated into English (UK/cm). 12290
We work hard to bring you the best knitting and crochet have to offer, inspiration and advice as well as great quality yarns at incredible prices! Would you like to use our patterns for other than personal use? You can read what you are allowed to do in the Copyright text at the bottom of all our patterns. Happy crafting!
Post a comment to pattern DROPS 221-11
We would love to hear what you have to say about this pattern!
If you want to leave a question, please make sure you select the correct category in the form below, to speed up the answering process. Required fields are marked *.