
Popular categories
Looking for a yarn?


Comments / Questions (11)
![]() Fontaine wrote:
Fontaine wrote:
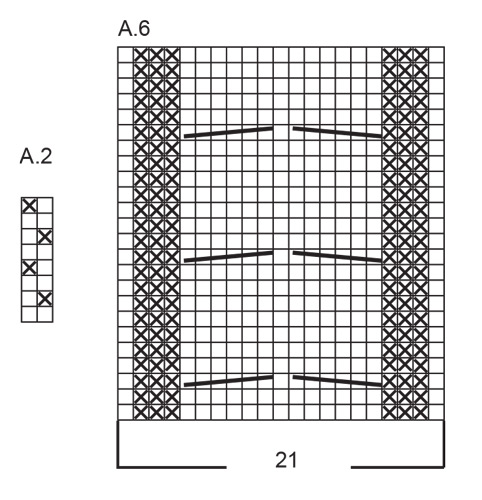
Bonjour, pour la manche, le diagramme A6, la torsade du rang 4 se fait elle sur l’envers?J’ai un doute, elle se faisait sur l’endroit pour le pull.Merci
21.03.2024 - 14:18DROPS Design answered:
Bonjour Mme Fontaine, vous avez raison, les torsades de A.6 doivent se faire sur l'endroit - commencez A.6 par le 2ème rang pour qu'il y ait 3 rangs avant les premières torsades (tant que le diagramme n'aura pas été corrigé). Merci pour votre retour. Bon tricot!
21.03.2024 - 16:00
![]() Wendy wrote:
Wendy wrote:
Good day this is a beautiful piece, is there anywhere that I can get the pattern in PDF format please?
24.06.2023 - 10:06DROPS Design answered:
Dear Wendy, you can click on the print option and, when it asks you to select the printer, you can choose to "Save as PDF". Happy knitting!
25.06.2023 - 13:45
![]() Anne Dubois wrote:
Anne Dubois wrote:
Pour l'arrondi de la manche, comment interpréter "rabattre 2 mailles de chaque côté jusqu'à ce que l'ouvrage mesure 46cm". Il me reste 6 rgs pour arriver à 46cm. Dois-je repartir ces 2m en 2x1m sur mes 6rgs restants ou dois-je rabattre en 1x2m au 5ème et 6ème rg ? Merci pour votre aide.
31.03.2023 - 12:27DROPS Design answered:
Bonjour Mme Dubois, rabattez 2 mailles au début de chaque rang sur l'endroit puis au début du rang suivant sur l'envers et répétez ces 2 rangs jusqu'à ce que la manche mesure 46 cm; s'i vous reste encore 6 rangs, vous allez tricoter 3 fois ces 2 rangs au total. Bon tricot!
11.04.2023 - 09:58
![]() Lyne Roberts wrote:
Lyne Roberts wrote:
What bust sizes are your patterns.Thankyou
12.02.2023 - 00:20DROPS Design answered:
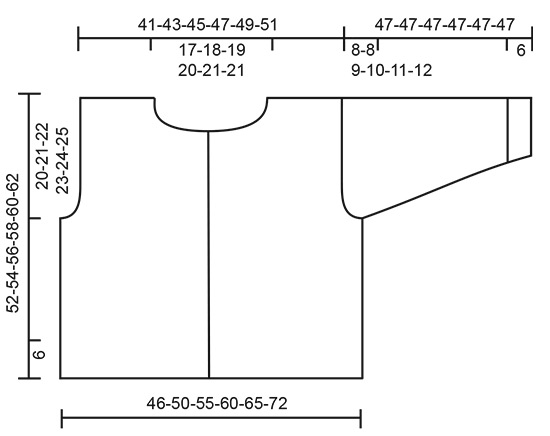
Dear Lyne, you can see the half-bust measurements of the garment in cm indicated in the schematic under the pattern instructions (41-43-45-47-49-51). Each number corresponds to a specific size: 41 is for the smallest size and 51 is for the largest size. Happy knitting!
12.02.2023 - 20:47
![]() Lyne Roberts wrote:
Lyne Roberts wrote:
I wish to knit this pattern but there's no back photo.Does it include pattern?
06.02.2023 - 08:58DROPS Design answered:
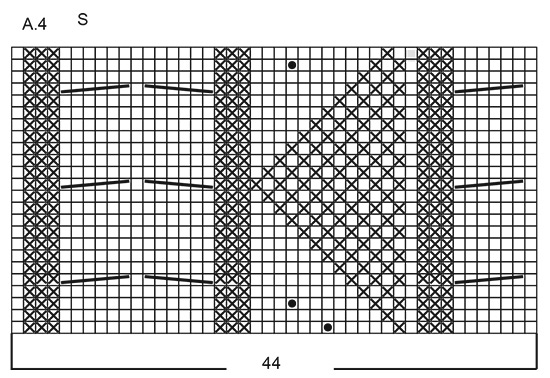
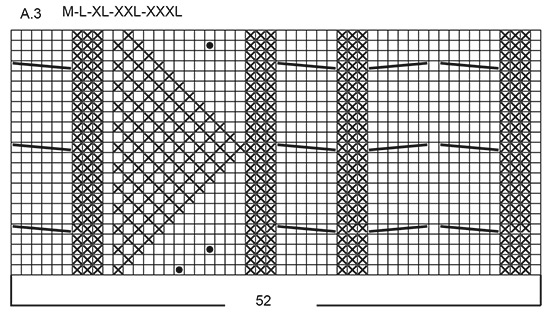
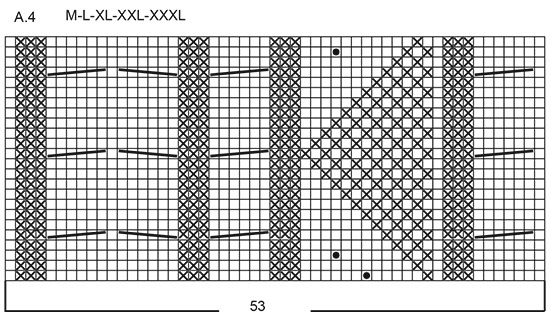
Dear Mrs Roberts, yes it does, you will work pattern A.3 and A.4 on back piece (with A.2 on each side of the jacket). Happy knitting!
06.02.2023 - 10:28
![]() Depaux wrote:
Depaux wrote:
Bonjour Madame oui j'aie recommender les cotes avec les mailles qui sont indicer sur le patron je vous remercie pour les conseille que vous me donnée
08.12.2022 - 16:44
![]() Depaux wrote:
Depaux wrote:
Bonjour madame j'aie bien reçu votre message et je vous remercie encore le modèle est bright sand shore cardigan je le tricote en bleu foncer j'aie du mal à comprendre les diagrammes du modèle après les cotes heureusement que je comment le modelé en gros plans du gilet en photo que je regarde en très gros plant Mercie pour votre conseille Mercie a vous madame depaux
06.12.2022 - 19:42DROPS Design answered:
Bonjour Mme Despaux, lisez bien les diagrammes en commençant en bas à droite (1er rang = sur l'endroit) et de droite à gauche sur l'endroit puis de gauche à droite sur l'envers. Les 5 m de bordure devant de chaque côté sont comprises dans le nombre de mailles à monter et vous n'avez pas besoin de les ajouter. Les manches se tricotent dans un point de riz fantaisie (cf diagramme A.2). Bon tricot!
07.12.2022 - 08:07
![]() Gouince wrote:
Gouince wrote:
Je ne comprends pas pour le diagramme j'aimerais faire taille moyen je ses pas où je doit regarder pour le diagramme et dommage que l'ont voie pas le dos merci beaucoup pour votre réponse
08.11.2022 - 14:39DROPS Design answered:
Bonjour Mme Gouince, cette leçon explique comment lire les diagrammes et devrait vous aider - en même temps, suivez bien les explications écrites qui indiquent comment tricoter les diagrammes. Nous n'avons malheureusement pas de photos du dos et n'avons plus le pull, mais le motif va se trouver dans le dos également, tout comme indiqué dans les explications. Bon tricot!
08.11.2022 - 16:50
![]() Babsi wrote:
Babsi wrote:
Bei den kraus rechts gestrickten Blenden: werden KEINE verkürzten Reihen gearbeitet? Ich frage wegen der Höhe...! Oder wird das durch die Zopfmuster nivelliert?
27.05.2021 - 18:12DROPS Design answered:
Liebe Babsi, hier wird keine verkürzte Reihe gestrickt, sollten Sie einige wollen, dann können Sie gerne einige stricken. Beachten Sie, ob Ihnen die Höhe unterschiedlich sein und verkürtzen Reihen verlangt. Viel Spaß beim stricken!
28.05.2021 - 07:54
![]() Sabine Hagemann wrote:
Sabine Hagemann wrote:
Alpenstrickjacke
07.01.2021 - 21:39
|
||||||||||||||||
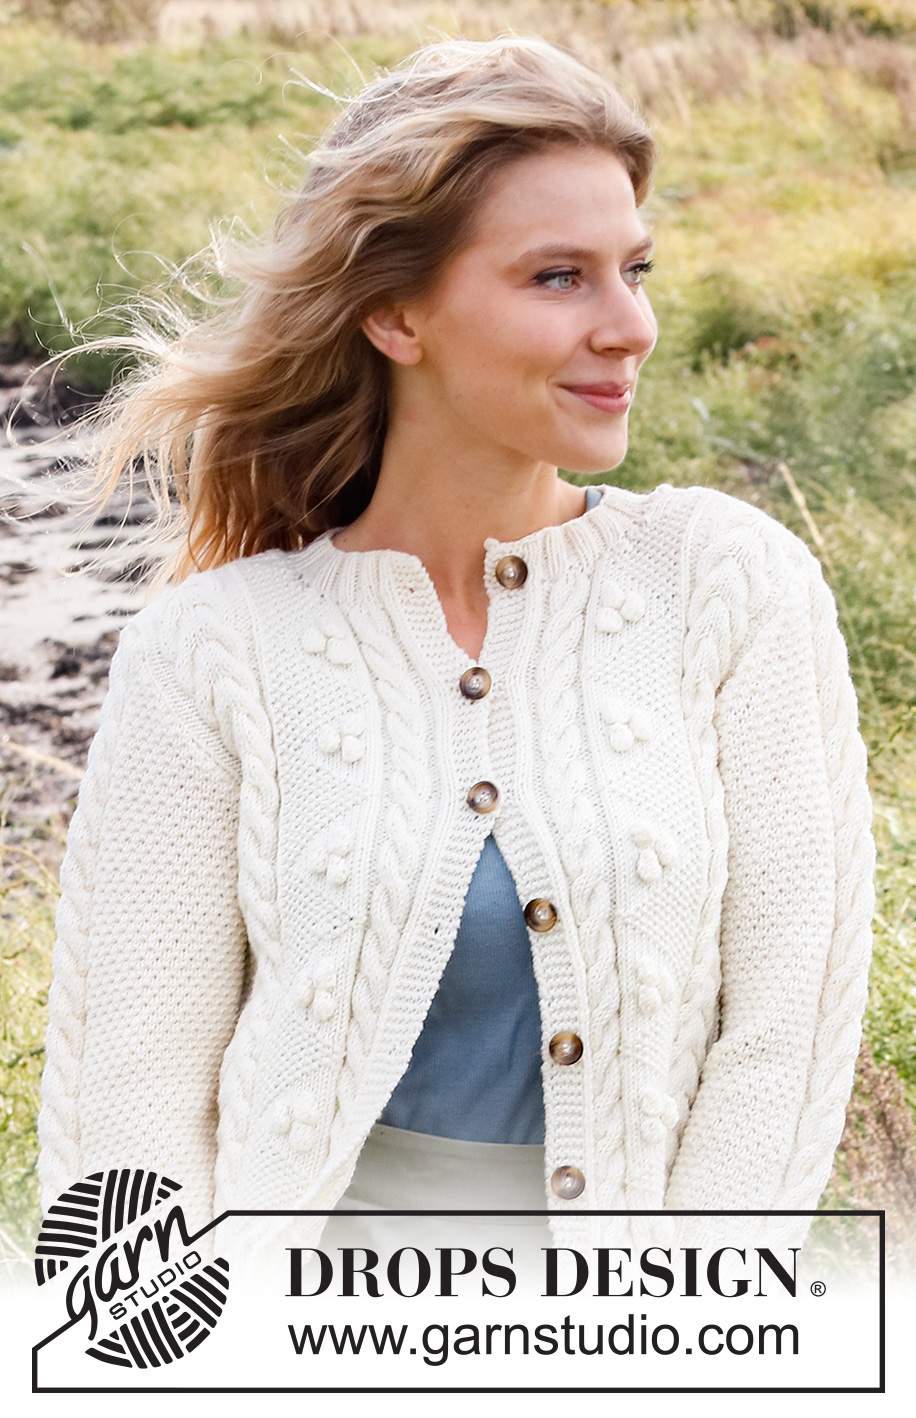
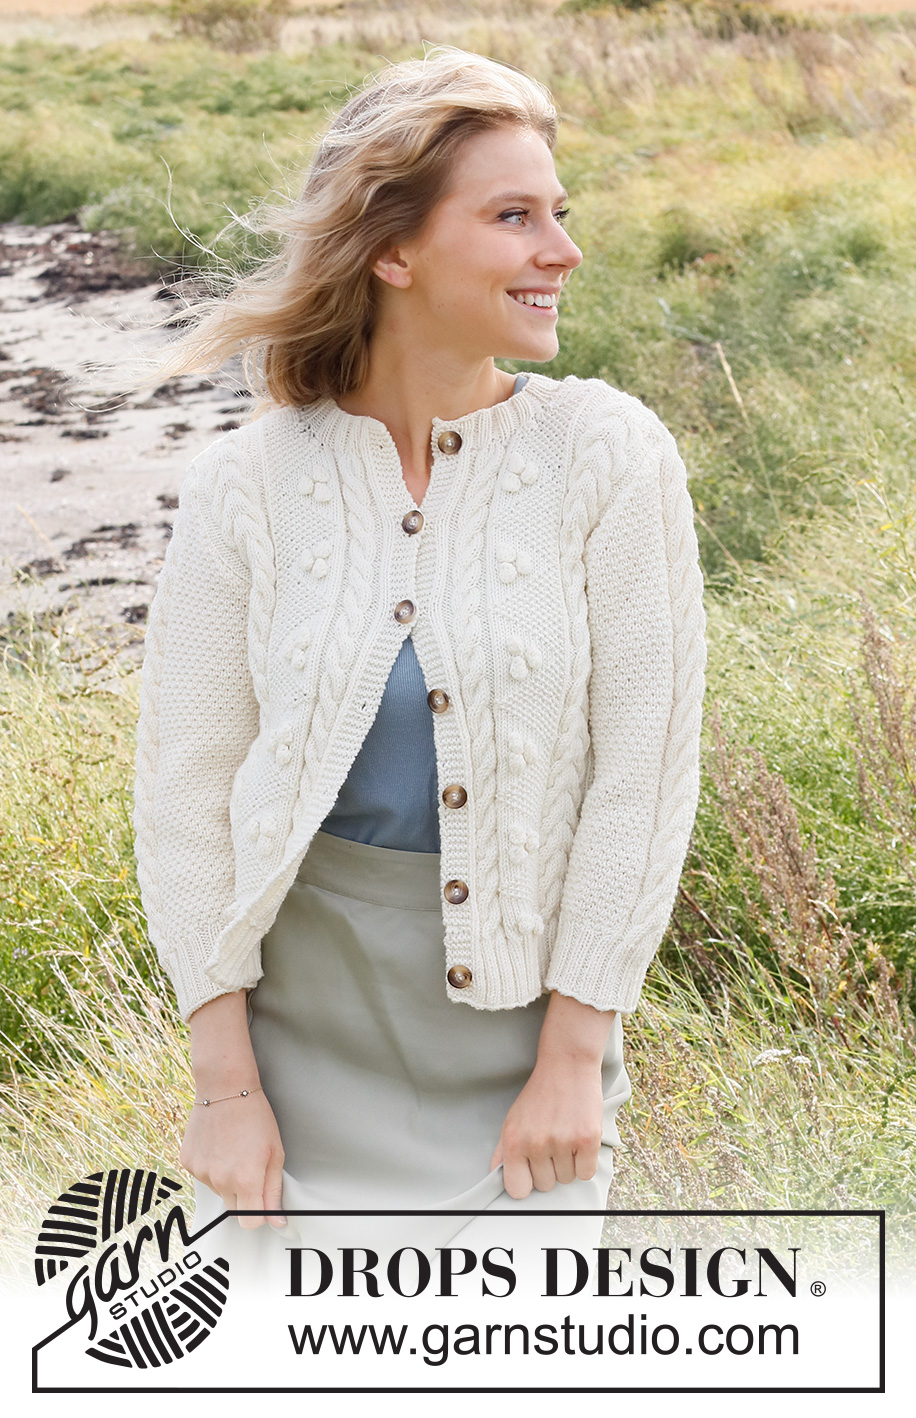
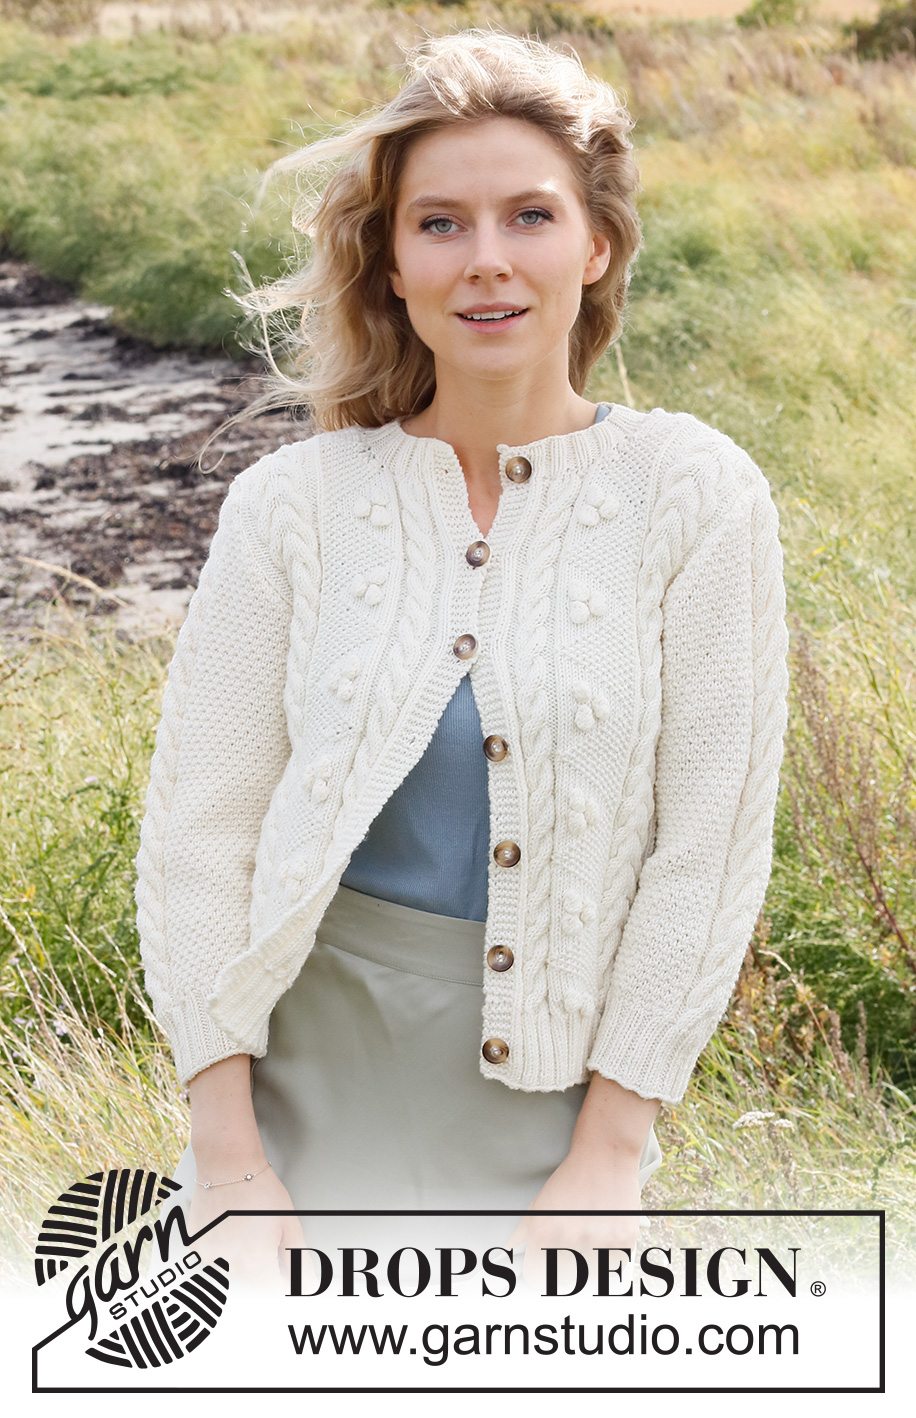
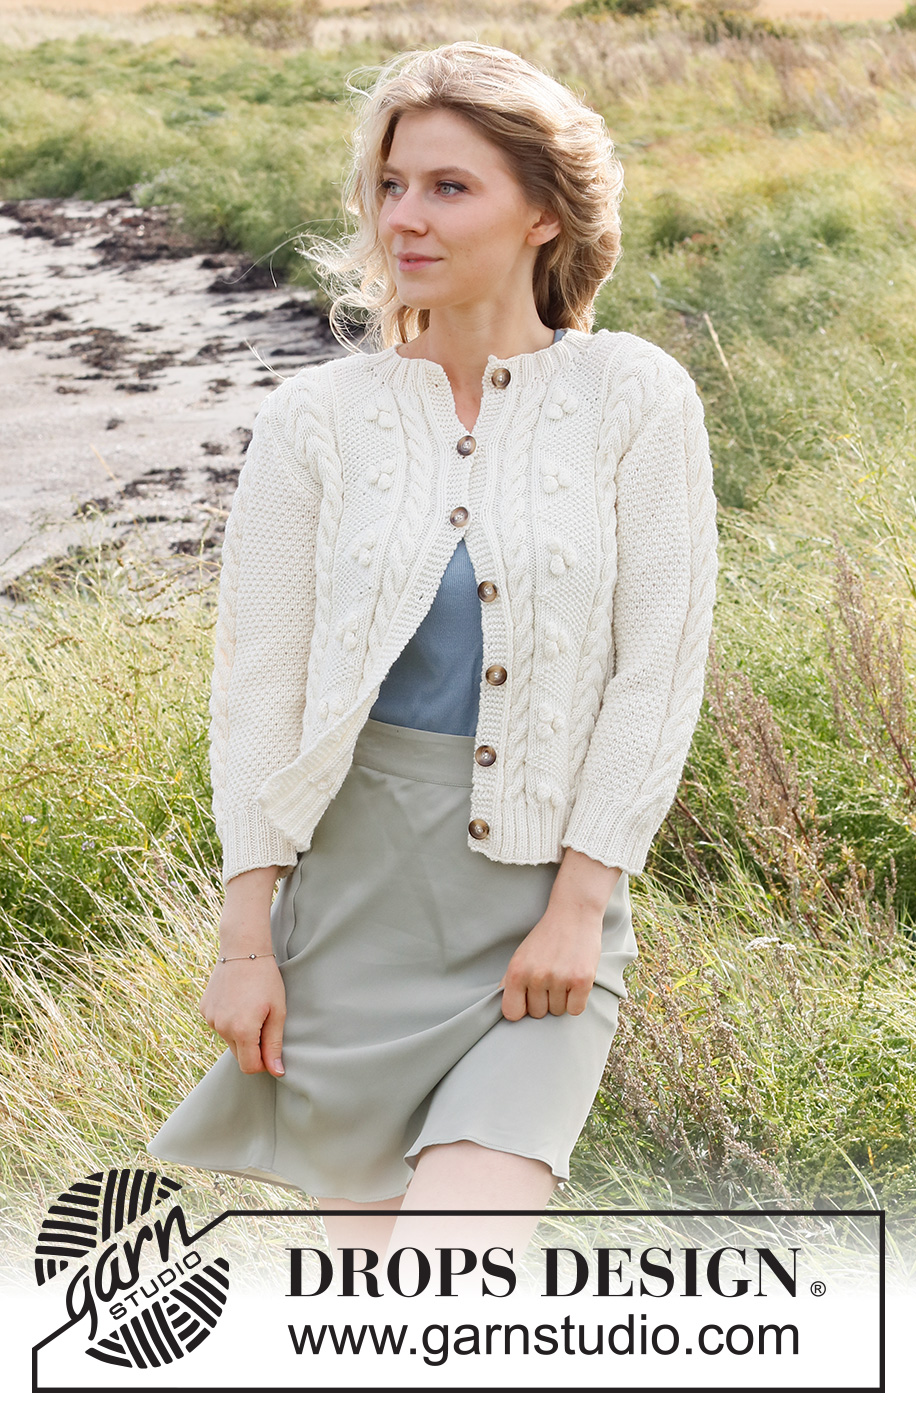
Bright Sand Shore Cardigan#brightsandshorecardigan |
||||||||||||||||
 |
 |
|||||||||||||||
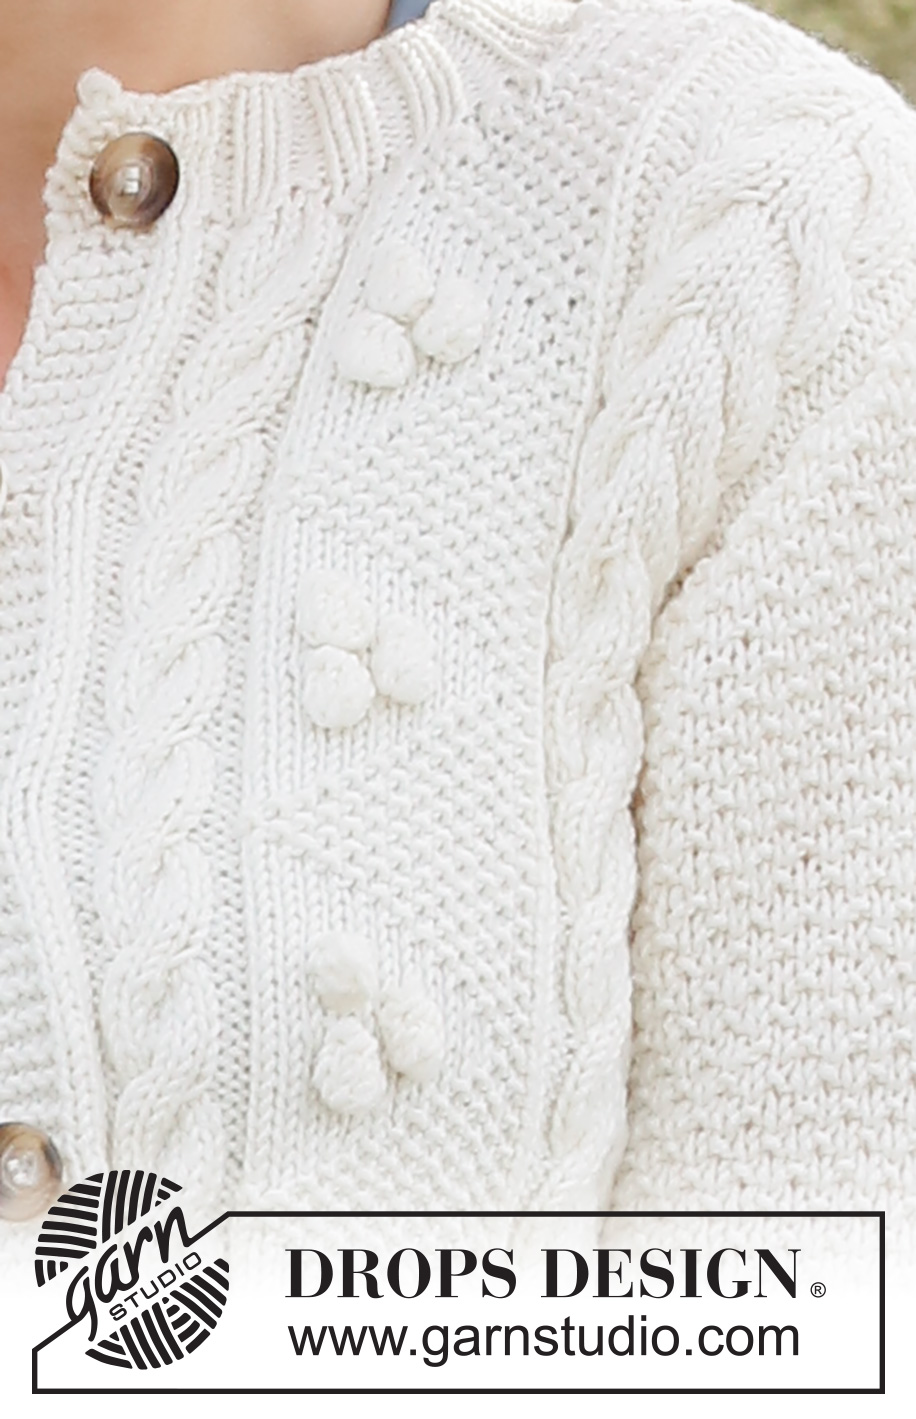
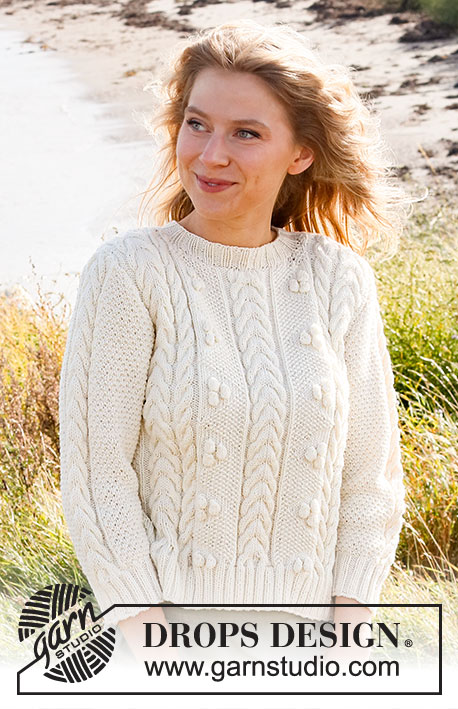
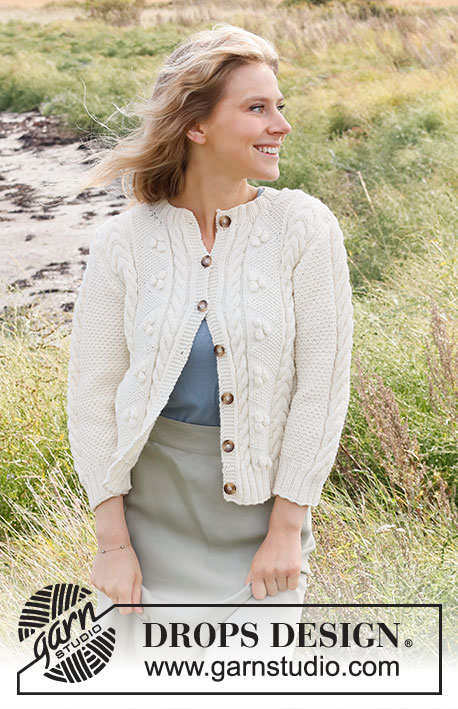
Knitted jacket in DROPS Merino Extra Fine. The piece is worked with cables, bobbles and ¾-length sleeves. Sizes S - XXXL.
DROPS 222-19 |
||||||||||||||||
|
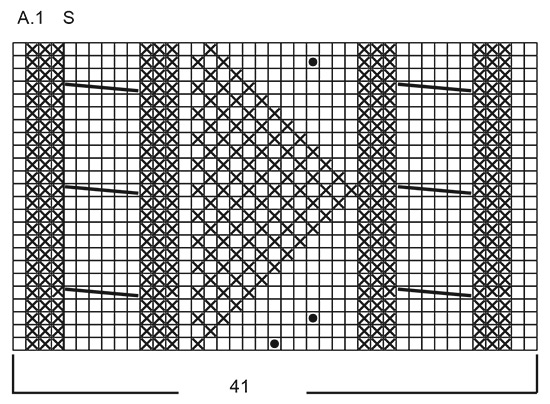
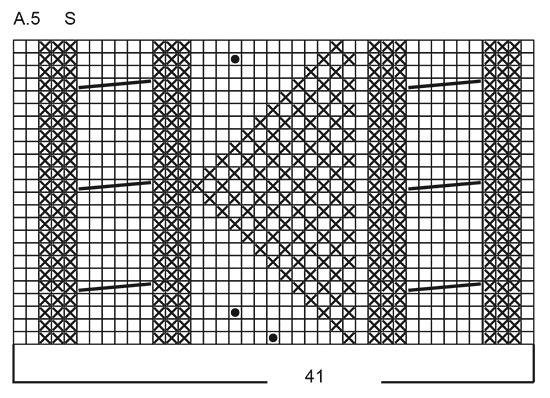
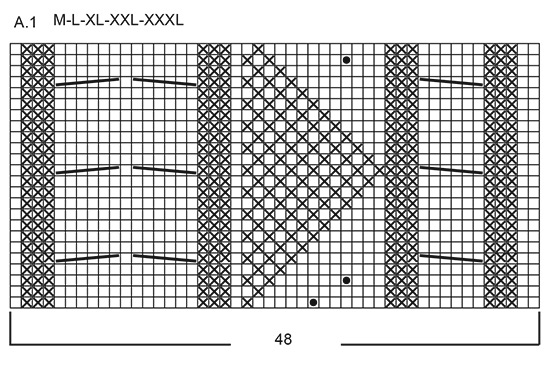
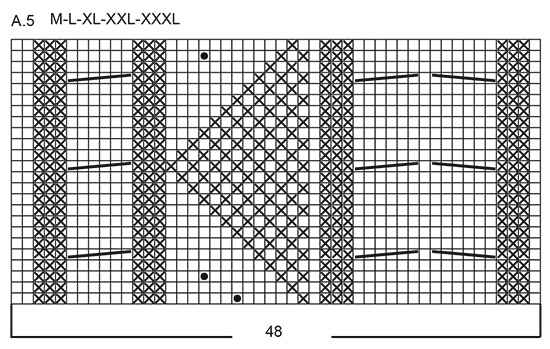
------------------------------------------------------- EXPLANATIONS FOR THE PATTERN: ------------------------------------------------------- RIDGE/GARTER STITCH (worked back and forth): Knit all rows. 1 ridge in height = Knit 2 rows. PATTERN: See diagrams A.1 to A.6. Choose diagrams for your size. The diagrams show all rows in the pattern seen from the right side. INCREASE TIP-1 (evenly spaced): To work out how to increase evenly, count the total number of stitches on the needle (e.g. 220 stitches), minus the bands (e.g. 10 stitches) and divide the remaining stitches by the number of increases to be made (e.g. 3) = 70. In this example, increase by making 1 yarn over after each 70th stitch. On the next row work the yarn overs twisted to avoid holes. INCREASE TIP-2 (for sleeves): Increase by making 1 yarn over inside the 1 edge stitch on each side. On the next row work the yarn overs twisted to avoid holes. Then work the new stitches into A.2. BUTTONHOLES: Work the buttonholes on the right band. 1 BUTTONHOLE = knit together the third and fourth stitch from the edge and make 1 yarn over. On the next row knit the yarn over to leave a hole. Work the buttonholes when the piece measures (the last buttonhole is worked on the neck): S: 3, 10, 17, 24, 31, 39 and 47 cm M: 3, 10, 17, 25, 33, 41 and 49 cm L: 3, 11, 19, 27, 35, 43 and 51 cm XL: 3, 11, 19, 27, 36, 44 and 53 cm XXL: 3, 11, 19, 28, 37, 46 and 55 cm XXXL: 3, 12, 21, 30, 39, 48 and 57 cm ------------------------------------------------------ START THE PIECE HERE: ------------------------------------------------------- JACKET – SHORT OVERVIEW OF THE PIECE: The piece is worked back and forth with circular needle, from mid front and bottom up as far as the armholes. Then the front and back pieces are finished separately back and forth. The sleeves are worked back and forth with circular needle, bottom up. The piece is sewn together as described in the text. The neck is worked to finish. BODY: Cast on 220-240-260-280-304-332 stitches (including 5 band stitches on each side towards mid-front) with circular needle size 3.5 mm and Merino Extra Fine. Purl 1 row from the wrong side. Then work rib from the right side as follows: 5 band stitches in GARTER STITCH – read description above, * knit 2, purl 2 *, work from *-* until there are 7 stitches left, knit 2 and 5 band stitches in garter stitch. Remember the BUTTONHOLES on the right band – read description above. Continue this rib for 6 cm. Change to circular needle size 4 mm and purl 1 row from the wrong side where you increase 3 stitches evenly spaced – read INCREASE TIP-1 = 223-243-263-283-307-335 stitches. The next row is worked as follows from the right side: 5 band stitches in garter stitch, A.1 (= 41-48-48-48-48-48 stitches), A.2 over the next 22-16-26-36-48-62 stitches, A.3 (= 43-52-52-52-52-52 stitches), A.4 (= 44-53-53-53-53-53 stitches), A.2 over the next 22-16-26-36-48-62 stitches, A.5 (= 41-48-48-48-48-48 stitches) and 5 band stitches in garter stitch. Continue this pattern. REMEMBER THE KNITTING TENSION! When the piece measures 32-33-34-35-36-37 cm, cast off for the armholes on the next row from the right side as follows: Work the first 54-58-63-68-74-81 stitches (= right front piece), cast off 6 stitches for the armhole, work the next 103-115-125-135-147-161 stitches (= back piece), cast off 6 stitches for the armhole, work the last 54-58-63-68-74-81 stitches (= left front piece). RIGHT FRONT PIECE (when garment is worn): = 54-58-63-68-74-81 stitches. Continue with the 5 band stitches in garter stitch and pattern as before, casting off for the armhole as follows: Cast off 2 stitches 1-1-2-3-5-7 times and 1 stitch 0-2-3-4-4-5 times = 52-54-56-58-60-62 stitches. Continue working until the piece measures 46-48-50-52-54-56 cm. On the next row from the right side place the first 20-19-20-21-23-23 stitches (towards mid-front) on 1 thread for the neck. To avoid cutting the strand, work these stitches before placing them on the thread and, in addition, decrease 2 stitches evenly over the first cable in A.1 = 18-17-18-19-21-21 stitches on the thread. Then cast off at the beginning of each row from the neck as follows: Cast off 2 stitches 1 time and 1 stitch 2 times = 28-31-32-33-33-35 stitches on the shoulder. Continue working until the piece measures 51-53-55-57-59-61 cm, then decrease 2 stitches evenly over each of the last 1-2-2-2-2-2 cables = 26-27-28-29-29-31 stitches. Cast off when the piece measures 52-54-56-58-60-62 cm. LEFT FRONT PIECE (when garment is worn): = 54-58-83-68-74-81 stitches. Continue with the 5 band stitches in garter stitch and pattern as before, casting off for the armhole as follows: Cast off 2 stitches 1-1-2-3-5-7 times and 1 stitch 0-2-3-4-4-5 times = 52-54-56-58-60-62 stitches. Continue working until the piece measures 46-48-50-52-54-56 cm. On the next row from the wrong side place the first 20-19-20-21-23-23 stitches (towards mid-front) on 1 thread for the neck. To avoid cutting the strand, work these stitches before placing them on the thread and, in addition, decrease 2 stitches evenly over the first cable in A.5 = 18-17-18-19-21-21 stitches on the thread. Then cast off at the beginning of each row from the neck as follows: Cast off 2 stitches 1 time and 1 stitch 2 times = 28-31-32-33-33-35 stitches on the shoulder. Continue working until the piece measures 51-53-55-57-59-61 cm, then decrease 2 stitches evenly over each of the last 1-2-2-2-2-2 cables = 26-27-28-29-29-31 stitches. Cast off when the piece measures 52-54-56-58-60-62 cm. BACK PIECE: = 103-115-125-135-147-161 stitches. Continue with the pattern as before, casting off for the armholes as follows: Cast off 2 stitches 1-1-2-3-5-7 times and 1 stitch 0-2-3-4-4-5 times on both sides = 99-107-111-115-119-123 stitches. Continue working until the piece measures 50-52-54-56-58-60 cm, then cast off the middle 37-39-41-43-47-47 stitches for the neck and each shoulder is finished separately. On the next row cast off 1 stitch for the neck = 30-33-34-35-35-37 stitches left on the shoulder. Continue working until the piece measures 51-53-55-57-59-61 cm, then decrease 2 stitches evenly over the last 2-3-3-3-3-3 cables = 26-27-28-29-29-31 stitches. Cast off when the piece measures 52-54-56-58-60-62 cm. Work the other shoulder in the same way. SLEEVES: Cast on 58-58-62-62-66-66 stitches with circular needle size 3.5 mm and Merino Extra Fine. Purl 1 row from the wrong side, then work as follows from the right side: 1 edge stitch in garter stitch, work rib (knit 2, purl 2) until there is 1 stitch left and work 1 edge stitch in garter stitch. Continue this rib until the piece measures 6 cm, purl 1 row from the wrong side where you increase 9 stitches evenly spaced – read INCREASE TIP-1 = 67-67-71-71-75-75 stitches. Change to circular needle size 4 mm and work pattern from the right side as follows: 1 edge stitch in garter stitch, A.2 over the next 22-22-24-24-26-26 stitches, A.6 (= 21 stitches), A.2 over the next 22-22-24-24-26-26 stitches, 1 edge stitch in garter stitch. Continue back and forth like this. When the piece measures 8 cm increase 1 stitch inside the 1 edge stitch in garter stitch on each side – read INCREASE TIP-2. Increase like this every 7-4-4½-2½-2-1½ cm a total of 5-8-7-11-12-15 times = 77-83-85-93-99-105 stitches. Continue the pattern until the piece measures 39-39-38-37-36-35 cm. Now cast off for the sleeve cap at the beginning of each row as follows: Cast off 3 stitches 1 time, 2 stitches 4 times, 1 stitch 1-1-3-4-4-6 times on each side, then cast off 2 stitches on each side until the piece measures 46 cm in all sizes. Cast off 3 stitches on each side then cast off the remaining stitches. The sleeve measures approx. 47 cm in all sizes. Work the other sleeve in the same way. ASSEMBLY: Sew the shoulder seams with grafting stitches. Sew in the sleeves. Sew the sleeve seams. Sew the buttons onto the left band. NECK: Knit up from the right side 84 to 120 stitches around the neck (including the stitches on the threads in front; the number of stitches should be divisible by 4) with circular needle size 3.5 mm and Merino Extra Fine. Purl 1 row from the wrong side (with 5 band stitches in garter stitch on each side), then work rib as follows: 5 band stitches in garter stitch, *knit 2, purl 2*, work from *-* until there are 7 stitches left, knit 2 and 5 band stitches in garter stitch. Work this rib for 3 cm. AT THE SAME TIME, when the rib measures 1 cm work the last buttonhole. Cast off with knit over knit and purl over purl. |
||||||||||||||||
Diagram explanations |
||||||||||||||||
|
||||||||||||||||
 |
||||||||||||||||
 |
||||||||||||||||
 |
||||||||||||||||
 |
||||||||||||||||
 |
||||||||||||||||
 |
||||||||||||||||
 |
||||||||||||||||
 |
||||||||||||||||
 |
||||||||||||||||
 |
||||||||||||||||
Have you finished this pattern?Tag your pictures with #dropspattern #brightsandshorecardigan or submit them to the #dropsfan gallery. Do you need help with this pattern?You'll find 25 tutorial videos, a Comments/Questions area and more by visiting the pattern on garnstudio.com. © 1982-2026 DROPS Design A/S. We reserve all rights. This document, including all its sub-sections, has copyrights. Read more about what you can do with our patterns at the bottom of each pattern on our site. |
||||||||||||||||


With over 40 years in knitting and crochet design, DROPS Design offers one of the most extensive collections of free patterns on the internet - translated to 17 languages. As of today we count 324 catalogues and 12290 patterns translated into English (UK/cm). 12290
We work hard to bring you the best knitting and crochet have to offer, inspiration and advice as well as great quality yarns at incredible prices! Would you like to use our patterns for other than personal use? You can read what you are allowed to do in the Copyright text at the bottom of all our patterns. Happy crafting!
Post a comment to pattern DROPS 222-19
We would love to hear what you have to say about this pattern!
If you want to leave a question, please make sure you select the correct category in the form below, to speed up the answering process. Required fields are marked *.