
Popular categories
Looking for a yarn?


Comments / Questions (53)
![]() Marie wrote:
Marie wrote:
Bonjour, je ne comprends pas le trait continu en début de diagramme (entre les 3 mailles en l'air du début et le premier point). Pouvez-vous me dire à quoi il correspond ? Merci d'avance pour votre réponse et votre superbe modèle. Marie
10.04.2026 - 13:48DROPS Design answered:
Bonjour Marie, c'est juste la séparation entre A.1 et A.2; A.1 montre comment commencer/terminer les tours (cf légende du 2ème symbole), ensuite on répète 4 fois A.2 tout le tour. Bon crochet!
10.04.2026 - 14:39
![]() Tina wrote:
Tina wrote:
Hoe moet ik dit maken als ik linkshandig ben?
14.03.2026 - 16:46
![]() Margie Wallis wrote:
Margie Wallis wrote:
I'm having difficulty with the graphics. Has anyone written out the pattern in US english? I love the look but I just don't understand the pattern,
09.02.2026 - 14:16DROPS Design answered:
Hi Margie, If you click on the language drop-down menu to the right of the main photo, you can change the language to US English. Regards, Drops Team.
10.02.2026 - 06:54
![]() Le Vaillant wrote:
Le Vaillant wrote:
Je souhaiterai avoir les explications de ce modèle Merci de me le poster
11.01.2026 - 09:10DROPS Design answered:
Bonjour Mme Le Vaillant, vous trouverez les explications en français en cliquant ICI. Bon crochet!
12.01.2026 - 16:36
![]() Jean-Amos wrote:
Jean-Amos wrote:
Bonjour, Je ne comprends pas le rang 5 (8 et 14 aussi) du diagramme A1. Le rond oval est censé représenter 4 brides écoulées ensemble, mais ça crée forcément une réduction de mail au rang suivant que je ne retrouve pas. Que faut-il faire ? Merci d'avance
09.01.2026 - 18:53DROPS Design answered:
Bonjour Jean-Amos, vous ne diminuez pas les mailles, vous faites 1 nope (4 brides écoulées ensemble dans la même maille), et entre chacune de ces nopes, vous crochetez 2 mailles en l'air et vous sautez 2 brides, vous conservez ainsi le bon nombre de mailles, en plus vous crochetez 2 brides, 5 ml, 2 brides dans les coins. Bon crochet!
12.01.2026 - 08:39
![]() Mette wrote:
Mette wrote:
Hvad gør jeg forkert når jeg i runde 5, 8 og 14 kan se de tre luftmasker imellem to ‘bobler’? Jeg starter med 3+1 luftmaske springer en maske over og laver de 4 masker sammen…. og slutter runden med en km i 4 maske.
12.11.2025 - 14:39DROPS Design answered:
Hei Mette. For at start/slutt på omgangen ikke skal forskyve seg, hekles det 3 luftmasker i begynnelsen av omgangen. Disse luftmaskene kommer i tillegg, og ja, da vil du se disse luftmaskene, ingen feil. mvh DROPS Design
24.11.2025 - 08:33
![]() E T wrote:
E T wrote:
Håndvask, tåler det ikke noe forsiktig ullprogram?
25.10.2025 - 17:36DROPS Design answered:
Hei E.T. Godt mulig, men vaskemaskiner kan vaske ulikt på ullprogram. Vi anbefaler derfor håndvask. Kjenner du maskinen din godt og vet hvordan den vasker ull, kan du jo prøve med en prøvelapp først, om du ønsker å vaske den i maskin. mvh DROPS Design
27.10.2025 - 14:26
![]() Xondra Barton wrote:
Xondra Barton wrote:
Hi Has anyone made this square using different colours. If so please can you post your pictures. I am struggling to know where to split the rows of colour. Any help will be appreciated
24.10.2025 - 06:36
![]() Xondra Barton wrote:
Xondra Barton wrote:
Is the relief stitch worked on the wrong side of the square to get the raised pattern into the right side?
02.10.2025 - 20:53
![]() Xondra Barton wrote:
Xondra Barton wrote:
Hi Before I start my actual blanket I am doing a sample square. The right side of my work looks nothing like the pattern, however the wrong side looks like the pattern. Is the wrong side of the work actually the right side.
02.10.2025 - 20:25DROPS Design answered:
Hi Xondra, it may be so :) Happy crocheting!
02.10.2025 - 20:29
|
||||||||||||||||||||||||||||
Day By The Sea#daybytheseablanket |
||||||||||||||||||||||||||||
 |
 |
|||||||||||||||||||||||||||
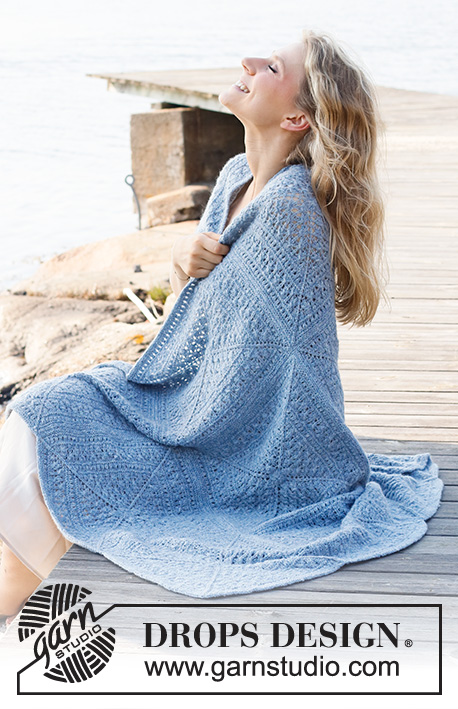
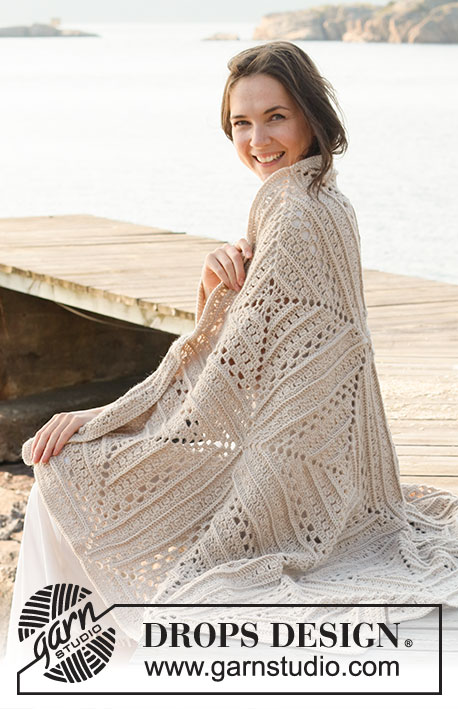
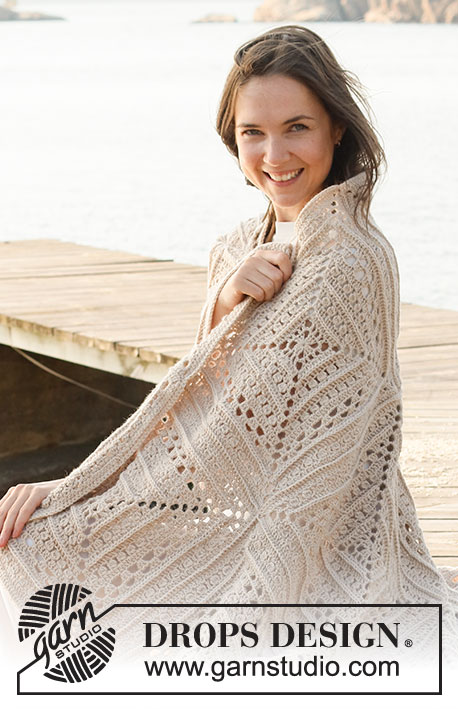
Crocheted blanket in DROPS Lima.
DROPS 221-2 |
||||||||||||||||||||||||||||
|
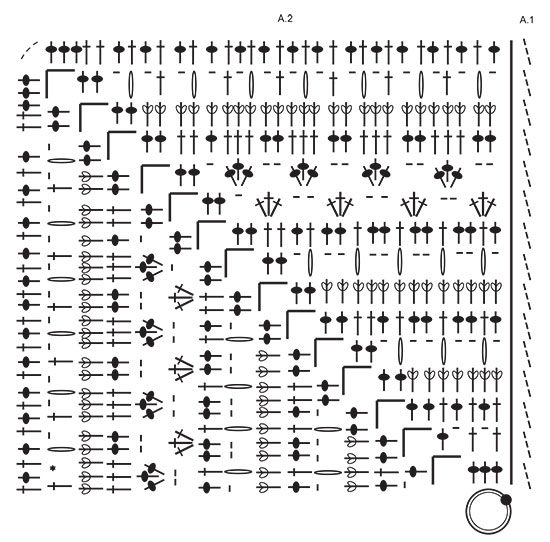
------------------------------------------------------- EXPLANATIONS FOR THE PATTERN: ------------------------------------------------------- PATTERN: See diagrams A.1 and A.2. Diagram A.1 shows how the rounds start and finish. CHAIN STITCH: If you work outermost on the hook the chain stitch will often be too tight; 1 chain stitch should be as long as 1 treble crochet is wide. ------------------------------------------------------- START THE PIECE HERE: ------------------------------------------------------- BLANKET – SHORT OVERVIEW OF THE PIECE: The blanket consists of 12 squares worked according to the diagrams. The squares are crocheted together and an edge is crocheted around the blanket to finish. SQUARE: Use crochet hook size 4 mm and Lima. Read CHAIN STITCH in explanations above. Work diagram A.2 a total of 4 times around the chain-stitch ring - A.1 shows how the round begins and ends. REMEMBER THE CROCHET TENSION! Work a total of 12 squares. ASSEMBLY: Lay the squares out, with 3 in width and 4 in length. Make sure all the squares have the right side up. Use Lima and work the squares together, first in width then in length. Lay 2 squares together, wrong side to wrong side, and work through both layers from the right side as follows: Fasten the strand with 1 double crochet around the chain-spaces in the corner, * work 1 double crochet in each stitch as far as the next corner (= 3 chain stitches), work 1 double crochet around the corner, 2 chain stitches and 1 double crochet around the next corner (= 3 chain stitches). Work from *-* until all the squares have been worked together, but on the last square finish with 1 double crochet in the last corner (= 3 chain stitches). Repeat along the other strips in width. Work the strips together lengthwise in the same way. EDGE: Use Lima and crochet hook size 4 mm. Start by fastening the strand with 1 slip stitch in the first corner, then work as follows: Work 3 chain stitches and 2 treble crochets around the first corner. * Work 1 treble crochet in each stitch as far as the corners between squares, work 1 treble crochet around each corner *, work from *-* to the last corner on this side of the blanket. Around corner 2 work 3 treble crochets, work from *-* to the last corner on this side of the blanket. Around corner 3 work 3 treble crochets, work from *-* to the last corner on this side of the blanket. Around corner 4 work 3 treble crochets, work from *-* as far as the first corner and finish with 1 slip stitch in the 3rd chain stitch at the beginning of the round. Cut and fasten the strand. |
||||||||||||||||||||||||||||
Diagram explanations |
||||||||||||||||||||||||||||
|
||||||||||||||||||||||||||||
 |
||||||||||||||||||||||||||||
Have you finished this pattern?Tag your pictures with #dropspattern #daybytheseablanket or submit them to the #dropsfan gallery. Do you need help with this pattern?You'll find 9 tutorial videos, a Comments/Questions area and more by visiting the pattern on garnstudio.com. © 1982-2026 DROPS Design A/S. We reserve all rights. This document, including all its sub-sections, has copyrights. Read more about what you can do with our patterns at the bottom of each pattern on our site. |
||||||||||||||||||||||||||||


With over 40 years in knitting and crochet design, DROPS Design offers one of the most extensive collections of free patterns on the internet - translated to 17 languages. As of today we count 324 catalogues and 12290 patterns translated into English (UK/cm). 12290
We work hard to bring you the best knitting and crochet have to offer, inspiration and advice as well as great quality yarns at incredible prices! Would you like to use our patterns for other than personal use? You can read what you are allowed to do in the Copyright text at the bottom of all our patterns. Happy crafting!
Post a comment to pattern DROPS 221-2
We would love to hear what you have to say about this pattern!
If you want to leave a question, please make sure you select the correct category in the form below, to speed up the answering process. Required fields are marked *.