
Popular categories
Looking for a yarn?


Comments / Questions (4)
![]() Hélène wrote:
Hélène wrote:
Bonjour, Y a-t-il un moyen de poster des photos de nos réalisations sur la page des modèle, par exemple celui-ci, afin que les gens puissent voir le résultat fait par un amateur ? Ou faut-il passer par un compte Instagram avec un # ou quelque chose de ce genre (je ne sais pas bien comment instagram marche) ? Merci d'avance !
23.10.2021 - 13:44DROPS Design answered:
Bonjour Helene, Instagram n'est pas necessaire. Vous pouvez partager des photos p.ex. sur Facebook ou Ravelry et nous fournir un lien internet dans notre galerie #dropsfan ICI. Salutations cordiales!
25.10.2021 - 12:47
![]() Irene Kjærsgaard wrote:
Irene Kjærsgaard wrote:
Hej! Hvordan strikker jeg 3. række i diagram A1? Jeg ved jeg skal strikke 6 masker vrang; men dernæst skal jeg STARTE med at "slippe omslaget ned fra forrige p.". Hvordan det? når omslaget er EFTER de 4 ret-masker. Med venlig hilsen Irene Kjærsgaard
22.06.2021 - 13:54DROPS Design answered:
Hei Irene. Se linken du fikk i ditt første spørsmål. mvh DROPS design
28.06.2021 - 11:03
![]() Irene Kjærsgaard wrote:
Irene Kjærsgaard wrote:
Hej! Hvordan strikker jeg 3. række i diagram A1? Jeg ved jeg skal strikke 6 masker vrang; men dernæst skal jeg STARTE med at "slippe omslaget ned fra forrige p.". Hvordan det? når omslaget er EFTER de 4 ret-masker. Med venlig hilsen Irene Kjærsgaard
21.06.2021 - 22:08DROPS Design answered:
Hei Irene. Ta en titt på denne hjelpevideoen: Hvordan strikkes picotkanten og strukturmønstret i DROPS 222-28 mvh DROPS design
28.06.2021 - 11:01
![]() Milena wrote:
Milena wrote:
Beau travail de finition des bordures. La manche bouffante, qui commence plus bas que l'épaule et finit sur l'avant bras, crée une belle originalité à la forme du modèle.
11.01.2021 - 12:55
|
||||||||||||||||
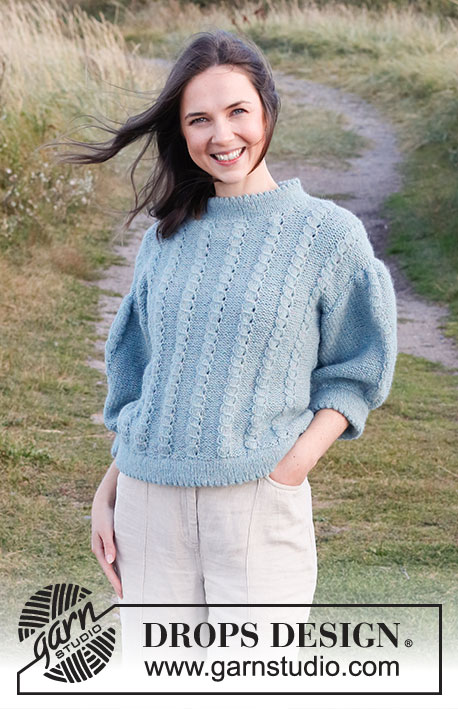
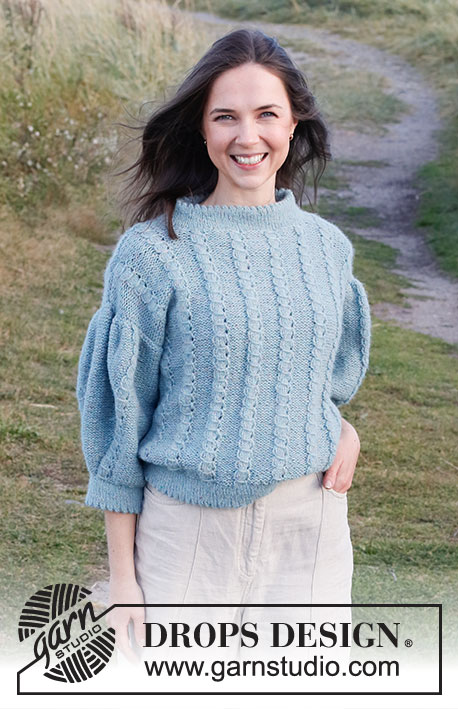
Spring Impressions#springimpressionssweater |
||||||||||||||||
 |
 |
|||||||||||||||
Knitted jumper in DROPS Air. The piece is worked with textured pattern, ¾-length puffed sleeves and double edges. Sizes S - XXXL.
DROPS 222-28 |
||||||||||||||||
|
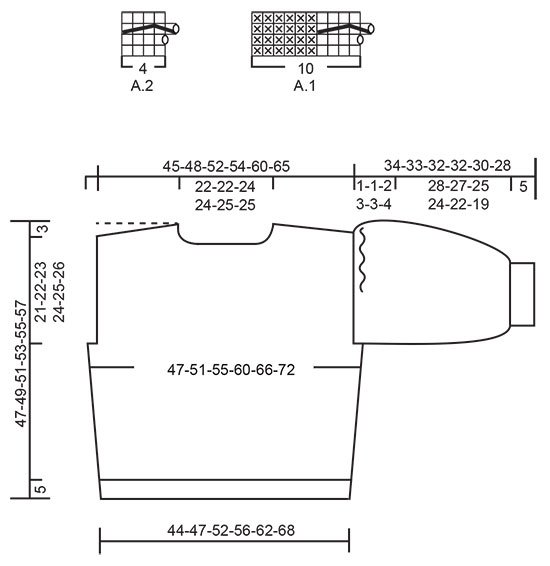
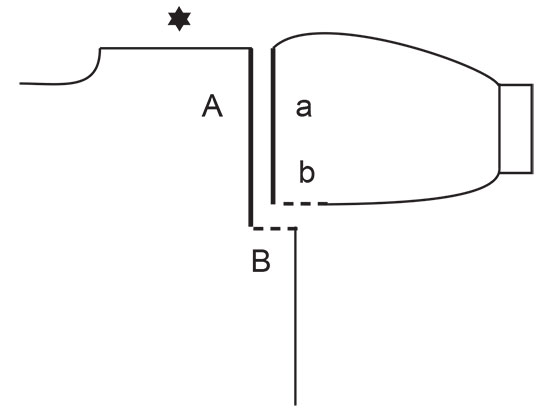
------------------------------------------------------- EXPLANATIONS FOR THE PATTERN: ------------------------------------------------------- RIDGE/GARTER STITCH (worked back and forth): Knit all rows. 1 ridge in height = Knit 2 rows. PICOT-EDGE: ROUND 1: * Knit 2 twisted together, make 1 yarn over *, work from *-* to end of round. ROUND 2: Knit all stitches and yarn overs. PATTERN: See diagrams A.1 and A.2. The diagrams show all rows in the pattern from the right side. INCREASE TIP-1 (for sides of body): Work until there are 2 stitches left before the marker thread, make 1 yarn over, purl 4 (marker thread sits between these 4 stitches) make 1 yarn over (= 2 stitches increased at the marker thread). On the next round purl the yarn overs twisted to avoid holes. Then purl the new stitches. INCREASE TIP-2 (evenly spaced): To work out how to increase evenly, count the total number of stitches on the needle (e.g. 52 stitches) minus the edge stitches (e.g. 2 stitches) and divide the remaining stitches by the number of increases to be made (e.g. 10) = 5. In this example, increase by making 1 yarn over after each 5th stitch. On the next row work the yarn overs twisted to avoid holes. INCREASE TIP-3 (for mid-top of sleeve): Increase 2 stitches between the 2 “cables” on top of the sleeve, giving more and more purled stitches between the 2 cables. Increase 1 stitch by making 1 yarn over, on the next round purl the yarn over twisted to avoid a hole. Then purl the new stitches. CASTING-OFF TIP: To avoid the cast-off edge being tight you can cast off with a larger size needle. If the edge is still tight, make 1 yarn over after approx. each 4th stitch at the same time as casting off; the yarn overs are cast off as normal stitches. ------------------------------------------------------- START THE PIECE HERE: ------------------------------------------------------- JUMPER – SHORT OVERVIEW OF THE PIECE: The body is worked in the round with circular needle, as far as the armholes. Stitches are cast off for the armholes and the front and back pieces finished separately, back and forth. The sleeves are worked in the round with double pointed needles as far as the armhole, then the sleeve cap is finished back and forth. The piece is sewn together and the neck worked. BODY: Cast on 148-160-176-192-212-232 stitches with circular needle size 4 mm and Air. Work stocking stitch in the round for 5 cm. Work PICOT-EDGE – read description above. Work stocking stitch in the round for 5 cm. The piece is measured from the picot-edge (the edge is later folded along the picot-edge). Change to circular needle size 5 mm. Insert 1 marker thread at the beginning of the round and 1 marker thread after 74-80-88-96-106-116 stitches (= sides). Allow the threads to follow your work onwards; they are used when increasing in the sides. Work the first round as follows: * Purl 5-3-7-11-11-11, work A.1 over the next 60-70-70-70-80-90 stitches (= 6-7-7-7-8-9 repeats of 10 stitches), A.2 (= 4 stitches), purl 5-3-7-11-11-11, marker thread *, work from *-* one more time. Continue this pattern. REMEMBER THE KNITTING TENSION! When the piece measures 6 cm from the picot-edge, increase 1 stitch on each side of both marker threads – read INCREASE TIP-1 (= 4 stitches increased). Increase like this every 6-6-6-7-7-7 cm a total of 3 times in each side = 160-172-188-204-224-244 stitches. When the piece measures 23-24-25-26-27-28 cm from the picot-edge, cast off for the armholes, adjusting so the next round is either round 1 or round 3 in A.1/A.2, as follows: Start 2-2-3-5-5-6 stitches before the marker thread at the beginning of the round and cast off 4-4-6-10-10-12 stitches, work as before until there are 2-2-3-5-5-6 stitches left before the other marker thread, cast off 4-4-6-10-10-12 stitches and work as before over the remaining stitches. The back and front pieces are finished separately. BACK PIECE: = 76-82-88-92-102-110 stitches. Continue the pattern back and forth with 1 edge stitch in GARTER STITCH – read description above, on each side. NOTE: On row 2 in A.1/A.2 a yarn over is also made from the wrong side. When the piece measures 44-46-48-50-52-54 cm from the picot-edge, place stitches on threads on both sides for the diagonal shoulders, but to avoid having to cut the strand, work the stitches before placing them on the thread: Place 7-8-8-8-10-12 stitches on the thread 1 time on both sides, then 6-7-8-9-10-11 stitches on the threads 2 times on each side. AT THE SAME TIME when the piece measures 45-47-49-51-53-55 cm from the picot-edge, cast off the middle 34-34-36-36-38-38 stitches for the neck and each shoulder is finished separately. Continue placing the shoulder stitches on the threads and cast off 2 stitches on the next row from the neck. When all the stitches have been cast off for the neck and the shoulder stitches placed on a thread, the piece measures approx. 47-49-51-53-55-57 cm from the shoulder down (measured from the neck). Finish the other shoulder in the same way. FRONT PIECE: = 76-82-88-92-102-110 stitches. Continue the pattern back and forth with 1 edge stitch in garter stitch on each side. When the piece measures 42-44-45-47-48-50 cm from the picot-edge, place the middle 20-20-22-22-24-24 stitches on 1 thread for the neck and each shoulder is finished separately. Continue as before and cast off for the neck at the beginning of each row from the neck as follows: Cast off 5 stitches 1 time and 4 stitches 1 time. AT THE SAME TIME when the piece measures 44-46-48-50-52-54 cm from the picot-edge, place stitches on threads for the diagonal shoulders in the same way as the back piece: Place 7-8-8-8-10-12 stitches on 1 thread 1 time and then 6-7-8-9-10-11 stitches on the thread 2 times. When all the stitches have been cast off for the neck and the shoulder stitches placed on a thread, the piece measures approx 47-49-51-53-55-57 cm from the shoulder down (measured from the neck). Finish the other shoulder in the same way. SLEEVES: Cast on 50-52-54-56-60-62 stitches with double pointed needles size 4 mm and Air. Work stocking stitch in the round for 5 cm. Work picot-edge and then stocking stitch for 5 cm. The piece is measured from the picot-edge (the edge is later folded along the picot-edge). Insert 1 marker thread at the beginning of the round = mid-under the sleeve. Work 1 round of stocking stitch where you increase 10-10-14-14-18-22 stitches evenly spaced – read INCREASE TIP-2 = 60-62-68-70-78-84 stitches. Change to double pointed needles size 5 mm and work the next round as follows: Purl 23-24-27-28-32-35, work A.1 (= 10 stitches), A.2 (= 4 stitches) and purl 23-24-27-28-32-35. Continue this pattern. AT THE SAME TIME on the next round start to increase for the puffed sleeves. Increase stitches between the 2 cables by increasing1 stitch after the cable in A.1 and 1 stitch before the cable in A.2 – read INCREASE TIP-3 (= 2 stitches increased). Increase like this every 2nd round a total of 24-24-23-23-20-18 times = 108-110-114-116-118-120 stitches. When the sleeve measures 33-32-30-29-27-24 cm from the picot-edge, insert 1 marker mid-under the sleeve (it marks where the sleeve will be sewn to the armhole). Working back and forth, work 0-0-0-1-1-2 cm stocking stitches from the marker, then cast off 9-10-13-10-11-13 stitches at the beginning of each row a total of 1-1-1-2-2-2 times on each side = 90-90-88-76-74-68 stitches left. On the next row knit all stitches together 2 and 2 = 45-45-44-38-37-34 stitches. Cast off with purl from the wrong side. The sleeve measures approx. 34-33-32-32-30-28 cm from the top down. Work the other sleeve in the same way. ASSEMBLY: Place the 19-22-24-26-30-34 stitches on the one shoulder-thread on circular needle size 5 mm. Knit 1 row from the wrong side, but to avoid holes where the stitches were placed on the thread, place the strand between the 2 stitches onto the left needle and knit it twisted together with the next stitch on the left needle. Then cast off with knit from the right side – read CASTING-OFF TIP! Repeat on the other 3 shoulders. Sew the shoulder seams inside the cast-off edges. Sew the sleeve-caps to the armholes on the front and back pieces – see sketch. Sew the bottoms of the armholes – the markers on the sleeves should match the sides on the body. Fold the edge double to the wrong side at the bottom of the body and the sleeves, folding along the picot-edge. Sew down - to avoid the edges being tight and rolling outwards it is important the seam is elastic. NECK: Start from the right side on the one shoulder and knit up 82 to 96 stitches around the neck (including the stitches on the thread in front) with short circular needle size 4 mm and Air. Work stocking stitch in the round for 5 cm. Work picot-edge and then stocking stitch for 5 cm. Change to short circular needle size 5 mm and cast off with knit. Fold the neck double to the wrong side along the picot-edge and sew down – make sure the seam is elastic. |
||||||||||||||||
Diagram explanations |
||||||||||||||||
|
||||||||||||||||
 |
||||||||||||||||
 |
||||||||||||||||
Have you finished this pattern?Tag your pictures with #dropspattern #springimpressionssweater or submit them to the #dropsfan gallery. Do you need help with this pattern?You'll find 32 tutorial videos, a Comments/Questions area and more by visiting the pattern on garnstudio.com. © 1982-2026 DROPS Design A/S. We reserve all rights. This document, including all its sub-sections, has copyrights. Read more about what you can do with our patterns at the bottom of each pattern on our site. |
||||||||||||||||


With over 40 years in knitting and crochet design, DROPS Design offers one of the most extensive collections of free patterns on the internet - translated to 17 languages. As of today we count 324 catalogues and 12290 patterns translated into English (UK/cm). 12290
We work hard to bring you the best knitting and crochet have to offer, inspiration and advice as well as great quality yarns at incredible prices! Would you like to use our patterns for other than personal use? You can read what you are allowed to do in the Copyright text at the bottom of all our patterns. Happy crafting!
Post a comment to pattern DROPS 222-28
We would love to hear what you have to say about this pattern!
If you want to leave a question, please make sure you select the correct category in the form below, to speed up the answering process. Required fields are marked *.