
Popular categories
Looking for a yarn?


Comments / Questions (23)
![]() Susanne wrote:
Susanne wrote:
Jeg skal til at dele arbejdet i forstykke, ærmer og ryg. Der står 42 m til forstykke, 42 m på tråd til ærme, slå 8 m op. Strik 75 m til ryg, 42 m til ærme på tråd, slå 8 m op og 42 m til forstykke. Er det korrekt, at de 8 m der bliver slået op ifm med ærmerne, ikke skal slås op symmetrisk?
05.03.2024 - 14:54DROPS Design answered:
Hei Susanne. Litt usikker på hva du mener med symmetrisk. I str. XXXL har du 243 masker på pinnen for bærestykket deles til bol og ermer. Du har 75 masker til bakstykket. 42 masker på hvert av forstykkene og 42 masker på hvert erme (= 243 masker). Når du legger opp 8 masker i hver side / under ermene er maskeantallet 175 masker. Maskeantallet til forstykkene er 42 +42 (inkl 4 stolpemasker i hver side + 1 maske for å få et jevnt maskeantall) og bakstykket har 75 masker. mvh DROPS Design
11.03.2024 - 08:33
![]() Turlure wrote:
Turlure wrote:
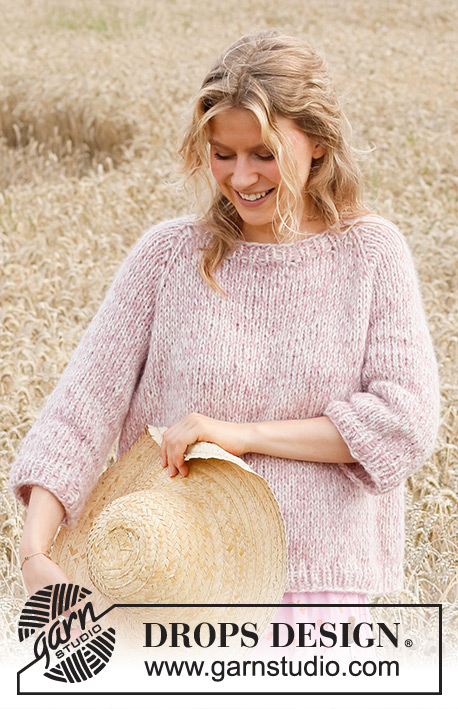
Ce modèle m’intéresse ainsi que le coloris du modèle. En revanche je vois que pour obtenir ce coloris, il faut utiliser 2 laines de coloris différents. En revanche je ne comprends pas comment on les utilise au cours du tricot ? Faut-il faire une rangée d’une couleur, puis une rangée d’une autre couleur ? J’ai peur d’obtenir des rayures du coup ? Pouvez-vous m’expliquer svp ?
30.08.2023 - 15:21DROPS Design answered:
Bonjour Mme Turlure, vous tricotez simplement avec 1 fil Air de chacune des couleurs naturel et rose pour obtenir cet effet mix (soit 2 fils en même temps). En tricotant, les fils vont se mettre alternativement devant/derrière l'aiguille et on obtient ainsi des mailles plutôt naturel (si le fil naturel est devant) ou rose (si c'est le fil rose qui se trouve plutôt devant), de loin, on a cet effet chiné comme sur la photo. Bon tricot!
30.08.2023 - 16:16
![]() Mette wrote:
Mette wrote:
Jeg forstår ikke mønstret i ærmeafsnittet. Som jeg læser det, er det de små størrelser, der har de længste ærmer. Kan det være rigtigt? Tak, for en super hjemmeside, med udførlige opskrifter og mange smarte mønstre. Hilsen Mette
30.12.2021 - 16:41DROPS Design answered:
Hei Mette. Ja, oppskriften stemmer. Overvidden er mye mindre i de minste str, slik at da må ermene bli lengre. Man har ikke lengre armer selv om man bruker større størrelser. mvh DROPS Design
04.01.2022 - 15:25
![]() Hilde Johansen wrote:
Hilde Johansen wrote:
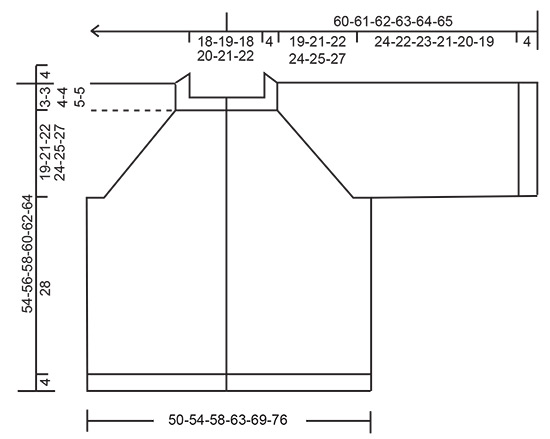
Hvor finner jeg målskissen til denne oppskriften? Mvh Hilde
26.12.2021 - 20:54DROPS Design answered:
Hej Hilde, du finder målene i måleskitsen nederst i opskriften. :)
03.01.2022 - 15:42
![]() Sofie wrote:
Sofie wrote:
Hei! Har jeg fortsatt det rikitg; at man stopper med raglan økning på bolen på 175 m (strl M), og fortsette strikke rett til målt 21 cm? Synes det virket litt rart å stoppe med raglan men ikke dele inn til ermer og bol.
12.11.2021 - 23:10DROPS Design answered:
Hei Sofie. I de fleste oppskrifter vi har så strikker man noen cm ( i dette tilfelle ca 3 cm) etter alle raglan økningene er ferdig, ellers så vil man få økninger under selve erme og det vil se litt rart ut. mvh DROPS Design
15.11.2021 - 10:29
![]() Margit wrote:
Margit wrote:
Kan opskriften bruges med 1 tråd air og en tråd kid slik ? Mvh Margit
13.10.2021 - 10:34DROPS Design answered:
Hej Margit. För att få riktig stickfasthet så måste du sticka den med 1 tråd Air och 2 trådar Kid-Silk i så fall. Du kan också välja att sticka den med 1 tråd Air och 1 tråd Brushed Alpaca Silk. Mvh DROPS Design
13.10.2021 - 11:53
![]() Erling Johansen wrote:
Erling Johansen wrote:
Skal det være mindre masker på forstykket med knapphull. Får det ikke til å stemme når jeg skal sette di 4 merkene i bærestykket. Skal stolpen telles med på den ene siden? Og økningen, skal den gjøres på utsiden av merkene ( 6 masker for arm ) Skjønner ikke helt oppskriften
11.10.2021 - 13:28DROPS Design answered:
Hej Erling, hvis du strikker den mindste størrelse bliver det som følgende: 15, 1, 6, 1, 21, 1, 6, 1, 15 = 67 masker (15 masker mod midt foran i hver side og 21 på rygstykket). RAGLAN: Alle økninger gjøres fra retten! Øk 1 maske på hver side av de 4 maskene med merke – i hver overgang mellom forstykke/bakstykke og ermer (= 8 masker økt på økepinnen). Øk 1 maske ved å lage 1 kast om pinnen. På neste pinne strikkes kastene vridd vrang, slik at det ikke blir hull. Videre strikkes de nye maskene i glattstrikk.
13.10.2021 - 09:18
![]() Tina wrote:
Tina wrote:
Thanks for the quick answer, however in the beginning it says "cast on 71 stiches incl. 4+4 for the border" and then later pick up 16 stiches = 87 including 4+4 for the border. In your calculation resulting in 87 stiches the border stiches are missing. Best regards
18.06.2021 - 09:47DROPS Design answered:
Dear Tina, correct you cast on 71 stitches and work rib for 4 cm then increarse evenly 16 stitches = 71+16=87 stitches. The front band stitches are included, this means they don't have to be extra cast on, they belong to the given number of sts. Hope this will help. Happy knitting!
18.06.2021 - 13:41
![]() Tina wrote:
Tina wrote:
Hello, making it in nature and yellow - looks great! As mentioned by someone before, there must be a mistake in the count of setting the markings in the beginning. Knitting size XXL total 87 stiches - adds up to 4+17+10+25+10+17+4 and not 4+18+10+27+10+18 (added is 91 stiches). Best regards from Hamburg!
17.06.2021 - 18:04DROPS Design answered:
Dear Tina, remember that the markers for the raglan lines shoud be added in a stitch and not between stitches, so that you will have in XXL: 18+1+10+1+27+1+10+1+18=87 sts. Happy knitting!
18.06.2021 - 07:43
![]() Susanne wrote:
Susanne wrote:
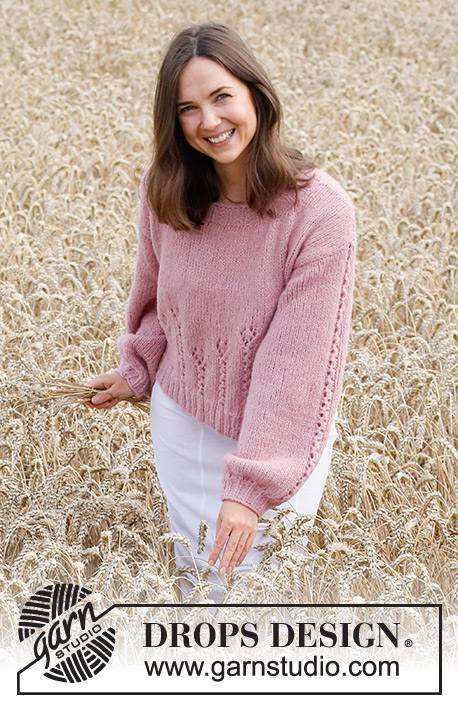
Hallo, mit welchem rosa wurde der Pulli gestrickt? Hellrosa oder zartrosa ? Vielen Dank für eine Rückmeldung.
25.03.2021 - 19:36DROPS Design answered:
Liebe Susanne, der Pullover wird mit Farbe Nr 24 gestrickt = zartrosa. Viel Spaß beim stricken!
26.03.2021 - 07:13
|
|
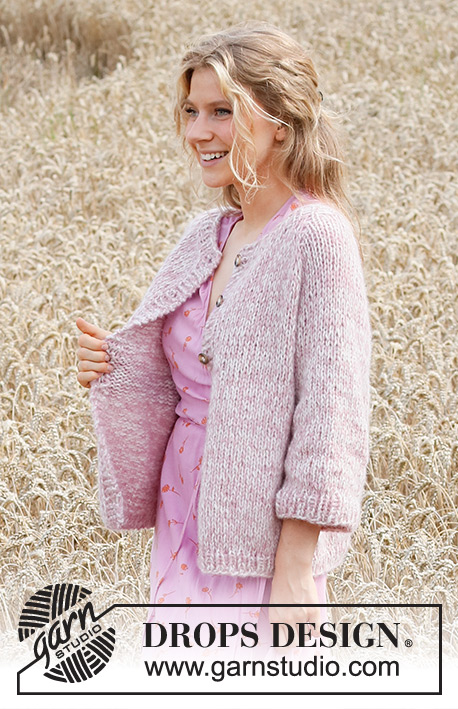
Cosy Rosy Cardigan#cosyrosycardigan |
|
 |
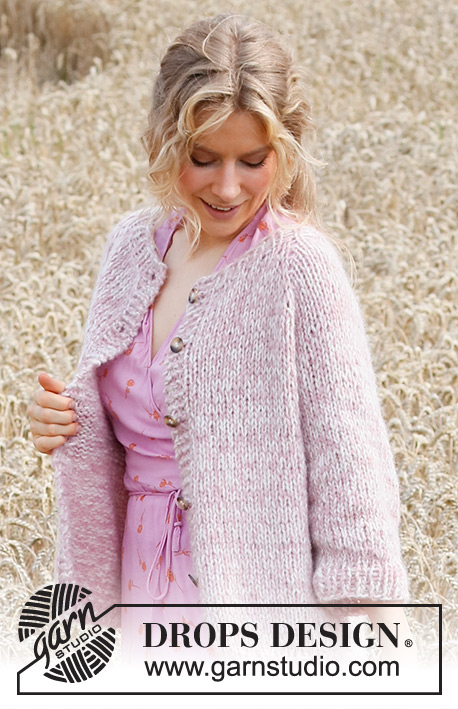 |
Knitted jacket in 2 strands DROPS Air or 1 strand DROPS Wish. The piece is worked top down, with raglan and ¾-length sleeves. Sizes S - XXXL.
DROPS 220-12 |
|
|
------------------------------------------------------- EXPLANATIONS FOR THE PATTERN: ------------------------------------------------------- RIDGE/GARTER STITCH (worked back and forth): Knit all rows. 1 ridge in height = Knit 2 rows. INCREASE TIP (evenly spaced): To work out how to increase evenly, count the total number of stitches on the needle (e.g. 61 stitches) minus bands (e.g. 8 stitches) and divide the remaining stitches by the number of increases to be made (e.g. 6) = 8.8. In this example, increase by making 1 yarn over after approx. each 9th stitch. Do not increase on the bands. On the next row work the yarn overs twisted to avoid holes. RAGLAN: All increases are worked from the right side! Increase 1 stitch on each side of the 4 stitches with markers – in each transition between front/back piece and sleeves (= 8 stitches increased). Increase 1 stitch by making 1 yarn over. On the next row purl the yarn overs twisted to avoid holes. Then work the new stitches in stocking stitch. BUTTONHOLES: Work buttonholes on the right band (when the garment is worn). Work from the right side, when there are 3 stitches left on the row as follows: Make 1 yarn over, knit 2 together and knit 1. On the next row (wrong side), knit the yarn over to leave a hole. The first buttonhole is worked when the rib on the neck measures approx. 1½-2 cm. Then work the other 4-4-5-5-5-5 buttonholes with approx. 9½-9½-8½-9-9-9½ cm between each one. CASTING-OFF TIP: To avoid the cast-off edge being tight you can cast off with a larger size needle. If the edge is still tight, make 1 yarn over after approx. each 6th stitch at the same time as casting off; the yarn overs are cast off as normal stitches. ------------------------------------------------------- START THE PIECE HERE: ------------------------------------------------------- JACKET – SHORT OVERVIEW OF THE PIECE: The neck and yoke are worked back and forth with circular needle from mid front and top down. The yoke is divided for body and sleeves and the body continued back and forth. The sleeves are worked in the round with short circular needle/double pointed needles, top down. NECK: Cast on 61-63-65-69-71-73 stitches (including 4 band stitches on each side towards mid-front) with circular needle size 7 mm and 1 strand of each colour in DROPS AIR (= 2 strands) or 1 strand DROPS Wish. Purl 1 row (= wrong side). The next row is worked as follows from the right side: Work 4 band stitches in GARTER STITCH – read description above, * knit 1, purl 1 *, work from *-* until there are 5 stitches left on the row, knit 1 and finish with 4 band stitches in garter stitch. Continue this rib for 4 cm – remember the BUTTONHOLES on the right band – read description above. When the rib is finished, knit 1 row from the right side where you increase 6-8-10-10-16-18 stitches evenly spaced – read INCREASE TIP = 67-71-75-79-87-91 stitches. Purl 1 row from the wrong side (yarn overs purled twisted and bands worked in garter stitch). Change to circular needle size 8 mm. Insert 1 marker after the band at the beginning of the row; the yoke is measured from this marker! YOKE: Insert 4 markers as described below without working the stitches, each marker is inserted in a stitch and are used when increasing to raglan; they should have a different colour to the marker on the neck. Count 15-16-16-17-18-19 stitches (= front piece), insert 1 marker in the next stitch, count 6-6-8-8-10-10 stitches (= sleeve), insert 1 marker in the next stitch, count 21-23-23-25-27-29 stitches (= back piece), insert 1 marker in the next stitch, count 6-6-8-8-10-10 stitches (= sleeve), insert 1 marker in the next stitch. There are 15-16-16-17-18-19 stitches left after the last marker (front piece). Work stocking stitch back and forth with 4 band stitches in garter stitch on each side. AT THE SAME TIME, on the first row from the right side, increase to RAGLAN – read description above (= 8 stitches increased). Increase like this every 2nd row (i.e. every row from the right side) a total of 12-13-15-16-17-19 times. REMEMBER THE KNITTING TENSION! After the last increase there are 163-175-195-207-223-243 stitches on the needle. Continue as before without further increases until the piece measures 19-21-22-24-25-27 cm from the marker on the neck. Now divide the piece for body and sleeves on the next row as follows: Work 29-31-33-35-38-42 stitches (= front piece), place the next 28-30-36-38-40-42 stitches on 1 thread for the sleeve, cast on 6-6-6-8-8-8 new stitches on the needle (= in side under sleeve), work 49-53-57-61-67-75 stitches as before (= back piece), place the next 28-30-36-38-40-42 stitches on 1 thread for the sleeve, cast on 6-6-6-8-8-8 new stitches on the needle (= in side under sleeve) and work 29-31-33-35-38-42 stitches (= front piece). Body and sleeves are finished separately. THE PIECE IS NOW MEASURED FROM HERE! BODY: = 119-127-135-147-159-175 stitches. Work stocking stitch back and forth with 4 band stitches in garter stitch on each side until the piece measures 28 cm from the division. There is approx. 4 cm left to finished length; you can try the jacket on and work to desired length. Change to circular needle size 7 mm. Work rib as follows from the right side: 4 band stitches in garter stitch, * knit 1, purl 1 *, work from *-* until there are 5 stitches left, knit 1 and work 4 band stitches in garter stitch. Continue this rib for 4 cm. Cast off with garter stitch over garter stitch, knit over knit and purl over purl – read CASTING-OFF TIP! The jacket measures approx. 54-56-58-60-62-64 cm from the shoulder down. SLEEVE: Place the 28-30-36-38-40-42 stitches from the thread on the one side of the piece on double pointed needles/short circular needle size 8 mm and knit up 1 stitch in each of the 6-6-6-8-8-8 stitches cast on under the sleeve = 34-36-42-46-48-50 stitches. Work stocking stitch in the round until the sleeve measures 24-22-23-21-20-19 cm. Change to short circular needle/double pointed needles size 7 mm and work rib (knit 1, purl 1) for 4 cm. Cast off with knit over knit and purl over purl. The sleeve measures 28-26-27-25-24-23 cm from the division. Work the other sleeve in the same way. ASSEMBLY: Sew the buttons onto the left band. |
|
 |
|
Have you finished this pattern?Tag your pictures with #dropspattern #cosyrosycardigan or submit them to the #dropsfan gallery. Do you need help with this pattern?You'll find 30 tutorial videos, a Comments/Questions area and more by visiting the pattern on garnstudio.com. © 1982-2026 DROPS Design A/S. We reserve all rights. This document, including all its sub-sections, has copyrights. Read more about what you can do with our patterns at the bottom of each pattern on our site. |
|


With over 40 years in knitting and crochet design, DROPS Design offers one of the most extensive collections of free patterns on the internet - translated to 17 languages. As of today we count 324 catalogues and 12290 patterns translated into English (UK/cm). 12290
We work hard to bring you the best knitting and crochet have to offer, inspiration and advice as well as great quality yarns at incredible prices! Would you like to use our patterns for other than personal use? You can read what you are allowed to do in the Copyright text at the bottom of all our patterns. Happy crafting!
Post a comment to pattern DROPS 220-12
We would love to hear what you have to say about this pattern!
If you want to leave a question, please make sure you select the correct category in the form below, to speed up the answering process. Required fields are marked *.