
Popular categories
Looking for a yarn?


Comments / Questions (41)
![]() Kia wrote:
Kia wrote:
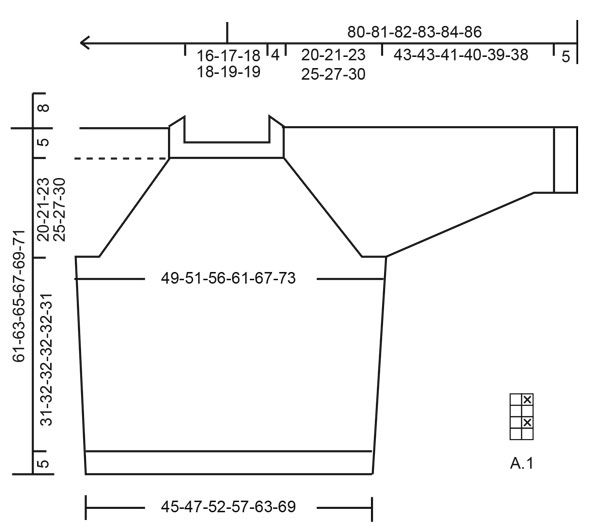
Hi! I cant find the A1 chart in this pattern? Where is it shown?
29.12.2025 - 15:33DROPS Design answered:
Hi, you can find the A.1 chart to the right of the measurement chart at the bottom of the pattern.
29.12.2025 - 17:32
![]() Mary Fahnestock-Thomas wrote:
Mary Fahnestock-Thomas wrote:
I would love to knit this for myself, a woman, and can, with effort, figure that out, but I'm hoping you can point me to a women's pattern for which I can use the same stitch pattern and gauge -- top-down, sort-of ribbed body, plain sleeves. Thank you so much!
24.11.2025 - 14:32DROPS Design answered:
Dear Mrs Fahnestock-Thomas, we don't have exactly the same one for woman, but you will find here similar top down with raglan and similar tension, one of them can help/inspire you. Happy knitting!
24.11.2025 - 14:51
![]() BRUYÈRE FRÉDÉRIQUE wrote:
BRUYÈRE FRÉDÉRIQUE wrote:
Ou est le diagramme ? Je ne le vois pas
04.09.2024 - 12:58DROPS Design answered:
Bonjour Mme Bruyère, vous trouverez le diagramme A.1 à droite du schéma des mesures, sous la manche; c'est un diagramme qui se tricote sur 2 mailles et 4 rangs. Bon tricot!
05.09.2024 - 08:45
![]() Malti wrote:
Malti wrote:
Hi, if I want to make back, front and sleeves seperately do you instructions for that
28.03.2024 - 22:05DROPS Design answered:
Dear Mati, please understand, that since we have many thousands of patterns on our site, we cannot modify patterns to each individual request, or have many variation of one sweater. This sweater was designed from top down, and sleeves knitted integrally, together with the body to reduce the need for sewing up. There are plenty of patterns on our site that have the front/back/sleeves knitted separately. We hope you will understand. Happy Knitting!
29.03.2024 - 08:21
![]() Gunn-Heidi Nordtveit wrote:
Gunn-Heidi Nordtveit wrote:
Mønster A1 til 219-10, Budding Warmup mangler i oppskrifta. Kan dere hjelpe med dette mønsteret?
04.03.2024 - 21:40DROPS Design answered:
Hej Gunn-Heidi. Du finner diagram A.1 längst ner, till höger om måleskitsen. Mvh DROPS design
05.03.2024 - 08:03
![]() Gunn-Heidi Nordtveit wrote:
Gunn-Heidi Nordtveit wrote:
Ser ut som mønster A1 ikkje er med i oppskrifta til 219-10, Budding Warmup. Kan dere hjelpe med hvordan dette mønsteret er?
04.03.2024 - 21:38
![]() Fanny wrote:
Fanny wrote:
Bonjour, J'ai une question dans les diminution de la section DOS/DEVANT : je fais la première diminution donc sur les 9cm suivants, le shéma de ce que je tricote ne correspond plus au diagramme. je fais la seconde diminution et ça correspond de nouveau. Je fais la dernière diminution et ça ne correspond plus de nouveau... jusqu'à la fin du tricot. Comment faire pour adapter ça de façon à ce que ça reste joli et harmonieux svp ? Merci!
05.08.2023 - 20:53DROPS Design answered:
Bonjour Fanny, comme le motif est multiple de 2 m et que l'on diminue 3 mailles, il ne va plus tomber juste tout le tour, continuez comme avant ou bien diminuez 1 maille en plus/en moins pour que le motif tombe de nouveau juste. Bon tricot!
07.08.2023 - 09:57
![]() Fanny wrote:
Fanny wrote:
Bonjour ! Mon homme trouve que ce fil 100% laine pique trop... Y a-t-il un autre fil de chez vous avec lequel je peux faire ce patron sans que ça ne modifie le résultat? Merci d'avance !
05.06.2023 - 19:38DROPS Design answered:
Bonjour Fanny, utilisez notre convertisseur pour voir toutes les alternatives possibles (Air, Big Merino par ex pour un fil du groupe C ou bien en utilisant 2 fils du groupe de fils A) et les quantités correspondantes. Votre magasin saura vous conseiller la laine idéale (même par mail ou téléphone) en fonction de sa sensibilité. Bon tricot!
06.06.2023 - 08:51
![]() Meri wrote:
Meri wrote:
Hei! Ohjeessa mainittu ruutupiirros ei näy tällä sivulla mobiilissa eikä tietokoneen selaimella tarkastellessa. Kokeilin myös ohjeen tulostamista ja Ruutupiirros -niminen sivu tuli näkyville - tyhjänä. Mistä saisin tuon ruutupiirroksen? Nimimerkillä aloitin jo tekemään ja vasta sen jälkeen aloin katselemaan oliko ohjeessa kaikki tiedot kohdillaan.
23.03.2023 - 08:44DROPS Design answered:
Hei, ruutupiirros A.1 avautuu normaalisti. Se löytyy mittapiirroksen oikealta puolelta.
23.03.2023 - 17:18
![]() Lesley wrote:
Lesley wrote:
In working this pattern, I've installed the centre back stitch marker at the top of the neck and again at its base. Having moved the marker at the base along with its knitted row, I am now unclear as to the total 'yoke' measurement I must reach before dividing the sleeves from the body. ( Mine is the 'L' size. ) Will you kindly clarify whether I should measure from the base of the neck piece or the top?
02.01.2023 - 12:01DROPS Design answered:
Dear Lesley, the yoke should be measured from the marker inserted on mid back, ie from after the neck edge (or just at the beginning of "yoke" section). Happy knitting!
02.01.2023 - 16:14
|
|||||||
Budding Warmup#buddingwarmupsweater |
|||||||
 |
 |
||||||
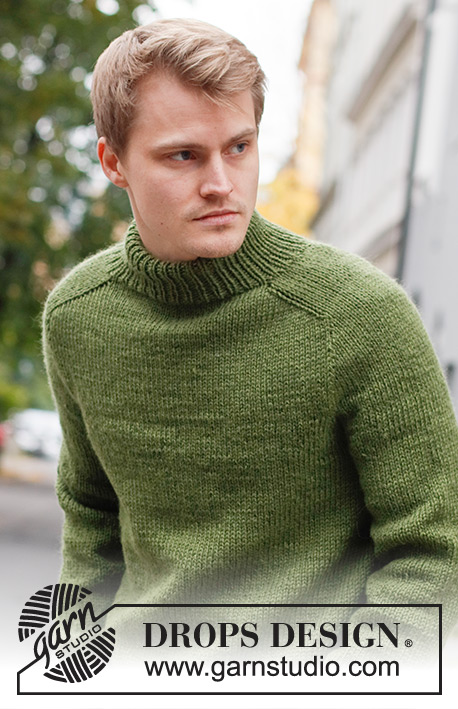
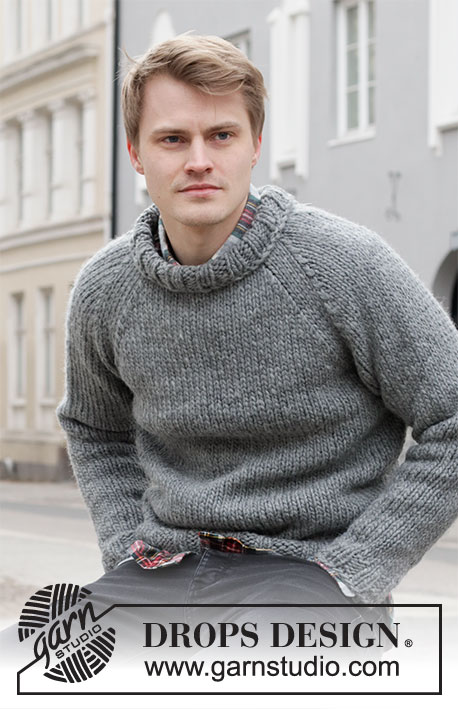
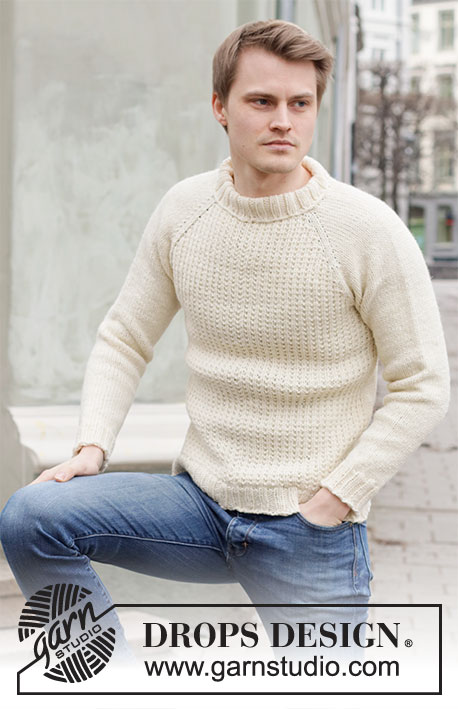
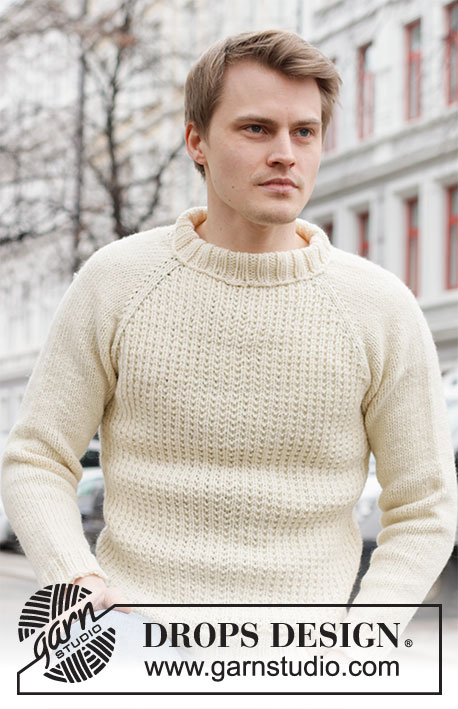
Knitted jumper for men with raglan in DROPS Alaska. Piece is knitted top down with textured pattern and stocking stitch. Size: S - XXXL
DROPS 219-10 |
|||||||
|
---------------------------------------------------------- EXPLANATION FOR THE PATTERN: ---------------------------------------------------------- PATTERN: See diagram A.1. INCREASE TIP-1 (evenly): To calculate how to increase evenly, use the total number of stitches on row (e.g. 96 stitches) , and divide stitches by number of increases to be done (e.g. 10) = 9.6. In this example increase by making 1 yarn over after approx. every 10th stitch. On next round work yarn overs twisted to avoid holes. INCREASE TIP-2 (applies to raglan): Work until 1 stitch remains before marker, 1 yarn over (= 1 stitch increased), work 2 stitches in stocking stitch, 1 yarn over (= 1 stitch increased). Increase like this at all markers (= 8 stitches increased). Knit yarn overs twisted on next round to avoid holes. Work the increased stitch on front piece and back piece in pattern A.1, work the increased stitch on sleeve in stocking stitch. DECREASE TIP (applies to side on body and sleeves): Decrease 1 stitch on each side of marker thread as follows: Work until 4 stitches remain before marker thread and knit 2 together, knit 4 (marker thread is in the middle of these stitches), slip 1 stitch knitwise, knit 1, pass slipped stitch over stitch worked. CAST-OFF TIP: To avoid a tight cast-off edge you may use a larger needle. If this also is too tight, make 1 yarn over after approx. every 4th stitch, cast off these as regular stitches. ---------------------------------------------------------- START THE PIECE HERE: ---------------------------------------------------------- JUMPER - SHORT OVERVIEW OF THE PIECE: Work neck edge and yoke in the round on circular needle from mid back, top down. Work neck edge double and sew in at the end. Now divide yoke for body and sleeves. Body is worked in the round on circular needle, top down. Work sleeves in the round on double pointed needles, top down. NECK EDGE: Cast on 80-84-92-96-96-104 stitches on circular needle size 4.5 mm with Alaska. Work rib = knit 2/purl 2 for 8 cm. Rounds begin mid back. Switch to circular needle size 5.5 mm. Insert 1 marker at the beginning of round, measure yoke from this marker! YOKE: Knit 1 round and increase 2-6-6-2-10-2 stitches evenly = 82-90-98-98-106-106 stitches – read INCREASE TIP-1. Work next round as follows (insert markers between stitches): Work 12-14-16-16-18-18 stitches according to diagram A.1 (= half back piece), 1 stitch in stocking stitch, insert 1st marker, 14 stitches in stocking stitch (= sleeve), insert 2nd marker, work 1 stitch in stocking stitch, work 25-29-33-33-37-37 according to diagram A.1, work 1 stitch in stocking stitch (= front piece), insert 3rd marker, 14 stitches in stocking stitch (= sleeve), insert 4th marker, work 1 stitch in stocking stitch, work 13-15-17-17-19-19 stitches according to diagram A.1 (= last half of back piece). Move the markers upwards when working, increase for raglan on each side of every marker. On next round increase 1 stitch in each side of every marker - read INCREASE TIP -2! Increase like this every other round 19-20-22-24-26-30 times in total = 234-250-274-290-314-346 stitches. REMEMBER THE KNITTING TENSION! Piece measures approx. 19-20-22-24-26-29 cm from marker mid back. Work until piece measures 20-21-23-25-27-30 cm from marker. Now divide the piece for sleeves and body as follows: Work pattern as before over the first 34-35-39-42-47-52 stitches (= half back piece), slip the next 48-54-58-60-62-68 stitches on a stitch holder for sleeve and cast on 10-10-10-12-12-12 stitches under sleeve, work pattern as before over the next 69-71-79-85-95-105 stitches (= front piece), slip the next 48-54-58-60-62-68 stitches on a stitch holder for sleeve and cast on 10-10-10-12-12-12 stitches under sleeve, work pattern as before over the last 35-36-40-43-48-53 stitches (= half back piece). BODY: = 158-162-178-194-214-234 stitches. Insert 1 marker thread in the middle of the 10-10-10-12-12-12 new stitches under sleeve (= in the side of body). Move the marker threads upwards when working; they are used when decreasing in the sides later. Continue with pattern as before (adjust A.1 in the sides so that pattern continue nicely on front and back piece). When piece measures 5 cm from division, decrease 1 stitch on each side of marker threads - read DECREASE TIP (= 4 stitches decreased). Decrease like this every 9 cm 3 times in total = 146-150-166-182-202-222 stitches. When piece measures 31-32-32-32-32-31 cm from division, knit 1 round while AT THE SAME TIME increasing 14-18-14-18-14-18 stitches evenly = 160-168-180-200-216-240 stitches. Switch to circular needle size 4.5 mm and work rib knit 2/purl 2 in the round. Cast off with knit over knit and purl over purl when rib measures 5 cm - read CAST-OFF TIP. Piece measures approx. 36-37-37-37-37-36 cm from division. SLEEVE: Slip the 48-54-58-60-62-68 stitches from stitch holder in one side of piece on double pointed needles size 5.5 mm and knit up 1 stitch in each of the 10-10-10-12-12-12 stitches cast on under sleeve = 58-64-68-72-74-80 stitches. Insert 1 marker thread in the middle of the 10-10-10-12-12-12 new stitches. Move the marker thread upwards when working; it should be used for decrease under sleeve. Work in stocking stitch in the round. When sleeve measures 3-3-4-5-5-5 cm from division, decrease 1 stitch on each side of marker thread - remember DECREASE TIP (= 2 stitches decreased). Decrease like this every 3½-3-2½-2-2-1½ cm 11-12-13-15-15-18 times in total = 36-40-42-42-44-44 stitches. When sleeve measures 43-43-41-40-39-38 cm from division, increase 4-4-2-6-4-4 stitches evenly = 40-44-44-48-48-48 stitches. Switch to double pointed needles size 4.5 mm and work rib knit 2/purl 2 in the round. Cast off with knit over knit and purl over purl when rib measures 5 cm - read CAST-OFF TIP. Work the other sleeve the same way. ASSEMBLY: Fold the neck outwards towards right side. Fasten cast-off edge – Sew with neat little stitches on the wrong side of jumper (make sure to make the seam invisible on the right side and to avoid a tight seam). |
|||||||
Diagram explanations |
|||||||
|
|||||||
 |
|||||||
Have you finished this pattern?Tag your pictures with #dropspattern #buddingwarmupsweater or submit them to the #dropsfan gallery. Do you need help with this pattern?You'll find 27 tutorial videos, a Comments/Questions area and more by visiting the pattern on garnstudio.com. © 1982-2026 DROPS Design A/S. We reserve all rights. This document, including all its sub-sections, has copyrights. Read more about what you can do with our patterns at the bottom of each pattern on our site. |
|||||||


With over 40 years in knitting and crochet design, DROPS Design offers one of the most extensive collections of free patterns on the internet - translated to 17 languages. As of today we count 324 catalogues and 12290 patterns translated into English (UK/cm). 12290
We work hard to bring you the best knitting and crochet have to offer, inspiration and advice as well as great quality yarns at incredible prices! Would you like to use our patterns for other than personal use? You can read what you are allowed to do in the Copyright text at the bottom of all our patterns. Happy crafting!
Post a comment to pattern DROPS 219-10
We would love to hear what you have to say about this pattern!
If you want to leave a question, please make sure you select the correct category in the form below, to speed up the answering process. Required fields are marked *.