
Popular categories
Looking for a yarn?


Comments / Questions (30)
![]() Monique wrote:
Monique wrote:
Mijn opmerking van net bedoel ik de toeren van de dubbele stokjes. De vaste toeren niet meegerekend
07.03.2021 - 12:11
![]() Monique wrote:
Monique wrote:
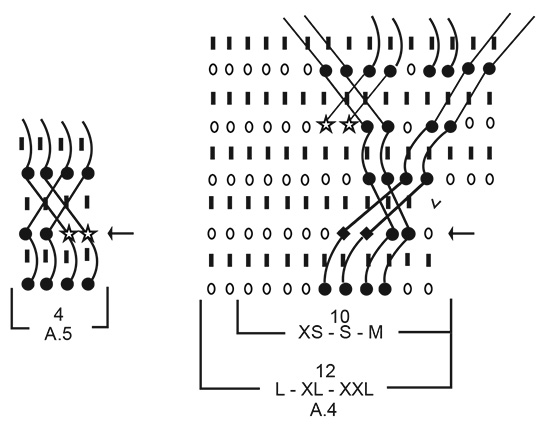
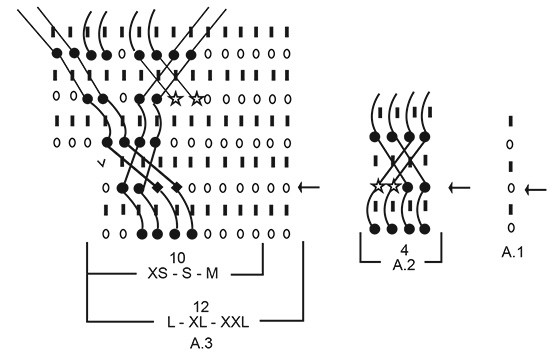
Er zit een grote fout in diagram A2 en A5. Als je het vergelijkt met de foto vd trui van drops. Als je het patroon volgt zijn de kabels langgerekt terwijl de op de foto de kabel op zo gezegt toer 2, 4, 6 etc kabelt. Als je het patroon volgt kabelt hij op toer 2, 5, 8 etc. Dit kan je ook zien op de foto van Angelina die hier onder een foto geplaatst heeft. Daar lopen diagram A2 en A5 precies als bij mij, maar komen niet overeen met de foto vd trui van het patroon zelf .
07.03.2021 - 12:02
![]() Lydia wrote:
Lydia wrote:
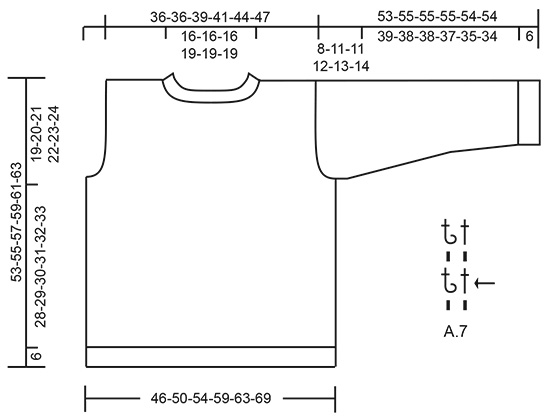
No veo el diagrama A.7 y en el patrón se hace referencia a él. Podrían aclararme cómo se continúa el diseño después de terminar el diagrama A.6???
02.03.2021 - 21:46DROPS Design answered:
Hola Lydia, el diagrama A.7 esta junto al esquema de medidas. Buen trabajo!
02.03.2021 - 21:52
![]() Eveline wrote:
Eveline wrote:
Ik begrijp het meerderen aan de mouwen niet. Doe ik 1 toer 2 steken meerderen en 8 toeren 1 steek meerderen? Of 1 keer 2 steken en 8 keren 1 steek? Dus verdeeld over 5 toeren?
23.01.2021 - 13:29DROPS Design answered:
Dag Eveline,
Je meerdert inderdaad 1 toer 2 steken en daarna 8 toeren 1 steek. In totaal meerder je dus in 9 toeren.
24.01.2021 - 11:28
![]() Zuzanna wrote:
Zuzanna wrote:
Czy jeśli chciałabym zrobić ten sweter w rozmiarze M, ale włóczką Sky, wystarczy że zrobię go według wzoru na rozmiar XL? Zrobiłam próbkę szydełkiem 5mm, włóczką Sky i przy 14 oczkach i 8 rzędach mam 8x8cm, czyli - 20%, czy wymiary swetra też zmniejszą się o 20% i rozmiar XL powinien być ok?
19.01.2021 - 02:11DROPS Design answered:
Witaj Zuziu, proponuję ci 2 kursy Czy mogę użyć innej włóczki niż ta wskazana we wzorze oraz Jak zmierzyć próbkę i wyliczyć liczbę oczek w projekcie. Czy będzie ok? Nie wiem, jest tu za dużo zmiennych. Pierwszy problem to rozmiar szydełka i grupa włóczek, tzn. jak użyjesz takiego samego szydełka jak we wzorze, ale przy cieńszej włóczce, efekt nie będzie taki sam. W razie problemów radzę skontaktować się ze sklepem, w którym kupujesz włóczkę. Pozdrawiamy!
19.01.2021 - 09:01
![]() Rosalia Vancardo wrote:
Rosalia Vancardo wrote:
Bin pomeriggio, una domanda perchè i modelli che proponete li lavorate a pezzi?mi piacerebbe lavorare i vostri modelli con spiegazione top-down Sarebbe stupendo grazie di cuore ,buon lavoro in attesa di un vostro riscontro ,R.V
12.01.2021 - 14:26DROPS Design answered:
Buongiorno Rosalia, ci sono tantissimi modelli sul nostro sito lavorati top-down e ce ne sono tanti altri in arrivo con la nuova collezione: continui a cercare! Buon lavoro!
12.01.2021 - 14:58
![]() Monica wrote:
Monica wrote:
Hvad str har modellen på?
08.01.2021 - 23:22
![]() Daniela wrote:
Daniela wrote:
Mi dispiace ma le vostre indicazioni sono poco chiare non si capisce quale è lo schema da seguire ed in quale ordine Partendo da “Alla fine della riga con la freccia, continuare con la riga successiva del diagramma (= 1 aumento verso il collo), poi avviare 20-20-20-24-24-24 catenelle lasse (= collo) e continuare con la stessa riga sulla spalla sinistra come segue: ... e fino a “Ripetere i diagrammi dalla riga con la freccia” non si capisce come seguire gli schemi
17.12.2020 - 22:43DROPS Design answered:
Buongiorno Daniela, le spiegazioni sono corrette, non ci sono errori: deve lavorare come indicato. Buon lavoro!
18.12.2020 - 09:06
![]() Therese Stoebner wrote:
Therese Stoebner wrote:
Pattern is missing diagram A.7
30.11.2020 - 02:19DROPS Design answered:
Dear Mrs Stoebner, you will find diagram A.7 just next to the measurement chart, under the sleeve - it's a small diagram drawn over 2 sts and 4 rows. Happy crocheting!
30.11.2020 - 10:17
![]() M Del Cristo Diaz Felipe wrote:
M Del Cristo Diaz Felipe wrote:
Es precioso este modelo y el que sea a ganchillo, me encanta.
05.06.2020 - 11:53
|
|||||||||||||||||||||||||||||||
Enchanted Underwood#enchantedunderwoodsweater |
|||||||||||||||||||||||||||||||
 |
 |
||||||||||||||||||||||||||||||
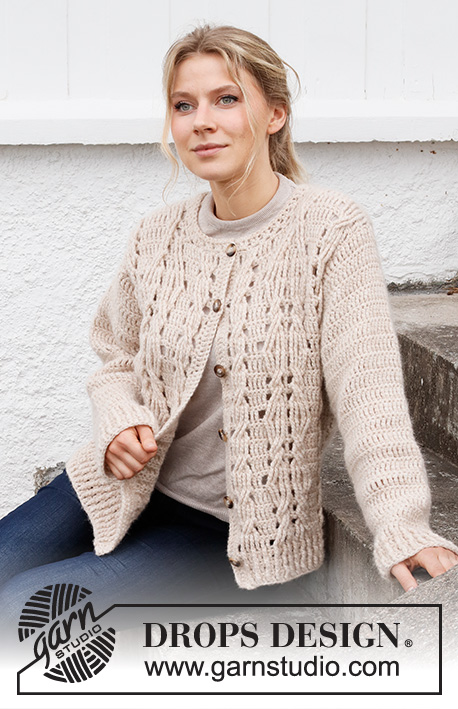
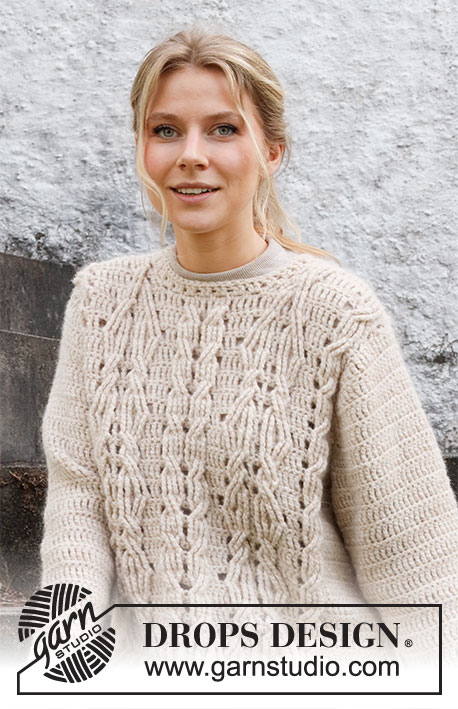
Crocheted jumper in DROPS Air. The piece is worked top down with cables and relief stitches. Sizes XS - XXL.
DROPS 218-32 |
|||||||||||||||||||||||||||||||
|
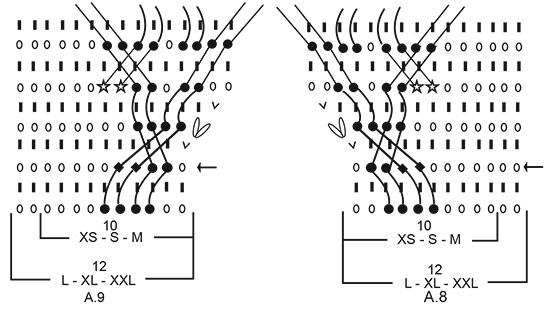
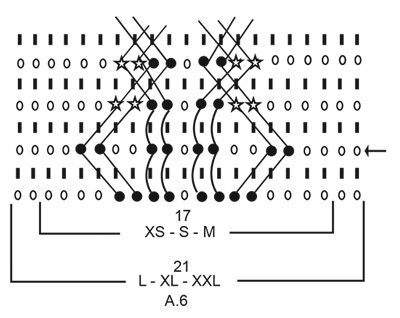
------------------------------------------------------- EXPLANATIONS FOR THE PATTERN: ------------------------------------------------------- CHAIN STITCH: If you work outermost on the hook the chain stitch will often be too tight; 1 chain stitch should be as long as 1 double crochet/double treble crochet is wide. CROCHET INFORMATION: At the beginning of each row of double treble crochets, work 4 chain stitches; these chain stitches do not replace the first double treble crochet. At the beginning of each row/round of double crochets work 1 chain stitch; this chain stitch does not replace the first double crochet. PATTERN: See diagrams A.1 to A.9. Find your size in the diagrams (applies to A.3, A.4, A.6, A.8 and A.9). INCREASE TIP (for armholes): Increase 2 stitches by working 3 stitches in one stitch. DECREASE TIP (for sleeves): Decrease 1 stitch on each side of the piece by working together the first 2 stitches on the row and the last 2 stitches on the row as follows: Work 1 double crochet, but wait with the last yarn over and pull-through (= 2 loops on the hook), work 1 double crochet in the next stitch; on the last yarn over pull the strand through all 3 loops on the hook (= 1 stitch decreased). ------------------------------------------------------- START THE PIECE HERE: ------------------------------------------------------- JUMPER – SHORT OVERVIEW OF THE PIECE: The piece is worked top down and back and forth in sections, which are crocheted or sewn together to finish. BACK PIECE: Left shoulder: Work 15-15-17-17-19-21 chain stitches – read CHAIN STITCH, with hook size 5 mm and Air. Turn and work the first row from the right side as follows: 1 double treble crochet in each chain stitch – read CROCHET INFORMATION = 15-15-17-17-19-21 double treble crochets. Then work a row with 1 double crochet in each double treble crochet. Now work pattern (start on the row with an arrow which corresponds to your size in the diagrams) from the right side as follows: Work A.1 over the first 1-1-3-1-3-5 stitches, A.2 over the next 4 stitches, A.3 over the next 10-10-10-12-12-12 stitches. When the row with the arrow is finished, cut the strand and lay the piece to one side. Right shoulder: Work 15-15-17-17-19-21 chain stitches, with hook size 5 mm and Air. Turn and work the first row from the right side as follows: 1 double treble crochet in each chain stitch = 15-15-17-17-19-21 double treble crochets. Then work a row with 1 double crochet in each double treble crochet. Now work pattern (start on the row with an arrow which corresponds to your size in the diagrams) from the right side as follows: Work A.4 over the first 10-10-10-12-12-12 stitches, A.5 over the next 4 stitches, A.1 over the last 1-1-3-1-3-5 stitches. When the row with the arrow is finished, work the next row in the diagrams (= 1 stitch increased towards the neck), then work 20-20-20-24-24-24 loose chain stitches (= neck) and continue the same row over the left shoulder as follows: Work A.3 over the first 10-10-10-12-12-12 stitches (= 1 stitch increased towards the neck), A.2 over the next 4 stitches, A.1 over the last 1-1-3-1-3-5 stitches = 52-52-56-60-64-68 stitches. REMEMBER THE CROCHET TENSION! Continue the next 2 rows in the pattern and, over the new stitches on the neck, work 1 double treble crochet in each stitch from the right side and 1 double crochet in each stitch from the wrong side. Now work pattern as follows: Work as before over the first 22-22-24-26-28-30 stitches, A.2 over the next 4 stitches and A.5 over the next 4 stitches (make sure you work the same row in the diagrams on each side of the back piece), work as before over the last 22-22-24-26-28-30 stitches. When A.3 and A.4 have been finished in height, work pattern as follows: Work as before over the first 5-5-7-5-7-9 stitches, A.6 over the next 17-17-17-21-21-21 stitches, work A.2 and A.5 as before, A.6 over the next 17-17-17-21-21-21 stitches and work as before over the last 5-5-7-5-7-9 stitches. Continue this pattern back and forth. Repeat the diagrams from the row with the arrow. When the piece measures 17-16-17-18-19-19 cm, increase 2 stitches on each side of the piece for the armholes – read INCREASE TIP. Increase like this on each row 2-3-3-3-3-4 times on both sides = 60-64-68-72-76-84 stitches. At the end of the next 2 rows work 3-4-5-6-7-7 loose chain stitches for the armholes = 66-72-78-84-90-98 stitches. The new stitches are worked with A.1. Continue back and forth until the piece measures 47-49-51-53-55-57 cm measured from the shoulder – adjust so you finish after the row with the arrow in A.6 or after the next to last row in the diagram. Now work an edge as follows: Work 1 row with 1 double crochet in each stitch and increase 1 stitch on the row by working 2 double crochets in one stitch = 67-73-79-85-91-99 stitches. Work from the row with the arrow in A.7 until there is 1 stitch left, work the first stitch in A.7. Repeat the last 2 rows in the diagram until the edge measures 6 cm – adjust so you finish after a row of treble crochets/relief triple treble crochets. Cut and fasten the strand. The back piece measures approx. 53-55-57-59-61-63 cm from the shoulder down. FRONT PIECE: Right shoulder: Work 15-15-17-17-19-21 chain stitches – remember CHAIN STITCH, with hook size 5 mm and Air. Turn and work the first row from the right side as follows: 1 double treble crochet in each chain stitch – remember CROCHET INFORMATION = 15-15-17-17-19-21 double treble crochets. Then work a row with 1 double crochet in each double treble crochet. Now work pattern (start on the row with the arrow which corresponds to your size in the diagrams) from the right side as follows: Work A.1 over the first 1-1-3-1-3-5 stitches, A.2 over the next 4 stitches, A.8 over the next 10-10-10-12-12-12 stitches. When row 3 from the arrow is finished, cut the strand and lay the piece to one side. Left shoulder: Work 15-15-17-17-19-21 chain stitches, with hook size 5 mm and Air. Turn and work the first row from the right side as follows: 1 double treble crochet in each chain stitch = 15-15-17-17-19-21 double treble crochets. Then work a row with 1 double crochet in each double treble crochet. Now work pattern (start on the row with an arrow which corresponds to your size in the diagrams) from the right side as follows: Work A.9 over the first 10-10-10-12-12-12 stitches, A.5 over the next 4 stitches, A.1 over the last 1-1-3-1-3-5 stitches. Continue back and forth until row 4 has been worked, then work 16-16-16-20-20-20 loose chain stitches at the end of the row (= neck) and continue row 4 over the right shoulder as follows: Work A.8 over the first 12-12-12-14-14-14 stitches, A.2 over the next 4 stitches, A.1 over the last 1-1-3-1-3-5 stitches = 52-52-56-60-64-68 stitches. Continue the next 2 rows in the diagrams and over the new stitches on the neck work 1 double treble crochet in each stitch from the right side and 1 double crochet in each stitch from the wrong side. Now work pattern as before over the first 22-22-24-26-28-30 stitches, A.2 over the next 4 stitches and A.5 over the next 4 stitches (make sure you work the same rows in A.2 and A.5 on each side of the front piece), work as before over the last 22-22-24-26-28-30 stitches. When A.8 and A.9 are finished in height, work as follows: As before over the first 5-5-7-5-7-9 stitches, A.6 over the next 17-17-17-21-21-21 stitches, A.2 and A.5 as before, A.6 over the next 17-17-17-21-21-21 stitches and as before over the last 5-5-7-5-7-9 stitches. Continue this pattern back and forth. The diagrams are repeated from the row with the arrow. When the piece measures 17-16-17-18-19-19 cm, increase 2 stitches on each side of the piece for the armholes – remember INCREASE TIP. Increase like this every row 2-3-3-3-3-4 times on each side = 60-64-68-72-76-84 stitches. At the end of the next 2 rows work 3-4-5-6-7-7 loose chain stitches for the armholes = 66-72-78-84-90-98 stitches. The new stitches are worked according to A.1. Continue back and forth until the piece measures 47-49-51-53-55-57 cm measured from the shoulder – adjust so you finish after the row with the arrow in A.6 or after the next to last row in the diagram. Now work an edge as follows: Work 1 row with 1 double crochet in each stitch and increase 1 stitch on the row by working 2 double crochets in one stitch = 67-73-79-85-91-99 stitches. Work from the row with the arrow in A.7 until there is 1 stitch left, work the first stitch in A.7. Repeat the last 2 rows in the diagram until the edge measures 6 cm – adjust so you finish after a row of treble crochets/relief triple treble crochets. Cut and fasten the strand. The front piece measures approx. 53-55-57-59-61-63 cm from the shoulder down. ASSEMBLY: Sew the shoulder seams in each and every stitch, making sure the seam is not tight. Crochet the side seams together through both layers, from the wrong side as follows: Fasten the strand with 1 double crochet in the side under the sleeve, * work 2 chain stitches, skip 1 cm, 1 double crochet *, work from *-* down the whole seam and finish with 1 double crochet. SLEEVE: The sleeves are worked back and forth, top down. Work 24-24-24-25-25-27 chain stitches with hook size 5 mm and Air. Turn and work row 1 in A.1, AT THE SAME TIME increase for the sleeve cap on both sides as follows: Increase 2 stitches 3-1-2-1-0-0 times and 1 stitch 3-7-6-8-10-11 times = 42-42-44-45-45-49 stitches. At the end of the next 2 rows, work 3-4-5-6-7-7 new chain stitches = 48-50-54-57-59-63 stitches. The new stitches are worked in A.1. Insert 1 marker. THE PIECE IS NOW MEASURED FROM HERE. Continue back and forth with A.1. When the piece measures 2 cm – adjust so the next row is a row of double crochets, decrease on each side of the piece – read DECREASE TIP. Decrease like this on every row of double crochets a total of 6-6-8-8-9-10 times = 36-38-38-41-41-43 stitches. Continue working until the sleeve measures 39-38-38-37-35-34 cm – adjust so the next row is a row of double crochets. Now work an edge as follows: Work 1 row with 1 double crochet in each stitch and increase 1-1-1-0-0-0 stitch on the row = 37-39-39-41-41-43 stitches. Work from the row with the arrow in A.7 until there is 1 stitch left, work the first stitch in A.7. Repeat the last 2 rows in the diagram until the edge measures 6 cm – adjust so you finish after a row with treble crochets/relief triple treble crochets. Now crochet the sleeve seams, through both layers from the wrong side, as follows: * Work 1 double crochets, 2 chain stitches, skip approx. 1 cm *, work from *-* as far as the chain stitches cast on for the armholes, finish with 1 double crochet. Work the other sleeve in the same way. Sew the sleeves to the body. NECK: ROUND 1: Start at the top of the shoulder and fasten the strand with 1 double crochet, * work 2 chain stitches, skip approx. 1½ cm, 1 double crochet *, work from *-* around the whole neck and finish with 1 slip stitch in the first double crochet on the round = approx. 31- 35 chain-spaces. ROUND 2: Work 1 slip stitch around the chain-space, 3 chain stitches, 1 treble crochet in the same chain-space, then work 2 treble crochets around each of the remaining chain-spaces on the round and finish with 1 slip stitch in the 3rd chain stitch on the round. ROUND 3: 1 chain stitch, work 1 double crochet in each stitch and finish with 1 slip stitch in the first chain stitch on the round. Cut and fasten the strand. |
|||||||||||||||||||||||||||||||
Diagram explanations |
|||||||||||||||||||||||||||||||
|
|||||||||||||||||||||||||||||||
 |
|||||||||||||||||||||||||||||||
 |
|||||||||||||||||||||||||||||||
 |
|||||||||||||||||||||||||||||||
 |
|||||||||||||||||||||||||||||||
 |
|||||||||||||||||||||||||||||||
Have you finished this pattern?Tag your pictures with #dropspattern #enchantedunderwoodsweater or submit them to the #dropsfan gallery. Do you need help with this pattern?You'll find 15 tutorial videos, a Comments/Questions area and more by visiting the pattern on garnstudio.com. © 1982-2026 DROPS Design A/S. We reserve all rights. This document, including all its sub-sections, has copyrights. Read more about what you can do with our patterns at the bottom of each pattern on our site. |
|||||||||||||||||||||||||||||||


With over 40 years in knitting and crochet design, DROPS Design offers one of the most extensive collections of free patterns on the internet - translated to 17 languages. As of today we count 324 catalogues and 12290 patterns translated into English (UK/cm). 12290
We work hard to bring you the best knitting and crochet have to offer, inspiration and advice as well as great quality yarns at incredible prices! Would you like to use our patterns for other than personal use? You can read what you are allowed to do in the Copyright text at the bottom of all our patterns. Happy crafting!
Post a comment to pattern DROPS 218-32
We would love to hear what you have to say about this pattern!
If you want to leave a question, please make sure you select the correct category in the form below, to speed up the answering process. Required fields are marked *.