
Popular categories
Looking for a yarn?


Comments / Questions (16)
![]() NZINA wrote:
NZINA wrote:
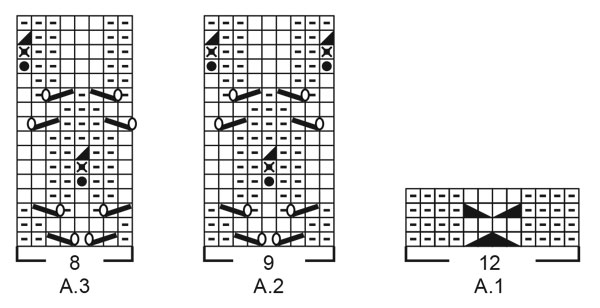
Bonjour je ne comprends pas le premier rang de A.1. Est-ce une torsade ou bien 4 mailles rabattues ensemble ? Merci.
14.12.2020 - 12:32DROPS Design answered:
Bonjour Nzina, au 1er rang de A.1 vous retrouvez les 2 derniers symboles de la légende: d'abord placer 1 maille sur l'aiguille auxiliaire devant l'ouvrage, tricoter 1 maille endroit, reprendre la maille en attente et la tricoter à l'endroit puis placer 1 maille sur l'aiguille auxiliaire derrière l'ouvrage, tricoter 1 maille endroit, reprendre la maille en attente et la tricoter à l'endroit. Bon tricot!
14.12.2020 - 13:31
![]() Maryline wrote:
Maryline wrote:
Merci pour votre message Beau modèle Maryline
23.10.2020 - 13:37
![]() Maryline wrote:
Maryline wrote:
Bonjour Pour ce modèle,j'ai terminé le 1er diagramme 16 rangs Pouvez vous me dire comment continuer: je recommence depuis le début ? Merci
20.10.2020 - 17:49DROPS Design answered:
Bonjour Maryline, vous répétez les diagrammes en hauteur, comme vous avez répété A.1 pour terminer A.2 et A.3, autrement dit, quand les diagrammes sont terminés, vous les reprenez au 1er rang. Bon tricot!
21.10.2020 - 08:00
![]() Marit wrote:
Marit wrote:
Diagram A1, der er det 2 forskjellige symboler, et stort på nederste omg. over 4 masker😉
09.10.2020 - 14:37DROPS Design answered:
Hei Marit. Det du mener er 1 stort symbolet på 1.rad er 2 symboler, lik de 2 over, men står bare forskjellige veier. mvh DROPS design
11.10.2020 - 20:50
![]() Marit wrote:
Marit wrote:
Forklaring til diagram 1, et mønstertegn uten forklaring.
08.10.2020 - 21:27DROPS Design answered:
Hej Marit. Det ska finnas förklaring till alla symboler. Vilken är det du inte kan se? Mvh DROPS Design
09.10.2020 - 07:44
![]() Viviana wrote:
Viviana wrote:
Bel traforo
08.06.2020 - 20:56
|
|||||||||||||||||||||||||||||||
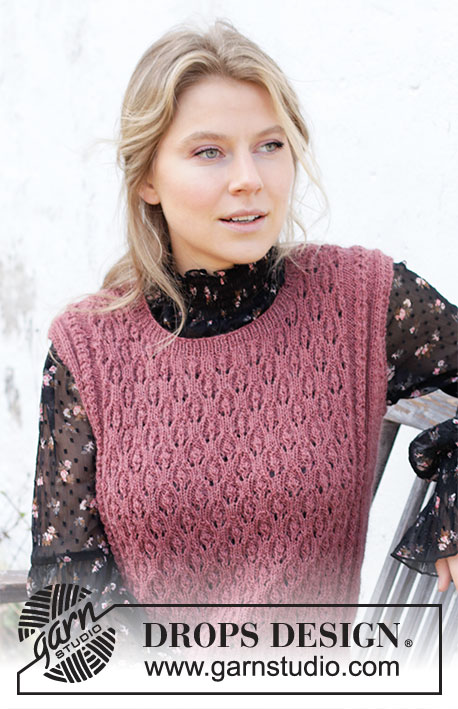
Raspberry Rose Sweater#raspberryrosesweater |
|||||||||||||||||||||||||||||||
 |
 |
||||||||||||||||||||||||||||||
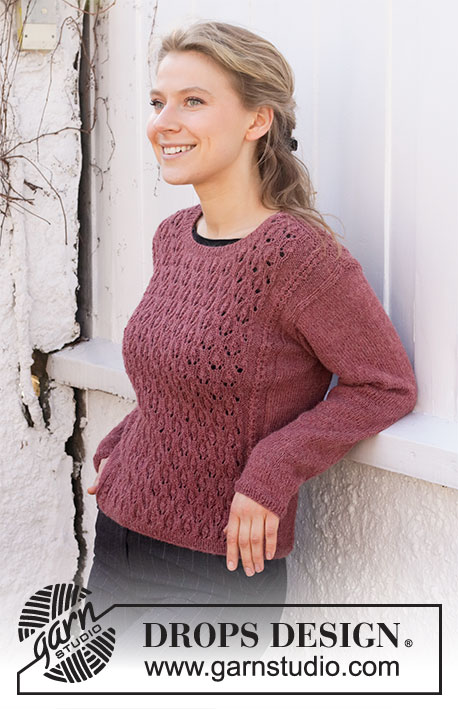
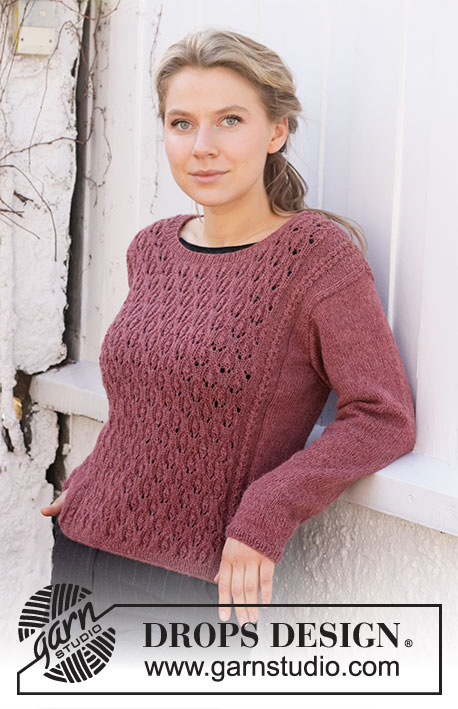
Knitted jumper in DROPS Alpaca. The piece is worked with lace pattern, small cables and round neck. Sizes S - XXXL.
DROPS 218-18 |
|||||||||||||||||||||||||||||||
|
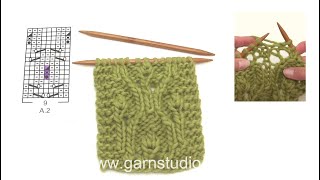
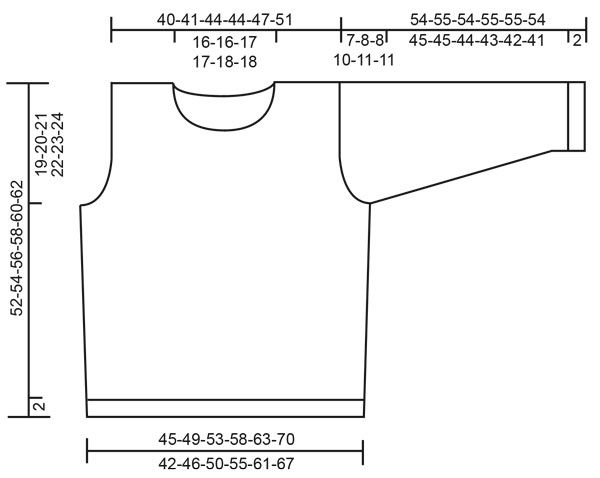
------------------------------------------------------- EXPLANATIONS FOR THE PATTERN: ------------------------------------------------------- PATTERN: See diagrams A.1 to A.3. The diagrams show all the rows from the right side. DECREASE TIP (evenly spaced): To work out how to decrease evenly, count the total number of stitches on the needle (e.g. 242 stitches) and divide by the number of decreases to be made (e.g. 24) = 10.1. In this example, decrease by knitting together each 9th and 10th stitch (approx.). INCREASE TIP (for sides of body and sleeves): Work until there are 3 stitches left before the marker thread, make 1 yarn over, knit 6 (marker thread sits between these 6 stitches) make 1 yarn over (= 2 stitches increased at each marker thread; 4 stitches increased on round). On the next round knit the yarn overs twisted to avoid holes. Then work the new stitches in stocking stitch. ------------------------------------------------------- START THE PIECE HERE: ------------------------------------------------------- JUMPER – SHORT OVERVIEW OF THE PIECE: The body is worked in the round with circular needle, bottom up, as far as the armholes. The front and back pieces are then finished separately, back and forth on the needle. The sleeves are worked with double pointed needles/short circular needle, bottom up. The neck is worked to finish. BODY: Cast on 242-264-286-312-344-378 stitches with circular needle size 2.5 mm and Alpaca. Knit 1 round, then work rib (= knit 1, purl 1) for 5 rounds. Knit 1 round where you decrease 24-26-28-30-34-36 stitches evenly spaced – read DECREASE TIP = 218-238-258-282-310-342 stitches. Change to circular needle size 3 mm and insert 1 marker thread at the beginning of the round and 1 marker thread after 109-119-129-141-155-171 stitches (= sides of body). Allow the threads to follow your work onwards; they will be used when increasing in the sides. The next round is worked as follows: * Work 6-11-12-18-21-25 stitches in stocking stitch, A.1 (= 12 stitches), A.2 (= 9 stitches), A.3 over the next 64-64-72-72-80-88 stitches (= 8-8-9-9-10-11 repeats of 8 stitches), work A.1 (= 12 stitches), work 6-11-12-18-21-25 stitches in stocking stitch *(marker thread here). Work from *-* 1 more time. Continue this pattern. REMEMBER THE KNITTING TENSION! AT THE SAME TIME when the piece measures 9 cm in all sizes, increase 1 stitch on each side of both marker threads – read INCREASE TIP (= 4 stitches increased). Increase like this every 9-9-9-9-10-10 cm a total of 3 times = 230-250-270-294-326-354 stitches. Continue working until the piece measures 33-34-35-36-37-38 cm. On the next round cast off for the armholes as follows: Cast off 3 stitches, work as before until there are 3 stitches left before the marker thread on the other side of the piece, cast off 6 stitches, work as before until there are 3 stitches left before the first marker thread and cast off these stitches. Cut the strand. The back and front pieces are finished separately. BACK PIECE: = 109-119-129-141-155-171 stitches. Continue the pattern back and forth and cast off for the armholes at the beginning of each row on each side as follows: Cast off 2 stitches 1-2-3-5-6-7 times and 1 stitch 1-3-2-3-4-5 times = 103-105-113-115-123-133 stitches left. Continue working until the piece measures 50-52-54-56-58-60 cm. On the next row cast off the middle 37-37-41-41-43-43 stitches for the neck and each shoulder is finished separately. Continue as before and cast off 2 stitches on the next row from the neck = 31-32-34-35-38-43 stitches on the shoulder. Work until there are 2 rows left before the piece measures 52-54-56-58-60-62 cm. Knit 1 row from the right side where you decrease 1 stitch over the cable in A.1 = 30-31-33-34-37-42 stitches. Knit 1 row from the wrong side and cast off with knit from the right side. Work the other shoulder in the same way. The piece measures 52-54-56-58-60-62 cm from the shoulder down. FRONT PIECE: = 109-119-129-141-155-171 stitches. Continue the pattern back and forth and cast off for the armholes at the beginning of each row on each side as follows: Cast off 2 stitches 1-2-3-5-6-7 times and 1 stitch 1-3-2-3-4-5 times = 103-105-113-115-123-133 stitches. Continue working until the piece measures 43-44-46-47-49-50 cm. On the next row place the middle 17-17-21-21-23-23 stitches on 1 thread for the neck and each shoulder is finished separately. Continue the pattern and cast off for the neck at the beginning of each row from the neck as follows: Cast off 2 stitches 4 times and 1 stitch 4 times = 31-32-34-35-38-43 stitches on the shoulder. Work until there are 2 rows left before the piece measures 52-54-56-58-60-62 cm. Knit 1 row from the right side where you decrease 1 stitch over the cable in A.1 = 30-31-33-34-37-42 stitches left. Knit 1 row from the wrong side and cast off with knit from the right side. Work the other shoulder in the same way. The piece measures approx. 52-54-56-58-60-62 cm from the shoulder down. SLEEVE: Cast on 54-56-58-62-64-66 stitches with double pointed needles size 2.5 mm and Alpaca. Knit 1 round then work rib in the round (= knit 1, purl 1) for 5 rounds. Knit 1 round where you decrease 6 stitches evenly spaced in all sizes – remember DECREASE TIP = 48-50-52-56-58-60 stitches. Change to double pointed needles size 3 mm and insert 1 marker thread at the beginning of the round = mid-under the sleeve. Allow the thread to follow your work onwards; it will be used when increasing under the sleeve. Work stocking stitch in the round. When the sleeve measures 6-9-6-11-9-5 cm, increase 2 stitches under the sleeve – read INCREASE TIP. Increase like this every 2½-2-2-1½-1½-1½ cm a total of 16-18-20-21-23-25 times = 80-86-92-98-104-110 stitches. Continue working until the sleeve measures 47-47-46-45-44-43 cm. There is approx. 7-8-8-10-11-11 cm left to finished length; you can try the jumper on and work to desired length. NOTE: Shorter measurements in larger sizes due to wider shoulders and longer sleeve cap. The next round is worked as follows: Start 3 stitches before the marker thread, cast off 6 stitches and work stocking stitch to the end of the round. The rest of the sleeve is worked back and forth and in stocking stitch, AT THE SAME TIME as you cast off stitches for the sleeve cap at the beginning of each row on both sides as follows: Cast off 2 stitches 3-5-5-5-5-5 times and 1 stitch 3-2-2-4-6-6 times. Then cast off 2 stitches on both sides until the piece measures approx. 53-54-53-54-54-53 cm (or 1 cm before finished length). Cast off 3 stitches 1 time on each side and then cast off the remaining stitches. The sleeve measures approx. 54-55-54-55-55-54 cm from the shoulder down. Work the other sleeve in the same way. ASSEMBLY: Sew the shoulder seams inside the cast-off edge. Sew in the sleeves, inside the 1 edge stitch. NECK: Start on the right side by the one shoulder seam, using short circular needle size 2.5 mm, and knit up approx. 118 to 140 stitches, including the stitches from the thread in front (the number of stitches must be divisible by 2). Work 6 rounds of rib (= knit 1, purl 1). Cast off with knit over knit and purl over purl. |
|||||||||||||||||||||||||||||||
Diagram explanations |
|||||||||||||||||||||||||||||||
|
|||||||||||||||||||||||||||||||
 |
|||||||||||||||||||||||||||||||
 |
|||||||||||||||||||||||||||||||
Have you finished this pattern?Tag your pictures with #dropspattern #raspberryrosesweater or submit them to the #dropsfan gallery. Do you need help with this pattern?You'll find 32 tutorial videos, a Comments/Questions area and more by visiting the pattern on garnstudio.com. © 1982-2026 DROPS Design A/S. We reserve all rights. This document, including all its sub-sections, has copyrights. Read more about what you can do with our patterns at the bottom of each pattern on our site. |
|||||||||||||||||||||||||||||||


With over 40 years in knitting and crochet design, DROPS Design offers one of the most extensive collections of free patterns on the internet - translated to 17 languages. As of today we count 324 catalogues and 12290 patterns translated into English (UK/cm). 12290
We work hard to bring you the best knitting and crochet have to offer, inspiration and advice as well as great quality yarns at incredible prices! Would you like to use our patterns for other than personal use? You can read what you are allowed to do in the Copyright text at the bottom of all our patterns. Happy crafting!
Post a comment to pattern DROPS 218-18
We would love to hear what you have to say about this pattern!
If you want to leave a question, please make sure you select the correct category in the form below, to speed up the answering process. Required fields are marked *.