
Popular categories
Looking for a yarn?


Comments / Questions (56)
![]() Madeleine wrote:
Madeleine wrote:
Pourquoi augmenter avant les cotes ?du corps , pour ce joli modèle je ne comprends pas très bien merci
21.02.2021 - 14:11DROPS Design answered:
Bonjour Madeleine, on augmente avant de tricoter les côtes car on ne veut pas ici que la bordure en côtes resserre trop l'ouvrage, car on a besoin de plus de mailles en côtes avec les aiguilles 3,5 qu'en jersey avec les aiguilles 4,5 pour une largeur équivalente. Bon tricot!
22.02.2021 - 08:45
![]() Marianne Ehler wrote:
Marianne Ehler wrote:
Hej Er normalt meget glad for jeres opskrifter, hvor maskeantal og mål passer perfekt. Her synes jeg dog at ribben på ærmerne er meget vid - 76 masker (størrelse M) = ca 25 cm. Jeg lader være med at tage ud, når jeg starter på ribben, det synes jeg er bedre.
05.02.2021 - 14:54DROPS Design answered:
Hej Marianne, det er helt ok - God weekend :)
05.02.2021 - 15:16
![]() Mona wrote:
Mona wrote:
Hej! När man ska dela upp arbetet till fram- och bakstycke och ärmar så står det att ”lägg upp 8 maskor under armen”. Vad menas med det?
29.01.2021 - 10:58
![]() Caroline wrote:
Caroline wrote:
Dank voor de extra instructie voor de zadelschouder. Is het een idee om de instructievideo's voor de meerderingen voor de mouwen en pas bij zadelschouders onder het patroon toe te voegen bij de relevante video's?
27.12.2020 - 16:18
![]() ZITA LANG wrote:
ZITA LANG wrote:
Wo kann ich die Farbe Glacier Waters erhalten
23.12.2020 - 14:09DROPS Design answered:
Liebe Frau Lang, hier finden Sie die Liste von den DROPS Händlern in Deutschland, gerne können Sie ihnen fragen ob/wenn sie die gewünschte Farbe haben/bekommen. Viel Spaß beim stricken!
04.01.2021 - 07:21
![]() Diane Dufour wrote:
Diane Dufour wrote:
Bonjour, est-il possible qu'il y ait une erreur dans les explications ``AUGMENTATIONS 2: APRÈS LE MARQUEUR``. Il est dit de tricoter la maille dans le brin avant mais ça laissait un trou. J'ai donc tricoté la maille dans le brin arrière. Qu'en pensez-vous ? Merci, le modèle est splendide.
05.12.2020 - 18:51DROPS Design answered:
Bonjour Mme Dufour, vous avez tout à fait raison, merci pour votre retour, la correction a été faite. Bonne continuation!
07.12.2020 - 07:53
![]() Mia wrote:
Mia wrote:
Et l'augmentation se fait tout les 2 tours mais non pour chaque tour? (augmentation des manches)
26.11.2020 - 15:15DROPS Design answered:
Bonjour Mia, tout à fait, pour les manches, vous augmentez tous les 2 tours (= 1 tour d'augmentations, 1 tour sans augmentations). Bon tricot!
26.11.2020 - 16:53
![]() Mia wrote:
Mia wrote:
Pour l\'augmentation des manches, c\'est augmentation 1 ou 2?
25.11.2020 - 21:02DROPS Design answered:
Bonjour Mia, pour l'augmentation des manches, vous augmentez comme vous avez fait pour celles des épaules = AUGMENTATIONS-2 en relevant les fils soit avant soit après les marqueurs (les augmentations se situent cette fois sur les manches et plus sur le dos/le devant). Bon tricot!
26.11.2020 - 10:06
![]() Miryam Van Ommen wrote:
Miryam Van Ommen wrote:
Hoe brei ik een verhoging in de nek van een trui met zadelschouders?
08.11.2020 - 10:49DROPS Design answered:
Dag Miryam,
In dit patroon is geen verhoogde hals opgenomen aan de achterkant. Je zou een aantal verkorte naalden aan de achterkant kunnen breien, maar zorg er daarbij voor je niet voorbij de zadelschouder gaat, anders verstoor je het patroon.
18.11.2020 - 13:18
![]() Pascale wrote:
Pascale wrote:
Un modèle qui me plaît à moi aussi, cependant je remarque une « bosse » sous l’encolure à l’avant... je ne trouve pas ça très joli. Comment l’éviter ?
29.10.2020 - 16:11DROPS Design answered:
Bonjour Pascale, vous pouvez bloquer votre pull quand il est terminé pour essayez de lui donner la forme souhaitée, mais on ne peut pas ici, dans un modèle de haut en bas avec des manches marteau, ajouter de rangs raccourcis pour avoir l'encolure dos plus haute que celle du devant. Bon tricot!
09.11.2020 - 12:18
|
|||||||||||||
Glacier Waters#glacierwaters |
|||||||||||||
 |
 |
||||||||||||
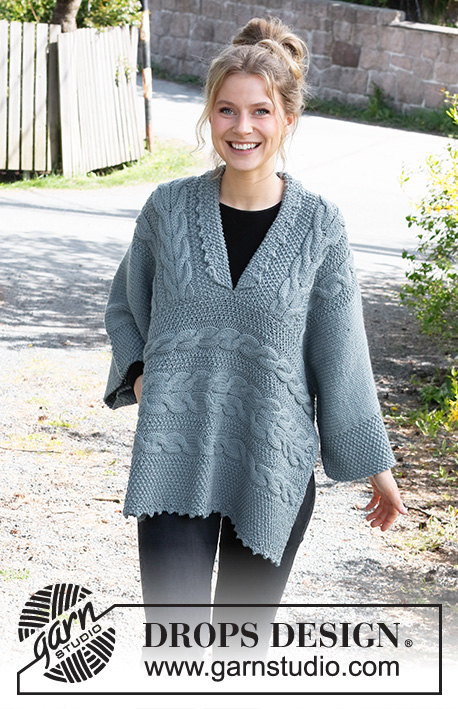
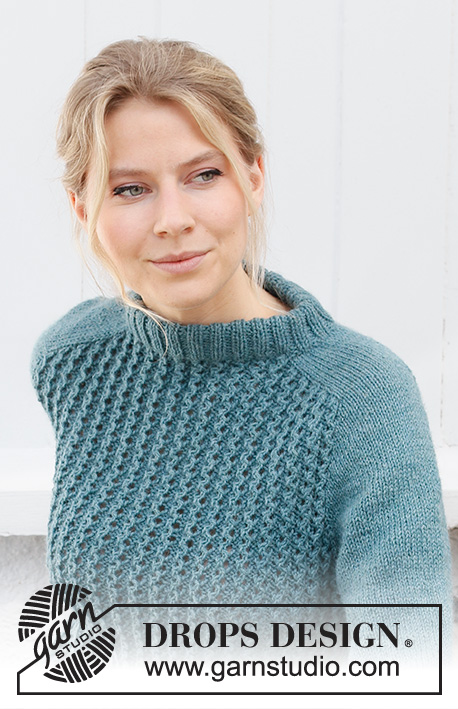
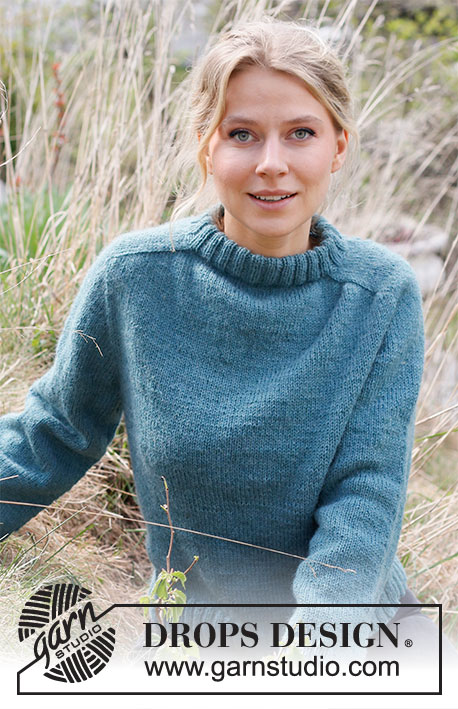
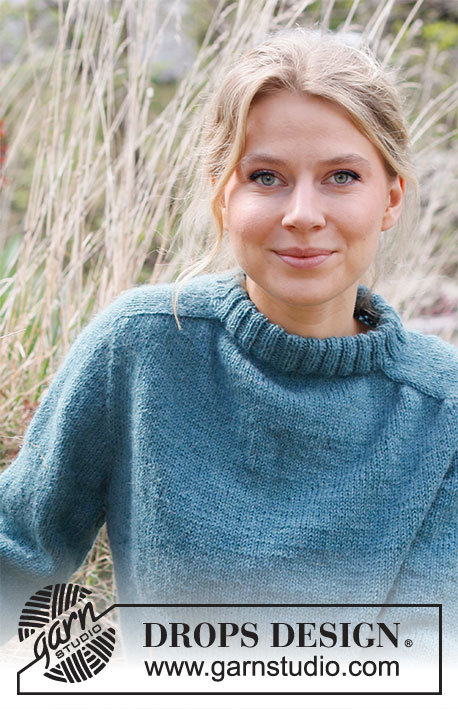
Knitted jumper with saddle shoulders in DROPS Lima or DROPS Soft Tweed. The piece is worked top down. Sizes S - XXXL.
DROPS 216-9 |
|||||||||||||
|
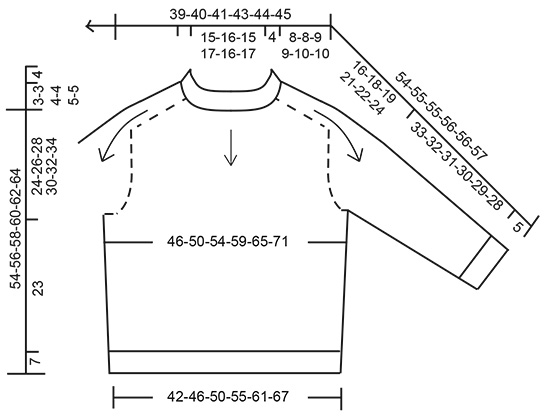
------------------------------------------------------- EXPLANATIONS FOR THE PATTERN: ------------------------------------------------------- INCREASE TIP-1 (evenly spaced): To work out how to increase evenly, count the total number of stitches on the needle (e.g. 96 stitches) and divide by the number of increases to be made (e.g. 12) = 8. In this example, increase by making 1 yarn over after each 8th stitch. On the next round work the yarn overs twisted to avoid holes. INCREASE TIP-2: BEFORE MARKER: The new stitch will be twisted, leaning towards the right. Use left needle to pick up strand between 2 stitches from the row below, pick up strand from behind and knit stitch in front loop. AFTER MARKER: The new stitch will be twisted, leaning towards the left. Use left needle to pick up strand between 2 stitches from the row below, pick up strand from the front and knit stitch in back loop. DECREASE TIP (for body and sleeves): Decrease 1 stitch on either side of the marker thread as follows: Work until there are 3 stitches left before the marker thread, knit 2 together, knit 2 (marker thread sits between these 2 stitches), slip 1 stitch as if to knit, knit 1 and pass the slipped stitch over the knitted stitch. CASTING-OFF TIP: To avoid the cast-off edge being tight you can cast off with a larger size needle. If the edge is still tight, make 1 yarn over after approx. each 4th stitch at the same time as casting off; the yarn overs are cast off as normal stitches. ------------------------------------------------------- START THE PIECE HERE: ------------------------------------------------------- JUMPER – SHORT OVERVIEW OF THE PIECE: The neck and yoke are worked in the round with circular needle, top down. Stiches are increased for the shoulders, then for the sleeves. The yoke is divided for body and sleeves and the body is continued in the round with circular needle. The sleeves are worked with double pointed needles, top down. NECK: Cast on 92-96-100-108-112-116 stitches with circular needle size 3.5 mm and Lima. Knit 1 round. Then work rib (= knit 2. purl 2) in the round for 8½ cm. Knit 1 round where you increase 12-12-20-20-24-28 stitches evenly spaced – read INCREASE TIP-1 = 104-108-120-128-136-144 stitches. Change to circular needle size 4.5 mm. Insert a marker at the beginning of the round (mid-back). THE PIECE IS NOW MEASURED FROM HERE! YOKE: Insert 4 markers in the piece, without working the stitches and between the stitches, as follows: Count 18-19-20-22-22-24 stitches (= half back piece), insert marker 1, count 16-16-20-20-24-24 stitches (= shoulder), insert marker 2, count 36-38-40-44-44-48 stitches (= front piece), insert marker 3, count 16-16-20-20-24-24 stitches (= shoulder), insert marker 4, there are 18-19-20-22-22-24 stitches left after the last marker (= half back piece). SADDLE SHOULDER INCREASE: Continue with stocking stitch and increase on the shoulders as follows: Increase 1 stitch BEFORE markers 1 and 3 and AFTER markers 2 and 4 – read INCREASE TIP-2 (=4 stitches increased); there are increases on back piece and front piece, number of shoulder stitches remain the same. The increased stitches are worked in stocking stitch. Increase like this every round a total of 21-21-24-24-26-26 times = 188-192-216-224-240-248 stitches. The piece measures approx. 8-8-9-9-10-10 cm from the marker on the neck. REMEMBER THE KNITTING TENSION! SLEEVE INCREASES: Now increase for the sleeves as follows: Increase 1 stitch AFTER markers 1 and 3 and BEFORE markers 2 and 4 (= 4 stitches increased). There are only increases on shoulder stitches and number of stitches on front piece and back piece remains the same. Number of shoulder stitches increases. Increase like this every 2nd round a total of 17-18-18-17-17-17 times = 256-264-288-292-308-316 stitches. The piece measures approx. 21-22-23-22-23-23 cm from the neck. If your measurements are shorter, continue with stocking stitch without increasing until the piece measures 21-22-23-22-23-23 cm. YOKE INCREASE: Now increase 1 stitch on each side of all markers as follows: Work until there is 1 stitch left before markers 1 and 3, increase 1 stitch BEFORE these markers, work 1 stitch, move the marker onto the right needle and increase 1 stitch AFTER these markers. Work to markers 2 and 4, increase 1 stitch BEFORE these markers, move the marker onto the right needle, work 1 stitch and increase 1 stitch AFTER these markers – remember INCREASE TIP-2 (= a total of 8 stitches increased). Increase like this every 2nd round a total of 4-5-6-10-11-14 times = 288-304-336-372-396-428 stitches. When all the increases are finished, the piece measures approx. 24-26-28-30-32-34 cm from the neck. Divide the piece for body and sleeves on the next round as follows: Work the first 42-45-49-54-59-65 stitches (half back piece), place the next 60-62-70-78-80-84 stitches on a thread for the sleeve, cast on 8-10-10-10-12-12 stitches under the sleeve, work 84-90-98-108-118-130 stitches (= front piece), place the next 60-62-70-78-80-84 stitches on a thread for the sleeve, cast on 8-10-10-10-12-12 stitches under the sleeve, work the last 42-45-49-54-59-65 stitches (= half back piece). Body and sleeves are finished separately. BODY: = 184-200-216-236-260-284 stitches. Insert 1 marker in the middle of the 8-10-10-10-12-12 stitches cast on under each sleeve; these will be used when decreasing in the sides. Work stocking stitch in the round. When the piece measures 4 cm from the division, decrease 1 stitch on each side of both markers – read DECREASE TIP (= 4 stitches decreased). Decrease like this every 5 cm a total of 4 times = 168-184-200-220-244-268 stitches. When the piece measures 23 cm from the division, knit 1 round where you increase 40 stitches evenly spaced = 208-224-240-260-284-308 stitches. Change to circular needle size 3.5 mm and work rib (= knit 2, purl 2) for 7 cm. Cast off with knit over knit and purl over purl – read CASTING OFF TIP! SLEEVE: Place the 60-62-70-78-80-84 stitches from the thread on the one side of the piece on double pointed needles size 4.5 mm and knit up 1 stitch in each of the 8-10-10-10-12-12 stitches cast on under the sleeve = 68-72-80-88-92-96 stitches. Insert a marker thread in the middle of the 8-10-10-10-12-12 stitches under the sleeve; you will decrease stitches either side of this marker. Work stocking stitch in the round. When the piece measures 3 cm from the division, decrease 1 stitch on each side of the marker thread – remember DECREASE TIP. Decrease like this every 6-5-3-2-2-1½ cm a total of 5-6-9-12-13-14 times = 58-60-62-64-66-68 stitches. Continue working until the sleeve measures 33-32-31-30-29-28 cm from the division. Knit 1 round where you increase 18-16-18-16-18-16 stitches evenly spaced = 76-76-80-80-84-84 stitches. Change to double pointed needles size 3.5 mm and work rib (= knit 2, purl 2) for 5 cm. Cast off with knit over knit and purl over purl – remember CASTING-OFF TIP. Work the other sleeve in the same way. ASSEMBLY: Fold the neck to the inside and sew down. To avoid the neck being tight and rolling outwards, it is important that the seam is elastic. |
|||||||||||||
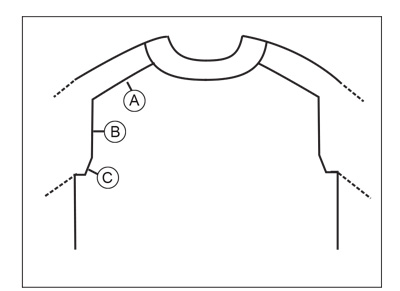
Diagram explanations |
|||||||||||||
|
|||||||||||||
 |
|||||||||||||
 |
|||||||||||||
Have you finished this pattern?Tag your pictures with #dropspattern #glacierwaters or submit them to the #dropsfan gallery. Do you need help with this pattern?You'll find 23 tutorial videos, a Comments/Questions area and more by visiting the pattern on garnstudio.com. © 1982-2026 DROPS Design A/S. We reserve all rights. This document, including all its sub-sections, has copyrights. Read more about what you can do with our patterns at the bottom of each pattern on our site. |
|||||||||||||


With over 40 years in knitting and crochet design, DROPS Design offers one of the most extensive collections of free patterns on the internet - translated to 17 languages. As of today we count 324 catalogues and 12239 patterns translated into English (UK/cm). 12239
We work hard to bring you the best knitting and crochet have to offer, inspiration and advice as well as great quality yarns at incredible prices! Would you like to use our patterns for other than personal use? You can read what you are allowed to do in the Copyright text at the bottom of all our patterns. Happy crafting!
Post a comment to pattern DROPS 216-9
We would love to hear what you have to say about this pattern!
If you want to leave a question, please make sure you select the correct category in the form below, to speed up the answering process. Required fields are marked *.