Comments / Questions (50)
![]() Hetty wrote:
Hetty wrote:
Ik begrijp de volgende zin niet denk ik: "minder voor de raglan aan elke kant van de 4 steken op elke markeerdraad." Want als ik de tip voor het minderen (voor de raglan) volg, zit de markeerdraad in de mindering in het midden. Daardoor krijg ik aan de ene kant de overgehaalde steek op het voorpand en aan de andere kant op de mouw? Wat doe ik niet goed?
03.02.2021 - 22:37DROPS Design answered:
Dag Hetty,
De markeerdraden zitten in het midden van de raglanlijn en je mindert aan beide zijden van deze markeerdraden. Bij 'tip voor het minderen (voor de raglan)' staat aangegeven hoe je dit precies doet (verschillend voor en na de markeerdraad, zodat de steek de goede kant op leunt).
06.02.2021 - 11:58
![]() Annette Franzen wrote:
Annette Franzen wrote:
Beim Stricken in Gr. M. kann etwas beim Bündchen nicht stimmen. Stricke ich wie angegeben am Ende der Runde 2M. rechts bleibt 1 M. übrig. Stricke ich diese links, habe ich an der Stelle nur 1M.links bevor die neue Runde wieder mit nur 1M.rechts beginnt.Oder ich stricke diese M. rechts und habe dann 4M.rechts in Folge und nicht 2M.rechts und dann 2 M. links. Was mache ich verkehrt? Danke für eure Hilfe. Liebe Grüße,Annette
02.02.2021 - 19:48DROPS Design answered:
Liebe Annette, so stricken Sie in M; 1 M re, 2 M li, 2 M re, 2 M li, 2 M re, A.1a (= 8 M), A.2a (= 18 M), A.3a (= 8 M), 2 M re, 2 M li, 2 M re, 2 M li, 1 M re = 52 Maschen. Viel Spaß beim stricken!
03.02.2021 - 08:42
![]() Carla Sforza wrote:
Carla Sforza wrote:
Buongiorno, dopo aver diminuito a destra le 4 maglie nelle trecce ho messo in attesa su un fermamaglie le 10 centrali dello scollo ma come faccio a diminuire quelle a sinistra? Come devo proseguire? Grazie mille
21.01.2021 - 17:13DROPS Design answered:
Buongiorno Carla, da questo punto in poi deve proseguire la lavorazione in piano, per cui il lavoro inizierà a un lato del collo. Buon lavoro!
21.01.2021 - 20:21
![]() Hilde wrote:
Hilde wrote:
Ik begrijp de instructie niet voor de pas. Er staat ‘ ...minder tegelijkertijd als het werk 56-66 cm meet 4 steken over de kabels in A.2BE.’ Worden de kabels zelf smaller of moet je aan de zijkant minderen in de averecht steken?
27.12.2020 - 20:51DROPS Design answered:
Dag Hilde,
Nee, je mindert over de kabels, dus de 8 steken van de kabels minder je door deze steken 2 aan 2 samen te breien. Alleen over de kabels dus.
17.01.2021 - 14:50
![]() Alessia wrote:
Alessia wrote:
Buongiorno, non capisco come diminuire 4 maglie nelle trecce di A2b. In che punto dello schema? Grazie
21.12.2020 - 00:48DROPS Design answered:
Buongiorno Alessia, da questo punto in poi le trecce non saranno più lavorate, può diminuire dove preferisce. Buon lavoro!
21.12.2020 - 08:57
![]() Bente wrote:
Bente wrote:
Rett helst opp oppskriften på norsk. Kjedelig å strikke feil når tegnforklaringen ikke stemmer
01.12.2020 - 07:01
![]() Joyce Geene wrote:
Joyce Geene wrote:
Wordt het telpatroon al in de boord gestart? Of brei je eerst 5 cm boord en daarna starten met telpatroon kabel? En is de kabel alleen aan de voorkant vd trui
24.11.2020 - 22:10DROPS Design answered:
Dag Joyce,
Ja, dat klopt, het patroon begint gelijk al aan het begin, midden voor en midden achter. De delen waar geen patroon wordt gebreid, wordt er 5 cm boordsteek gebreid.
30.11.2020 - 20:35
![]() Sylviane AMOURET-LEBIDEAU wrote:
Sylviane AMOURET-LEBIDEAU wrote:
Bonjour Quand on diminue 4 mailles sur A2b pour l'encolure de la taille S, ce sont bien 2 mailles de part et d'autre des 6 mailles centrales qui sont à diminuer? Merci pour votre aide.
13.09.2020 - 12:50DROPS Design answered:
Bonjour Mme Amouret-Lebideau, vous devez diminuer 4 mailles dans A.2b, au tour suivant, vous allez mettre en attente les 8 m centrales, et ne pourrez donc plus tricoter les torsades, pour éviter que ces mailles ne soient trop larges, on doit diminuer (on tricote les mailles comme elles se présentent mais on n'a plus de torsades). Bon tricot!
14.09.2020 - 08:58
![]() Anna Pranga wrote:
Anna Pranga wrote:
Hi! I have 16 pieces drops nepal ( typ c, 800 g). It's enough to made size M, if i will add two of filaments tougether?
26.08.2020 - 11:56DROPS Design answered:
Dear Mrs Pranga, you would need 934 g DROPS Nepal to replace Eskimo - try out yarn converter to check. Happy knitting!
26.08.2020 - 12:54
![]() Dóra wrote:
Dóra wrote:
Uppskriftin er röng miðað við þá norsku. 4 munstrið í munsturlistanum er rangt þýdd. Það ætti að standa: setjið 3 lykkjur á kaðlaprjón, prjónið 1 lykkju brugðið, prjónið 3 lykkjur SLÉTT (ekki brugðið) af kaðlaprjóni.
19.08.2020 - 18:53DROPS Design answered:
Takk fyrir þetta Dóra. Þetta hefur verið lagfært.
20.08.2020 - 12:58
Trails Head#trailsheadsweater |
|||||||||||||||||||||||||
 |
 |
||||||||||||||||||||||||
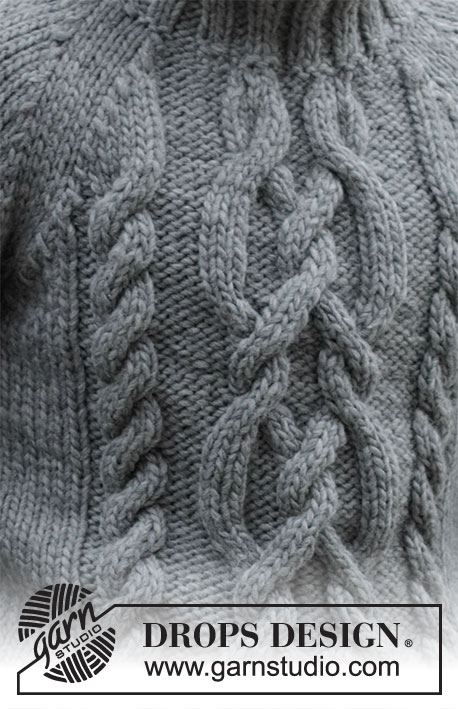
Knitted jumper with raglan, cables and high neck for men in DROPS Snow. Sizes S - XXXL.
DROPS 219-4 |
|||||||||||||||||||||||||
|
------------------------------------------------------- EXPLANATIONS FOR THE PATTERN: ------------------------------------------------------- PATTERN: See diagrams A.1 to A.3. The diagrams show all rows in the pattern from the right side. DECREASE TIP (for raglan): Decrease in each transition between body and sleeves every 2nd round – start 4 stitches before the marker thread and work as follows: Slip 1 stitch as if to knit, knit 1 and pass the slipped stitch over the knitted stitch, knit 4 (the marker sits in the middle of these 4 stitches) and knit 2 together. When the stitches for the neck have been placed on a thread, continue working back and forth – now decrease to raglan on each row from the right side. INCREASE TIP (for sides of body and mid under sleeves): Work as far as 1 stitch before the marker, make 1 yarn over, knit 2 (the marker sits between these 2 stitches), 1 yarn over = 2 stitches increased. On the next round knit the yarn overs twisted to avoid holes. ------------------------------------------------------- JUMPER – SHORT OVERVIEW OF THE PIECE: The body is worked in the round with circular needle as far as the armholes. The sleeves are worked in the round with double pointed needles (change to short circular needle when necessary). Then place the sleeves on the same circular needle as the body and continue the yoke in the round. The neck is worked in the round with double pointed needles or short circular needle. BODY: Cast on 96-104-112-120-128-148 stitches with circular needle size 7 mm and Snow. Insert 1 marker at the beginning of the round and a new marker after 48-52-56-60-64-74 stitches. Work 1 round of stocking stitch. Now work rib in the round, starting in the different sizes as follows: SIZES S, L and XXL: Start with purl 1, then work rib (knit 2, purl 2) over the next 6-10-14 stitches, continue as explained under all sizes below. SIZES M, XL: Start with knit 1, then work rib (purl 2, knit 2) over the next 8-12 stitches, continue as explained under all sizes below. SIZES XXXL: Start with purl 2, then work rib (knit 2, purl 2) over the next 18 stitches, continue as explained under all sizes below. ALL SIZES: Continue in the round as follows: Work diagram A.1a over 8 stitches, A.2a over 18 stitches, A.3a over 8 stitches, then rib (knit 2, purl 2) to end of round. On the last row in the diagrams increase stitches so there are 58-62-66-70-74-84 stitches on the front piece and you still have 48-52-56-60-64-74 stitches on the back piece. Piece measures now approx. 5 cm. Change to circular needle size 8mm and work stocking stitch over the first 7-9-11-13-15-20 stitches, A.1b over A.1a, A.2b over A.2a, A.3b over A.3a and stocking stitch to the end of the round. Continue this pattern. REMEMBER THE KNITTING TENSION! When the piece measures 12-12-12-12-12-12 cm, increase 1 stitch on each side of each marker – read INCREASE TIP in the explanations above. Repeat the increase every 6-10-10-10-10-10 cm a total of 3 times = 118-126-134-142-150-170 stitches. Work until the piece measures 41-41-42-42-42-42 cm. On the next round cast off 6 stitches each side for the armholes (= 3 stitches on each side of each marker) = 58-62-66-70-74-84 stitches on the front piece and 48-52-56-60-64-74 stitches on the back piece. Lay the piece to one side and work the sleeves. SLEEVE: Cast on 24-24-24-32-32-36 stitches with double pointed needles size 7 mm and Snow. Work 2 rounds of stocking stitch, then work rib (knit 2, purl 2) until the piece measures 6-6-6-7-7-7 cm. Change to double pointed needles size 8 mm and insert a marker at the beginning of the round, then continue with stocking stitch. When the piece measures 8-10-10-9-9-9 cm, increase 1 stitch on each side of the marker – read INCREASE TIP in the explanations above. Repeat the increase every 5½-4-3½-5-4½-4 cm a total of 8-10-11-8-9-9 times = 40-44-46-48-50-54 stitches. Work until the piece measures 51-50-49-48-46-46 cm. On the next round cast off 6 stitches mid under the sleeve (3 stitches on each side of the marker) = 34-38-40-42-44-48 stitches. Lay the piece to one side and work 1 more sleeve in the same way. YOKE: Place the sleeves on the same circular needle as the body – where stitches were cast off for the armholes = 174-190-202-214-226-254 stitches. Insert marker threads in each transition between the sleeves and the body = 4 marker threads. Work 2-1-1-0-0-0 rounds before beginning to decrease to raglan. READ THE WHOLE OF THE NEXT SECTION BEFORE CONTINUING! Decrease to raglan on each side of the 4 stitches at each marker thread - read DECREASE TIP in explanations above – every 2nd round, 13-15-16-17-18-21 times. AT THE SAME TIME when the piece measures 56-58-60-62-64-66 cm decrease 4-4-4-4-4-4 stitches over the cables in A.2b.Then place the middle 8-8-10-12-14-16 stitches on 1 thread for the neck. The piece is continued back and forth, continuing to decrease to raglan as before on each row from the right side. In addition, decrease for the neck at the beginning of each row as follows: Cast off 2 stitches 1 time and 1 stitch 1 time. After all the decreases to raglan and to the neck there are 52-52-54-56-58-60 stitches on the needle. NECK: Using double pointed needles size 7 mm knit up stitches for the neck and place the stitches from the thread onto the needles, so you have approx. 14 to 22 stitches on the front neck. There should be a total of 60 to 76 stitches on the needle (stitch-number needs to be divisible by 4). Purl 1 round, then work rib (knit 2, purl 2) for 9 cm. Loosely cast off with knit over knit and purl over purl. ASSEMBLY: Sew the openings under the sleeves. |
|||||||||||||||||||||||||
Diagram explanations |
|||||||||||||||||||||||||
|
|||||||||||||||||||||||||
 |
|||||||||||||||||||||||||
 |
|||||||||||||||||||||||||
 |
|||||||||||||||||||||||||
Have you finished this pattern?Tag your pictures with #dropspattern #trailsheadsweater or submit them to the #dropsfan gallery. Do you need help with this pattern?You'll find 30 tutorial videos, a Comments/Questions area and more by visiting the pattern on garnstudio.com. © 1982-2026 DROPS Design A/S. We reserve all rights. This document, including all its sub-sections, has copyrights. Read more about what you can do with our patterns at the bottom of each pattern on our site. |
|||||||||||||||||||||||||


Post a comment to pattern DROPS 219-4
We would love to hear what you have to say about this pattern!
If you want to leave a question, please make sure you select the correct category in the form below, to speed up the answering process. Required fields are marked *.