
Popular categories
Looking for a yarn?


Comments / Questions (19)
Jolanta Kozak wrote:
Gdzie znajdę schemat A1 i A2?
09.02.2025 - 10:17DROPS Design answered:
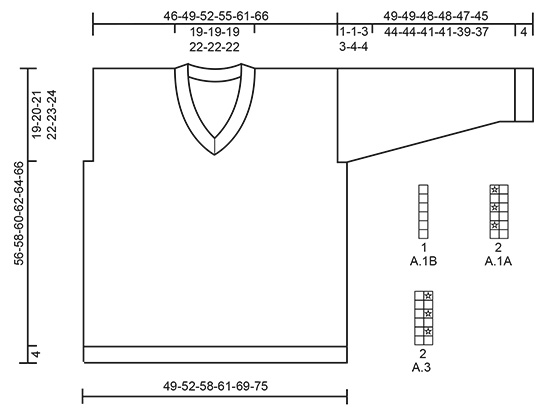
Witaj Jolu, schematy znajdują się pod wzorem, a mniejsze schematy znajdziesz po prawej stronie schematycznego rysunku swetra (na samym dole wzoru). Pozdrawiamy!
10.02.2025 - 11:42
![]() Raija Tervo wrote:
Raija Tervo wrote:
En löydä ohjeesta mallipiirroksia, vain A2 näkyy .
15.02.2023 - 08:45DROPS Design answered:
Piirrokset A.1 ja A.3 ovat mittapiirroksen oikealla puolella.
17.02.2023 - 13:20
![]() Angele Chatman wrote:
Angele Chatman wrote:
I'm so sorry to trouble you again. I'm in the States and so it's a challenge to translate the Norwegian conventions. After the ribbing what would be the next row. Is it A1B, then A1A, then A2? Where do I start A3? I appreciate your prompt reply. I know once I get started I will have a lovely garment...
19.01.2022 - 16:17DROPS Design answered:
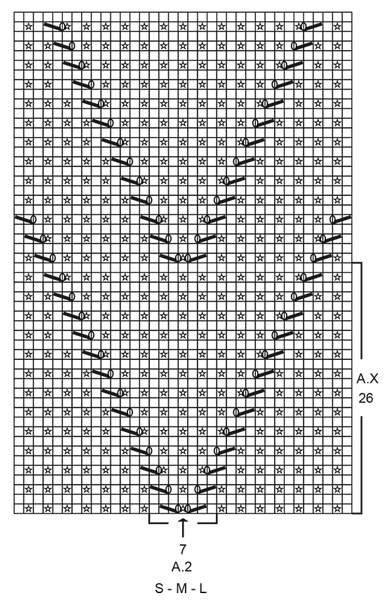
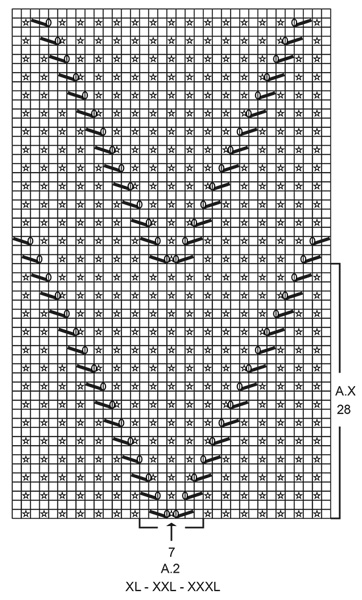
Dear Mrs Chatman, you will first diagram like this: *1 stitch in garter stitch, repeat A.1A until 2 sts remain before marker on the side, work A.1B (= 1 st), and 1 st in garter stitch*, repeat from *-*. Then when piece meeasures 5-8 cm (see size), you will work: *1 st in garter st, A.1A over 30-48 sts, A.2 (= 7 sts over the middle 7 sts in A.1A, the middle stitch on front/back piece should be the stitch with the marker) , A.3 over 30-48 sts, 1 st in garter st* and repeat from*-*. Happy knitting!
19.01.2022 - 17:19
![]() Angele Chatman wrote:
Angele Chatman wrote:
I have found A.1B, A.1A, and A.3 stitch patterns in the instructions but I'm unclear when to use them because they don't appear horizontally. In the photo of the finished garment it shows the lace block A.2 in the middle. Where do I incorporate the others? Second, is the back of the sweater same as the front? Please advise. Thank you.
17.01.2022 - 05:35DROPS Design answered:
Dear Mrs Chatman, back and front piece will be worked the same way: with A.2 on both pieces (stitch with arrow in A.2 = middle stitch on front and back piece). Start working as shown in the diagram, then continue the diagonal lines as before until they reach the side and repeat the 26 rows shown in A.x to create a new Lace-V. Happy knitting!
17.01.2022 - 09:35
![]() Colen Anne wrote:
Colen Anne wrote:
Modèle 205-51 taile 3XL. Vous dites 350 g de Drops Sky et 150 g de Kid silk. La premire pelote de Kid Silk est terminée avant celle de Sky. Combien faut-il réellement de pelotes de Kid Silk? Merci
30.12.2021 - 18:30DROPS Design answered:
Bonjour Mme Colen, les quantités indiquées correspondent à l'échantillon, pensez à bien conserver la bonne tension, et, pour éviter que Kid-Silk ne s'enroule de trop autour du fil Sky, vous pouvez préparer une pelote avec les deux laines. Bon tricot!
03.01.2022 - 10:13
![]() Evaluna wrote:
Evaluna wrote:
Beste, Hoewel mijn stekenverhouding klopt, krijg ik in maat XL niet de belijning zoals op de foto. Ter hoogte van het armsgat (40cm), komt pas de laagste driehoek tot aan de zijkant ipv de tweede. De derde lijn komt in mijn geval veel hoger over de schouder. Kunt u mij zeggen bij welke herhaling (eventueel welke nld) het armsgat moet worden gemaakt om het effect te bekomen zoals op de foto? Mij lijkt dat ik de trui hiervoor 10 cm langer zou moeten maken. Graag uw antwoord.
21.01.2020 - 12:37DROPS Design answered:
Dag Evaluna,
De trui die is afgebeeld op de foto is in maat S. Als je een andere maat breit, kan het iets anders uitkomen met het patroon, omdat de verhoudingen ook anders zijn (bredere schouders, bredere panden, etc.). Daardoor is het niet mogelijk om letterlijk hetzelfde effect te krijgen. Ik weet niet of je ook de verdeling van de strepen aan wilt passen, zodat het aan de onderkant ook ongeveer hetzelfde is. Aan de hand van de tekening onderaan het patroon en de stekenverhouding zou je uit kunnen rekenen waar je de strepen en armsgaten moet beginnen.
26.01.2020 - 15:51
![]() DURAND Renée wrote:
DURAND Renée wrote:
Bonjour, tous vos modèles sont tricotés avec des aiguilles circulaires ou doubles pointes. Pouvez vous me dire si je peux tricoter ce modèle avec des aiguilles normales ? Par avance, merci, de votre réponse.
18.12.2019 - 18:49DROPS Design answered:
Bonjour Mme Durand, la plupart de nos modèles peuvent être adaptés pour des aiguilles droites, vous trouverez ici plus d'informations. Bon tricot!
19.12.2019 - 07:48
![]() Elise Pedersen wrote:
Elise Pedersen wrote:
Fin model, den må jeg strikke.
18.09.2019 - 17:55
![]() Shirke wrote:
Shirke wrote:
Il manque le diagramme A1 et A3....
04.09.2019 - 12:50DROPS Design answered:
Bonjour Mme Shirke, vous trouverez les diagrammes A.1A. A.1B et A.3 sous la manche du schéma des mesures. Bon tricot!
04.09.2019 - 13:58
![]() Shirke wrote:
Shirke wrote:
Il manque en effet le diagramme A1 et A 3 comme l'a indiqué Laura en première ligne...
04.09.2019 - 12:49
|
|||||||||||||||||||
April Gold#aprilgoldsweater |
|||||||||||||||||||
 |
 |
||||||||||||||||||
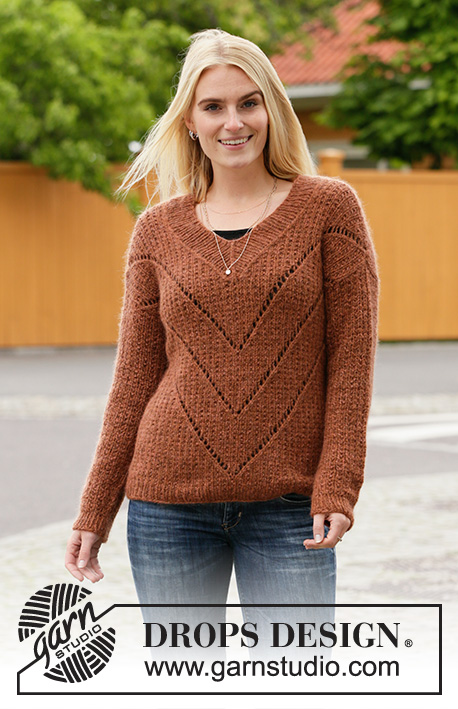
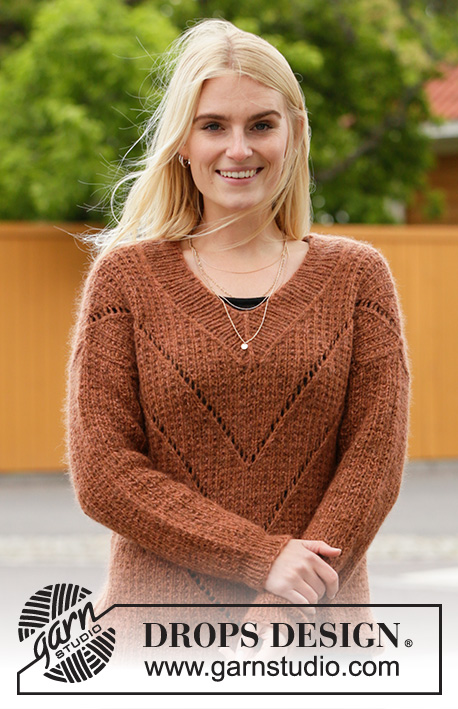
Knitted jumper in DROPS Sky and DROPS Kid-Silk. The piece is worked with textured pattern and lace-rows. Sizes S - XXXL.
DROPS 205-51 |
|||||||||||||||||||
|
------------------------------------------------------- EXPLANATIONS FOR THE PATTERN: ------------------------------------------------------- RIDGE/GARTER STITCH (worked in the round): 1 ridge in height = 2 rounds; Knit 1 round and purl 1 round (i.e. the 1 stitch in garter stitch is alternately knitted and purled). RIDGE/GARTER STITCH (worked back and forth): Knit all rows. 1 ridge in height = Knit 2 rows (i.e. the 1 stitch in garter stitch is always knitted). PATTERN: See diagrams A.1 to A.3. Choose diagram for your size (applies to A.2). The diagrams show all rows in the pattern seen from the right side. DECREASE TIP-1 (for v-neck): Decrease for the neck on the inside of the 1 edge stitch in garter stitch. All decreases are worked from the right side! Decrease as follows after the 1 edge stitch in garter stitch: slip 1 stitch as if to knit, knit 1 and pass the slipped stitch over the knitted stitch (= 1 stitch decreased). Decrease as follows before the 1 edge stitch in garter stitch: Work until there are 3 stitches left on the row, knit 2 together and finish with 1 edge stitch in garter stitch (= 1 stitch decreased). DECREASE TIP-2 (for mid under sleeve): Work until there are 3 stitches left before the marker thread, knit 2 twisted together, work 2 stitches in garter stitch (marker thread sits between these 2 stitches), knit 2 together (2 stitches decreased). KNITTING TIP: In this pattern, stitches are knitted up around the armholes and the sleeves are worked top down. This is done to give improved control of the sleeve length. If you wish you can work the sleeves separately and sew them in later; cast on the same number of stitches as are knitted up and then follow the instructions in the text. Sew the sleeves inside the 1 ridge along the armholes and sew the bottom of the armhole to finish. ------------------------------------------------------- START THE PIECE HERE: ------------------------------------------------------- JUMPER – SHORT OVERVIEW OF THE PIECE: The body is worked in the round with circular needle, bottom up as far as the armholes. Stitches are cast off for the armholes, then the front and back pieces are finished separately, back and forth with circular needle. The shoulder seams are sewn, then stitches are knitted up around the armholes for the sleeves. The sleeves are worked back and forth with circular needle until the sleeve cap is finished, then continued in the round with short circular needle/double pointed needles. The bottom of the armhole is sewn and the neck is worked to finish. The whole piece is worked with 1 strand Sky and 1 strand Kid-Silk (= 2 strands). BODY: Cast on 138-146-162-170-194-210 stitches with circular needle size 6 mm and 1 strand Sky + 1 strand Kid-Silk (= 2 strands). Knit 1 round. Then work the next round as follows: * Purl 1, knit 1 *, work from *-* to end of round. Continue this rib for 4 cm. Insert 1 marker thread at the beginning of the round and 1 marker thread after 69-73-81-85-97-105 stitches (= sides of body). Change to circular needle size 7 mm. The next round is worked as follows: * Work 1 stitch in GARTER STITCH – read description above, A.1A until there are 2 stitches left before the marker thread, work A.1B (= knit 1) and 1 stitch in garter stitch *, work from *-* 1 more time. Continue this pattern. REMEMBER THE KNITTING TENSION! Work until the piece measures 5-6-7-6-7-8 cm but adjust so the next round is knitted. Now insert 1 marker mid front and 1 marker mid back; i.e. the next round is worked as follows: * Work 1 stitch in garter stitch, knit 33-35-39-41-47-51, knit 1 stitch and insert 1 marker in this stitch, knit 33-35-39-41-47-51 stitches and 1 stitch in garter stitch *, work from *-* 1 more time. Now start the lace-rows in A.2; i.e. the next round is worked as follows: * Work 1 stitch in garter stitch, A.1A over the next 30-32-36-38-44-48 stitches, A.2 over the next 7 stitches (middle stitch in A.2 = stitch with marker), work A.3 over the next 30-32-36-38-44-48 stitches, 1 stitch in garter stitch *, work from *-* 1 more time. Continue this pattern. A.X is repeated in height. AT THE SAME TIME continue the lace-rows as far as possible out to the sides (i.e. right into the 2 stitches in garter stitch on each side of the body). When A.X has been worked a total of 3 times in height, work A.1 as before over all stitches, but allow the line in A.2 to continue all the way out to each side. ARMHOLES: At the same time, when the piece measures 37-38-39-40-41-42 cm cast off for the armholes on each side; i.e. adjust so the next round is knitted and work as follows: Cast off 2-2-4-4-6-6 stitches for the armhole, knit the next 65-69-73-77-85-93 stitches, cast off 4-4-8-8-12-12 stitches for the armhole (i.e. cast off 2-2-4-4-6-6 stitches on each side of the marker thread in the side), knit the next 65-69-73-77-85-93 stitches and cast off the remaining 2-2-4-4-6-6 stitches for the armhole. Cut the strand. Back and front pieces are finished separately. BACK PIECE: = 65-69-73-77-85-93 stitches. Continue the pattern in the same way as on the body but working back and forth with 1 edge stitch in garter stitch on each side. When the piece measures 53-55-57-59-61-63 cm, cast off the middle 23-23-23-27-27-27 stitches for the neck and each shoulder is finished separately. Continue the pattern and cast off for the neck at the beginning of each row from the neck as follows: Cast off 1 stitch 2 times = 19-21-23-23-27-31 stitches left on shoulder. Continue working until the piece measures 56-58-60-62-64-66 cm. Cast off with knit from the right side but make sure the cast-off edge is not tight. Work the other shoulder in the same way. FRONT PIECE: = 65-69-73-77-85-93 stitches. Continue the pattern in the same way as on the body but working back and forth with 1 edge stitch in garter stitch on each side. When the piece measures 38-39-40-41-42-43 cm, start to decrease for the v-neck; i.e. the next row is worked as follows from the right side: Knit 31-33-35-37-41-45 stitches, place these stitches on 1 thread or extra needle, cast off 3 stitches for the v-neck (the middle of these 3 stitches is the stitch with the marker) and knit the remaining 31-33-35-37-41-45 stitches. Each side is finished separately. RIGHT FRONT PIECE (when the garment is worn): = 31-33-35-37-41-45 stitches. Work back from the wrong side with 1 edge stitch in garter stitch on each side. On the next row (right side), decrease 1 stitch for the v-neck at the beginning of the row from the neck – read DECREASE TIP-1. Continue to decrease for the neck every 2nd row (i.e. each row from the right side) a total of 6-6-6-7-7-7 times and then every 4th row (i.e. every other row from the right side) a total of 6-6-6-7-7-7 times = 19-21-23-23-27-31 stitches left on shoulder. Continue working until the piece measures 56-58-60-62-64-66 cm. Cast off with knit from the right side but make sure the cast-off edge is not tight. LEFT FRONT PIECE (when the garment is worn): Place the 31-33-35-37-41-45 stitches from the thread/extra needle back on circular needle size 7 mm. Work back from the wrong side with 1 edge stitch in garter stitch on each side. On the next row (right side), decrease 1 stitch for the v-neck at the end of the row towards the neck – read DECREASE TIP-1. Continue to decrease for the neck every 2nd row a total of 6-6-6-7-7-7 times and then every 4th row a total of 6-6-6-7-7-7 times = 19-21-23-23-27-31 stitches left on shoulder. Continue working until the piece measures 56-58-60-62-64-66 cm. Cast off with knit from the right side but make sure the cast-off edge is not tight. ASSEMBLY: Sew the shoulder seams inside the cast-off edge. SLEEVE: Read KNITTING TIP! Knit up stitches along the armhole on the front and back pieces; i.e. start in the corner of the armhole on the one side of the piece where stitches were cast off for the armhole and knit up from the right side 53-55-59-61-65-67 stitches inside the 1 edge stitch in garter stitch with circular needle size 7 mm and 1 strand of each quality (do not knit up stitches along the bottom of the armhole). Start on row 2 in A.1 and work the first row as follows from the wrong side: 1 edge stitch in garter stitch, work A.1B (= 1 stitch), A.1A until there is 1 stitch left on the row and finish with 1 edge stitch in garter stitch. Continue this pattern back and forth. When the sleeve measures 1-1-3-3-4-4 cm from where you knitted up stitches, insert a marker on the row; this marker shows where the sleeve will be sewn onto the bottom of the armhole and the sleeve is now measured from this marker! Continue by working the sleeve in the round. Change to short circular needle or double pointed needles size 7 mm. Insert a marker at the beginning of the round and allow it to follow your work onwards; it will be used when decreasing mid under sleeve. Continue in the round with A.1 and 1 stitch in garter stitch on each side of the marker thread mid under sleeve (= 2 stitches in garter stitch mid under sleeve). When the sleeve measures 3-3-3-3-2-2 cm from the marker decrease 2 stitches mid under sleeve – read DECREASE TIP-2. Decrease like this every 4-4-3-3-2½-2½ cm a total of 10-10-12-12-14-14 times = 33-35-35-37-37-39 stitches. Continue working until the sleeve measures 44-44-41-41-39-37 cm from the marker (there is approx. 4 cm left to finished length; you can try the jumper on and work to desired length). NOTE: Shorter measurements in larger sizes due to broader shoulders and longer sleeve cap. Change to double pointed needles size 6 mm and knit 1 round then work rib (= knit 1 / purl 1), but make sure you work knit over knit and purl over garter stitch. Continue this rib for 4 cm. Then cast off with knit over knit and purl over purl. Make sure the cast-off edge is not tight. Work the other sleeve in the same way. ASSEMBLY: Sew the sleeves to the bottom of the armholes from the marker and to the corner on each side. NECK: Start by the one shoulder and knit up approx. 96-100-104-112-116-120 stitches from the right side around the neck with short circular needle size 6 mm and 1 strand of each quality (knit up on the inside of the 1 edge stitch in garter stitch along the v-neck and make sure you knit up 3 stitches mid front at the bottom of the v-neck). Work rib in the round (= knit 1 / purl 1) but adjust so you knit 1 at the bottom of the v-neck. Insert 1 marker in this knitted stitch. AT THE SAME TIME on each round decrease 2 stitches mid front as follows: Work until there is 1 stitch left before the stitch with the marker, slip the next 2 stitches as if to knit together, knit 1 and pass the 2 slipped stitches over the knitted stitch (= 2 stitches decreased). When decreasing like this the knitted stitch with the marker will follow a straight line mid front. Decrease like this every round until the neck measures 5 to 6 cm in the knitting direction (or to desired length; the wider the neck the narrower the opening). Loosely cast off with knit over knit and purl over purl. |
|||||||||||||||||||
Diagram explanations |
|||||||||||||||||||
|
|||||||||||||||||||
 |
|||||||||||||||||||
 |
|||||||||||||||||||
 |
|||||||||||||||||||
Have you finished this pattern?Tag your pictures with #dropspattern #aprilgoldsweater or submit them to the #dropsfan gallery. Do you need help with this pattern?You'll find 30 tutorial videos, a Comments/Questions area and more by visiting the pattern on garnstudio.com. © 1982-2026 DROPS Design A/S. We reserve all rights. This document, including all its sub-sections, has copyrights. Read more about what you can do with our patterns at the bottom of each pattern on our site. |
|||||||||||||||||||


With over 40 years in knitting and crochet design, DROPS Design offers one of the most extensive collections of free patterns on the internet - translated to 17 languages. As of today we count 324 catalogues and 12290 patterns translated into English (UK/cm). 12290
We work hard to bring you the best knitting and crochet have to offer, inspiration and advice as well as great quality yarns at incredible prices! Would you like to use our patterns for other than personal use? You can read what you are allowed to do in the Copyright text at the bottom of all our patterns. Happy crafting!
Post a comment to pattern DROPS 205-51
We would love to hear what you have to say about this pattern!
If you want to leave a question, please make sure you select the correct category in the form below, to speed up the answering process. Required fields are marked *.