Comments / Questions (35)
![]() Kinga wrote:
Kinga wrote:
Hei! Jeg sliter med økningen på begynnelsen av A1. Jeg skal fra 90 til 98 masker men i følge oppskrifta så skal jeg bare lage 4 ekstra kast om pinnen. Misforstår jeg noe nå?
09.11.2019 - 23:52DROPS Design answered:
Hei Kinga. Husk de 2 kastene i A.1 også (A.1 strikkes 2 ganger = 4 økninger) + de 4 som er beskrevet i oppskriften = 8 økninger på 1. omgang = 98 masker. God Fornøyelse!
11.11.2019 - 13:24
![]() Astrid Louise Løvlie wrote:
Astrid Louise Løvlie wrote:
Jeg får ikke masketallet til å stemme for str S etter A2.-A.4. For ermene står det at det skal være 44 masker, men 14 startmasker med 18 økninger gir femti masker, og for for og bakstykke ender jeg opp med 65. Så summen blir 230, men fordelingen feil. Kan dere hjelpe med hvordan fordelingen skal være og hvordan arbeidet blir videre?
26.10.2019 - 18:10DROPS Design answered:
Hej Astrid, nogle af maskerne (forskelligt antal i de forskellige størrelser) fra hver side af ærmet strikkes med forstykket og bagstykket ifølge opskriften. God fornøjelse!
21.11.2019 - 15:53
![]() Nguyễn Thu Thảo wrote:
Nguyễn Thu Thảo wrote:
I am 1m60 80kg, which size i should choose?
12.10.2019 - 13:36DROPS Design answered:
Dear Mrs Thu Thảo , measure a similar garment you have and like the shape and compare these measurements to those in meeasurement chart, this will then help you to choose the matching size. Read more about schematic drawing here. Happy knitting!
14.10.2019 - 09:22
![]() Eva Karlsen wrote:
Eva Karlsen wrote:
Hei ! Jeg har kommet til første økning av A8 på armen . Det skal her økes 1 maske først og sist på rapporten . Det blir da 2 kast etter hverandre ....forstår jeg det riktig ???
15.09.2019 - 14:10DROPS Design answered:
Hei Eva. Litt usikker på hva du mener. Når du starter med erme og diagram A.8a strikker du 2 omganger glattstrikk før du starter med økningene og økningene er ca midt i diagrammet. Hvor står det at det skal økes med 1 maske først og sist i rapporten? Og hvilken str strikker du? Mvh DROPS design
16.09.2019 - 13:47
![]() Eva wrote:
Eva wrote:
Hvorfor skal det økes på bolen før en strikker vrangborden ?? Kan jeg sløyfe det ??
10.09.2019 - 19:29DROPS Design answered:
Hei Eva, Dette er foreslått for å hindre at vrangborden blir stram. Du kan gjerne sløyfe det hvis du vil. God fornøyelse!
11.09.2019 - 10:10
![]() Turid wrote:
Turid wrote:
Hvorfor skal tråden klippes etter deling av armer osv? Skjønner ikke hvor omgangen skal begynne !
15.08.2019 - 20:31DROPS Design answered:
Hej Turid, du starter nu omgangen i den ene side ved mærketråden. God fornøjelse!
06.09.2019 - 10:37
![]() Silje wrote:
Silje wrote:
Det er noe feil i oppdelingmaskene etter du har, strikket opp til angitt str på mønster a2 til a4...
30.07.2019 - 10:25
![]() Cristine wrote:
Cristine wrote:
Hi, I can't seem to find the pattern "A.7a" on this page.
03.06.2019 - 01:17DROPS Design answered:
Hi Christine. We'll upload A.7 shortly. Thank's for letting us know it was missing. Happy knitting
03.06.2019 - 10:06
![]() Helinä wrote:
Helinä wrote:
Miksi sama kavennus ohjeistetaan tekemään eri tavoilla? Esim. tässä ohjeessa hihojen kavennusvinkki: 2 o yhteen on käytännössä sama kuin "nosta 1 silmukka oikein neulomatta, 1 silmukka oikein, vedä nostettu silmukka neulotun silmukan yli". Sama asia, ensimmäinen yhdellä kertaa ja jälkimmäinen vaiheittain tehtynä. Kavennus taipuu kummassakin neuleen suuntaan. Jos haluttaisiin kavennus eri suuntaan, pitäisi tehdä 1o, nosta seuraava äsken neulotun yli (neulesuuntaa vastaan).
02.06.2019 - 09:24
![]() Colle wrote:
Colle wrote:
Bonsoir, Où trouver les explications de ce joli modèle ? Merci. Bonne soirée.
20.02.2019 - 22:40
Berry Diamond#berrydiamondsweater |
|||||||||||||||||||||||||
 |
 |
||||||||||||||||||||||||
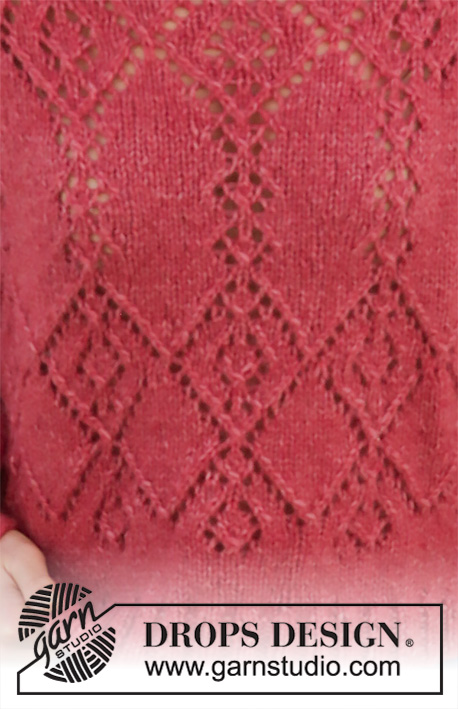
Knitted jumper with raglan and balloon sleeves in DROPS Air. The piece is worked top down with lace pattern. Sizes S - XXXL.
DROPS 202-18 |
|||||||||||||||||||||||||
|
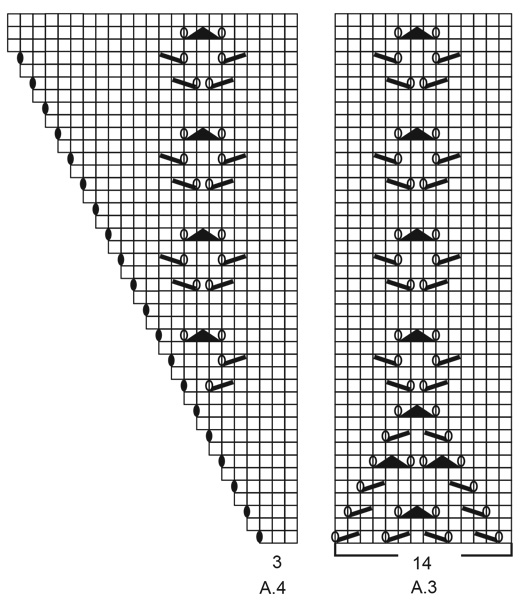
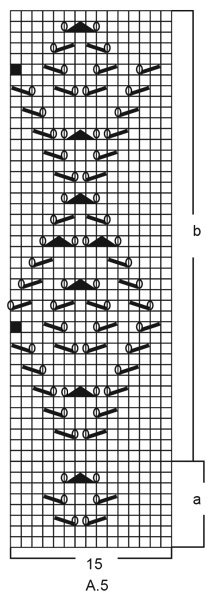
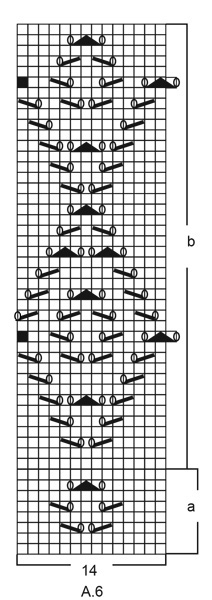
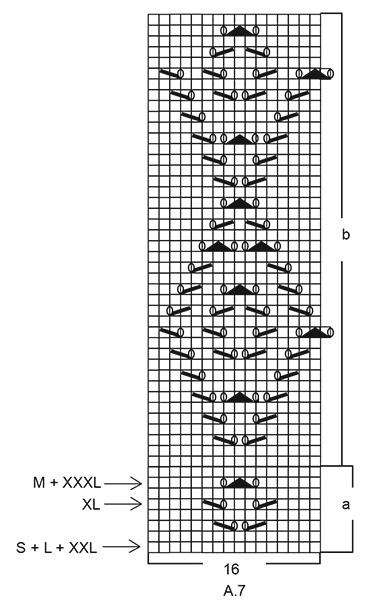
------------------------------------------------------- EXPLANATIONS FOR THE PATTERN: ------------------------------------------------------- INCREASE/DECREASE TIP (evenly spaced): To work out how to increase/decrease evenly, count the total number of stitches on the needle (e.g. 78 stitches) and divide by the number of increases/decreases to be made (e.g. 10) = 7.8. In this example, increase by making 1 yarn over after approx. each 8th stitch. On the next round knit the yarn overs twisted to avoid holes. When decreasing knit approx. each 7th and 8th stitch together. PATTERN: See diagrams A.1 to A.8. Choose diagram for your size (applies to A.8). DECREASE TIP (for sleeves): Decrease 1 stitch on each side of the marker thread as follows: Work until there are 3 stitches left before the marker thread, knit 2 together, knit 2, (marker thread sits between these stitches), slip 1 stitch as if to knit, knit 1 and pass the slipped stitch over the knitted stitch. ------------------------------------------------------- START THE PIECE HERE: ------------------------------------------------------- JUMPER - SHORT OVERVIEW OF THE PIECE: Neck, yoke and body are worked in the round with circular needle from the transition between sleeve and back piece, top down. Sleeves are worked in the round with short circular needle/double pointed needles, top down. NECK: Cast on 76-80-84-88-92-96 stitches with circular needle size 4.5 mm and Air. Knit 1 round. Then work rib (= knit 2 / purl 2) for 3 cm. Knit 1 round where you increase 10 stitches evenly spaced in all sizes – read INCREASE/DECREASE TIP = 86-90-94-98-102-106 stitches. Change to circular needle size 5.5 mm. Then work yoke as described below. YOKE: The first round is worked as follows: Work A.1 over 29 stitches (= back piece), work 2 stitches in stocking stitch (= raglan line), make 1 yarn over, 10-12-14-16-18-20 stitches in stocking stitch (= sleeve), 1 yarn over, 2 stitches in stocking stitch (= raglan line), work A.1 over 29 stitches (= front piece), 2 stitches in stocking stitch (= raglan line), 1 yarn over, 10-12-14-16-18-20 stitches in stocking stitch (= sleeve), make 1 yarn over and 2 stitches in stocking stitch (= raglan line). There are now 94-98-102-106-110-114 stitches on needle. Continue this pattern, i.e. on front and back pieces you increase on each side as shown in A.1. On the sleeves you increase on each side with a yarn over either side of the stitches in stocking stitch. Raglan line is always 2 stitches in stocking stitch. Increase like this every 2nd round. On the next round knit the yarn overs twisted to avoid holes. On the sleeves work the increased stitches in stocking stitch. On front and back pieces work the increased stitches into the pattern as shown in A.1. REMEMBER THE KNITTING TENSION! When A.1 has been completed in height there are 158-162-166-170-174-178 stitches on the needle. Continue the increases both on sleeves and front/back pieces, but now work A.2 to A.4 over the 47 stitches in A.1 as follows: Work A.2 (= 2 stitches), A.3 over 42 stitches (= 3 repeats of 14 stitches) and work A.4 (= 3 stitches). Raglan line and sleeves are worked as before. When you have worked as far as the round marked with an arrow in your size, you have increased a total of 18-21-22-24-26-29 times from the beginning of the yoke and there are 230-258-270-290-310-338 stitches on the needle. The piece measures approx. 21-24-25-27-29-32 cm from the cast-on edge mid front. The next round is worked as follows: Work 68-74-77-83-89-97 stitches as before (= back piece), place the next 44-52-54-56-58-62 stitches on 1 thread for sleeve, cast on 8-8-10-10-12-12 new stitches on needle (= in side under sleeve), work the next 71-77-81-89-97-107 stitches as before (= front piece), place the next 44-52-54-56-58-62 stitches on 1 thread for sleeve, cast on 8-8-10-10-12-12 new stitches on needle (= in side under sleeve)) and work the last 3-3-4-6-8-10 stitches as before (= back piece). Cut the strand. Body and sleeves are continued separately. THE PIECE IS NOW MEASURED FROM HERE! BODY: = 158-170-182-198-218-238 stitches. Insert 1 marker thread in each side in the middle of the 8-8-10-10-12-12 stitches cast on under each sleeve. Allow them to follow your work onwards; they mark the sides. The first round is worked as follows (start on round marked with an arrow in your size so that the pattern continues): Work 3-6-9-13-4-9 stitches in stocking stitch, A.5a (= 15 stitches), A.6a over the next 42-42-42-42-70-70 stitches (= 3-3-3-3-5-5 repeats of 14 stitches), work A.7a (= 16 stitches), 6-12-18-26-8-18 stitches in stocking stitch (marker thread sits in the middle of these stitches), work A.5a (= 15 stitches), A.6a over the next 42-42-42-42-70-70 stitches (= 3-3-3-3-5-5 repeats of 14 stitches), work A.7a (= 16 stitches) and finish with 3-6-9-13-4-9 stitches in stocking stitch. Repeat A.5a to A.7a in height (the remaining stitches are worked as before) until the piece measures approx. 4-5-4-6-4-4 cm from the division – adjust so that you finish after a complete repeat in height. Then continue with A.5b to A.7b, the remaining stitches worked as before. Work until A.5b to A.7b have been completed 1 time in height. Then continue in stocking stitch over all stitches. When the piece measures 28-27-28-28-28-27 cm from the division, knit 1 round where you increase 30-34-38-38-42-50 stitches evenly spaced = 188-204-220-236-260-288 stitches. Change to circular needle size 4.5 mm and work rib (= knit 2 / purl 2) for 4 cm. Loosely cast off with knit over knit and purl over purl, but to avoid the cast-off edge being tight you can cast off with needle size 5.5 mm. SLEEVE: Place the 44-52-54-56-58-62 stitches from the thread on the one side of the piece on short circular needle/double pointed needles size 5.5 mm and knit up 1 stitch in each of the 8-8-10-10-12-12 stitches cast on under the sleeve = 52-60-64-66-70-74 stitches. Insert 1 marker thread in the middle of the 8-8-10-10-12-12 stitches under the sleeve and allow it to follow your work onwards; it will be used when decreasing. Start the round by the marker thread and work stocking stitch in the round. When the piece measures 2 cm from the division, decrease 2 stitches mid under sleeve (does not apply to size XXL) – read DECREASE TIP. Decrease like this every 2nd round a total of 1-5-2-3-0-2 times = 50-50-60-60-70-70 stitches. When the piece measures 7-8-8-6-8-6 cm work pattern in the round as follows: Work A.8a over all stitches (= 5-5-6-6-7-7 reports of 10 stitches). When A.8a has been completed there are 70-70-84-84-84-84 stitches on the needle. Continue with A.8b. Repeat A.8b in height until the piece measures approx. 41-38-38-36-34-32 cm from the division (shorter measurements in larger sizes due to wider shoulders and longer sleeve cap) – adjust so that you finish after a complete repeat in height. Continue with A.8c. When A.8c has been completed there are 35-35-42-42-42-42 stitches on the needle. Knit 1 round where you decrease 3-3-6-6-2-2 stitches evenly spaced = 32-32-36-36-40-40 stitches. Change to double pointed needles size 4.5 mm and work rib (= knit 2 / purl 2) for 5 cm. Loosely cast off with knit over knit and purl over purl, but to avoid the cast-off edge being tight you can cast off with needle size 5.5 mm. The sleeve measures approx. 48-45-45-43-41-39 cm from the division. Work the other sleeve in the same way. |
|||||||||||||||||||||||||
Diagram explanations |
|||||||||||||||||||||||||
|
|||||||||||||||||||||||||
 |
|||||||||||||||||||||||||
 |
|||||||||||||||||||||||||
 |
|||||||||||||||||||||||||
 |
|||||||||||||||||||||||||
 |
|||||||||||||||||||||||||
 |
|||||||||||||||||||||||||
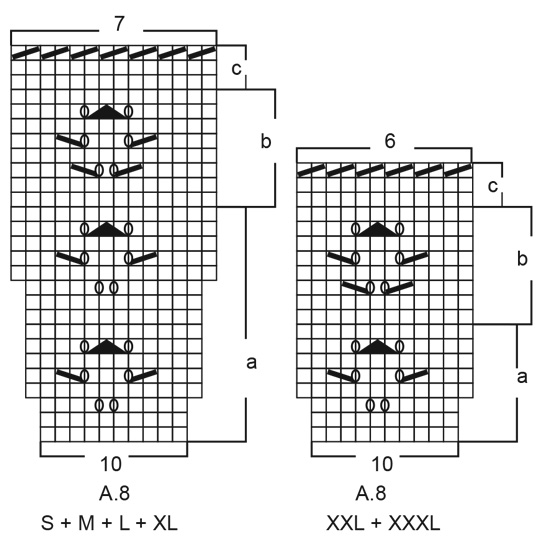 |
|||||||||||||||||||||||||
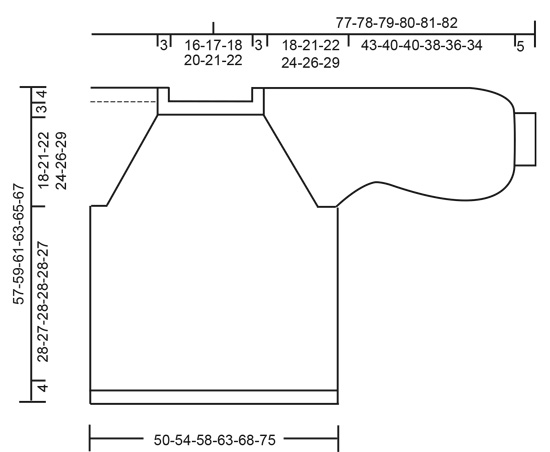 |
|||||||||||||||||||||||||
Have you finished this pattern?Tag your pictures with #dropspattern #berrydiamondsweater or submit them to the #dropsfan gallery. Do you need help with this pattern?You'll find 24 tutorial videos, a Comments/Questions area and more by visiting the pattern on garnstudio.com. © 1982-2026 DROPS Design A/S. We reserve all rights. This document, including all its sub-sections, has copyrights. Read more about what you can do with our patterns at the bottom of each pattern on our site. |
|||||||||||||||||||||||||






Post a comment to pattern DROPS 202-18
We would love to hear what you have to say about this pattern!
If you want to leave a question, please make sure you select the correct category in the form below, to speed up the answering process. Required fields are marked *.