
Popular categories
Looking for a yarn?


Comments / Questions (61)
![]() Ronel wrote:
Ronel wrote:
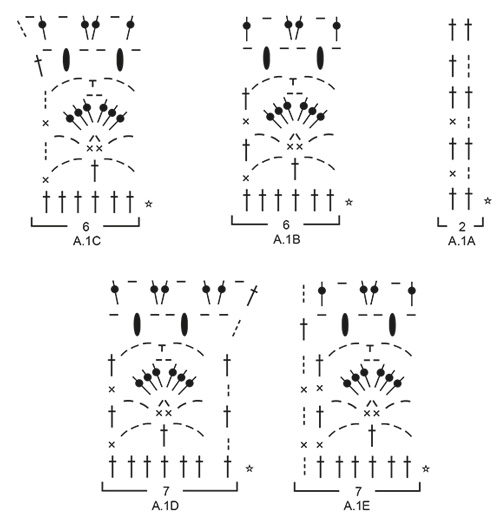
Could you please help by explaining this section: When the pattern say The next row is worked as follows from the right side: Work A.1A (= 2 stitches), work A.1B over the next 12-12-18-24-24-30 stitches (= 2-2-3-4-4-5 repeats of 6 stitches) and finish with A.1C (= 6 stitches). "Continue this pattern back and forth until A.1 has been completed." Do I start each row with A1A?
03.05.2019 - 07:47DROPS Design answered:
Hello Ronel, yes, you've to work as established until the end of diagram A.1. Happy crocheting!
03.05.2019 - 08:58
![]() Chantelle wrote:
Chantelle wrote:
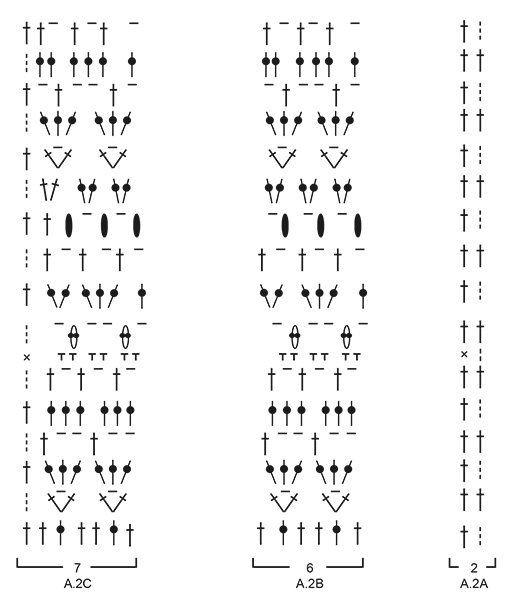
I have joined my two shoulder pieces and then I have started with the front piece, but I get stuck at the first part where they say Work A.2A(= 2 stitches), work A.2B over the next 72 stitches and A.2C (= 7 stitches). I am not sure what I have to do there. Can you please help me? The shoulder pieces worked out great until I got to this part. Please help?
01.05.2019 - 18:27DROPS Design answered:
Dear Chantelle, after shoulders have been worked separately work next row from RS first over the stitches from right shoulder + over the chains worked for neckline at the end of left shoulder + stitches from left shoulders: A.2A, then repeat A.2B a total of 12 times (over next stitches = over the stitches worked with A.1B/A.1C (right shoulder) + chain stitches + A.1E/A.1B (left shoulder) and finish with A.2C over A.1E (last repeat on left shoulder). Happy crocheting!
02.05.2019 - 09:50
![]() Pia Dupont wrote:
Pia Dupont wrote:
Man skal hækle a2 til færdigt mål. Men når jeg har hæklet sidste række som er 1 lm og en st og skal starte med række 1 igen som er 2 st i 2 masker og 1 st om lm så passer det jo ikke. Vil I venligst forklare hvad jeg skal gøre. Mange hilsner Pia
11.04.2019 - 23:19DROPS Design answered:
Hei Pia. Siste rad i A.2 hekles fra rettsiden og avsluttes med 1 luftmaske og 2 staver. Når du så skal starte med første rad igjen, må du hekle den fra vrangsiden (altså du hekler A.2C, A.2B x-antall ganger, A.2A). Du erstatter første stav med 3 luftmasker som vanlig, og ellers hekler du diagrammet som vist - altså du hekler1 stav i hver maske over hele raden (du avslutter med de 2 stavene i A.1A - de 3 luftmaskene = 1 stav). Vi har nå lagt til denne informasjonen i oppskriften. God fornøyelse
12.04.2019 - 09:42
![]() Gunilla Åström wrote:
Gunilla Åström wrote:
Hej. Jag tycker att den är liten i storlek. Brukar sticka/virka storlek S och det brukar stämma. Här fick jag gå upp till storlek L för att få plats med bysten. Upptäckte dock inte detta förrän jag monterat tröjan. Får nu börja om från början.
22.03.2019 - 00:07
![]() Vanessa wrote:
Vanessa wrote:
Hallo! Leider komme ich mit den Ärmeln nicht klar. Wenn ich die Abnahmen mache, stimmt die Anzahl der Maschen nicht mehr, um mit dem Muster weiterzuhäkeln. Mache ich etwas falsch?
02.03.2019 - 13:48DROPS Design answered:
Liebe Vanessa, die Maschen, die nicht mehr im Muster gehäkelt werden können, können Sie dann mit feste Maschen/Stäbchen häkeln, solange daß die Maschenanzahl richtig ist. viel Spaß beim häkeln!
04.03.2019 - 12:45
![]() Gretha wrote:
Gretha wrote:
Nu linker en rechtenstudie schouder af. Wst is nou de goede iant? Daar waar de eerste stokjes aan de verkeerde kant zitten? Want als ik het patroon volg dan zou ik aan rechterkant beginnen maar dan zijn de eerste stokjes de ‘verkeerde kant’. Of klopt dit...
09.01.2019 - 13:31DROPS Design answered:
Dag Gretha,
De eerste toer van de rechter schouder (gezien zoals het kledingstuk gedragen wordt) wordt aan de verkeerde kant gehaakt, dus richting de arm, de tweede toer van der rechter schouder wordt aan de goede kant gehaakt, dus dan haak je weer richting de hals.
09.01.2019 - 13:54
![]() Gretha wrote:
Gretha wrote:
Nu linker en rechtenstudie schouder af. Wst is nou de goede iant? Daar waar de eerste stokjes aan de verkeerde kant zitten? Want als ik het patroon volg dan zou ik aan rechterkant beginnen maar dan zijn de eerste stokjes de ‘verkeerde kant’. Of klopt dit...
09.01.2019 - 13:29DROPS Design answered:
Dag Gretha,
De eerste toer van de rechter schouder (gezien zoals het kledingstuk gedragen wordt) wordt aan de verkeerde kant gehaakt, dus richting de arm, de tweede toer van der rechter schouder wordt aan de goede kant gehaak, dus dan haak je weer richting de hals.
09.01.2019 - 13:52
![]() Gretha wrote:
Gretha wrote:
Patroon begint met rij lossen en dan rij stokjes. Dan zegt t patroon ga nu aan goede kant verder met A1a. Maar ik heb dan net rij stokjes aan goede kant gedaan. Moet ik afhechten en beginnen aan andere kant vd stokjes en dus de goede kant? Of lees ik t verkeerd. Dank alvast
08.01.2019 - 14:29
![]() Wilma wrote:
Wilma wrote:
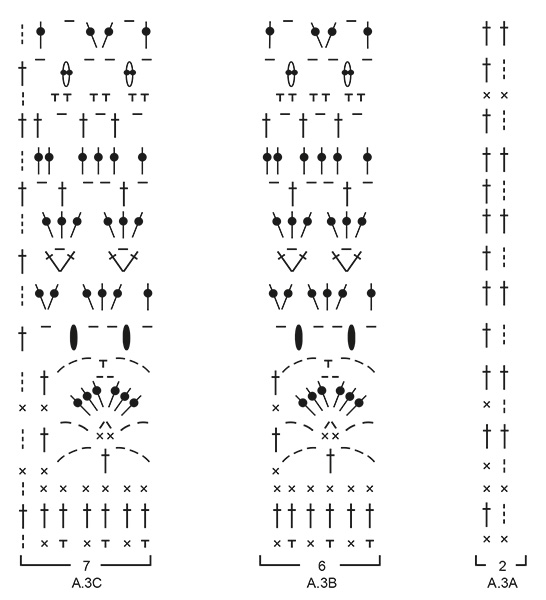
Weet niet hoe ik op het voorpand na A2 weer met A3 moet beginnen. Krijg ook de stokjes aan de verkeerde kant ipv aan de goede kant net als de vorige toeren.
17.11.2018 - 22:06DROPS Design answered:
Dag Wilma,
Je kan gewoon door gaan met heen en weer haken. De laatste toer van A.2 is op de goede kant, waardoor je de eerste toer van A.3. weer op de verkeerde kant haakt.
19.11.2018 - 07:54
![]() Els wrote:
Els wrote:
2 schouders gehaakt op 26 stokjes plus 25 losse voor de hals is samen toch 77 ( maat L) voor het voorpand moet ik in totaal 2+72+7= 81 steken hebben dan kom ik er 4 tekort. Wat doe ik fout?
31.10.2018 - 14:55DROPS Design answered:
Dag Els,
In A.1c en A.1D zie je dat er op de laatste toer 2 steken meer zijn, hierdoor heb je in totaal 81 steken ipv 77 (4 steken extra in totaal) en heb je een lichte ronding in de halslijn.
02.11.2018 - 08:30
|
|||||||||||||||||||||||||
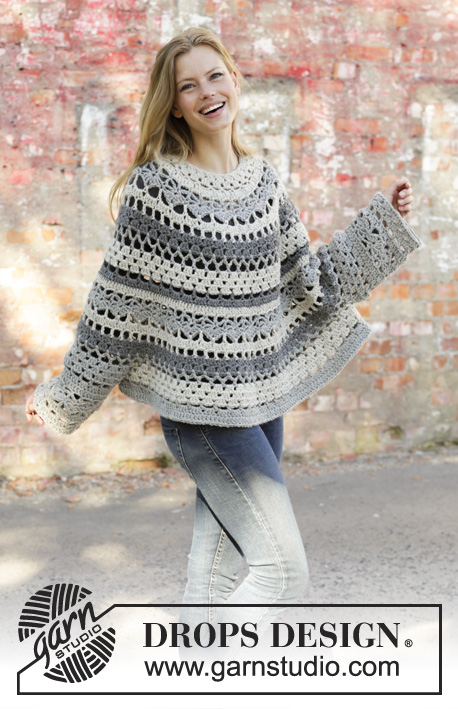
Grey Sparrow#greysparrowtunic |
|||||||||||||||||||||||||
 |
 |
||||||||||||||||||||||||
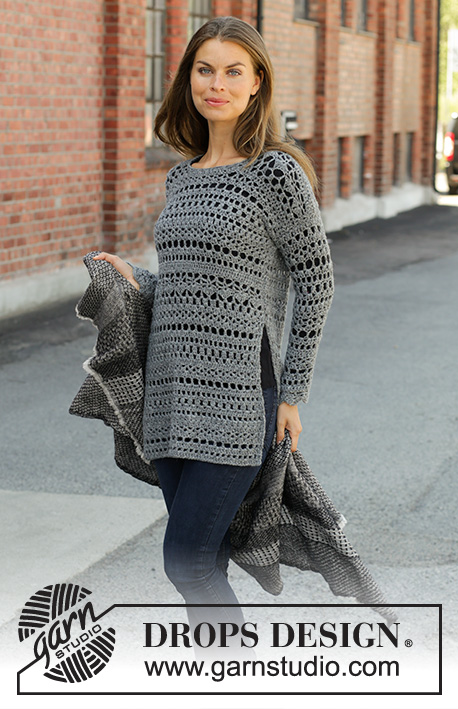
Crocheted jumper in DROPS Sky. The piece is worked top down with lace pattern and long split in the sides. Sizes S - XXXL.
DROPS 195-14 |
|||||||||||||||||||||||||
|
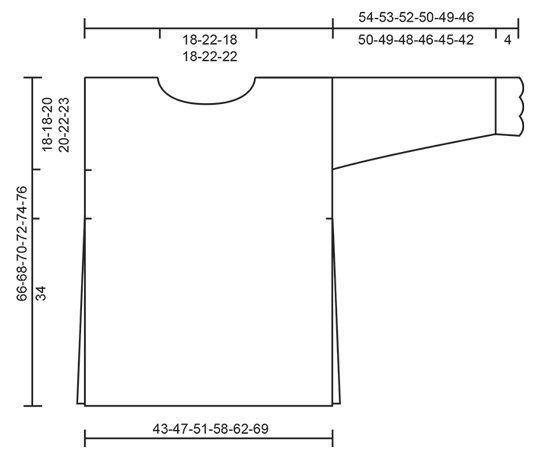
------------------------------------------------------- EXPLANATIONS FOR THE PATTERN: ------------------------------------------------------- CROCHET INFO: At the beginning of each row of treble crochets, the first treble crochet is replaced by 3 chain stitches. The row finishes with 1 treble crochet in the 3rd or 2nd chain stitch from the beginning of the previous row (depending on whether the previous row started with 3 or 2 chain stitches). At the beginning of each row of double crochets, the first double crochet is replaced by 2 chain stitches. The row finishes with 1 double crochet in the 3rd or 2nd chain stitch from the beginning of the previous round. PATTERN: See diagrams A.1 to A.3. DECREASE TIP (for sleeves): Decrease 1 stitch inside of the 2 outermost stitches in each side. Decrease 1 stitch by skipping 1 stitch. It is difficult to say where the decreases will occur in the pattern, but adjust so that you decrease on a row of treble/double crochets (not on a row of large chain-spaces). INCREASE TIP (for bottom of sleeves): Increase 1 stitch by working 2 double crochets in same stitch. ------------------------------------------------------- START THE PIECE HERE: ------------------------------------------------------- JUMPER - QUICK SUMMARY OF THE PIECE: Front and back pieces are worked back and forth separately, top down. You first work the right front shoulder increasing for the neck, then the left shoulder increasing for the neck before the pieces are worked together back and forth to finished length. The back piece is worked in the same way. The sleeves are worked back and forth, top down. The garment is sewn together before working a finishing edge to the neck. RIGHT FRONT SHOULDER (when the garment is worn): Read CROCHET INFO! Work 28-28-36-44-44-52 chain stitches with hook size 4.5 mm and Sky. The first row is worked as follows from the wrong side: Work 1 treble crochet in the 4th chain stitch from the hook, * skip 1 chain stitch, work 1 treble crochet in each of the next 3 chain stitches *, work from *-* to end of row = 20-20-26-32-32-38 treble crochets on the row. The next row is worked as follows from the right side: Work A.1A (= 2 stitches), work A.1B over the next 12-12-18-24-24-30 stitches (= 2-2-3-4-4-5 repeats of 6 stitches) and finish with A.1C (= 6 stitches). Continue this pattern back and forth until A.1 has been completed. REMEMBER THE CROCHET TENSION! Lay the piece to one side and work the left front shoulder as described below. LEFT FRONT SHOULDER (when the garment is worn): Work 28-28-36-44-44-52 chain stitches with hook size 4.5 mm and Sky. The first row is worked as follows from the wrong side: Work 1 treble crochet in the 4th chain stitch from the hook, * skip 1 chain stitch, work 1 treble crochet in each of the next 3 chain stitches *, work from *-* to end of row = 20-20-26-32-32-38 treble crochets on the row. The next row is worked as follows from the right side: Work A.1D (= 7 stitches), work A.1B over the next 6-6-12-18-18-24 stitches (= 1-1-2-3-3-4 repeats of 6 stitches) and finish with A.1E (= 7 stitches). Continue this pattern back and forth until A.1 has been completed. At the end of the last row, work 25-31-25-25-31-31 slightly loose chain stitches for the neck. Fasten the loose chains with 1 slip stitch in the outermost stitch towards the neck on right shoulder on the front (from wrong side). Cut and fasten the strand. Now work the pieces together for the front piece as described below. FRONT PIECE: Start from the right side of the right front shoulder; continue working over the chain stitches for the neck and then work over the stitches on the left front shoulder as follows: Work A.2A (= 2 stitches), work A.2B over the next 60-66-72-84-90-102 stitches (= 10-11-12-14-15-17 repeats of 6 stitches) and finish with A.2C (= 7 stitches). NOTE: When working over the chain stitches for the neckline, work 1 treble crochet in each chain stitch. Continue this pattern back and forth. When A.2 has been worked one time in height, work A.3 one time in height in the same way. Then work A.2 to finished length, NOTE: When A.2 is repeated after itself, the 1st row on the 2nd repeat will be worked from wrong side. The 1st treble crochet on row is replaced with 3 chain stitches as usual. AT THE SAME TIME when the piece measures 18-18-20-20-22-23 cm from the cast-on edge, insert 1 marker in each side to mark the armholes. Continue working as described above until the piece measures approx. 65-67-69-71-73-75 cm. Finish with 1 row of treble crochets – NOTE: Choose a row from one of the diagrams which fits with where you are in the repeat so that you have 69-75-81-93-99-111 treble crochets on the row. Cut and fasten the strands. The front piece measures approx. 66-68-70-72-74-76 cm from the shoulder down. LEFT BACK SHOULDER (when the garment is worn): Work 28-28-36-44-44-52 chain stitches with hook size 4.5 mm and Sky. The first row is worked as follows from the wrong side: Work 1 treble crochet in the 4th chain stitch from the hook, * skip 1 chain stitch, work 1 treble crochet in each of the next 3 chain stitches *, work from *-* to end of row = 20-20-26-32-32-38 treble crochets on the row. Lay the piece to one side and work the right back shoulder as described below. RIGHT BACK SHOULDER (when the garment is worn) Work 28-28-36-44-44-52 chain stitches with hook size 4.5 mm and Sky. The first row is worked as follows from the wrong side: Work 1 treble crochet in the 4th chain stitch from the hook, * skip 1 chain stitch, work 1 treble crochet in each of the next 3 chain stitches *, work from *-* to end of row = 20-20-26-32-32-38 treble crochets on row. At the end of this row, work 29-35-29-29-35-35 slightly loose chain stitches for the neck. Fasten the loose chains with 1 slip stitch in the outermost stitch towards the neck on left shoulder on the back (from wrong side). Cut and fasten the strand.Now work the pieces together for the back piece as described below. BACK PIECE: Start from the right side of the left back shoulder; continue working over the chain stitches for the neck and then over the stitches on the right back shoulder as follows: Work A.1A (= 2 stitches), work A.1B over the next 60-66-72-84-90-102 stitches (= 10-11-12-14-15-17 repeats of 6 stitches) and finish with A.1E (= 7 stitches). Continue this pattern back and forth. When A.1 has been completed, work A.2 in the same way. When A.2 has been worked one time in height, work A.3 one time in height in the same way. Then work A.2 to finished length in the same way as the front piece. AT THE SAME TIME when the piece measures 18-18-20-20-22-23 cm from the cast-on edge, insert 1 marker in each side to mark the armholes. Continue working as described above until the piece measures approx. 65-67-69-71-73-75 cm – adjust to match the front piece. Finish with 1 row of treble crochets in the same way as the front piece. Cut and fasten the strands. The back piece measures approx. 66-68-70-72-74-76 cm from the shoulder down. SLEEVE: Work 77-77-85-85-93-101 chain stitches with hook size 4.5 mm and Sky. The first row is worked as follows from the right side: Work 1 treble crochet in the 4th chain stitch from the hook, work 1 treble crochet in the next chain stitch, * skip 1 chain stitch, work 1 treble crochet in each of the next 3 chain stitches *, work from *-* to end of row = 57-57-63-63-69-75 treble crochets on the row. The next row is worked as follows from the wrong side: 4 chain stitches (equivalent to 1 treble crochet + 1 chain stitch), skip 2 treble crochets, * 2 treble crochets in the space before the next 3 treble crochets, 1 chain stitch * work from *-* until there are 3 treble crochets left on the row, skip 2 treble crochets and finish with 1 treble crochet in the last treble crochet = 57-57-63-63-69-75 stitches on the row. The next row is worked as follows from the right side: Work A.2A (= 2 stitches), work A.2B over the next 48-48-54-54-60-66 stitches (= 8-8-9-9-10-11 repeats of 6 stitches) and finish with A.2C (= 7 stitches). Continue this pattern back and forth. A.2 is repeated in height. AT THE SAME TIME when the piece measures 2 cm in all sizes, decrease 1 stitch in each side – read DECREASE TIP (= 2 stitches decreased). Decrease like this approx. every 5½-5½-4½-4-3½-2½ cm a total of 9-9-11-11-13-15 times in each side = 39-39-41-41-43-45 stitches on the row. When the sleeve measures approx. 50-49-48-46-45-42 cm (shorter measurements in larger sizes due to wider shoulders) work 1 row of double crochets from the wrong side where you increase 6-6-4-4-8-6 stitches evenly on the row - read INCREASE TIP = 45-45-45-45-51-51 double crochets. The next row is worked as follows from the right side: Work A.1A (= 2 stitches), work A.1B over the next 36-36-36-36-42-42 stitches (= 6-6-6-6-7-7 repeats of 6 stitches) and finish with A.1E (= 7 stitches). Continue this pattern, but finish after the 3rd row of A.1. Cut and fasten the strands. The sleeve measures approx. 54-53-52-50-49-46 cm from the top down. Work the other sleeve in the same way. ASSEMBLY: Sew the shoulder seams. Sew in the sleeves between the markers on the front and back pieces. Sew the sleeve and side seams in one go – start at the bottom of the sleeve and sew edge to edge in the outermost stitch, but finish the seam when there is still 34 cm left, leaving a split in each side. NECK: Start on the one shoulder and work the first round as follows with hook size 4.5 mm: Work 1 double crochet in the first stitch, * 3 chain stitches, 1 double crochet around the next row/chain-space *, work from *-* around the whole neck, finish with 3 chain stitches and 1 slip stitch in the first double crochet at the beginning of the round. Work slip stitches to the middle of the first chain-space, work 3 chain stitches, * 1 double crochet around the next chain-space, 2 chain stitches *, work from *-* to end of round, finish with 1 slip stitch in the first chain stitch at the beginning of the round. Cut and fasten the strand. |
|||||||||||||||||||||||||
Diagram explanations |
|||||||||||||||||||||||||
|
|||||||||||||||||||||||||
 |
|||||||||||||||||||||||||
 |
|||||||||||||||||||||||||
 |
|||||||||||||||||||||||||
 |
|||||||||||||||||||||||||
Have you finished this pattern?Tag your pictures with #dropspattern #greysparrowtunic or submit them to the #dropsfan gallery. Do you need help with this pattern?You'll find 13 tutorial videos, a Comments/Questions area and more by visiting the pattern on garnstudio.com. © 1982-2026 DROPS Design A/S. We reserve all rights. This document, including all its sub-sections, has copyrights. Read more about what you can do with our patterns at the bottom of each pattern on our site. |
|||||||||||||||||||||||||


With over 40 years in knitting and crochet design, DROPS Design offers one of the most extensive collections of free patterns on the internet - translated to 17 languages. As of today we count 324 catalogues and 12245 patterns translated into English (UK/cm). 12245
We work hard to bring you the best knitting and crochet have to offer, inspiration and advice as well as great quality yarns at incredible prices! Would you like to use our patterns for other than personal use? You can read what you are allowed to do in the Copyright text at the bottom of all our patterns. Happy crafting!
Post a comment to pattern DROPS 195-14
We would love to hear what you have to say about this pattern!
If you want to leave a question, please make sure you select the correct category in the form below, to speed up the answering process. Required fields are marked *.