
Popular categories
Looking for a yarn?


Comments / Questions (28)
![]() Kirsten Mortensen wrote:
Kirsten Mortensen wrote:
Hvordan sammensætter jeg farver når jeg vil ikke vil laver en hvid "white willow" trøje men en grå og jeg skal bruge såvel drops air som drops alpaca silk mvh Kirsten Mortensen
20.06.2019 - 20:15DROPS Design answered:
Hei Kirsten. Her er det ikke noe fasitsvar. Om du vil strikke i grå kan du velge 1 gråfarge i hver kvalitet, avhengig av hvor mørk du vil ha genseren. Om du feks velger Air 04, mellomgrå og Brushed Alpaca Silk 03, grå, vil du få et mørkere resultat enn om du hadde brukt Brushed Alpaca Silk 02, lys grå. Om du vil ha Air 03, perlegrå kan du justere hvor mørk den skal være med å velge enten 02 eller 03 Brushed Alpaca Silk. Siden begge trådene er i mer eller mindre samme farge vil du ikke kunne se at det er 2 tråder når arbeidet er ferdig. God fornøyelse
21.06.2019 - 13:43
![]() Jytte Jensen wrote:
Jytte Jensen wrote:
Hej Kan det virkelig passe at denne opskrift kræver 2 forskellige garntyper ? Så kan det da blive meget svært at ramme helt samme farve ?!
17.06.2019 - 21:55DROPS Design answered:
Hei Jytte. Ja her skal du strikke med 2 tråder samtidig: 1 tråd Air og 1 tråd Brushed Alpaca Silk. Så lenge alle nøstene i hver kvalitete tilhører samme farge-batch så skal kombinasjonen av de 2 kvalitetene forbli lik hele veien. God fornøyelse
18.06.2019 - 07:47
![]() Charlotte wrote:
Charlotte wrote:
Jeg har et forståelsesmæssigt spørgsmål til ryg/forstykke: "På næste omgang tages der 8 masker ind i hver side (= 4 masker på hver side af mærketrådene i hver side) " set i forhold til bærestykke: "Nu sættes ærmerne ind på samme rundpind som ryg- og forstykke hvor der blev lukket af til ærmegab" Der står jo ikke noget om, at der skal lukkes af i afsnittet om ryg/forstykke. Skal de beskrevne indtagninger forstås som at der skal lukkes af? VH Charlotte
27.05.2019 - 09:40DROPS Design answered:
Hei Charlotte. Ja, disse maskene skal lukkes av. Vi skal få korrigert dette i oppsrkiften. Takk for beskjed og god fornøyelse
28.05.2019 - 07:47
![]() Anouk wrote:
Anouk wrote:
Ik snap het telpatroon niet vanaf A1 de 5e tour: het zwarte driehoekje. Na drie recht moet de rechter naald in dezelfde steek. Welke steek? Om de rechternaald in een steek te voegen die al op de rechternaald staat, lijkt me onmogelijk.
26.05.2019 - 11:38DROPS Design answered:
Dag Anouk,
Met dezelfde steek wordt de middelste steek van de 3 steken 4 naalden eronder bedoeld. Heer steek je dus eerst de naald in, maakt een omslag en haalt deze naar boven. Dan brei je 3 steken recht en dan steek je op nieuw de naald 4 naalden eronder in, in dezelfde steek.
31.05.2019 - 16:18
![]() Vilde B wrote:
Vilde B wrote:
Hei! på bærestykket, når man ska felle hver 4 omgang og hver 2 omgang. Er alle fellingene i A.1 eller skal man ta fellingen som er hver 2 omgang i de 6 siste omgangene i A.1? Mvh Vilde
18.03.2019 - 17:24DROPS Design answered:
Hei Vilde. Du feller til raglan på hver side av A.1, og ikke i selve diagrammet - fellingene i diagrammet er en del av mønsteret, og kommer i tillegg. Når du har strikket hele A.1 1 gang i høyden repeterer du de 6 siste omgangene oppover til alle fellinger til raglan er ferdig. Hvis siste felling skjer før du er ferdig med en hel rapport av de siste 6 omgangene, strikker du ferdig den rapporten i høyden før du strikker A.2. God fornøyelse
19.03.2019 - 13:55
![]() Campener Cecile wrote:
Campener Cecile wrote:
Je ne comprends pas le raglan à partir de: quand toutes les diminutions sont faites(ce qui n'est pas le cas!!!) De où sortent les 66 mailles(je fais la taille M)? Merci de m'aider.
02.03.2019 - 15:51DROPS Design answered:
Bonjour Mme Campener, nos stylistes vont vérifier le nombre de mailles, merci d'avance pour votre patience.
05.03.2019 - 09:19
![]() Camilla wrote:
Camilla wrote:
Hei, skal jeg ikke bytte til pinne 8 på ermene? Det står at jeg trenger settpinner i 8mm, men står ikke i oppskriften at jeg skal skrifte til 8 mm på ermene!
25.02.2019 - 16:28DROPS Design answered:
Hei Camilla. Jo, det skal du. Bytt til pinnenr 8 etter vrangborden. Vi skal få lagt til dette i oppskriften. Takk for beskjed og god fornøyelse
26.02.2019 - 15:07
![]() Cristina wrote:
Cristina wrote:
Hei jeg lurer på om jeg ikke skal øke til pinne 8 på ermer? Står ingenting om det men i forklaringen står det at man trenger settpinner i str. 8
20.02.2019 - 15:29
![]() Tine wrote:
Tine wrote:
Som vilde skriver. Skjønte ikke helt denne forklaringen. Skal den starte der masken er midt forran/bak, eller rett før A2? Hvis dette ga noe mening. - Mvh Tine.
04.02.2019 - 21:19DROPS Design answered:
Hei Tine. Omgangen starter på samme sted som før: Midt bak. Si at du strikker størrelse M. Før fellingene til raglan strikket du slik: 20 masker glattstrikk (=halve bakstykket), A.1 over 10 masker i overgang mellom bol og erme, 37 masker rett (=ermet), A.1 i overgangen osv. Du har felt 17 masker på hver side av A.1. Som betyr at du her igjen 3 masker glattstrikk på bakstykket, før første A.1. Du strikker nå slik: 1 maske rett, de 2 neste maskene strikkes rett sammen (bakstykket), så strikkes A.2 over A.1. Videre feller du 2 masker over de 3 maskene som er igjen på ermet (mellom rapportene av A.1). Så strikker du A.2 over A.1, osv. God fornøyelse.
08.02.2019 - 14:08
![]() Vilde wrote:
Vilde wrote:
Hallo :) Jeg skjønner jeg ikke hva jeg skal gjøre når det står " * 1-1-2-2-3-4 masker rett, strikk 2 masker rett sammen (= 1 maske felt), strikk A.2 (= 13 masker øker til 19 masker) over A.1, ta 1 maske løs av pinnen som om den skulle strikkes rett, 2 rett sammen, løft den løse masken over (= 2 masker felt), strikk A.2 over A.1, ta 1 maske løs av pinnen som om den skulle strikkes rett, 1 rett, løft den løse masken over (= 1 maske felt), strikk 1-1-2-2-3-4 masker rett * Mvh Vilde
29.01.2019 - 19:31DROPS Design answered:
Hei Vilde. Start omgangen med 1-1-2-2-3-4 masker rett (etter størrelse), fell 1 maske ved å strikke 2 masker sammen. Strikk A.2 over de samme 13 maskene som du strikket A.1 - det er økninger i A.2 som gjør at det er 19 masker på neste omgang. Fell 2 masker over de neste 3 maskene, Strikk A.2, igjen over de samme maskene som du strikket A.1, Fell 1 maske, og avslutt med 1-1-2-2-3-4 masker rett. Fordi dette avsnittet står innenfor to * skal hele avsnittet gjentas - i dette tilfellet 1 gang til på samme omgang. God fornøyelse
30.01.2019 - 07:58
|
|||||||||||||||||||||||||
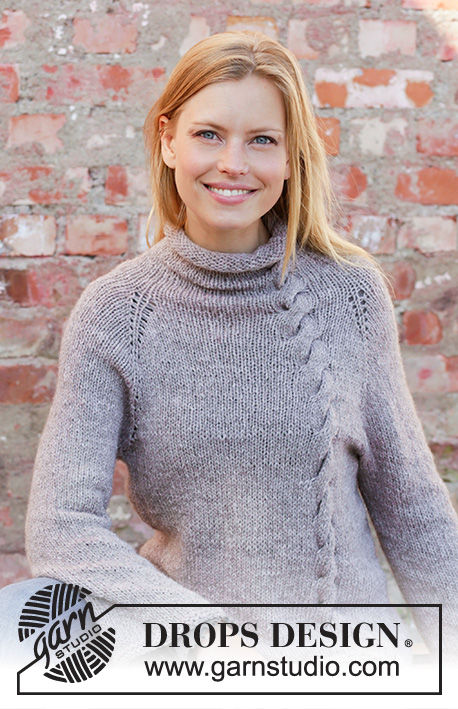
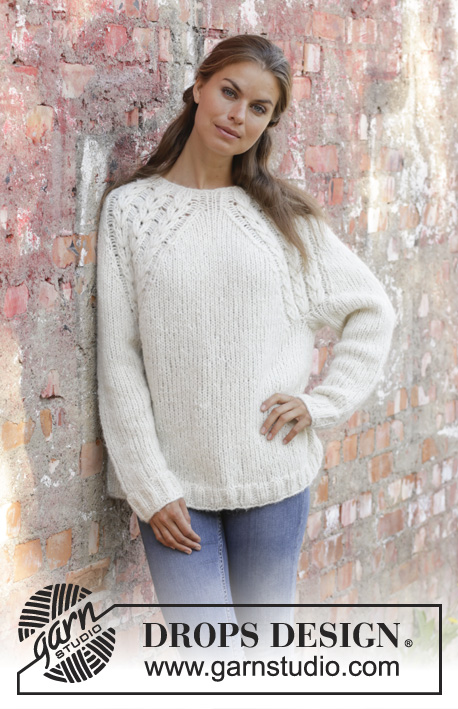
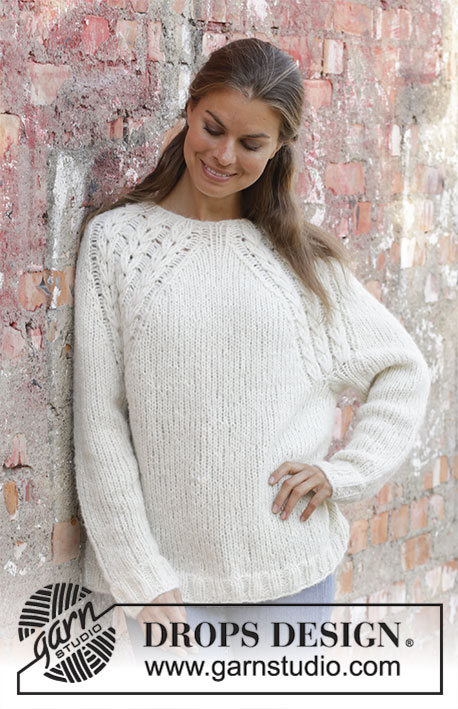
White Willow#whitewillowsweater |
|||||||||||||||||||||||||
 |
 |
||||||||||||||||||||||||
Knitted jumper with raglan in DROPS Air and DROPS Brushed Alpaca Silk. Piece is knitted with texture. Size: S - XXXL
DROPS 194-5 |
|||||||||||||||||||||||||
|
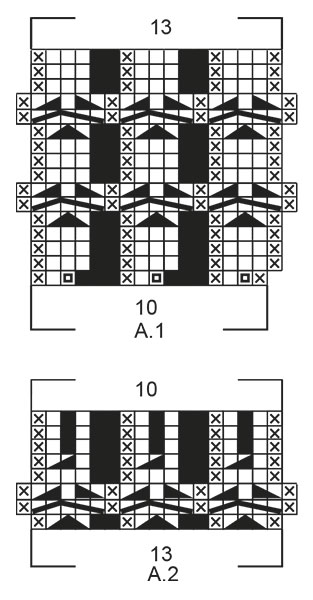
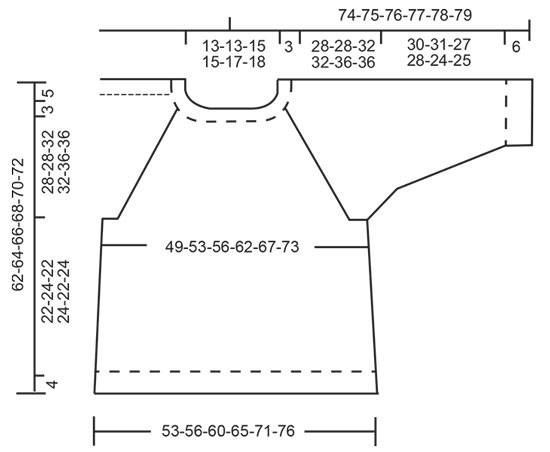
---------------------------------------------------------- EXPLANATION FOR THE PATTERN: ---------------------------------------------------------- PATTERN: See diagrams A.1 and A.2. DECREASE TIP-1 (evenly): To calculate how to decrease evenly, use the total number of stitches on row (e.g. 144 stitches) and divide stitches by number of decreases to be done (e.g. 28) = 5.1. In this example knit approx. every 4th and 5th stitch together. DECREASE TIP-2: Work until 3 stitches remain before marker thread, slip 1 stitch knitwise, knit 1, pass slipped stitch over stitch worked, knit 2 (marker thread is in the middle of these stitches), knit the next 2 stitches together (= 2 stitches decreased). Repeat at the other marker thread (= 4 stitches decreased). INCREASE TIP (applies to sleeves): Work until 2 stitches remain before marker thread, 1 yarn over, knit 4 (marker thread is in the middle of these stitches), 1 yarn over. On next round knit yarn over twisted to avoid holes. Then work the new stitches in stocking stitch. RAGLAN: Decrease 1 stitch on each side of every A.1 as follows: Work until 2 stitches remain before A.1 and knit 2 together, knit A.1, slip 1 stitch knitwise, knit 1, pass slipped stitch over stitch worked. Repeat at each of the remaining repetitions of A.1 (= 8 stitches decreased on round). ---------------------------------------------------------- START THE PIECE HERE: ---------------------------------------------------------- JUMPER - SHORT OVERVIEW OF THE PIECE: Work piece in the round on circular needle, bottom up. Work sleeves in the round on double pointed needles, switch to circular needle when needed. BODY: Cast on 144-152-160-176-192-212 stitches on circular needle size 7 mm with 1 strand Air + 1 strand Brushed Alpaca Silk (= 2 strands). Knit 1 round. Then work rib (= knit 2/purl 2) for 4 cm. Switch to circular needle size 8 mm, knit 1 round while decreasing 28-28-28-32-36-44 stitches evenly - read DECREASE TIP-1 = 116-124-132-144-156-168 stitches. Then work in stocking stitch in the round. REMEMBER THE KNITTING TENSION! When piece measures 10 cm, insert marker thread at beginning of round (= in the side) and a marker thread after 58-62-66-72-78-84 stitches (= in the sides). On next round decrease 1 stitch on each side of marker threads – read DECREASE TIP-2. Repeat decrease when piece measures 20 cm = 108-116-124-136-148-160 stitches. Continue to work until piece measures 26-28-26-28-26-28 cm. On next round cast off 8 stitches in each side (= 4 stitches on each side of marker threads in each side) = 46-50-54-60-66-72 stitches for front and back piece. Put piece aside and work the sleeves. SLEEVE: Cast on 32-32-36-36-36-40 stitches on double pointed needles size 7 mm with 1 strand Air + 1 strand Brushed Alpaca Silk (= 2 strands). Knit 1 round. Then work rib (= knit 2/purl 2) for 6 cm. Switch to double pointed needle size 8 mm, knit 1 round while decreasing 7-7-9-9-7-7 stitches evenly = 25-25-27-27-29-33 stitches. Insert a marker thread at beginning of round. Move the marker thread upwards when working. When piece measures 7-8-8-7-8-8 cm, increase 1 stitch on each side of marker thread - read INCREASE TIP. Increase like this every 3-2-2-2-1-2 cm 8-10-10-11-12-10 times in total = 41-45-47-49-53-53 stitches. When piece measures 29-30-26-27-23-24 cm, increase 1 stitch on each side of marker thread every other round 5 times = 51-55-57-59-63-63 stitches. On next round cast off 8 stitches mid under sleeve (i.e. 4 stitches on each side of marker thread) = 43-47-49-51-55-55 stitches. Work another sleeve the same way. YOKE: Now slip sleeves on to same circular needle as body where armholes were cast off = 178-194-206-222-242-254 stitches. Insert a marker thread mid back and begin round here. Now work pattern as follows: * Knit 18-20-22-24-27-29, work A.1 (= 10 stitches on first round) over the last 5-5-5-6-6-7 stitches on back piece/(= front piece when this sentence is repeated) and the first 5-5-5-4-4-3 stitches on sleeve, knit over the next 33-37-39-43-47-49 stitches, work A.1 over the last 5-5-5-4-4-3 stitches on sleeve and the first 5-5-5-6-6-7 stitches on front piece/(= back piece when this sentence is repeated), knit 18-20-22-24-27-29 *, work from *-* 1 more time on round. Continue pattern in the round like this. NOTE: To avoid a tight knitting tension vertically it is important that the yarn overs in diagram A.1 are not too short - yarn overs must be 4½ cm long! On 4th round in diagram begin decrease for RAGLAN - read explanation above. Decrease like this every 4th round 5-3-5-3-4-3 times and every other round 10-14-13-17-18-20 times (= 15-17-18-20-22-23 rounds in total with decrease) = 70-70-74-74-78-82 stitches (there are now 13 stitches in every A.1). When A.1 has been worked vertically, repeat the last 6 rounds in diagram vertically. When all decreases are done and last round in A.1 is finished vertically, work next round as follows: * Knit 1-1-2-2-3-4, knit 2 together (= 1 stitch decreased), work A.2 (= 13 stitches increase to 19 stitches) over A.1, slip 1 stitch knitwise, knit 2 together, pass slipped stitch over (= 2 stitches decreased), work A.2 over A.1, slip 1 stitch knitwise, knit 1, pass slipped stitch over (= 1 stitch decreased), knit 1-1-2-2-3-4 *, work from *-* 1 more time on round = 86-86-90-90-94-98 stitches (there are now 19 stitches in every A.2). Work next round in the different sizes as follows: Size S, M, L and XL: * Knit 1-1-1-1, purl 1-1-2-2, A.2, purl next stitch together with first stitch in A.2 and work the remaining stitches in A.2, purl 1-1-2-2, knit 1 *, work from *-* 1 more time on round. 1 stitch is now decreased on each shoulder (= 2 stitches decreased). Size XXL and XXXL: * Knit 1-1, purl 1-2, knit 2-2, A.2, purl next stitch together with first stitch in A.2 and work the remaining stitches in A.2, knit 2-2, purl 1-2, knit 1-1 *, work from *-* 1 more time on round. 1 stitch is now decreased on each shoulder (= 2 stitches decreased). All sizes: Work 1 more round with next round in A.2 and knit over knit and purl over purl over the remaining stitches. NECK EDGE: Switch to circular needle size 7 mm. Continue with the remaining rounds in A.2 and knit over knit and purl over purl over the remaining stitches on needle. When entire A.2 has been worked vertically, 48-48-52-52-56-60 stitches remain on round. Cast off stitches with knit over knit and purl over purl. Piece measures approx. 62-64-66-68-70-72 cm from shoulder and down. |
|||||||||||||||||||||||||
Diagram explanations |
|||||||||||||||||||||||||
|
|||||||||||||||||||||||||
 |
|||||||||||||||||||||||||
 |
|||||||||||||||||||||||||
Have you finished this pattern?Tag your pictures with #dropspattern #whitewillowsweater or submit them to the #dropsfan gallery. Do you need help with this pattern?You'll find 28 tutorial videos, a Comments/Questions area and more by visiting the pattern on garnstudio.com. © 1982-2026 DROPS Design A/S. We reserve all rights. This document, including all its sub-sections, has copyrights. Read more about what you can do with our patterns at the bottom of each pattern on our site. |
|||||||||||||||||||||||||


With over 40 years in knitting and crochet design, DROPS Design offers one of the most extensive collections of free patterns on the internet - translated to 17 languages. As of today we count 324 catalogues and 12290 patterns translated into English (UK/cm). 12290
We work hard to bring you the best knitting and crochet have to offer, inspiration and advice as well as great quality yarns at incredible prices! Would you like to use our patterns for other than personal use? You can read what you are allowed to do in the Copyright text at the bottom of all our patterns. Happy crafting!
Post a comment to pattern DROPS 194-5
We would love to hear what you have to say about this pattern!
If you want to leave a question, please make sure you select the correct category in the form below, to speed up the answering process. Required fields are marked *.