DROPS Brushed Alpaca Silk uni colour 77% Alpaca, 23% Silk |
3.10 € /25g |
Order |
Clicking the ORDER button will redirect you to Camellia website
The yarn cost is calculated from the pattern’s smallest size and the yarn’s cheapest product type. Looking for an even better price? You might find it on the DROPS Deals!
-------------------------------------------------------
Alternative Yarn – See how to change yarns here
Yarn Groups A to F – Use the same pattern and change the yarn here
Yarn usage using an alternative yarn – Use our yarn converter here
-------------------------------------------------------
DROPS Brushed Alpaca Silk uni colour 77% Alpaca, 23% Silk 3.10 € /25g Order |
Clicking the ORDER button will redirect you to Camellia website
The yarn cost is calculated from the pattern’s smallest size and the yarn’s cheapest product type. Looking for an even better price? You might find it on the DROPS Deals!
This pattern has been corrected. Click here to see the correction/s.
= knit | |
= purl | |
= work 2 stitches in a stitch, i.e. work in front and back loop of stitch (= 1 stitch increased) | |
= insert right needle through the middle of the 3 knit stitches 4 rounds below, make 1 yarn over and pull yarn back to right side so that yarn over is 4½ cm long (yarn over must not be too tight - the knitting tension will be too tight vertically), knit 3, insert right needle through same stitch, make 1 yarn over and pull yarn back to right side so that yarn over is 4½ cm long | |
= slip 1st stitch (= yarn over made on previous round) knitwise, knit 3, slip next stitch (= yarn over made on previous round) purlwise | |
= knit 2 stitches twisted together | |
= knit 2 together | |
= this square is not a stitch because stitch was decreased earlier, go directly to next symbol in diagram |
Each of our patterns has specific tutorial videos to help you.
These step-by-step tutorials might also help you:
Why is the knitting/crochet tension so important?
Knitting tension is what determines the final measurements of your work, and is usually measured per 10 x 10 cm. It is provided like so: number of stitches in width x number of rows in height - eg: 19 stitches x 26 rows = 10 x 10 cm.
The knitting tension is very individual; some people knit/crochet loosely while others work tightly. You adjust the knitting tension with the needle size, which is why the suggested needle size is only meant as a guide! You need to adjust this (up or down) to ensure that YOUR knitting tension matches the knitting tension provided in the pattern. If you work with a different knitting tension than provided you will have a different yarn consumption, and your work will have different measurements than what the pattern suggests.
The knitting tension also determines which yarns can replace each other. As long as you achieve the same knitting tension you can replace one yarn with another.
See DROPS lesson: How to measure your tension/gauge
See DROPS video: How to make a gauge tension swatch
How do I know how many balls of yarn I need?
The required amount of yarn is provided in grams, eg: 450 g. To calculate how many balls you’ll need you first need to know how many grams are in 1 ball (25g, 50g or 100g). This information is available if you click on the individual yarn quality on our pages. Divide the amount required with the amount of each ball. For example, if each ball is 50g (the most common amount), the calculation will be as follows: 450 / 50 = 9 balls.
Can I use a different yarn than what the pattern suggests?
The important thing when changing from one yarn to another is that the knitting/crochet tension remains the same. This is so that the measurements of the finished piece will be the same as on the sketch provided. It is easier to achieve the same knitting tension using yarns from the same yarn group. It is also possible to work with multiple strands of a thinner yarn to achieve the knitting tension of a thicker one. Please try our yarn converter. We recommend you to always work a test swatch.
Please NOTE: when changing yarn the garment might have a different look and feel to the garment in the photo, due to individual properties and qualities of each yarn.
See DROPS lesson: Can I use a different yarn than the one mentioned in the pattern?
What are the yarn groups?
All our yarns are categorised into yarn groups (from A to F) according to thickness and knitting tension – group A contains the thinnest yarns and group F the thickest. This makes it easier for you to find alternative yarns to our patterns, should you wish to switch yarn. All yarns within the same group have a similar knitting tension and can easily replace each other. However, different yarn qualities have different structures and properties which will give the finished work a unique look and feel.
How do I use the yarn calculator?
At the top of all our patterns you’ll find a link to our yarn calculator, which is a helpful tool should you wish to use a different yarn than suggested. By filling in the yarn quality you wish to replace, the amount (in your size) and number of strands, the calculator will present good alternative yarns with the same knitting tension. Additionally it will tell you how much you’ll require in the new qualities and whether you’ll need to work with multiple strands. Most skeins are 50g (some are 25g or 100g).
If the pattern is worked with multiple colours, every colour will have to be calculated separately. Similarly, if the pattern is worked with several strands of different yarns (for example 1 strand Alpaca and 1 strand Kid-Silk) you will have to find alternatives for each, individually.
Why do you show discontinued yarns in the patterns?
Since different yarns have different qualities and textures we have chosen to keep the original yarn in our patterns. However, you can easily find options among our available qualities by using our yarn calculator, or simply pick a yarn from the same yarn group.
It is possible that some retailers still have discontinued yarns in stock, or that someone has a few skeins at home that they would like to find patterns for.
The yarn calculator will provide both alternative yarn as well as required amount in the new quality.
What size should I knit?
If you think it's hard to decide what size to make, it can be a good idea to measure a garment you own already and like the size of. Then you can pick the size by comparing those measures with the ones available in the pattern's size chart.
You'll find the size chart at the bottom of the pattern.
See DROPS lesson: How to read size chart
Why do I get the wrong knitting tension with the suggested needle size?
The needle size provided in the pattern serves only as a guide, the important thing is to follow the knitting tension. And since knitting tension is very individual, you will have to adjust the needle size to ensure that YOUR tension is the same as in the pattern – maybe you’ll have to adjust 1, or even 2 needle sizes, up or down to achieve the correct tension. For this, we recommend that you work test swatches.
Should you work with a different knitting tension than the one provided, the measurements of the finished garment might deviate from the measurement sketch.
See DROPS lesson: How to measure your tension/gauge
See DROPS video: How to make a tension/gauge swatch
Why is the pattern worked top-down?
Working a garment top-down provides more flexibility and room for personal adjustment. For example it is easier to try the garment on while working, as well as making adjustments to length of yoke and shoulder caps.
The instructions are carefully explaining every step, in the correct order. Diagrams are adjusted to the knitting direction and are worked as usual.
How do I work according to a knitting diagram?
The diagram depicts all rows/rounds, and every stitch seen from the right side. It is read from bottom to top, from right to left. 1 square = 1 stitch.
When working back and forth, every other row is worked from the right side and every other row is worked from the wrong side. When working from the wrong side, the diagram will have to be worked reversed: from left to right, knit stitches are purled, purl stitches are knit etc.
When working in the round every round is worked from the right side and the diagram are worked from right to left on all rounds.
See DROPS lesson: How to read knitting diagrams
How do I work according to a crochet diagram?
The diagram depicts all rows/rounds, and every stitch seen from the right side. It is worked from bottom to top, from right to left.
When working back and forth every other row is worked from the right side: from right to left and every other row is worked from the wrong side: from left to right.
When working in the round, every row in the diagram are worked from the right side, from right to left.
When working a circular diagram you start in the middle and work your way outwards, counter clockwise, row by row.
The rows usually start with a given number of chain stitches (equivalent to the height of the following stitch), this will either be depicted in the diagram or explained in the pattern.
See DROPS lesson: How to read crochet diagrams
How do I work several diagrams simultaneously on the same row/round?
Instructions for working several diagrams after each other on the same row/round, will often be written like so: “work A.1, A.2, A.3 a total of 0-0-2-3-4 times". This means you work A.1 once, then A.2 is worked once, and A.3 is repeated (in width) the number of times provided for your size – in this case like so: S = 0 times, M = 0 times, L=2 times, XL= 3 times and XXL = 4 times.
The diagrams are worked as usual: begin with the first row in A.1, then work the first row in A.2 etc.
See DROPS lesson: How to read knitting diagrams
See DROPS lesson: How to read crochet diagrams
Why are the sleeves shorter in larger sizes?
The total width of the garment (from wrist-to-wrist) will be larger in the larger sizes, despite the actual sleeves being shorter. The larger sizes have longer sleeve caps and wider shoulders, so there will be a good fit in all sizes.
Where on the garment is the length measured?
The measurement sketch/schematic drawing provides information regarding the full length of the garment. If it’s a jumper or a jacket the length is measured from the highest point on the shoulder closest to the neckline, and straight down to the bottom of the garment. It is NOT measured from the tip of shoulder. Similarly, the length of yoke is measured from the highest point on the shoulder and down to where yoke is split into body and sleeves.
On a jacket measures are never taken along bands, unless specifically stated. Always measure inside band stitches when measuring the length.
See DROPS lesson: How to read a schematic drawing
What is a repeat?
Diagrams are often repeated on the round or in height. 1 repeat is the diagram the way it appears in the pattern. If it says to work 5 repeats of A.1 in the round, then you work A.1 a total of 5 times after/next to each other in the round. If it says to work 2 repeats of A.1 vertically/in height you work the entire diagram once, then begin again at the start and work the entire diagram one more time.
Why does the piece start with more chain stitches than it’s worked with?
Chain stitches are slightly narrower than other stitches and to avoid working the cast-on edge too tight, we simply chain more stitches to begin with. The stitch count will be adjusted on the following row to fit the pattern and measurement sketch.
Why increase before the rib edge when the piece is worked top-down?
The rib edge is more elastic and will contract slightly compared to, for example, stocking stitch. By increasing before the rib edge, you avoid a visible difference in width between the rib edge and the rest of the body.
Why increase in the cast-off edge?
It’s very easy to cast off too tightly, and by making yarn overs while casting off (and simultaneously casting these off) you avoid a too tight cast off edge.
See DROPS video: How to bind off with yarn overs (yo)
How do I increase/decrease on every 3rd and 4th row/round alternately?
To achieve an even increase (or decrease) you can increase on, for example: every 3rd and 4th row alternately, like so: work 2 rows and increase on the 3rd row, work 3 rows and increase on the 4th. Repeat this until the increase is complete.
See DROPS lesson: Increase or decrease 1 st on every 3rd and 4th row alternately
How can I work a jacket in the round instead of back and forth?
Should you prefer to work in the round instead of back and forth, you may of course adjust the pattern. You’ll need to add steeks mid-front (usually 5 stitches), and follow the instructions. When you would normally turn and work from the wrong side, simply work across the steek and continue in the round. At the end you’ll cut the piece open, pick up stitches to work bands, and cover the cut edges.
See DROPS video: How to knit steeks and cut open
Can I work a jumper back and forth instead of in the round?
Should you prefer to work back and forth instead of in the round, you may of course adjust the pattern so you work the pieces separately and then assemble them at the end. Divide the stitches for the body in 2, add 1 edge stitch in each side (for sewing) and work the front and back pieces separately.
See DROPS lesson: Can I adapt a pattern for circular needles into straight needles?
Why is the pattern slightly different than what I see in the photo?
Pattern repeats can vary slightly in the different sizes, in order to get the correct proportions. If you’re not working the exact same size as the garment in the photo, yours might deviate slightly. This has been carefully developed and adjusted so that the complete impression of the garment is the same in all sizes.
Make sure to follow instructions and diagrams for your size!
How do I make a women’s size garment into a men’s size one?
If you have found a pattern you like which is available in women’s size it’s not very difficult to convert it to men’s size. The biggest difference will be the length of sleeves and body. Start working on the women size that you think would fit across the chest. The additional length will be worked right before you cast off for the armhole/sleeve cap. If the pattern is worked top-down you can add the length right after the armhole or before the first decrease on sleeve.
Regarding additional yarn amount, this will depend on how much length you add, but it is better with a skein too many than too few.
How do I prevent a hairy garment from shedding?
All yarns will have excess fibres (from production) that might come off as lint or shedding. Brushed yarns (ie hairier yarns) have more of these loose, excess fibres, causing more shedding.
Shedding also depends on what is worn under or over the garment, and whether this pulls at the yarn fibres. It’s therefore not possible to guarantee that there will be no shedding
Below are some tips on how to get the best result when working with hairier yarns:
1. When the garment is finished (before you wash it) shake it vigorously so the looser hairs come off. NOTE: do NOT use a lint roller, brush or any method that pulls at the yarn.
2. Place the garment in a plastic bag and put it in your freezer - the temperature will cause the fibres to become less attached to each other, and excess fibres will come off easier.
3. Leave in the freezer for a few hours before taking it out and shaking it again.
4. Wash the garment according to the instructions on the yarn label.
Why does my garment pill?
Pilling is a natural process that happens to even the most exclusive of fibers. It's a natural sign of wear and tear that is hard to avoid, and that is most visible in high friction areas of your garment like a sweater's arms and cuffs.
You can make your garment look as new by removing the pilling, using a fabric comb or a pill/lint remover.
White Willow |
|||||||||||||||||||||||||
|
|
||||||||||||||||||||||||
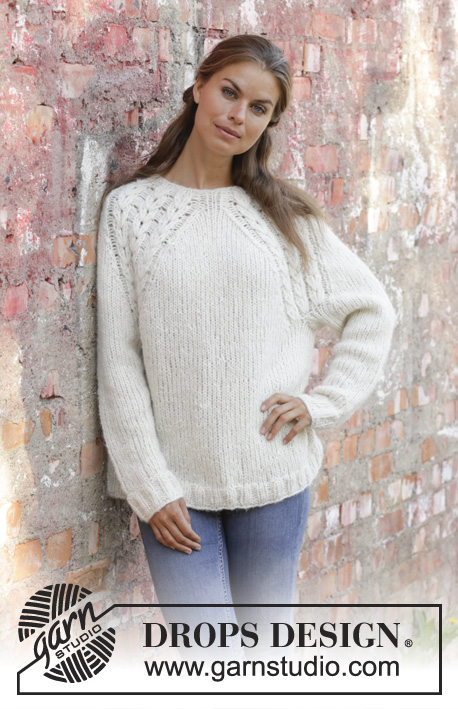
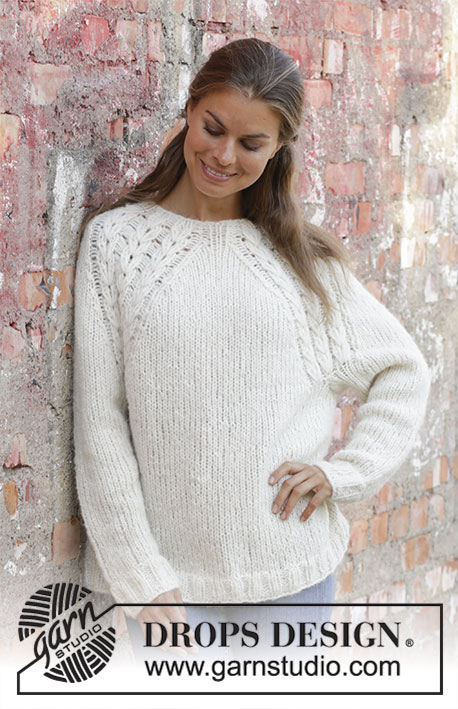
Knitted jumper with raglan in DROPS Air and DROPS Brushed Alpaca Silk. Piece is knitted with texture. Size: S - XXXL
DROPS 194-5 |
|||||||||||||||||||||||||
---------------------------------------------------------- EXPLANATION FOR THE PATTERN: ---------------------------------------------------------- PATTERN: See diagrams A.1 and A.2. DECREASE TIP-1 (evenly): To calculate how to decrease evenly, use the total number of stitches on row (e.g. 144 stitches) and divide stitches by number of decreases to be done (e.g. 28) = 5.1. In this example knit approx. every 4th and 5th stitch together. DECREASE TIP-2: Work until 3 stitches remain before marker thread, slip 1 stitch knitwise, knit 1, pass slipped stitch over stitch worked, knit 2 (marker thread is in the middle of these stitches), knit the next 2 stitches together (= 2 stitches decreased). Repeat at the other marker thread (= 4 stitches decreased). INCREASE TIP (applies to sleeves): Work until 2 stitches remain before marker thread, 1 yarn over, knit 4 (marker thread is in the middle of these stitches), 1 yarn over. On next round knit yarn over twisted to avoid holes. Then work the new stitches in stocking stitch. RAGLAN: Decrease 1 stitch on each side of every A.1 as follows: Work until 2 stitches remain before A.1 and knit 2 together, knit A.1, slip 1 stitch knitwise, knit 1, pass slipped stitch over stitch worked. Repeat at each of the remaining repetitions of A.1 (= 8 stitches decreased on round). ---------------------------------------------------------- START THE PIECE HERE: ---------------------------------------------------------- JUMPER - SHORT OVERVIEW OF THE PIECE: Work piece in the round on circular needle, bottom up. Work sleeves in the round on double pointed needles, switch to circular needle when needed. BODY: Cast on 144-152-160-176-192-212 stitches on circular needle size 7 mm with 1 strand Air + 1 strand Brushed Alpaca Silk (= 2 strands). Knit 1 round. Then work rib (= knit 2/purl 2) for 4 cm. Switch to circular needle size 8 mm, knit 1 round while decreasing 28-28-28-32-36-44 stitches evenly - read DECREASE TIP-1 = 116-124-132-144-156-168 stitches. Then work in stocking stitch in the round. REMEMBER THE KNITTING TENSION! When piece measures 10 cm, insert marker thread at beginning of round (= in the side) and a marker thread after 58-62-66-72-78-84 stitches (= in the sides). On next round decrease 1 stitch on each side of marker threads – read DECREASE TIP-2. Repeat decrease when piece measures 20 cm = 108-116-124-136-148-160 stitches. Continue to work until piece measures 26-28-26-28-26-28 cm. On next round cast off 8 stitches in each side (= 4 stitches on each side of marker threads in each side) = 46-50-54-60-66-72 stitches for front and back piece. Put piece aside and work the sleeves. SLEEVE: Cast on 32-32-36-36-36-40 stitches on double pointed needles size 7 mm with 1 strand Air + 1 strand Brushed Alpaca Silk (= 2 strands). Knit 1 round. Then work rib (= knit 2/purl 2) for 6 cm. Switch to double pointed needle size 8 mm, knit 1 round while decreasing 7-7-9-9-7-7 stitches evenly = 25-25-27-27-29-33 stitches. Insert a marker thread at beginning of round. Move the marker thread upwards when working. When piece measures 7-8-8-7-8-8 cm, increase 1 stitch on each side of marker thread - read INCREASE TIP. Increase like this every 3-2-2-2-1-2 cm 8-10-10-11-12-10 times in total = 41-45-47-49-53-53 stitches. When piece measures 29-30-26-27-23-24 cm, increase 1 stitch on each side of marker thread every other round 5 times = 51-55-57-59-63-63 stitches. On next round cast off 8 stitches mid under sleeve (i.e. 4 stitches on each side of marker thread) = 43-47-49-51-55-55 stitches. Work another sleeve the same way. YOKE: Now slip sleeves on to same circular needle as body where armholes were cast off = 178-194-206-222-242-254 stitches. Insert a marker thread mid back and begin round here. Now work pattern as follows: * Knit 18-20-22-24-27-29, work A.1 (= 10 stitches on first round) over the last 5-5-5-6-6-7 stitches on back piece/(= front piece when this sentence is repeated) and the first 5-5-5-4-4-3 stitches on sleeve, knit over the next 33-37-39-43-47-49 stitches, work A.1 over the last 5-5-5-4-4-3 stitches on sleeve and the first 5-5-5-6-6-7 stitches on front piece/(= back piece when this sentence is repeated), knit 18-20-22-24-27-29 *, work from *-* 1 more time on round. Continue pattern in the round like this. NOTE: To avoid a tight knitting tension vertically it is important that the yarn overs in diagram A.1 are not too short - yarn overs must be 4½ cm long! On 4th round in diagram begin decrease for RAGLAN - read explanation above. Decrease like this every 4th round 5-3-5-3-4-3 times and every other round 10-14-13-17-18-20 times (= 15-17-18-20-22-23 rounds in total with decrease) = 70-70-74-74-78-82 stitches (there are now 13 stitches in every A.1). When A.1 has been worked vertically, repeat the last 6 rounds in diagram vertically. When all decreases are done and last round in A.1 is finished vertically, work next round as follows: * Knit 1-1-2-2-3-4, knit 2 together (= 1 stitch decreased), work A.2 (= 13 stitches increase to 19 stitches) over A.1, slip 1 stitch knitwise, knit 2 together, pass slipped stitch over (= 2 stitches decreased), work A.2 over A.1, slip 1 stitch knitwise, knit 1, pass slipped stitch over (= 1 stitch decreased), knit 1-1-2-2-3-4 *, work from *-* 1 more time on round = 86-86-90-90-94-98 stitches (there are now 19 stitches in every A.2). Work next round in the different sizes as follows: Size S, M, L and XL: * Knit 1-1-1-1, purl 1-1-2-2, A.2, purl next stitch together with first stitch in A.2 and work the remaining stitches in A.2, purl 1-1-2-2, knit 1 *, work from *-* 1 more time on round. 1 stitch is now decreased on each shoulder (= 2 stitches decreased). Size XXL and XXXL: * Knit 1-1, purl 1-2, knit 2-2, A.2, purl next stitch together with first stitch in A.2 and work the remaining stitches in A.2, knit 2-2, purl 1-2, knit 1-1 *, work from *-* 1 more time on round. 1 stitch is now decreased on each shoulder (= 2 stitches decreased). All sizes: Work 1 more round with next round in A.2 and knit over knit and purl over purl over the remaining stitches. NECK EDGE: Switch to circular needle size 7 mm. Continue with the remaining rounds in A.2 and knit over knit and purl over purl over the remaining stitches on needle. When entire A.2 has been worked vertically, 48-48-52-52-56-60 stitches remain on round. Cast off stitches with knit over knit and purl over purl. Piece measures approx. 62-64-66-68-70-72 cm from shoulder and down. |
|||||||||||||||||||||||||
Diagram explanations |
|||||||||||||||||||||||||
|
|||||||||||||||||||||||||
Have you made this or any other of our designs? Tag your pictures in social media with #dropsdesign so we can see them! Do you need help with this pattern?You'll find tutorial videos, a Comments/Questions area and more by visiting the pattern on garnstudio.com. © 1982-2024 DROPS Design A/S. We reserve all rights. This document, including all its sub-sections, has copyrights. Read more about what you can do with our patterns at the bottom of each pattern on our site. |
With over 40 years in knitting and crochet design, DROPS Design offers one of the most extensive collections of free patterns on the internet - translated to 17 languages. As of today we count 304 catalogues and 11422 patterns - 11422 of which are translated into English (UK/cm).
We work hard to bring you the best knitting and crochet have to offer, inspiration and advice as well as great quality yarns at incredible prices! Would you like to use our patterns for other than personal use? You can read what you are allowed to do in the Copyright text at the bottom of all our patterns. Happy crafting!
Comments / Questions (28)
Marit Holtborg wrote:
Som jeg leser oppskriften, så skal A1 strikkes 1x i høyden + 6 omganger. Det gir 3 repitisjoner i høyden av "struktur"/ fletter- mønster. Med A2 blir det totalt 4 strukturer oppover. På bildet av genseren ser det ut som strukturene gjentas ca 9 ganger i høyden. Er det noe jeg har misforstått?
27.12.2022 - 18:59DROPS Design answered:
Hei Marit. Du strikker A.1 1 gang i høyden (= 2 repitisjoner i høyden av "struktur"/ fletter- mønster), så repeteres de siste 6 omgangene i diagrammet i høyden, samtidig som det felles til raglan. Det skal strikkes totalt 15-17-18-20-22-23 omganger med felling og da strikkes det også de siste 6 omgangene i diagrammet, slik at du får flere "struktur"/ fletter- mønster enn de 4 du mener. Fremdeles problemer? Send et nytt spørsmål og da med hvilken str. du strikker så kan vi si hvor mange "struktur"/ fletter- mønster du vil få. mvh DROPS Design
02.01.2023 - 14:15Siv Selbæk wrote:
Får ikke oppskriften til å stemme på bærestykket, der det står "Når A.1 er strikket ferdig i høyden repeteres de siste 6 omgangene i diagrammet i høyden. Når alle fellingene er ferdige og siste omgang i A.1 er strikket ferdig i høyden" Når jeg kommer hit har jeg ikke fått gjort alle fellingene, så: skal jeg da forsette felling over i A2, eller skal de siste 6 omgangene i A1 repeteres flere ganger (helt til alle fellingene er gjort)?
25.10.2022 - 18:42DROPS Design answered:
Hei Siv. Om du opplyser om hvilken str. du strikker, så vi får dobbeltsjekket maskeantallet på fellingene og vi kan da hjelpe deg så godt vi kan. mvh DROPS Design
31.10.2022 - 08:40Caroline wrote:
Op de foto zie ik dat het patroon 9 keer herhaald wordt, maar als ik de tekst juist lees, kom ik maar aan 6 keer herhaling. Dank voor uw antwoord
28.12.2020 - 15:33DROPS Design answered:
Dag Caroline,
A.1 wordt in totaal 4 keer gebreid op een toer; in de raglanlijnen. In de tekst staat 2 keer A.1 aangegeven, maar de zin waarin staat beschreven hoe je in patroon breit staat tussen twee sterretjes en daarna staat aangegeven dat je dit gedeelte 2 keer moet breien.
02.01.2021 - 18:58Kimberly McGhee wrote:
I am confused about the last few sentences of the YOKE instructions. It says that the pattern A.2 is increased from 13 stitches to 19, but at the end of the A.2 pattern, I have decreased back to 10 stitches. Also, what does it mean to work A.2 "over" A.1? Do I repeat all of A.1 again?
01.05.2020 - 16:03DROPS Design answered:
Dear Mrs McGhee, when you work 1st row in A.2 you will increase stitches in A.2 so that over the 13 sts previously worked in A.1 there is now 19 sts from the first row in A.2. (A.2 is lined up over A.1). Happy knitting!
04.05.2020 - 10:49Kirsten Humble wrote:
Jeg strikker Small. Jeg har nu indtaget på hver 4. Omg 5 gange og er i gang med indtagning på hver 2. Omg. A1 er nu også strikket færdig. Der er nu 148 masker tilbage. Skal jeg strikke A1 igen med indtagning på hver2. Omg?
27.02.2020 - 13:29DROPS Design answered:
Hei Kristen. Når A.1 er strikket ferdig i høyden repeteres de siste 6 omgangene i diagrammet (A.1) i høyden og du fortsetter med fellingen på hver 2. omgang (10 ganger). Når alle fellingene er ferdige og siste omgang i A.1 er strikket ferdig i høyden, strikkes A.2, les i oppskriften. God Fornøyelse!
02.03.2020 - 08:56Kirsten Humble wrote:
Jeg strikker str. S. Skal jeg tage ind på hver 4. Omg 5 gange samtidig med hver 2. Omg 10 gange? Eller skal jeg først tage ind på hver 4. Omg og dernæst hver 2. 10 gange?
25.02.2020 - 20:04DROPS Design answered:
Hej Kirsten, du tager først ind på hver 4. omgang og bagefter på hver 2.omgang. God fornøjelse!
26.02.2020 - 11:40Vilde wrote:
Heii! Det står i et avsnitt: " *1 maske rett, 1 maske vrang, A.", strikk neste maske vrang sammen med første maske i A.2(som også er vrang?) og strikk de resterende maskene i A.2, 1 maske vrang, 1 maske rett* Jeg får ikke det til å stemme med mønsteret. Da blir hele mønsteret forskjøvet. Mvh Vilde :)
03.01.2020 - 23:34DROPS Design answered:
Hei Vilde. Hvilket avsnitt har du problemer med og hvilken strørrelse strikker du? Har du sett på hjelpevideoene til denne genseren? mvh DROPS design
10.02.2020 - 08:53Alibert wrote:
Merci de votre réponse à mon commentaire Cordialement
14.08.2019 - 15:42Alibert wrote:
Empiècement :\\r\\nJe ne comprend pas combien de fois faut il faire A1 ? On diminue 5 fois tous les 4 rangs puis 15fois tous les 2 rangs mais toujours sur A1? Ce qui fait 120 diminutions il ne resterait une 58 m ! Je fais une taille S merci de votre retour
14.08.2019 - 15:37DROPS Design answered:
Bonjour Mme Alibert, on va tricoter 4 fois A.1 au total en largeur, A.1 correspond à chaque raglan et se tricote entre le dos et la manche, entre la manche et le devant, entre le devant et la 2ème manche et entre la 2ème manche et le dos. On augmente 3 m au 1er rang de chaque A.1 et on diminue 1 m de chaque côté de chaque A.1 = 8 m au total x 15 = il reste 70 m. Ensuite, on tricote A.2 en diminuant entre les diagrammes et on augmente au 1er rang de A.2 = on a 86 m. Bon tricot!
15.08.2019 - 10:46Kirsten Mortensen wrote:
Hvordan sammensætter jeg farver når jeg vil ikke vil laver en hvid "white willow" trøje men en grå og jeg skal bruge såvel drops air som drops alpaca silk mvh Kirsten Mortensen
20.06.2019 - 20:15DROPS Design answered:
Hei Kirsten. Her er det ikke noe fasitsvar. Om du vil strikke i grå kan du velge 1 gråfarge i hver kvalitet, avhengig av hvor mørk du vil ha genseren. Om du feks velger Air 04, mellomgrå og Brushed Alpaca Silk 03, grå, vil du få et mørkere resultat enn om du hadde brukt Brushed Alpaca Silk 02, lys grå. Om du vil ha Air 03, perlegrå kan du justere hvor mørk den skal være med å velge enten 02 eller 03 Brushed Alpaca Silk. Siden begge trådene er i mer eller mindre samme farge vil du ikke kunne se at det er 2 tråder når arbeidet er ferdig. God fornøyelse
21.06.2019 - 13:43