
Popular categories
Looking for a yarn?




































Comments / Questions (51)
 Suma wrote:
I am very confused between the size shown and pattern stitches. As per the measurements shown, the neck width is (size S) 17x2=34 cm. As per the gauge (2.1 stitches US 6 needles)the CO should be 31x2.1 = 71 stitches + 10 Band = 81 stitches. But the pattern says CO=120 stitches - WHY? Also, after the neck rib, the stitches are increased to 132 (142-10). WHY? Also, as per the size chart, bust is 86 cm (round) = 181 stitches -- where is this number in the pattern.
06.06.2020 - 18:37DROPS Design answered:
Dear Suma, tension is measured in stocking stitch but neck is worked in rib - rib tighten work, ie you need much more stitches with rib than with stocking stitch for same width. You then have to increase to keep correct width when starting cables. Make sure your tension is right and keep it all the way, to get the same measurements as in the measurement chart. Happy knitting!
08.06.2020 - 08:34
 Anja wrote:
Hallo Liebes Drops-Team! Rumpfteil: Mache ich grade einen Fehler? Wie komme ich von 242 M auf 218 M, wenn doch gleichzeitig zu- und abgenommen wird? Die gleichmäßig verteilten Abnahmen hab ich gemacht...dann bin ich bei 230M. Aber dann hab ich immer noch 12 M zu viel! Ich hoffe, ihr könnt mir helfen! Liebe Grüße Anja
02.12.2019 - 10:26DROPS Design answered:
Liebe Anja, haben Sie auch die Abnahmen in Zöpfen gestrickt? Wenn nicht mehr genug Maschen in A.1 vorhanden sind, um 6 Maschen zu verzopfen, diese Maschen glatt rechts stricken, GLEICHZEITIG je 3 Maschen gleichmäßig verteilt über diesen Zöpfen abnehmen, es wird nicht bei den Zöpfen aus 2 Maschen abgenommen (nicht vergessen, an der Außenseite von A.1 zuzunehmen und beidseitig jedes Markierungsfadens abzunehmen). . Viel Spaß beim stricken!
02.12.2019 - 10:50
 Ragnhildur wrote:
Góðan dag. Ég skil ekki alveg hvort kaðlarnir me 2 lykkjum eigi að halda áfram niður bolinn eða hvað?
17.08.2019 - 11:59DROPS Design answered:
Blessuð. Litlu kaðlarnir halda áfram niður bolinn. Gangi þér vel.
10.09.2019 - 23:35
 Annie JANICKI wrote:
Bonjour, pour passer de 134 m à 158 m on a "1 jeté, 1m endroit" 3 fois puis 1 m endroit donc 10 m et 9 jetés mais vous indiquez "ces 7 m sont augmentées à 13 m" et là c'est que je suis perdue!!! Merci pour votre réponse
26.05.2019 - 01:15DROPS Design answered:
Bonjour Mme Janicki, les 7 mailles (après les 15 m end) vont se tricoter ainsi: *1 jeté, 1 m end* x 3 (= on a maintenant 6 m au lieu de 3), 1 m end, *1 jeté, 1 m end* x 3 (= on a maintenant 6 m au lieu de 3), vous avez maintenant: 6 + 1 + 6 m = 13 m au-desssus des 3 + 1 + 3 m du rang précédent. Bon tricot!
27.05.2019 - 10:21
Scherrer wrote:
Je suis en train de faire ce gilet et j'ai un problème au niveau du dos et devant. Il est dit que quand il n'y a plus assez de mailles pour faire les torsades, il faut tricoter les mailles en jersey et diminuer de 3m au dessus de chaque torsade , ce qui fait donc 8x 3 diminuer par rang. Es ce exact? Merci pour votre réponse
16.03.2019 - 20:13DROPS Design answered:
Bonjour Mme Scherrer. C'est correct. Grace a cette demarche, l'ouvrage ne sera trop large au pied des torsades. Bon travail!
18.03.2019 - 08:21
 Agnes wrote:
To get to 198s on the body do you decrease all the 24 stitches on the same row
25.02.2019 - 17:59DROPS Design answered:
Dear Agnes, you will decrease 12 sts a total of 2 times, ie you will first dec 3 sts in each cable in A.1 towards mid under sleeve (when there are not enough sts to work these cables because of the decrease), then you will decrease 3 sts in the remaining cable in A.1 some rows later when there will be not enough sts to work these cables. Happy knitting!
26.02.2019 - 10:26
Flo wrote:
Hi I am confused about the decrease on the six stitch cable. Will it be a decrease of 24 stitches altogether on one row? Or 12?
12.01.2019 - 16:21DROPS Design answered:
Dear Flo, you will decrease alltogether 24 sts on row - remember to continue dec/inc as before - but since cables are tighten work, you need to dec to keep correct width. Happy knitting!
14.01.2019 - 10:15
 Kim wrote:
Teil 2: Das würde auch heissen, dass ich in eben diesem Umgang den allerletzten 6er Zopf mache, da dann nach weiteren 3x Abnehmen vor dem Markierungsfaden auch für den ersten 6er Zopf in A1 nicht mehr genügend Maschen vorhanden wären. Das heisst ich hätte dann nur 9 mal die 6er Zöpfe gestrickt (Grösse M, stricke eher fest, Maschenanzahl stimmt 222), doch auf dem Foto, welches S oder M sein soll, sieht es eher nach mind. 12 6er Zöpfen aus. Stimmt ewas nicht? Bin froh um jeden Tipp. Danke!
07.10.2018 - 10:31DROPS Design answered:
Liebe Kim, wieviele A.1 in der Höhe stricken werden hängt auch von Ihrer Maschenprobe in der Höhe. Die Hauptsache ist, daß beide A.1 unter jedem Ärmel wie eine 3-Eck endet (= mit Zu- und Abnahmen). Viel Spaß beim stricken!
08.10.2018 - 08:56
Kim wrote:
Teil 1: Guten Tag. Komme ich zu dem Umgang in welchem für den zweiten 6er Zopf in A1 zu wenige Maschen vorhanden sind, so sieht das Muster wie folgt aus: 1 re, 2li, 2re, 2li, 6er Zopf, 1li (Mittelmasche), 6 re, Marierungsfaden. Nun soll ich also in diesem Umgang aus diesen 6 M vor der Markierung sowohl die zwei letzten Maschen vor dem Markierungsfaden zusammenstricken und zusätzlich 3 Maschen abnhemen. Das heisst im müsste aus den 6re Maschen vor der Markierung 2 machen?
07.10.2018 - 10:20DROPS Design answered:
Liebe Kim, die Abnahmen entstehen in den 6er Zopf, die Sie nicht mehr als Zopf stricken können (so wird dieses Teil nicht breiter sein) - auf beiden Seiten wiederholen. Die anderen Maschen wie zuvor stricken. Sie werden dann bei dieser Reihe Maschen abnehmen, dann wie zuvor weiter stricken (mit Zu- und Abnahme bis keine Maschen in A.1 gestrickt werden). Viel Spaß beim stricken!
08.10.2018 - 08:53
Diane wrote:
How do I print the photo of pattern pu-019?
04.07.2018 - 06:30DROPS Design answered:
Dear Diane, click on "Picture" between "Print pattern" and "Add to favorites", just above where you can read "Pattern instructions". Happy knitting!
04.07.2018 - 07:20
|
|||||||||||||||||||
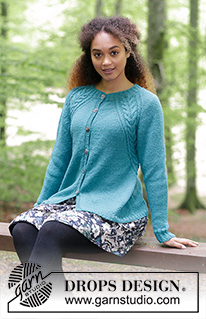
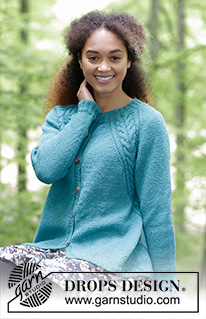
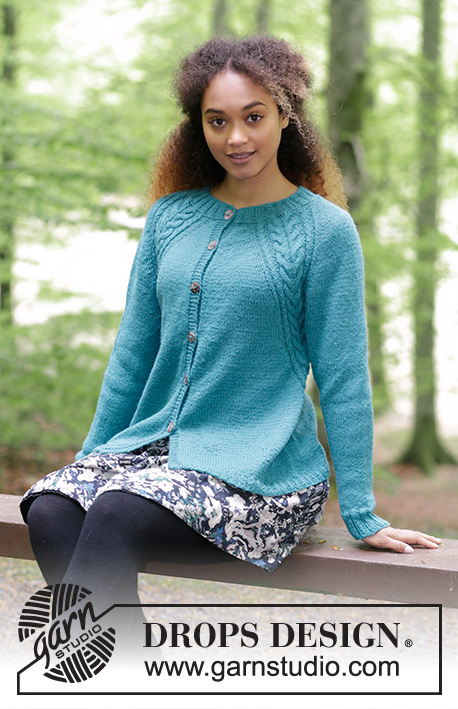
Arendal Cardigan#arendalcardigan |
|||||||||||||||||||
 |
 |
||||||||||||||||||
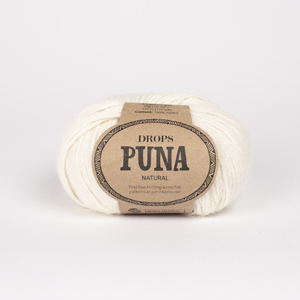
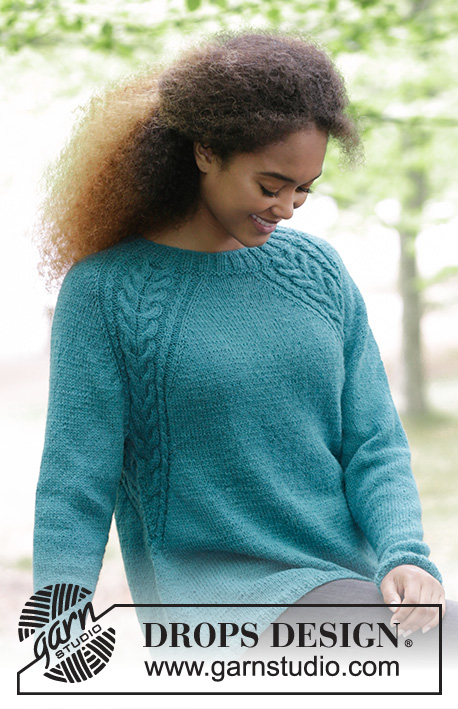
Knitted jacket with cables and raglan, worked top down. Sizes S - XXXL. The piece is worked in DROPS Puna.
DROPS 181-25 |
|||||||||||||||||||
|
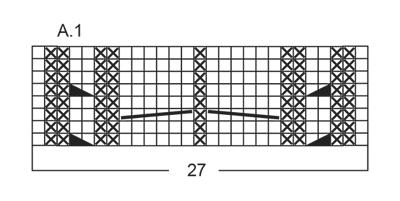
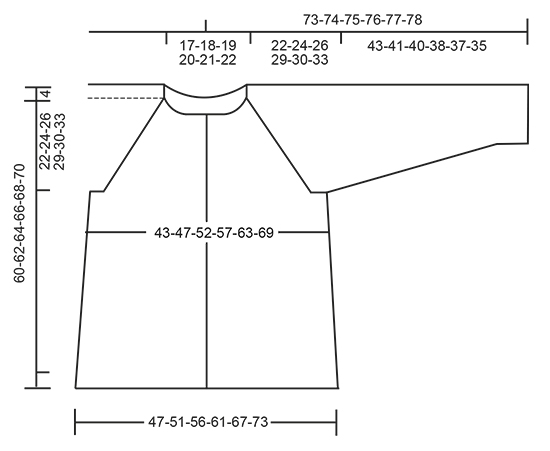
INFORMATION FOR THE PATTERN: RIDGE/GARTER STITCH (worked back and forth): 1 ridge = Knit 2 rows. PATTERN: See diagram A.1. The diagram shows all the rows in the pattern seen from the right side. RAGLAN: Increase to raglan on each side of A.1. Increase 1 stitch on each side of A.1 as follows (= 8 new stitches each time you increase). Work to A.1, 1 yarn over, work A.1, 1 yarn over. On the next round, purl the yarn overs twisted to prevent holes. INCREASE TIP (for the sides): Work until there are 2 stitches left before the marker thread in the side. Make 1 yarn over, knit 2 stitches (the marker thread sits between these) and make 1 yarn over. On the next round, purl the yarn overs twisted to prevent holes. DECREASE TIP (for sleeves): Decrease 1 stitch on each side of the marker thread as follows: Work until there are 3 stitches left before the marker thread, slip 1 stitch as if to knit, knit 1, pass the slipped stitch over, knit 2 stitches (the marker thread sits between these stitches), knit the next 2 stitches together. BUTTONHOLE: The first buttonhole is worked when the rib in the neck measures 3 cm, then work the 5-5-5-6-6-6 next buttonholes with approx. 8 cm between them. Decrease for buttonhole on the right band as follows: Work until there are 3 stitches left on the needle (seen from the right side), make 1 yarn over, knit 2 together and knit 1. On the next row, knit the yarn over, so that there is a hole. ---------------------------------------------------------- The jacket is worked back and forth with circular needle, from mid front and top down. JACKET: Cast on 120-128-132-136-144-144 stitches (including 5 band stitches in each side towards mid front) with circular needle size 4 mm and Puna. Purl 1 row from the wrong side, then work as follows – from the right side: 5 stitches garter stitch, * knit 2/ purl 2 *, repeat from *-* until there are 7 stitches left, knit 2 stitches and 5 stitches garter stitch. REMEMBER BUTTONHOLE! Continue with rib in this way for 4 cm. The last row is from the wrong side. Change to circular needle size 4.5 mm. Work 1 RIDGE – see description above, on the first row, decrease 2 stitches evenly on row = 118-126-130-134-142-142 stitches. Continue as follows – from the right side: Work 5 stitches garter stitch, knit 11-12-13-15-16-18, *1 yarn over, knit 1 *, repeat from *-* a total of 3 times, knit 1, * 1 yarn over, knit 1 *, repeat from *-* a total of 3 times (= these 7 stitches become 13 stitches), knit 18-20-20-18-20-16, *1 yarn over, knit 1 *, repeat from *-* a total of 3 times, knit 1, * 1 yarn over, knit 1 *, repeat from *-* a total of 3 times, knit 22-24-26-30-32-36, * 1 yarn over, knit 1 *, repeat from *-* a total of 3 times, knit 1, * 1 yarn over, knit 1 *, repeat from *-* a total of 3 times, knit 18-20-20-18-20-16, *1 yarn over, knit 1 *, repeat from *-* a total of 3 times, knit 1, * 1 yarn over, knit 1 *, repeat from *-* a total of 3 times, knit 11-12-13-15-16-18 and 5 stitches garter stitch = 142-150-154-158-166-166 stitches. Purl 1 row from the wrong side; the yarn overs are purled twisted to prevent holes and the bands are knitted. Continue as follows from the right side: Work 5 stitches garter stitch (= band stitches), 4-5-6-8-9-11 stitches stocking stitch (= left front piece), A.1 (= 27 stitches), 4-6-6-4-6-2 stitches stocking stitch (= sleeve), A.1, 8-10-12-16-18-22 stitches stocking stitch (= back piece), A1, 4-6-6-4-6-2 stitches stocking stitch (= sleeve), A.1, 4-5-6-8-9-11 stitches stocking stitch (= right front piece and finish with 5 stitches garter stitch (= band stitches). READ THE WHOLE OF THE NEXT SECTION BEFORE CONTINUING! Continue this pattern, at the same time increase on each side of A.1 to RAGLAN – see description above. Increase every 2nd row (= each row from the right side) 21-24-27-30-32-35 times. REMEMBER THE KNITTING TENSION! After all the increases, there are 310-342-370-398-422-446 stitches on the needle. Continue the pattern as before (without increases) until the piece measures 22-24-26-29-30-33 cm from the cast-on edge mid front. The next row is worked as follows from the wrong side: Work 50-54-58-63-68-73 stitches (= right front piece), place the next 60-68-74-78-80-82 stitches on 1 thread (= sleeve), cast on 8-8-10-10-12-14 new stitches on the needle (= under the sleeve), work 90-98-106-116-126-136 stitches (= back piece), place the next 60-68-74-78-80-82 stitches on 1 thread (= sleeve), cast on 8-8-10-10-12-14 new stitches on the needle (= under the sleeve) and work the remaining 50-54-58-63-68-73 stitches (= left front piece). BODY: = 206-222-242-262-286-310 stitches. THE PIECE IS NOW MEASURED FROM HERE! Insert a marker thread in each side, in the middle of the new stitches cast on. Continue back and forth with stocking stitch and 5 stitches garter stitch in each side of the piece. REMEMBER BUTTONHOLE. Continue A.1 over the 20-20-20-20-22-22 stitches in the pattern which remain on the front and back pieces, but on every 2nd row (= each row from the right side) make 1 yarn over on the outside of each A.1 (= towards mid front and mid back) and knit 2 stitches together on each side of the marker thread in the sides. The yarn overs are purled twisted on the next row to prevent holes. The number of stitches remains the same, but the stitches in A.1 will gradually decrease towards the sides of the jacket and there will be more and more stitches in stocking stitch. When there are not enough stitches in A.1 to work 6-stitch cable, work these stitches in stocking stitch, AT THE SAME TIME as you decrease 3 stitches evenly over the cable, do not decrease over the cable with 2 stitches (remember to make the increase on the outside of A.1 and decrease on each side of the marker threads). When all of A.1 has been decreased there are 182-198-218-238-262-286 stitches on the row. Continue with stocking stitch and garter stitch over the band stitches. There is 48-52-57-62-68-74 stitches on each front piece and 86-94-104-114-126-138 stitches on back piece. When the piece measures 15-15-15-15-15-15 cm increase 1 stitch on each side of the marker threads (= 4 stitches increased) – READ INCREASE TIP! Increase every 5 cm a total of 4 times = 198-214-234-254-278-302 stitches. When the piece measures 32-32-32-31-32-31 cm, purl 1 row from the wrong side where you increase 42-46-50-54-58-62 stitches evenly on row (the bands are continued in garter stitch, do not increase over these stitches) = 240-260-284-308-336-364 stitches. Change to circular needle size 4 mm. On the next row from the right side, work as follows: 5 stitches garter stitch, * knit 2, purl 2 *, repeat from *-* until there are 7 stitches left, knit 2 stitches and 5 stitches garter stitch. Work rib for 2 cm, cast off loosely, with knit over knit and purl over purl. The jacket measures approx. 60-62-64-66-68-70 cm from the shoulder. SLEEVE: The piece is worked in the round with circular needle/double pointed needles. Place the 60-68-74-78-80-82 stitches from the thread in the one side of the piece on a short circular needle size 4.5 mm. In addition, cast on 8-8-10-10-12-14 new stitches mid under the sleeve = 68-76-84-88-92-96 stitches on the needle. Insert a marker thread in the middle of these new stitches – The piece is now measured from here! Work stocking stitch in the round. When the piece measures 2-2-2-2-2-4 cm decrease 2 stitches mid under the sleeve – READ DECREASE TIP. Decrease every 3-2-1½-1½-1½-1 cm a total of 12-15-18-19-20-21 times = 44-46-48-50-52-54 stitches. When the sleeve measures 38-36-35-33-32-30 cm increase 4-6-8-6-8-10 stitches evenly on round = 48-52-56-56-60-64 stitches. Change to double pointed needles size 4 mm and work rib, knit 2/ purl 2 over all stitches. Cast off with knit over knit and purl over purl when the sleeve measures 43-41-40-38-37-35 cm. Work the other sleeve in the same way. ASSEMBLY: Sew the openings under the sleeves. Sew the buttons onto the left band. |
|||||||||||||||||||
Diagram explanations |
|||||||||||||||||||
|
|||||||||||||||||||
 |
|||||||||||||||||||
 |
|||||||||||||||||||
Have you finished this pattern?Tag your pictures with #dropspattern #arendalcardigan or submit them to the #dropsfan gallery. Do you need help with this pattern?You'll find 18 tutorial videos, a Comments/Questions area and more by visiting the pattern on garnstudio.com. © 1982-2026 DROPS Design A/S. We reserve all rights. This document, including all its sub-sections, has copyrights. Read more about what you can do with our patterns at the bottom of each pattern on our site. |
|||||||||||||||||||






With over 40 years in knitting and crochet design, DROPS Design offers one of the most extensive collections of free patterns on the internet - translated to 17 languages. As of today we count 333 catalogues and 12532 patterns translated into English (UK/cm). 12532
We work hard to bring you the best knitting and crochet have to offer, inspiration and advice as well as great quality yarns at incredible prices! Would you like to use our patterns for other than personal use? You can read what you are allowed to do in the Copyright text at the bottom of all our patterns. Happy crafting!
Post a comment to pattern DROPS 181-25
We would love to hear what you have to say about this pattern!
If you want to leave a question, please make sure you select the correct category in the form below, to speed up the answering process. Required fields are marked *.