
Popular categories
Looking for a yarn?


Comments / Questions (102)
![]() Stephanie Menetrey wrote:
Stephanie Menetrey wrote:
Bonjour, ce modèle peut être tricoté sur des aiguilles droites ?
14.12.2020 - 13:49DROPS Design answered:
Bonjour Mme Menetrey, tout à fait, on utilise ici une aiguille circulaire pour avoir suffisamment de place pour y loger toutes les mailles - retrouvez ici d'autres infos sur les aiguilles circulaires. Bon tricot!
14.12.2020 - 15:56
![]() Nickan wrote:
Nickan wrote:
Det måste vara felräkning? Strl L—211 m. 30 m var sida =framkant. 211-60=151m. Rep mönster över 6+4m =10 m 12 ggr=120m 120+60=180m. Det fattas 31 m i beskrivningen.
25.04.2020 - 10:01DROPS Design answered:
Hej Du stickar så här i strl L: 30 m + 4 m (A.1A) + 144 m ( A.1B x 6) + 3 m (A.1C) + 30 m = 211 m. Lycka till!
27.04.2020 - 09:50
![]() Maria Edgren wrote:
Maria Edgren wrote:
Hej! Hur ska jag få ihop 2 m slätst, 1 am, och slätst över de nästa 26-28-27-27-26-24 m (= framkant), sticka A.1A (= 4 m), A.1B (= 6 m) totalt 20-22-24-28-31-34 ggr, A.1C (= 3 m), sticka slätst över de nästa 26-28-27-27-26-24 m, 1 am och 2 m slätst (= framkant) 28 upprepningar på varvet med tot 236 m i XL? Fattar inte. A1a+ A1b är 10 m ihop....
01.03.2020 - 17:00
![]() Isabelle wrote:
Isabelle wrote:
Bonjour, J'aimerais savoir la dimension du devant. Dans le diagramme du modèle on voit seulement la largeur du dos et non ce chaque devant. Merci
02.09.2019 - 18:45DROPS Design answered:
Bonjour Isabelle, nous n'avons que les mesures finales de la veste, toutefois, si votre échantillon est juste, vous aurez le même rendu que sur la photo. Bon tricot!
03.09.2019 - 08:47
![]() Francien wrote:
Francien wrote:
Klopt het dat het patroon van beneden naar boven wordt gebreid? Ik wil deze graag wat korter maken, dus dan moet ik van tevoren bedenken hoeveel korter denk ik? Aangezien ik het dan nog niet kan passen voor de goede lengte. Alvast bedankt.
31.08.2019 - 13:01DROPS Design answered:
Dag Francien,
Dit vest wordt inderdaad van onder naar boven gebreid. Je zou het lijf korter kunnen maken door eerder af te kanten voor de armsgaten aan beide zijkanten.
01.09.2019 - 13:22
![]() Marie Gustafsson wrote:
Marie Gustafsson wrote:
Hej! Jag är precis där som jag ska sätta två markörer och maska av 4 m på varje sida=8 m och det jag undrar är om jag gör minskningen på räta varvet eller avigvarvet? Hur blir det då med mönstret? / Marie
27.07.2019 - 11:25DROPS Design answered:
Hej Marie, det bestämmer du själv, men se till att du fortsätter på det varv i diagrammet när du fortsätter med bakstycket. Lycka till :)
01.08.2019 - 15:33
![]() Christelle wrote:
Christelle wrote:
Bonsoir j adore ce modele j ai un soucis au rang 7 du diagramme pouvez vous m expliquer la separation avec a1a,a1b,a1c Merci d avance
23.03.2019 - 19:46DROPS Design answered:
Bonjour Christelle, cette vidéo montre comment tricoter les diagrammes (pour un autre modèle, mais la technique est la même): au 7ème rang, tricotez les 2 dernières mailles de A.1A(A.1B) avec la première maille de A.1B(A.1C). Bon tricot!
25.03.2019 - 10:46
![]() Megan wrote:
Megan wrote:
Hello love this pattern. Although I am new to diagram knitting. In the body section I’m guessing you follow the whole diagram until the body piece measures out to the length you want? And when it says to slip st as if I, k2 tog psso? You do both right?
25.08.2018 - 16:55
![]() Mariangeles wrote:
Mariangeles wrote:
Muchas gracias por la aclaración, he entendido lo de las filas acortadas. Me gusta mucho este patrón, yo soy más de crochet xq el punto normalmente me aburre pero reconozco que hacer punto con calados me encanta.
01.07.2018 - 13:30
![]() LEBIGOT wrote:
LEBIGOT wrote:
Bonjour, Je suis dans la partie dos/devant et je suis arrivée à mettre les marqueurs à 46 cm de haut. Il faut rabattre 3 mailles pour les emmanchure de chaque coté des marqueurs, mais de quel coté, dans la partie dos ou dans les parties extérieures? Une autre question pour la suite: comment continuer en point fantaisie sachant qu'en séparant les parties les mailles seront décalées? Merci
07.11.2017 - 00:46DROPS Design answered:
Bonjour Mme Lebigot, à 46 cm vous rabattez (sur l'endroit) 3 m de chaque côté des marqueurs soit 6 m pour chaque emmanchure: 51 m pour le devant droit, rabattez 6 m, tricotez 71 pour le dos, rabattez 6 m, tricotez les 51 dernières m du devant gauche. Continuez ensuite en allers et retours en commençant sur l'envers et continuez le point fantaisie comme avant, avec pour le dos, 1 m lis au point mousse de chaque côté. Quand vous reprendrez les devants, reprenez sur l'envers et continuez le point fantaisie comme pour le dos (notez le dernier rang tricoté pour que le motif se suive bien comme avant). Bon tricot!
07.11.2017 - 09:12
|
||||||||||||||||
Lace Affair#laceaffairjacket |
||||||||||||||||
 |
 |
|||||||||||||||
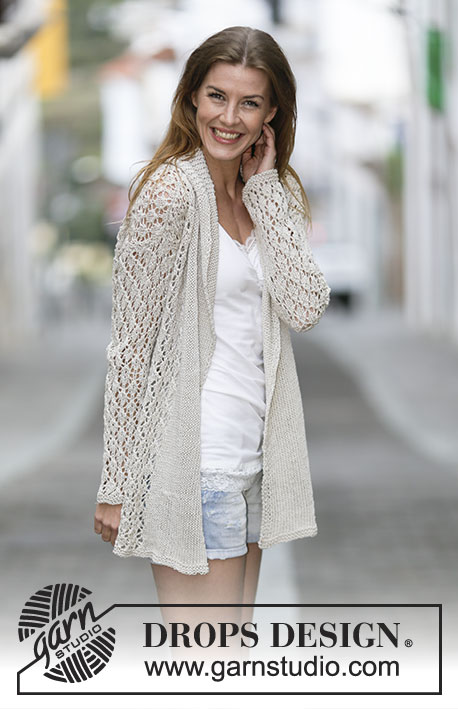
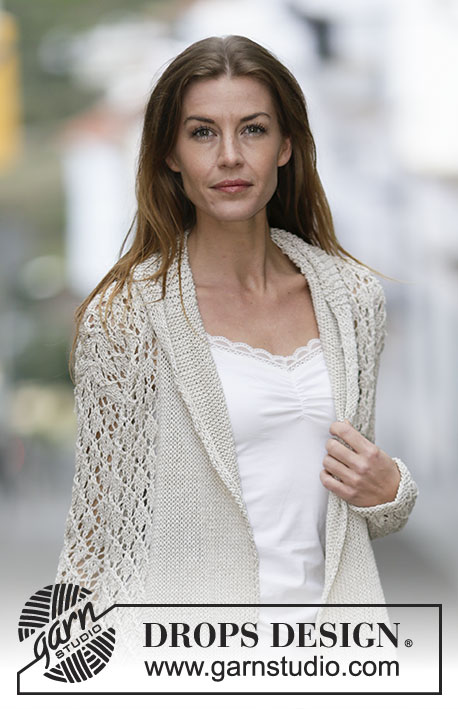
Knitted DROPS jacket with lace pattern and shawl collar in "Bomull-Lin" or "Paris". Size: S - XXXL.
DROPS 159-2 |
||||||||||||||||
|
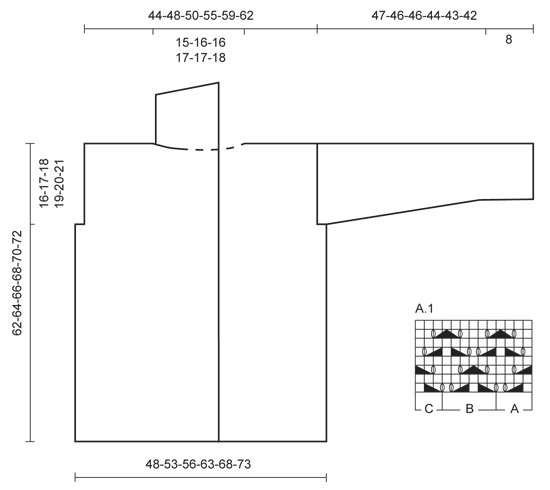
GARTER ST (back and forth): K all rows. 1 ridge = 2 rows K. PATTERN: See diagram A.1. The diagram show all rows in pattern seen from RS. KNITTING TIP: Band sts will wrinkle inwards when working but lay flat after assembly. INCREASE TIP: Inc 1 st by making 1 YO, on next row work YO twisted (i.e. work in the back loop of st instead front) to avoid holes. ---------------------------------------------------------- BODY: Worked back and forth on circular needle from mid front. Loosely cast on 185-201-211-235-251-265 sts on circular needle size 4.5 mm with Bomull-Lin or Paris. Work 2 ridges in GARTER ST - see explanation above. Switch to circular needle size 5.5 mm, work next row (= RS) as follows: 2 sts in stocking st, P 1, and stocking st over the next 26-28-27-27-26-24 sts (= band), work A.1A (= 4 sts), A.1B (= 6 sts) 20-22-24-28-31-34 times in total, A.1C (= 3 sts), work in stocking st over the next 26-28-27-27-26-24 sts, P 1 and 2 sts in stocking st (= band). Continue like this - READ KNITTING TIP AND REMEMBER THE KNITTING TENSION. When piece measures approx. 46-47-48-49-50-51 cm, insert 2 markers; 54-58-60-67-71-75 sts in from each side (= 77-85-91-101-109-115 sts between markers on back piece). On next row cast off 3-4-5-6-7-8 sts for armholes on each side of both markers (= 6-8-10-12-14-16 cast off sts in each side). Now divide the piece and finish each part separately. BACK PIECE: = 71-77-81-89-95-99 sts. Continue pattern as before with 1 edge st in garter st in each side until piece measures 60-62-64-66-68-70 cm. Then cast off the middle 21-23-23-25-25-27 sts for neck and finish each shoulder separately. Continue to dec 1 st on next row from neck = 24-26-28-31-34-35 sts remain on the shoulder. Cast off when piece measures 62-64-66-68-70-72 cm. LEFT FRONT PIECE: = 51-54-55-61-64-67 sts. Work 1 edge st in garter st towards the armhole and continue with pattern as before, and finish with 26-27-27-27-27-24 sts in stocking st, P 1 and 2 sts in stocking st (= band sts) towards mid front until piece measures 62-64-66-68-70-72 cm. At beg of next row from RS cast off the first 24-26-28-31-34-36 sts for shoulder = 27-28-27-30-30-31 sts remain for collar. Work in garter st over these sts - AT THE SAME TIME work short rows, beg from WS as follows: * Work 1 ridge over all sts. On next row from WS K 21-22-21-24-24-25, turn and K back *, repeat from *-* until piece measures approx. 9-10-10-10½-10½-11 cm from cast off for shoulder (short side). Loosely cast off all sts. RIGHT FRONT PIECE: Work as left front piece but reversed. Beg short rows on collar from RS. SLEEVE: Worked back and forth on needle. Loosely cast on 35-37-39-39-41-43 sts (incl 1 edge st each side) on circular needle size 4.5 mm with Bomull-Lin or Paris. Work 2 ridges. Switch to circular needle size 5.5 mm, work next row (= RS) as follows: 1 edge st in garter st, 1-2-0-0-1-2 sts in stocking st, work A.1A (= 4 sts), A.1B over the next 24-24-30-30-30-30 sts (= 4-4-5-5-5-5 times), A.1C (= 3 sts), 1-2-0-0-1-2 sts in stocking st, finish with 1 edge st in garter st. When piece measures 8 cm, inc 1 st inside 1 edge st in each side - READ INCREASE TIP above, work the inc sts in pattern. Repeat inc every 4½-4-3½-3-2½-2½ cm 8-9-10-11-12-13 more times = 53-57-61-63-67-71 sts. When piece measures 45-44-43-40-39-37 cm, insert 1 marker in each side of sleeve (for assembly). When piece measures 47-46-46-44-43-42 cm (shorter measurements in the larger sizes because of wider shoulders), cast off all sts. ASSEMBLY: Sew shoulder seams and sew in sleeves in outer loops of edge sts. Sew the sleeve seams in one inside 1 edge st - NOTE: Section worked after marker at the top of sleeve should fit the cast off for armhole. Sew band tog mid back and sew band to the neck egde - NOTE! Seam should be at the back so that is is not visible when collar is folded down. Lightly steam the band with iron, it will then be flat. |
||||||||||||||||
Diagram explanations |
||||||||||||||||
|
||||||||||||||||
 |
||||||||||||||||
Have you finished this pattern?Tag your pictures with #dropspattern #laceaffairjacket or submit them to the #dropsfan gallery. Do you need help with this pattern?You'll find 21 tutorial videos, a Comments/Questions area and more by visiting the pattern on garnstudio.com. © 1982-2026 DROPS Design A/S. We reserve all rights. This document, including all its sub-sections, has copyrights. Read more about what you can do with our patterns at the bottom of each pattern on our site. |
||||||||||||||||


With over 40 years in knitting and crochet design, DROPS Design offers one of the most extensive collections of free patterns on the internet - translated to 17 languages. As of today we count 324 catalogues and 12290 patterns translated into English (UK/cm). 12290
We work hard to bring you the best knitting and crochet have to offer, inspiration and advice as well as great quality yarns at incredible prices! Would you like to use our patterns for other than personal use? You can read what you are allowed to do in the Copyright text at the bottom of all our patterns. Happy crafting!
Post a comment to pattern DROPS 159-2
We would love to hear what you have to say about this pattern!
If you want to leave a question, please make sure you select the correct category in the form below, to speed up the answering process. Required fields are marked *.