
Popular categories
Looking for a yarn?


Comments / Questions (91)
Katherine wrote:
Hello. I have just knit the 3cm rib for the collar and then the instructions say to start A1. However, i looked at the photograph of the finished garment and it has a round of A4 before the A1 design with the stag. Please advise, i am not sure how to knit the A.4 pattern whilst increasing and i do not think it fits in with the amount of stitches (96) as it is not divisible by 5. Thank you so much, Katherine
16.06.2017 - 22:35DROPS Design answered:
Dear Katherine, the pattern you knit after the ribbing is indeed the A.1. If you look closely, you can see it starts with the little crosses, then continues with the wavy pattern, which also can be seen on the neck of the sweater. Since it starts out as an stitch repeat, it should fit the 96 stitch perfectly. I hope this helps. Happy Knitting!
18.06.2017 - 18:29
![]() Bianka wrote:
Bianka wrote:
Hallo liebes Team, Bei den Ärmeln steht bei der Stillegung dass man 10M aufnehmen muss und wenn man die Ärmel wieder aufnimmt muss man auch 10M aufnehmen. Es sollen dann 74 auf der Nadel sein, aber Muster A2 ist teilbar durch 12. Muss ich dann jetzt 84 M auf dem Nadelspiel haben oder 72M? Vielen Dank!
24.04.2017 - 16:58DROPS Design answered:
Liebe Bianka, wenn Sie A.2 stricken, sollen Sie das Muster so abzählen, dass die 2 mittleren M im Diagramm (siehe Pfeil) die beiden mittleren M oben auf dem Ärmel sind. Hier lesen Sie mehr. Viel Spaß beim stricken!
25.04.2017 - 07:14
![]() FOULOGNE ISABELLE wrote:
FOULOGNE ISABELLE wrote:
Ce serait génial que vous mettiez au niveau des commentaires une traduction possible car il est toujours sympa et instructif d'avoir les commentaires d'autres personnes meme et surtout étrangères mais ne changez rien sur vos modèles ils sont vraiment très tres jolis Isabelle
05.03.2017 - 13:00Manon wrote:
Ik heb een vraagje betreffend de maten. mijn maten van het lijf komt uit op XL (alleen wat te lang maar dat kan ik makkelijk aanpassen) maar de bovenkant snap ik niet helemaal. heb het idee dat ik daar namelijk op s of kleiner uit kom, ik heb gemeten met een trui en ik kom uit op lengte van mouwnaad tot boord als 23 cm (hoewel bij mijn trui de mouwnaad nogal laag zit) en de hoogte van de mouw is 21 cm. kan ik dit makkelijk aanpassen? of meet ik het verkeerd?
05.01.2017 - 13:21DROPS Design answered:
Hoi Manon. Het is goed mogelijk dat je afmetingen anders uitvalt dan de afmetingen op de tekening. Zoals in de hoogte denk ik dat het geen probleem zal zijn om de mouwlengte ook ietsjes aan te passen. Je kan ook altijd even meten op je arm tijdens het breien of het past bij 21 cm of je toch een paar cm bij wilt breien. Succes.
10.01.2017 - 14:00
![]() Britta Osbahr wrote:
Britta Osbahr wrote:
Ist es wirklich richtig, vor Beginn des Bündchens so viele Maschen zuzunehmen? Normalerweise kenne ich es eher so, dass das Bündchen weniger Maschen oder gleich viele hat wie der Körper. Herzliche Grüße und vielen Dank!
18.01.2016 - 11:41DROPS Design answered:
Ein Rippenmuster benötigt immer mehr Maschen als glatt rechts, da es sich ja stark zusammenzieht. Es ist richtig, dass Sie hier für das Rippenmuster diese Anzahl an Maschen zunehmen. Weniger Maschen würde ein sehr enges Bündchen bedeuten und der Pullover würde nach unten hin deshalb anders fallen.
23.01.2016 - 17:49
![]() Jaione wrote:
Jaione wrote:
Hola, buenos días. Me gustaría que me ayudarais con una cuestión. Al hacer el diagrama A1, las figuras me quedan como abultadas. Quiero saber cómo hay que hacerlo para que la prenda no quede con relieves. Creo que no cometo ningún fallo, he seguido las indicaciones de vuestro tutorial de jacquard. Gracias por vuestra atención.
07.01.2016 - 12:57DROPS Design answered:
Hola Jaione. Como podrás entender es bastante difícil solucionar esa duda sin ver la labor. Es muy probable que el hilo en la parte de revés de la labor quede muy tenso y en este caso el dibujo por el lado derecho saldrá más abultado. Si tienes cerca una tienda Drops te recomiendo acercarte para que te ayuden a encontrar una solución.
08.01.2016 - 10:48
![]() Berit wrote:
Berit wrote:
Det viktiga är att mönstret är snyggt på yttersidan av ärmen. På innersidan minskar man ju, så där kan det inte stämma hela tiden!
01.09.2015 - 15:30
![]() Dorthe Gaardboe wrote:
Dorthe Gaardboe wrote:
I september 2014 er der et spørgsmål om maskeantallet i ærmerne, hvor mønsterets 12 masker ikke går op i ærmets 74 (str m) masker. I skriver, I vil rette det. I dag den 31/8 er fejlen der stadig, så vidt jeg kan se?
30.08.2015 - 14:10DROPS Design answered:
Hej Dorthe, mønsteret skal ikke gå op under ærmet. God fornøjelse!
06.10.2015 - 15:26
![]() Aleksandra wrote:
Aleksandra wrote:
Witam, przerobiłam tył i przód (rozmiar M) i właśnie biorę się za rękaw, ale nie wiem jak przerobić schemat A2? Schemat ma 12 oczek, a rękaw ma mieć 74 oczka ? czy pod pachą mają zostać 2 oczka przerwy pomiędzy powtórzeniami schamatu? Proszę o radę :)
01.02.2015 - 18:53DROPS Design answered:
Gdy przerabiamy A.2 na rękawie, 2 o. na środku schematu (tam gdzie jest strzałka) powinny znajdować się na środku na wierzchu /na górze rękawa (poprawię we wzorze bo jest błąd). 2 o. pod rękawem są przerabiane w kolorze tła. Tak więc w rozmiarze M będą 2 o. pod spodem rękawa tzn. będzie jedna przerwa między motywami. Pozdrawiam i powodzenia!
03.02.2015 - 11:56Oceane wrote:
Bonjour, Je souhaiterai savoir où commencer après le col le motif A1. Merci
24.12.2014 - 13:18DROPS Design answered:
Bonjour Océane, vous commencez par 3 cm de côtes 2/2 puis 1 tour jersey en répartissant des augmentations puis au tour suivant, vous commencez A1. Bon tricot!
30.12.2014 - 12:51
|
||||||||||
Silver Stag#silverstagsweater |
||||||||||
 |
 |
|||||||||
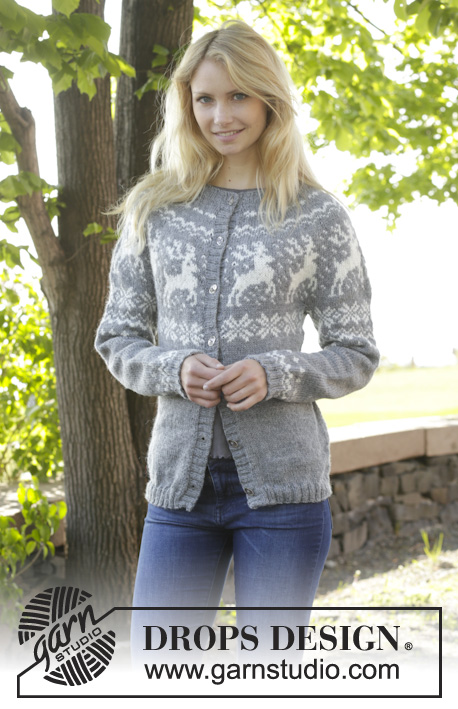
Knitted DROPS Christmas jumper with round yoke, reindeer pattern, worked top down in ”Karisma”. Size: S - XXXL.
DROPS 157-23 |
||||||||||
|
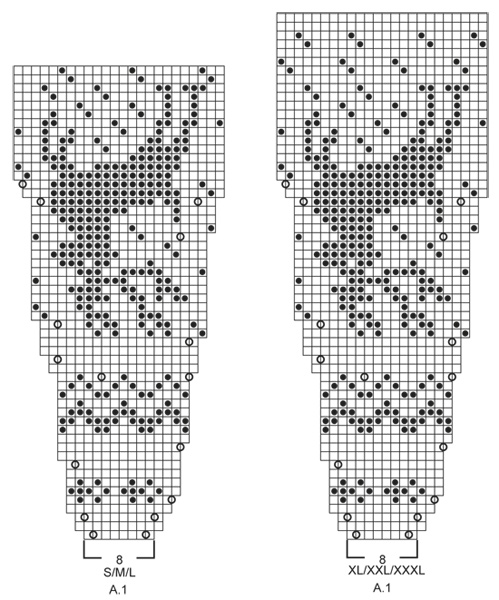
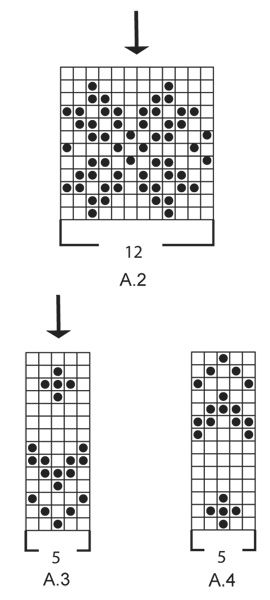
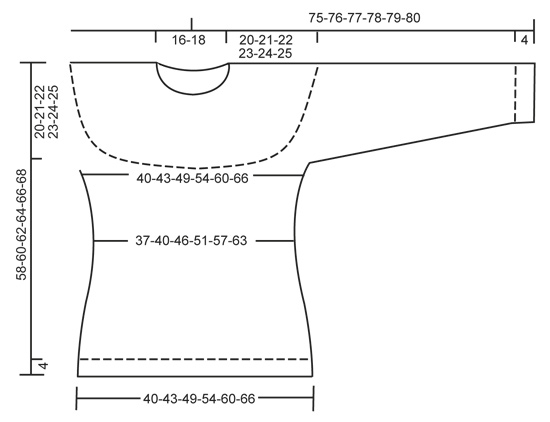
PATTERN: See diagrams A.1 to A.4. The diagrams show all rows in pattern seen from RS. Work entire pattern in stocking st. DECREASE TIP (applies to sides and sleeves): Dec before marker and 1 st K as follows: K 2 tog. Dec after marker and 1 st K as follows: Slip 1 st as if to K, K 1, psso. INCREASE TIP (applies to sides): Inc 4 sts in total on row. Work until 1 st remains before marker, 1 YO, 2 sts in stocking st, 1 YO = 2 sts inc. On next round K YO twisted (i.e. work in back loop of st instead of front) to avoid holes. ---------------------------------------------------------- JUMPER: Worked in the round on circular needle, top down. Work sleeves in the round on double pointed needles. YOKE: Cast on 88-92-96-100-104-108 sts on circular needle size 3 mm with medium grey. Work rib P 2/K 2 until piece measures 3 cm. Now switch to circular needle size 4 mm and work 1 round in stocking st, AT THE SAME TIME inc 0-4-8-20-24-28 sts evenly = 88-96-104-120-128-136 sts. Now work as follows: A.1 (= 8 sts) 11-12-13-15-16-17 times in width. REMEMBER THE KNITTING TENSION! When A.1 has been worked 1 time vertically, there are 264-288-312-360-384-408 sts on round. Continue with 3-5-9-5-7-11 rounds with medium grey. NOTE: In size S, L, XL, XXXL stop 24 sts (= 1 repetition) before last round is worked. This is now beg of the next rounds. Pattern is now correctly placed after sts are divided for sleeves and body. Work next round as follows: Work the first 37-40-46-52-58-64 sts (= half back piece), slip the next 58-64-64-76-76-76 sts on a stitch holder (= sleeve), cast on 10 new sts under sleeve, insert a marker in the middle of these 10 sts, work the next 74-80-92-104-116-128 sts (= front piece), slip the next 58-64-64-76-76-76 sts on a stitch holder (= sleeve), cast on 10 new sts under sleeve, insert a marker in the middle of these 10 sts, work the remaining 37-40-46-52-58-64 sts (= half back piece). BODY: There are now 168-180-204-228-252-276 sts for body. Now work A.2 (= 12 sts) over all sts on round. Continue like this until A.2 has been worked 1 time vertically. Now work piece in stocking st with medium grey. On next round dec 1 st on each side of each marker in the sides - SEE DECREASE TIP. Repeat dec every 2 cm 2 more times = 156-168-192-216-240-264 sts. When piece measures 12-13-14-15-16-17 cm from marker under sleeves, inc 1 st on each side of marker in each side of piece – see INCREASE TIP. Repeat inc every 2 cm 2 more times = 168-180-204-228-252-276 sts. When piece measures 56-58-60-62-64-66 cm, switch to circular needle size 3 mm and inc 20-24-24-28-28-32 sts evenly = 188-204-228-256-280-308 sts. Continue to work rib as follows: * K 2, P 2 *, repeat from *-*. When rib has been worked for 4 cm, cast off with K over K and P over P. SLEEVES: First work pattern, then continue sleeve in medium grey. Slip sts from stitch holder back on double pointed needles size 4 mm. There are now 58-64-64-76-76-76 sts for sleeve. Work 1 row in stocking st. Then cast on 10 sts under sleeve = 68-74-74-86-86-86 sts. Insert a marker in the middle of these new sts. Then work the sleeve in the round. Now work A.2. NOTE: Adjust so that the 2 middle sts in diagram (see arrow) are the 2 middle sts on sleeve. When A.2 has been worked, continue with A.3. NOTE: Adjust pattern so that the middle st in diagram (see arrow) is one of the 2 middle sts on sleeve, AT THE SAME TIME beg dec under sleeve - remember DECREASE TIP. Repeat dec every 3-2½-2½-2½-2½-2½ cm 9-12-12-12-12-12 more times = 48-48-48-60-60-60 sts. When sleeve measures 38 cm, work A.4. NOTE: Adjust so that the middle st in diagram (see arrow) is one of the 2 middle sts on sleeve. When A.4 has been worked vertically, switch to double pointed needles size 3 mm and inc 4-8-8-0-4-4 sts evenly = 52-56-56-60-64-64 sts. Then work rib (= K 2/P 2) for 3 cm. Cast off with K over K and P over P. |
||||||||||
Diagram explanations |
||||||||||
|
||||||||||
 |
||||||||||
 |
||||||||||
 |
||||||||||
Have you finished this pattern?Tag your pictures with #dropspattern #silverstagsweater or submit them to the #dropsfan gallery. Do you need help with this pattern?You'll find 25 tutorial videos, a Comments/Questions area and more by visiting the pattern on garnstudio.com. © 1982-2026 DROPS Design A/S. We reserve all rights. This document, including all its sub-sections, has copyrights. Read more about what you can do with our patterns at the bottom of each pattern on our site. |
||||||||||


With over 40 years in knitting and crochet design, DROPS Design offers one of the most extensive collections of free patterns on the internet - translated to 17 languages. As of today we count 324 catalogues and 12291 patterns translated into English (UK/cm). 12291
We work hard to bring you the best knitting and crochet have to offer, inspiration and advice as well as great quality yarns at incredible prices! Would you like to use our patterns for other than personal use? You can read what you are allowed to do in the Copyright text at the bottom of all our patterns. Happy crafting!
Post a comment to pattern DROPS 157-23
We would love to hear what you have to say about this pattern!
If you want to leave a question, please make sure you select the correct category in the form below, to speed up the answering process. Required fields are marked *.