
Popular categories
Looking for a yarn?


Comments / Questions (38)
![]() Céline wrote:
Céline wrote:
Bonjour. Merci de votre réponse, mais je ne vois vraiment pas comment on peut faire un lien pour un bonnet de 20 cm de large avec des fils plus de dix fois plus grands. Je n'arrive pas du tout à faire la cordelette, même en regardant la vidéo...
20.03.2015 - 12:02DROPS Design answered:
Bonjour Céline, une autre façon de faire consiste à plier les 4 fils en double et nouer les extrémités ensemble. Accrochez ensuite le côté noué à un point fixe et glissez une aiguille/un crochet dans la boucle, tournez l'aiguille jusqu'à ce que le cordon soit très serré. Pliez en double (en tendant si nécessaire) et laissez s'enrouler. Le cordon fait le tour du bonnet et doit être suffisamment long pour faire une boucle. N'hésitez pas à réaliser un autre type de cordon si vous préférez (une chaînette de la longueur souhaitée + 1 rang de mc par ex).
20.03.2015 - 13:46
![]() Céline wrote:
Céline wrote:
Pour faire le lien, vous dites de couper 4 fils de 2,5 mètres chacun. N'y-a-t-il pas une erreur ? J'ai essayé avec des fils de 25 cm, mais c'est trop court.
18.03.2015 - 22:47DROPS Design answered:
Bonjour Céline, il faut couper des liens de 2,50 m (= 250 cm) pour le lien. Vous pouvez ajuster si nécessaire pour un lien plus long. Bon crochet!
19.03.2015 - 11:01
![]() Paulina Membrila wrote:
Paulina Membrila wrote:
Sigo las instrucciones y a partir de la vuelta 9 es mi duda, trato de hacer una boina talla 3 meses... Mi duda es simple cuantos puntos tengo que aumentar en cada vuelta a partir de la 9? Segun yo, 26 en cada 'fila con relieve' pero se empieza a hacer muy olanuda. Gracias
30.01.2015 - 00:57DROPS Design answered:
Hola Paulina, los aumentos estarían bien. Si lo que te sucede es que se ondula puede ser debido a una incorrecta tensión del tejido. Comprueba que no estés trabajando con una tensión irregular.
04.02.2015 - 20:19GINETTE ROY MARTIN wrote:
J`ADORE TOUT CE QUE VOUS NOUS PRÉSENTÉS...CONTINUEZ DE NOUS GARDER DE SI BEAUX MODÈLES ,SI INTÉRESSANTS...MERCI BEAUCOUP
28.08.2014 - 01:20
![]() Anne wrote:
Anne wrote:
Hallo. Ich häkle für meine Tochter im Moment das Taufkleid "Beth" und möchte noch die dazu passende Mütze machen. Leider verstehe ich nicht, wie es nach den runden weiterfgeht. Zum einen heißt es, in einer Rückreihe soll man Stäbchen häkeln (Rückreihen sind doch aber eigentlich feste Maschen?) und was passiert dann mit den sechs Stäbchen, die nicht behäkelt werden? Bleibt die Mütze dann hinten offen? Ich hoffe, Sie können mir helfen. Herzliche Grüße
11.07.2014 - 17:08DROPS Design answered:
Liebe Anne, ja, die sechs Stäbchen werden zunächst nicht behäkelt, mit denen geht es dann wie unter "Lochkante für das Bindeband" beschrieben weiter - Sie fassen dann aus den Rändern der R, die Sie gehäkelt haben, M auf und häkeln außerdem über die 6 Stb. Und Sie beginnen tatsächlich mit einer Stb-Rück-R.
14.07.2014 - 21:00
![]() Erik wrote:
Erik wrote:
Det betyder 5 olika storlekar.
08.06.2014 - 19:19
![]() Hilde Eiesland wrote:
Hilde Eiesland wrote:
Hei. Jeg forstår ikke hva jeg skal gjøre videre i oppskriften. Jege er nå kommet til. Sett 1 merke på omg beg og 1 merke etter 6-6-6(8-8) m (sett fra retten) hva betyr 6-6-6(8-8)?
08.06.2014 - 14:02DROPS Design answered:
Hej Hilde. Du saetter 1 merke etter 6-6-6 (8-8) masker afhaengigt af hvilken str du vil lave. F.eks. str 0/1 saetter du etter 6 masker.
10.06.2014 - 16:20
![]() Tanja wrote:
Tanja wrote:
Was für eine schöne Mütze! Und endlich ein Modell dieser Art, dass man häkeln kann und nicht stricken "muss". So lange hab ich nach so einem Babymützchen gesucht und nun ist bei euch eines aufgetaucht, ich freu mich!!! Außerdem ist es herrlich einfach zu häkeln. Dankeschön!!!
11.05.2014 - 20:03
|
||||||||||
Camille#camillebonnet |
||||||||||
|
|
||||||||||
Crochet baby bonnet with fan pattern in DROPS BabyAlpaca Silk. Size 0 - 4 years.
DROPS Baby 25-14 |
||||||||||
|
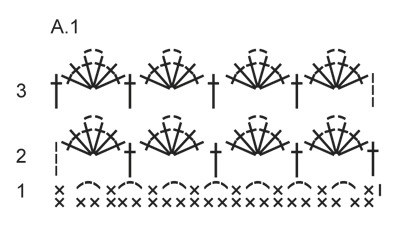
CROCHET INFO: Replace first dc at beg of every dc round/row with 1 ch. Finish round with 1 sl st in ch from beg of round. Finish row with 1 dc in 3rd ch from beg of previous row. Replace first tr at beg of every tr round/row with 3 ch. Finish round with 1 sl st in 3rd ch from beg of round. Finish row with 1 tr in ch from beg of previous row. TEXTURE ROWS: * 1 row dc from WS, 1 row tr from RS *, repeat from *-* (1 row dc + 1 row tr = 1 texture row). INCREASE TIP: Inc 1 dc/tr by working 2 dc/tr in same st. PATTERN: See diagram A.1. ---------------------------------------------------------- BONNET: Piece is first worked in the round, from mid back, then work back and forth over head. Work 4 ch on hook size 3.5 mm with powder and form a ring with 1 sl st in first ch. ROUND 1: LES HEKLEINFO! Work 12 tr in ch-ring. ROUND 2: Work 1 dc in every tr = 12 dc. ROUND 3: Work 2 tr in every dc = 24 tr. ROUND 4: Work 1 dc in every tr = 24 dc. ROUND 5: * Work 1 tr in first dc, 2 tr in next dc *, repeat from *-* the entire round = 36 tr. ROUND 6: Work 1 dc in every tr = 36 dc. ROUND 7: * Work 1 tr in each of the first 2 dc, 2 tr in next dc *, repeat from *-* the entire round = 48 tr. ROUND 8: Work 1 dc in every tr = 48 dc. Stop here in size 0/1 + 1/3 months. ROUND 9: * Work 1 tr in each of the first 3 dc, 2 tr in next dc *, repeat from *-* the entire round = 60 tr. ROUND 10: Work 1 dc in every tr = 60 dc. Stop here in size 6/9 + 12/18 months. ROUND 11: * Work 1 tr in each of the first 4 dc, 2 tr in next dc *, repeat from *-* the entire round = 72 tr. ROUND 12: Work 1 dc in every tr = 72 dc. Stop here in size 2 + 3/4 years. ALL SIZES: Insert 1 marker at beg of round and 1 marker after 6-6-6-8 (8-8) sts (seen from RS). Beg from RS at marker at beg of round and work 1 tr in every dc until second marker AT THE SAME TIME inc 20-26-20-28 (20-22) tr evenly over these sts – READ INCREASE TIP = 62-68-74-80 (84-86) tr on row (do not work over the 6-6-6-8 (8-8) dc between the 2 markers). Then work TEXTURE ROWS back and forth – see explanation above, until piece measures approx. 8-9-10-11 (12-13) cm from markers – finish after 1 row with dc from WS. Fasten off. EYELET HOLES FOR TIES: Work an edge at the bottom of hat with powder as follows: Beg from RS and work dc along one short side at the bottom of bonnet (work 1 dc in every dc-row and 2-3 dc in every tr-row), work 1 dc in each of the 6-6-6-8 (8-8) dc between the 2 markers on circle and work dc along the other short side (1 dc in every dc-row and 2-3 dc in every tr-row). Turn piece and work 1 row more with dc AT THE SAME TIME adjust dc-no so that it is divisible by 5 + 1. Work next row as follows: 1 ch, 1 dc in each of the first 2 dc, * skip 2 dc, 2 ch, 1 dc in each of the next 3 dc *, repeat from *-* until 4 sts remain, skip 2 dc, work 2 ch and 1 dc in each of the last 2 dc. Work 2 rows back and forth with dc (1 dc in every dc and 2 dc in every ch-space). Fasten off. TIES: Cut 4 lengths off white yarn of 2.5 metres each. Twine the strands tog until they resist, fold the string double so that it twines again. Make a knot at each end. Thread tie up and down through the eyelet holes on hat. FAN EDGE: Switch to off white and work 1 row dc from WS at the front of hat AT THE SAME TIME inc evenly to 64-70-76-82 (88-94) dc – READ INCREASE TIP. Then work FAN PATTERN according to diagram A.1, i.e. work as follows: ROW 1 (= RS): 1 ch, 1 dc in first dc, * 3 ch, skip 2 sts, 1 dc in next st *, repeat from *-* the entire row = 21-23-25-27 (29-31) ch-spaces, turn. ROW 2 (= WS): 3 ch (= 1 tr), 3 tr + 2 ch + 3 tr in first ch-space, * 1 tr in next ch-space, 3 tr + 2 ch + 3 tr in next ch-space *, repeat from *-* the entire row and finish with 1 tr in first dc from beg of previous row = 11-12-13-14 (15-16) tr-groups with 1 tr between every tr-group, turn piece. ROW 3 (= RS): 3 ch (= 1 tr), 3 tr + 2 ch + 3 tr in ch-space in first tr-group, * 1 tr in next tr, 3 tr + 2 ch + 3 tr in ch-space in the mid of next tr-group *, repeat from *-* the entire row and finish with 1 tr in 3rd ch from beg of previous row, fasten off. |
||||||||||
Diagram explanations |
||||||||||
|
||||||||||
 |
||||||||||
Have you finished this pattern?Tag your pictures with #dropspattern #camillebonnet or submit them to the #dropsfan gallery. Do you need help with this pattern?You'll find 11 tutorial videos, a Comments/Questions area and more by visiting the pattern on garnstudio.com. © 1982-2026 DROPS Design A/S. We reserve all rights. This document, including all its sub-sections, has copyrights. Read more about what you can do with our patterns at the bottom of each pattern on our site. |
||||||||||


With over 40 years in knitting and crochet design, DROPS Design offers one of the most extensive collections of free patterns on the internet - translated to 17 languages. As of today we count 324 catalogues and 12290 patterns translated into English (UK/cm). 12290
We work hard to bring you the best knitting and crochet have to offer, inspiration and advice as well as great quality yarns at incredible prices! Would you like to use our patterns for other than personal use? You can read what you are allowed to do in the Copyright text at the bottom of all our patterns. Happy crafting!
Post a comment to pattern DROPS Baby 25-14
We would love to hear what you have to say about this pattern!
If you want to leave a question, please make sure you select the correct category in the form below, to speed up the answering process. Required fields are marked *.