
Popular categories
Looking for a yarn?


Comments / Questions (14)
![]() Anja Anschau wrote:
Anja Anschau wrote:
Die erste Raute passt. Dann nicht mehr.Muss man die Anleitung M1 auch wiederholen oder ,M2 immer wieder von vorne stricken. Brauche Hilfe, Dank.
23.05.2025 - 21:29DROPS Design answered:
Liebe Frau Anschau, stimmt so, nach dem Lochmuster A.1 stricken Sie 3 Reihen Glattrechts dans A.2; A.2 folgt A.1 nicht gerade aber wird trotzdem über A.1 passen, so daß (am Anfang der Reihe) die 4. Masche A.1 (der mittlere Umschlag) jetzt bei A.2 die 9. Masche vom Diagram = die 4. M.2B (dann die 12. Masche M.2B usw) ist. Viel Spaß beim Stricken!
26.05.2025 - 08:43
![]() Evelyne Alanio wrote:
Evelyne Alanio wrote:
Bonjour. Ma fille aimerait ce pull en fiesta. Est-ce faisable ? Peut-on le tricoter en circulaires ? Merci
22.10.2024 - 18:17DROPS Design answered:
Bonjour Mme Alanio, Fiesta et Muskat sont du même groupe (B), vous pouvez donc tricoter Fiesta, utilisez le convertisseur pour calculer la nouvelle quantité; vous pouvez tricoter le dos et le devant en rond jusqu'aux emmanchures, pensez à bien adapter votre nombre de mailles et le motif à tricoter. Bon tricot!
23.10.2024 - 08:03
![]() Barbro Johansson wrote:
Barbro Johansson wrote:
Stickar storlek s 450g garnet räckte inte fattas 20gram tråkigt
03.07.2022 - 16:52
![]() Carla wrote:
Carla wrote:
Tips minderen (voor het afkanten voor de hals): De minderingen komen steeds op de goede kant van het werk. Vlak naast de 2 kantst minderen. Deze 2 st worden als volgt gebreid: 1 ribbelst en 1 tricotst. Na de 2 kantst minderen als volgt: haal 1 st r af, 1 r, haal de afgeh st daarover. Voor de 2 kantst minderen als volgt: 2 st r samen. Dit gedeelte begrijp ik niet. Kan dat misschien stap voor stap heel duidelijk uitgelegd worden? Ik kan nu niet verder
15.05.2020 - 19:14DROPS Design answered:
Dag Carla,
Als je mindert voor de halslijn doe je dit steeds als je aan de goede kant breit. Het komt er dan op neer dat je bij de rechter hals eerst de 2 kantsteken breit (omdat de naald dan begint aan de kant van de hals) en minder je door 1 steek af te halen, 1 steek te breien en de afgehaalde steek over te halen. Bij de rechter schouder begin je aan de schouderzijde als je op een naald aan de goede kant bent en brei je tot 4 steken voor het einde. Dan minder je door 2 steken samen te breien en tot slot brei je de 2 kantsteken.
19.05.2020 - 13:48
![]() Carla wrote:
Carla wrote:
Ik heb een vraag over het telpatroon. De eerste rij blokjes is dat alleen de heengaande naald of de heen en teruggaande naald samen. Of wel moet ik de eerste regel / rij als heengaande naald breien en dan de tweede regel/rij als teruggaande naald? Ik kom er niet goed uit.
02.05.2020 - 20:02DROPS Design answered:
Dag Carla,
De eerste (en alle andere oneven rijen) is altijd de heengaande naald, op de goede kant. De tweede (en alle andere even rijen) is de teruggaande naald, aan de verkeerde kant.
05.05.2020 - 12:05
![]() Ines wrote:
Ines wrote:
Sorry, meine Frage hat sich von alleine beantwortet. Es werden 3 M re zusammengestrickt. Wer richtig lesen kann, ist klar im Vorteil 🤣
22.08.2018 - 09:38
![]() Ines wrote:
Ines wrote:
Bei mir geht das Muster M1 am Vorderteil nicht auf. In der 3. Reihe verschiebt es sich jeweils um eine Masche. Könnte da ein Fehler drin versteckt sein? Mfg
21.08.2018 - 20:24DROPS Design answered:
Liebe Ines, das Muster sieht nicht falsch aus. Das Muster geht über 8 M und die Maschenzahlen für das Vorderteil sind alle durch 8 teilbar. Es sollte also passen. Vielleicht markieren Sie sich jeden Mustersatz mit Markierungsfäden, damit Sie erkennen, wo jeder Mustersatz beginnt und endet. Beachten Sie, dass Sie am Anfang vor dem Mustersatz M.1 6 Maschen stricken und am Ende nach allen Mustersätzen 5 Maschen. Gutes Gelingen weiterhin!
27.08.2018 - 10:38Tineke wrote:
Nee, de rechterschouderkant. Aan de gk, vanaf de V-hals, naar links breien. Halverwege nld 11, moet je 1 steek afkanten voor de V-hals. Hierdoor wordt het M2B motief van 64 st. onderbroken. Moet ik nu, na de te breien kantsteek voor de rechterhelft, verder in M2B (=7 st.) vervolgens een, volledige, M2B, Dan M2C en M2A of een aantal tricotsteken dan M2B, M2C en M2A of beginnen met M2A. Of eerst een aantal tricotsteken en dan M2A.... Ik heb al van alles geprobeerd. maar kom niet goed uit.
25.07.2016 - 21:55DROPS Design answered:
Hoi Tineke. Ja, het patroon wordt onderbroken. Maar je kant af, de eerste st van de nld is dan de nieuwe kantsteken en vervolgens brei je door volgens het patroon zoals eerder, je begint dan later in het patroon, maar je moet het patroon niet verschuiven - je breit door zodat de st in hetpatroon netjes boven elkaar komen.
26.07.2016 - 16:03Tineke wrote:
Hallo, ben ik nog een keer. Willen jullie alsjeblieft antwoorden. Ik kan niet verder omdat ik niet weet of ik eerst een paar tricotsteken moet breien, omdat nld. 11 onderbroken is door de afgekante steek voor de V-hals of dat ik na de kantsteek, aan halszijde, gelijk moet beginnen met M2A, M2B of M2C. Ik brei de Small versie. Heeelp! Bedankt! Tineke
25.07.2016 - 09:50DROPS Design answered:
Hoi Tineke. Ik zie dat je vraag is op zaterdag gesteld, en ik werk niet in het weekend. Ik zal in de loop van de komende dagen ernaar kijken.
25.07.2016 - 10:06Tineke wrote:
Hallo, Ik hoop dat jullie me kunnen helpen. Ik ben bezig met de 2e helft van het voorpand. Ik kom er niet uit omdat ik niet weet hoe het "in spiegelbeeld" breien moet. Met welke steken moet ik dan beginnen? De splitsing was bij mij in naald 11 van het M2 motief. Ik moet nu vanuit het midden, aan de goede kant, de linkerkant op, dus als het ware naar het einde van de naald. Alvast hartelijk dank! Tineke
23.07.2016 - 13:12DROPS Design answered:
Hoi Tineke. Ik kan het moeilijk precies uitleggen zonder jouw werk te zien, maar het is vrij simpel. Je minderde in de eerst helft (= rechterschouder??) aan het begin van de nld (aan de halszijde / goede kant) en vervolgens heb je doorgebreid volgens het patroon over de overige st. Als je nu de linkerchouder breit, moet je dus minderen aan het begin van de nld aan de halszijde / verkeerde kant. Je breit nog steeds door volgens het patroon zoals de st zich voordoen.
25.07.2016 - 16:11
|
|||||||||||||
DROPS 90-17 |
|||||||||||||
|
|
|||||||||||||
DROPS knitted jumper with lace pattern in "Muskat"
DROPS 90-17 |
|||||||||||||
|
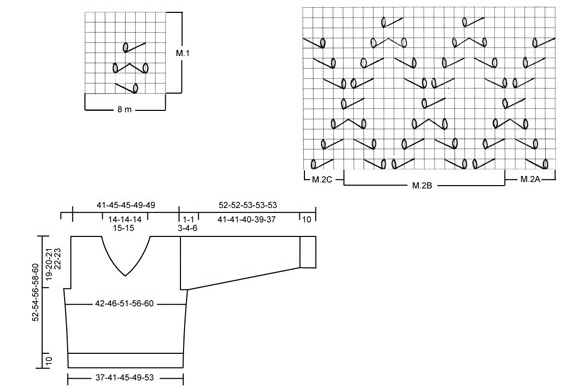
Knitting tension: Remember needle size is only a guide. 20 stitches x 26 rows with needle size 4.5 mm and stocking stitch = 10 x 10 cm. Pattern: 3 repeats in width of M.2B and 2 repeats in height = approx. 13 x 11 cm. Ridge/garter stitch (back and forth on needle): 1 ridge = Knit 2 rows. Pattern: See diagrams M.1 and M.2. The diagrams show the pattern seen from the right side. Decrease tip (for neck): Decrease on inside of 2 edge stitches, which are worked as follows from the edge: 1 stitch garter stitch and 1 stitch stocking stitch. All decreases are worked from the right side. Decrease as follows after the 2 edge stitches: Slip 1 stitch as if to knit, K1, pass slipped stitch over. Decrease as follows before the 2 edge stitches: K2 together. ------------------------------------------------------- Front piece: Cast on 75-83-91-99-107 stitches (incl. 1 edge stitch in each side) with needle size 3.5 mm and Muskat. Work 2 ridges, Change to needle size 4.5 mm and continue with stocking stitch. Remember the knitting tension. When piece measures 10 cm, work the next row as follows from the right side: 1 edge stitch, 5 stitches stocking stitch, M.1 over the next 64-72-80-88-96 stitches, 4 stitches stocking stitch and 1 edge stitch. When M.1 has been worked 1 time in height, continue with M.2 as follows (from the right side): 1 edge stitch, M.2A (= 5 stitches), M.2B over the next 64-72-80-88-96 stitches, M.2C (= 4 stitches) and 1 edge stitch. At the same time, when piece measures 12 cm increase 1 stitch in each side every 12-12-12-8-8 cm a total of 2-2-2-3-3 times = 79-87-95-105-113 stitches - the increased stitches are worked in stocking stitch. When piece measures 33-34-35-36-37 cm, decrease 2-2-6-7-11 stitches in each side for armholes = 75-83-83-91-91 stitches, continue the pattern with 1 edge stitch in each side - NOTE: Make sure the number of stitches stays the same, i.e. the number of stitches knitted together must equal the number of yarn overs made, the stitches which do not fit into a repeat of the pattern are worked in stocking stitch. When piece measures approx. 38-40-42-44-46 cm, cast off the middle stitch for neck and each part is finished separately. Place half the stitches on 1 thread. Side 1: = 37-41-41-45-45 stitches. Continue to decrease to neck every 2nd row - see Decrease tip: 1 stitch 12-12-12-13-13 times = 25-29-29-32-32 stitches left on shoulder. Continue the pattern with 1 edge stitch in the side - NOTE: Make sure the number of stitches stays the same as described earlier and the stitches which do not fit into a repeat of the pattern are worked in stocking stitch. When piece measures 52-54-56-58-60 cm cast off. Side 2: Work as for side 1, but reversed - NOTE: Row 1 is worked from mid front - start by picking up 1 stitch in the cast-off stitch and work this together with the first stitch on needle. This is done to avoid a "jump" at the bottom of the neck. Back piece: Cast on and work as for front piece. Decrease for armholes as for front piece and continue working until piece measures 50-52-54-56-58 cm. Now cast off the middle 23-23-23-25-25 stitches for neck. Then decrease 1 stitch on next row towards neck - see Decrease tip = 25-29-29-32-32 stitches left on each shoulder. Continue the pattern with 1 edge stitch in the side until piece measures the same as the front piece, cast off. Sleeve: Cast on 50-50-50-58-58 stitches (incl. 1 edge stitch in each side) with needle size 3.5 mm and Muskat. Work 2 ridges, change to needle size 4.5 mm and continue with stocking stitch. When piece measures 10 cm, work M.1 with 1 edge stitch in each side to finished length. At the same time, when piece measures 10-11-12-10-10 cm, increase 1 stitch in each side every 3-2.5-2-2.5-2 cm a total of 14-16-18-16-18 times = 78-82-86-90-94 stitches - the increased stitches are worked in stocking stitch until they fit into a repeat of the pattern. When sleeve measures 51-51-50-49-47 cm insert 1 marker thread in each side. When piece measures 52-52-53-53-53 cm cast off all stitches. Assembly: Sew shoulder seams. Neck: Crochet 1 round of chain-spaces around the whole neck with hook size 4 mm and 1 strand Muskat + 2 strands Glitter as follows: 1 double crochet in first stitch, * 9 chain stitches, skip 2 stitches/rows, 1 double crochet in next stitch/row *, repeat from *-* and finish with 9 chain stitches and 1 slip stitch in first double crochet at beginning of round. Sew side seams inside the 1 edge stitch. Sew the sleeves together as far as the marker thread inside the 1 edge stitch. Sew in sleeves - marker thread on sleeve should meet the side seam on the body. |
|||||||||||||
Diagram explanations |
|||||||||||||
|
|||||||||||||
 |
|||||||||||||
Have you finished this pattern?Tag your pictures with #dropspattern or submit them to the #dropsfan gallery. Do you need help with this pattern?You'll find 22 tutorial videos, a Comments/Questions area and more by visiting the pattern on garnstudio.com. © 1982-2026 DROPS Design A/S. We reserve all rights. This document, including all its sub-sections, has copyrights. Read more about what you can do with our patterns at the bottom of each pattern on our site. |
|||||||||||||


With over 40 years in knitting and crochet design, DROPS Design offers one of the most extensive collections of free patterns on the internet - translated to 17 languages. As of today we count 325 catalogues and 12298 patterns translated into English (UK/cm). 12298
We work hard to bring you the best knitting and crochet have to offer, inspiration and advice as well as great quality yarns at incredible prices! Would you like to use our patterns for other than personal use? You can read what you are allowed to do in the Copyright text at the bottom of all our patterns. Happy crafting!
Post a comment to pattern DROPS 90-17
We would love to hear what you have to say about this pattern!
If you want to leave a question, please make sure you select the correct category in the form below, to speed up the answering process. Required fields are marked *.