
Popular categories
Looking for a yarn?


Comments / Questions (29)
![]() Antoinette wrote:
Antoinette wrote:
Kunt u mij vertellen waar de tel tekeningen van het patroon Little Josefine by DROPS Design staan?
21.11.2015 - 14:47DROPS Design answered:
Hoi Antoinette. Het telpatroon is nu toegevoegd.
23.11.2015 - 10:08Val Bayer wrote:
I finished the jacket and the bonnet, but I have a problem with the socks. I am ok up to the point where I knit 1.5 cm of garter sts over all the stitches (constituting the sides of the bootie), then the decreases begin and I cannot visualize how the bottom of the bootie goes. Do the next 1.5 cm constitute the sole (that would be rather shallow) - or what does "until finished" mean? How many times to knit 2 tog on each side of the 2 centre stitches? Every row or every other row? Thanks.
01.07.2015 - 23:55DROPS Design answered:
Dear Mrs Bayer, the sole is worked with the 3 cm garter st (1st size) on all sts, but when you have worked 1,5 cm in garter st, start to dec 4 sts every other row until piece measures 3 cm (from where sts were picked up): ie you work 1,5 cm in garter st without dec then 1,5 cm in garter st with dec every other row. Happy knitting!
02.07.2015 - 10:06
![]() Eva Hallberg wrote:
Eva Hallberg wrote:
Hej Har begyndt på M2 på bærestykket. Har nu 164 masker og skal tage ind 11 masker på hvert 4 pind. Hvordan får jeg maskerne jævnt fordelt, så at indtagningerne efterlader lige mange masker (hvor der ikke tages ind) frem til de to forkanter (midten) af forstykket hvor knapperne skal sidde?
12.06.2015 - 09:15DROPS Design answered:
Hej eva, hvis du deler 164 med 11 så får du 14,9 - hvis du på første omg strikker hver 13 og 14 m sammen og så næste gang her 12 og 13 sammen og så videre så bliver det ret jævnt. God fornøjelse!
07.08.2015 - 11:18
![]() Chrisine wrote:
Chrisine wrote:
Also ich habe die jacke jetzt zum 3ten mal begonnen und komme auch recht gut klar nur jetzt meine frage in der Anleitung steht man soll 167 Maschen anschlagen, davon sind 10 Maschen für die blende (5 links und 5 rechts) bleiben 157 für das Muster jedoch beinhaltet das muster m1 nur 12 Maschen und ich habe bei korrekter Ausführung von m1 immer 1 masche übrig, wo liegt mein Fehler? Und noch 1 frage was ist passe? Lieben dank schon mal
15.02.2015 - 00:33DROPS Design answered:
Sie machen keinen Fehler, es ist korrekt, dass am Ende 1 M übrig bleibt - diese stricken Sie einfach wie die 1. M des Musters, dann wird es nämlich auf beiden Seiten symmetrisch. Als Passe bezeichnet man den oberen Teil ab den Armausschnitten, wenn die oberen Ärmelteile nicht separat gestrickt werden, sondern mit in den oberen Teil integriert sind. Hier ist es der kraus re gestrickte Teil mit den Abnahmen. Eine Rundpasse ist eine Passe, bei der gleichmäßig immer wieder Abnahmen gearbeitet werden, wie hier.
15.02.2015 - 20:47
![]() Gabriele Weigang wrote:
Gabriele Weigang wrote:
Ich verstehe den Anschlag nicht bitte genauer . Ist neu für mich .Kann mir das bildlich nicht vorstellen von der mitte aus LG G.Weigang
29.01.2015 - 21:54DROPS Design answered:
"von der Mitte vorne" bedeutet ab dem vorderen Rand, also ab dem Vorderteil. Die Reihe beginnt unten am rechten Vorderteil und endet am linken Vorderteil. Sie nehmen für den Anschlag 2 Fäden, d.h. Sie nehmen den Faden doppelt, dann schneiden Sie nach dem Anschlag den einen Faden ab und stricken nur noch normal einfädig weiter. Der Anschlag wird mit doppeltem Faden gemacht, damit der Anschlagrand etwas fester wird. Wenn Sie weitere Fragen haben, melden Sie sich einfach.
30.01.2015 - 08:28
![]() Inez Huizinga wrote:
Inez Huizinga wrote:
Sorry voor de vorige vraag. Antwoord al gevonden!
11.01.2015 - 20:44
![]() Inez Huizinga wrote:
Inez Huizinga wrote:
Hallo, Bij het telpatroon staat de uitleg in het Noors/Zweeds? Zou u dit kunnen vertalen?
11.01.2015 - 11:11
![]() Kate Holm wrote:
Kate Holm wrote:
I str 3 mdr
26.03.2014 - 08:43
![]() Kate Holm wrote:
Kate Holm wrote:
Der er enten 1 maske for meget eller fejl i diagrammet
26.03.2014 - 08:37DROPS Design answered:
Hej Kate. Du tager 19 m ind i den förste pind = 176 masker. Du strikker M.2 over 166 masker (exclusief stolpemaskerne), dvs, du strikker 13 hele gentagelser af M.2 (= 156 m) og slutter af med 10 masker af M.2 - du strikker altsaa ikke de sidste to masker. De samme gaelder senere naar du tager ind igen (154 m = 12 hele gentagelser + 10 m af 13e gentagelse). God fornöjelse.
26.03.2014 - 12:23
![]() Tine wrote:
Tine wrote:
M1 løber over 12 m. Det stemmer ikke med maskeantallet. I øvrigt er det påfuglemønster/feather&fan, der normalt løber over et ulige antal (11-17-23). Den ene r imellem udtagningerne plejer man vist ikke at have, vel?
28.04.2012 - 11:22DROPS Design answered:
M1 er 12 m, det ska vara sån. Du strikker 5 kantm og så gentar M1 til 6 m gjenstår på p, då strikker du 1.m i M.1 (så det blir likt i hver side mot stolpene), og avsluter med 5 kantm.
01.05.2012 - 00:42
|
||||||||||||||||
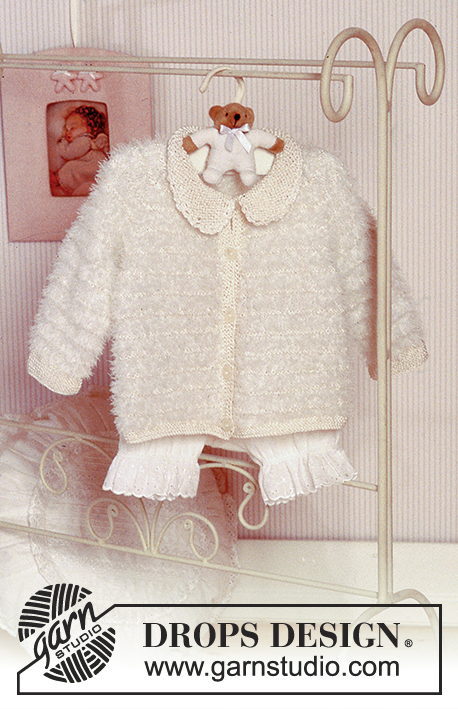
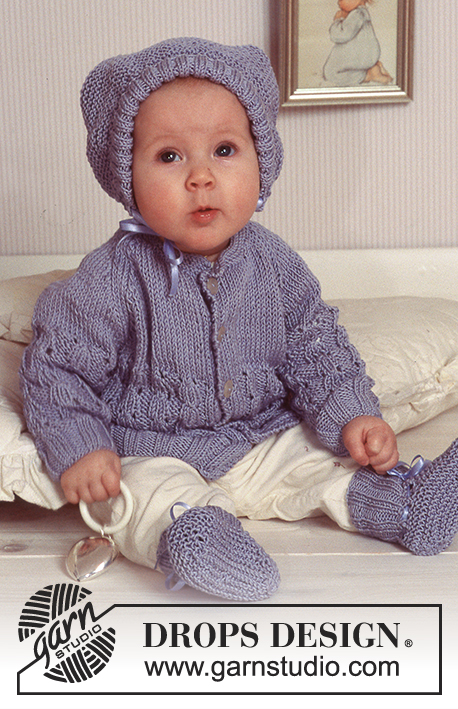
Little Josefine#littlejosefineset |
||||||||||||||||
|
|
||||||||||||||||
Cardigan, bonnet and socks in Safran.
DROPS Baby 11-17 |
||||||||||||||||
|
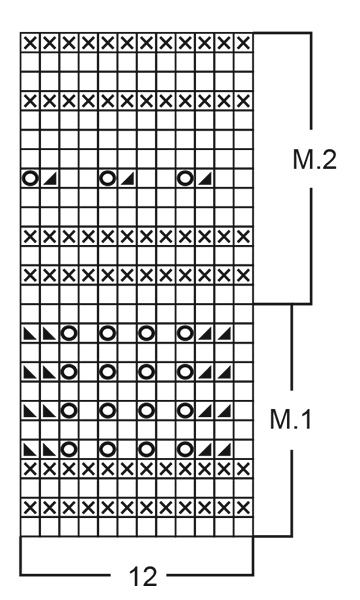
Knitting tension: 25 sts x 34 rows on needles size 2.5 mm in stocking sts = 10 x 10 cm. Garter sts (back and forth on needle): Knit all rows. Garter sts (circular needles): P 1 round, K 1 round. Pattern: See diagram M.1 and M.2. The diagrams show the pattern from the RS. 1 repeat of M.1 = approx. 3 cm in the height. Buttonhole: Cast off for buttonholes on right front band. 1 buttonhole = cast off the 3rd and the 4th st from the edge and cast on 2 new sts on the return row. Cast off for buttonholes when piece measures: Note: Make the last buttonhole when 2 rows remain to be knitted in garter sts on the front band. Size1/3 month: 5, 10, 15, 20 and 25 cm Size 6/9 month: 6, 11, 16, 21 and 28 cm Size 12/18 month: 6, 12, 18, 24 and 30 cm Size 24 month: 6, 13, 20, 27 and 34 cm ---------------------------------------------------------------------- CARDIGAN Back and front piece: The cardigan is knitted back and forth on circular needles from mid front. Cast on 131-143-167-179 sts (inc 5 front band sts each side towards mid front) on circular needle size 2.5 mm with 2 threads of Safran. Remove 1 thread and continue in M.1 (1st row = the RS), but the 5 front band sts each side are knitted in garter sts throughout – remember the buttonholes on right front band – see explanation above. Remember the knitting tension! When piece measures approx 15-15-18-21 cm – adjust to after a full repeat of M.1 – knit the next row as follows (from the RS): 30-33-39-42 sts = right front, cast off 8 sts for armhole, knit 55-61-73-79 sts = back piece, cast off 8 sts for armhole, knit 30-33-39-42 sts = left front. Put piece aside and knit the sleeves. Sleeves: Cast on 38-50-50-50 sts (incl 1 edge st each side) on needle size 2.5 mm with 1 thread of Safran. Knit 8 rows of garter sts (1st row = RS), continue in M.1. At the same time when piece measures 4 cm inc 1 st each side on every 7-15-10-11 row a total of 6-3-5-6 times = 50-56-60-62 sts- in the first 4 rows of M.1 knit the inc sts in garter sts and in the next 8 rows of M.1 knit them in stocking sts. When the piece measures 16-16-19-22 cm – adjust the length to a full repeat of M.1 – cast off 5 sts each side for the armhole = 40-46-50-52 sts left on row. Knit another sleeve. Yoke: Put the sleeves on the same circular needle as the front and back piece where you cast off for the armholes = 195-219-251-267 sts. Knit in M.2 – at the same time on the 1st row dec 19 sts evenly distributed on row. NB: Do not dec over the front bands = 176-200-232-248 sts. At the same time on the 9th row of M.2 dec 12-14-18-22 sts evenly distributed on row = 164-186-214-226 sts. Remember the button holes on front band! When finished with M.2 continue in garter sts – at the same time dec 11-11-12-12 sts evenly distributed on every 4th row (from the RS) a total of 8-9-10-11 times = 76-87-94-94 sts left on row. When the piece measures 25-26-30-34 cm dec 18-19-24-16 sts evenly distributed = 58-68-70-78 sts. Assembly: Knit over all sts incl the front band sts. Knit 3 rows of stocking sts, then knit the next row as follows (from the RS): *K2 tog, make a yo*, repeat from *-* and finish with K2. Knit 3 rows of stocking sts before casting off the remaining sts. Fold the edge double towards the WS and sew tight. Sew the sleeve seams and the openings under the sleeves. Sew on buttons. ---------------------------------------------------------------------- SOCKS To fit foot length: 10-11-12 -14 cm Socks: The sock is knitted back and forth from mid back. Cast on 50-52-54-56 sts on needle size 2.5 with 2 threads of Safran. Remove 1 thread and continue with M.1 (1st row = the RS) with 1-2-3-4 sts of stocking sts each side. Knit 2 repeats of M.1 (= approx 6 cm). Continue with 1 row of stocking sts at the same time dec 16-14-16-14 sts evenly distributed = 34-38-38-42 sts. Knit the next row as follows from the RS: K1, * K2 tog, make a yo*, repeat from *-* and finish with K1. Then purl 1 row from the WS. Put 12-13-13-15 sts on a thread each side and knit 4-4.5-5.5-6.5 cm of garter sts over the centre 10-12-12-12 sts. Put the sts from the threads back on the needle and pick up 10-11-13-16 sts each side of the centre piece = 56-60-64-74 sts in total. Knit 3-4-5-5 cm of garter sts over all sts at the same time after 1.5-2-2.5-3 cm cast off on every other row until finished as follows: Cast off 1 st at the beginning and the end of the piece and K2 tog each side of the 2 centre sts. Cast off and sew the seam underneath the foot and up along mid back in the most outer part of the st to avoid a chunky seam. Pull a silk ribbon approx. 50 cm through the row of holes at the bottom of M.1. ---------------------------------------------------------------------- BONNET To fit head circumference: approx 41-44-47-50 cm Bonnet: Cast on 72-78-86-92 sts on pointed needles size 2.5 mm with Safran. Knit in garter sts. When the piece measures 10-11-12-13 cm cast off 24-26-28-30 sts each side. Continue in garter sts over the middle 24-26-30-32 sts until the piece measures 20-22-24-26 cm. Sew the middle piece to the sides pieces. Pick up 72-78-86-92 sts (from the WS) in the casting on edge at the front of the bonnet. Knit M.1 (with 1 edge st each side knitted in garter sts throughout) so the RS shows when folding the edge over the bonnet. At the same time on the 1st row inc./dec. to 75-75-87-99 sts. When M.1 is knitted 2 times, knit 4 rows of garter sts before casting off with 2 threads of Safran. Fold the edge over the bonnet and sew it tight and neat at the bottom of the sides. Pick up approx 74 to 98 sts (from the RS) at the bottom edge of the bonnet (divisible with 4 + 2) on needles size 2.5 mm. Purl the first row from the WS, then knit M.2 with 2 edge sts each side knitted in garter sts throughout, the hole edge (= 7th row in M.2) is knitted as follows: 2 sts of garter sts *K2 tog, make a yo, K2*, repeat from *-*, finish with K2 tog, make a yo and 2 sts in garter sts. After M.2 cast off. Pull 1 silk ribbon approx. 80 cm long through the row of holes at the bottom of the bonnet. |
||||||||||||||||
Diagram explanations |
||||||||||||||||
|
||||||||||||||||
 |
||||||||||||||||
 |
||||||||||||||||
Have you finished this pattern?Tag your pictures with #dropspattern #littlejosefineset or submit them to the #dropsfan gallery. Do you need help with this pattern?You'll find 22 tutorial videos, a Comments/Questions area and more by visiting the pattern on garnstudio.com. © 1982-2026 DROPS Design A/S. We reserve all rights. This document, including all its sub-sections, has copyrights. Read more about what you can do with our patterns at the bottom of each pattern on our site. |
||||||||||||||||


With over 40 years in knitting and crochet design, DROPS Design offers one of the most extensive collections of free patterns on the internet - translated to 17 languages. As of today we count 324 catalogues and 12245 patterns translated into English (UK/cm). 12245
We work hard to bring you the best knitting and crochet have to offer, inspiration and advice as well as great quality yarns at incredible prices! Would you like to use our patterns for other than personal use? You can read what you are allowed to do in the Copyright text at the bottom of all our patterns. Happy crafting!
Post a comment to pattern DROPS Baby 11-17
We would love to hear what you have to say about this pattern!
If you want to leave a question, please make sure you select the correct category in the form below, to speed up the answering process. Required fields are marked *.