
Popular categories
Looking for a yarn?


Comments / Questions (43)
![]() Linda wrote:
Linda wrote:
Då ställer jag frågan igen; Ska jag då sticka som tidigare; A1,A2, A2, A3? Sen är det enbart A4 som gäller, eller tänker jag fel🤔? Tack 🙏 för hjälpen! Mvh Linda
09.04.2026 - 15:35DROPS Design answered:
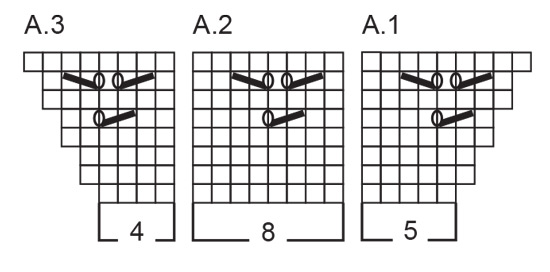
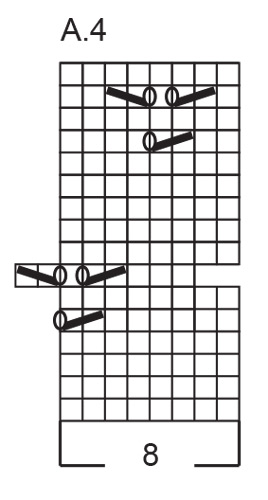
Hej Linda. När du ska öka på ärmarna på vart 4e varv så ser du till fortsätta mönster-stickningen enligt A.4. Så det ökas på framstyckena/bakstycke på vartannat varv och på ärmarna på var 4e varv, och på ärmarna ser du till att mönstret stämmer med A.4. Mvh DROPS Design
10.04.2026 - 09:07
![]() Linda wrote:
Linda wrote:
Ska jag då sticka som tidigare; A1,A2, A2, A3? Sen är det enbart A4 som gäller, eller tänker jag fel🤔? Tack 🙏 för hjälpen! Mvh Linda
08.04.2026 - 11:36
![]() Linda wrote:
Linda wrote:
Ska jag då sticka som tidigare; A1, A2, A2, A3? Sen är det enbart A4 som gäller, eller tänker jag fel🤔? Tack 🙏 för hjälpen! Mvh Linda
07.04.2026 - 16:13
![]() Linda wrote:
Linda wrote:
Hej! Jag har 2 frågor; Räcker 350 g till storlek 7/8 år? Hur kommer A4 in i mönstret? Jag ska nu börja öka vart 4:e varv på ärmarna. Mvh Linda
07.04.2026 - 14:14DROPS Design answered:
Hei Linda. Ja, det skal det, bare husk å overholde strikkefastheten. Du starter med A.1-A.2-A.3 og når du har økt nok masker vil man etterhvert strikke etter A.4, du må bare passe på at det stemmer videre over det etablert mønster (fra A.1-A.2-A.3). mvh DROPS Design
07.04.2026 - 14:25
![]() Emilce wrote:
Emilce wrote:
En el comentario anterior puse A2 tres veces y quise decir A2 dos veces
06.04.2026 - 22:39
![]() Emilce wrote:
Emilce wrote:
Hola estoy tejiendo la chaqueta en talla 2 ya hice los aumentos en la manga y ahora comencé con los otros aumentos hice las cuatro primeras vueltas y tengo 39 puntos en las mangas y no entiendo bien como hacer ahora el patrón. Porque si hago A1 A2 tres veces y A3 tengo 33 puntos y no sé cómo seguir me podéis ayudar. Gracias
06.04.2026 - 20:24DROPS Design answered:
Hola Emilce, al inicio del canesú tienes 19 pts en cada manga, según los marcapuntos colocados. De estos 19 pts, 1 pt a cada lado en cada manga forma parte de la línea del raglán y los aumentos para el raglán en cada manga van a encontrarse al lado de estos puntos. Los otros 17 pts se trabajan según A.1-A.2-A.3. Al final de la 1ª repetición del diagrama (= 8 filas) se ha aumentado 4 veces para el raglán en la manga, 4 pts en las mangas en cada fila con aumentos, 2 en cada manga (= 27 pts en cada manga). Ahora deberías comenzar los diagramas A.1, A.2 y A.3 de nuevo, pero como has aumentado 8 pts en cada manga tienes espacio para una repetición más de A.2 entre ellos. Por lo que tienes: 1 derecho, aumento para el raglán, A.1, A.2 4 veces, A.3, aumento para el raglán, 1 derecho. Repites estos aumentos 1 vez más (= 35pts en cada manga) y aumentas 1 vez más, 2 pts en cada manga (= 37 pts en cada manga). Ahora sigues con los diagramas como antes pero los aumentos para el raglán se trabajan solo cada 4ª fila y no cada 2ª, por lo que tienes que ajustar el patrón de calados para que sea similar a A.4.
27.04.2026 - 00:22
![]() Marina Gabriella wrote:
Marina Gabriella wrote:
Bellissimo golfino, l'ho riprodotto
25.03.2026 - 17:58
![]() Marie Larsson wrote:
Marie Larsson wrote:
Jag stickar denna i storlek 3-4 år. Med en ärm kvar att sticka är garnet nästan slut. Stickfastheten stämmer. Jag har inte förlängt liv och ärmar. Jag ser att garnåtgången har ändrats i mönstret. Är det så att ni tagit bort 50g? Nu måste jag beställa mer garn och hoppas att färgen stämmer.
23.03.2026 - 09:25
![]() Christina wrote:
Christina wrote:
Hello -- I have reached the point in the pattern where I am increasing the front and back every 2nd row, and the sleeves every 4th row. However, I am unsure how to maintain the pattern on the sleeves. I don't understand how the A4 chart works. Can you help? I am working in size 2, and will be starting the first row of the pattern soon.
03.09.2025 - 16:25DROPS Design answered:
Dear Christina, A.4 shows that, when you don't have enough increases (because you don't work the yarn overs next to A.1 and A.3 on the sleeves), you will omit these charts in that specific row and only work A.2, while the A.1/A.3 stitches are just knitted. After increasing more stitches (you increase every 4th row for the sleeves) you will once again have enough space and will be able to work A.1 and A.3. This is what chart A.4 shows. Happy knitting!
15.09.2025 - 01:00
![]() Nelleke wrote:
Nelleke wrote:
Geen
03.08.2025 - 21:40
|
|||||||||||||
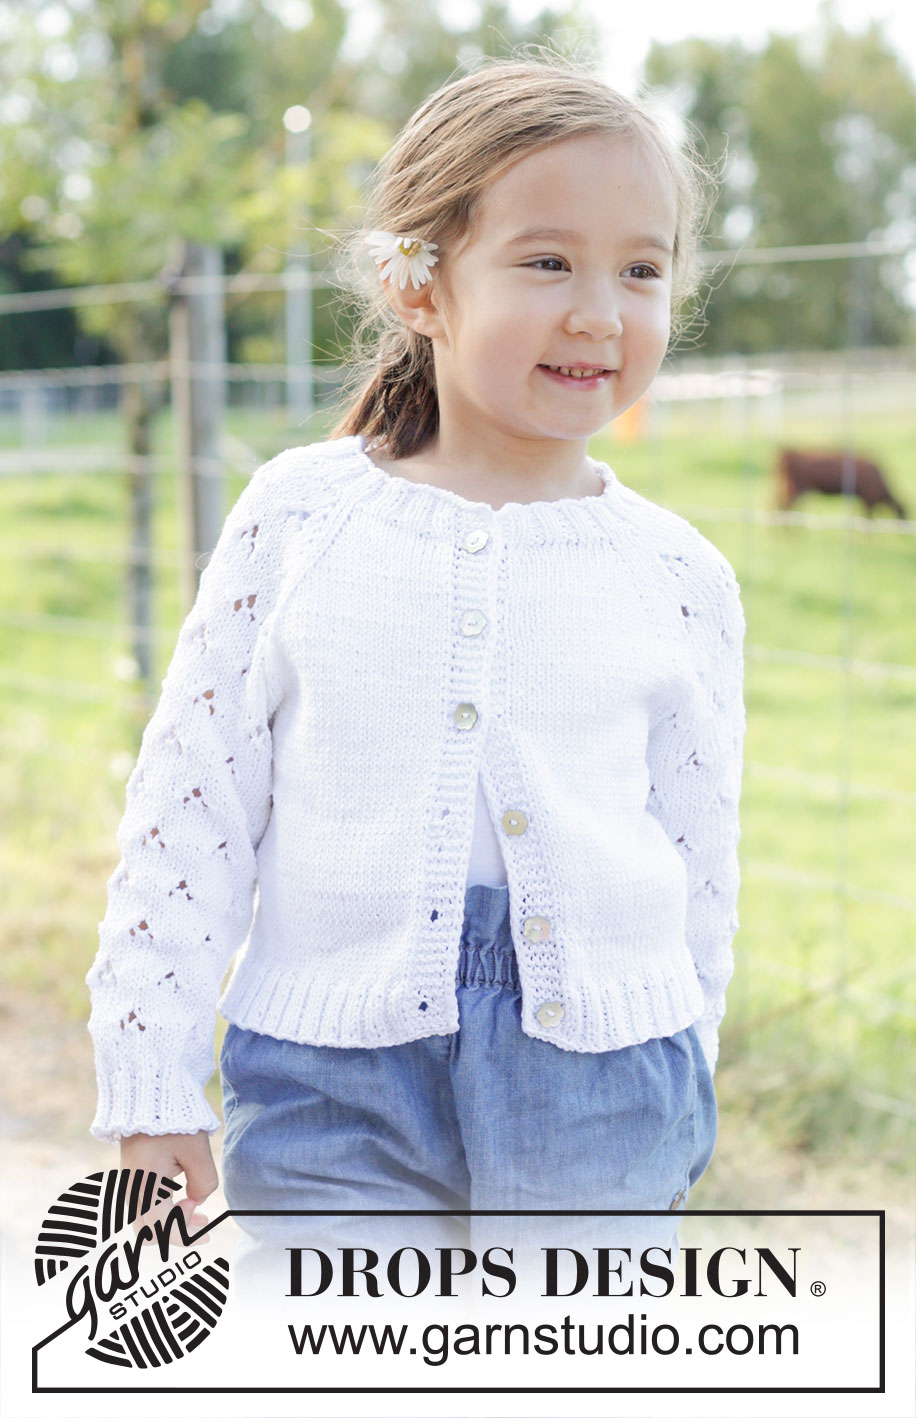
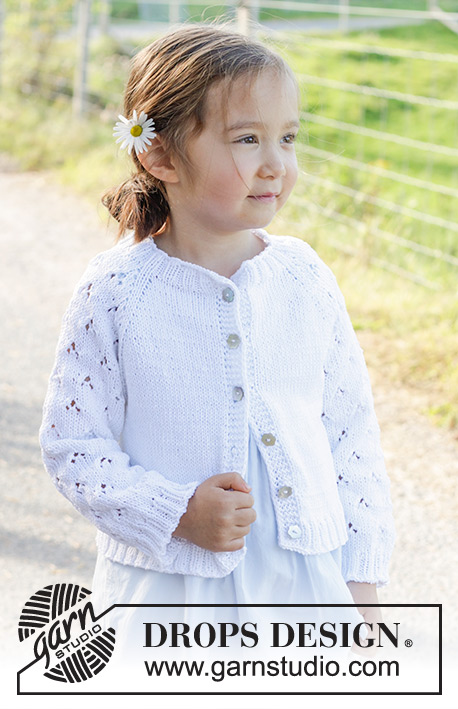
Daisy Fields Cardigan#daisyfieldscardigan |
|||||||||||||
 |
 |
||||||||||||
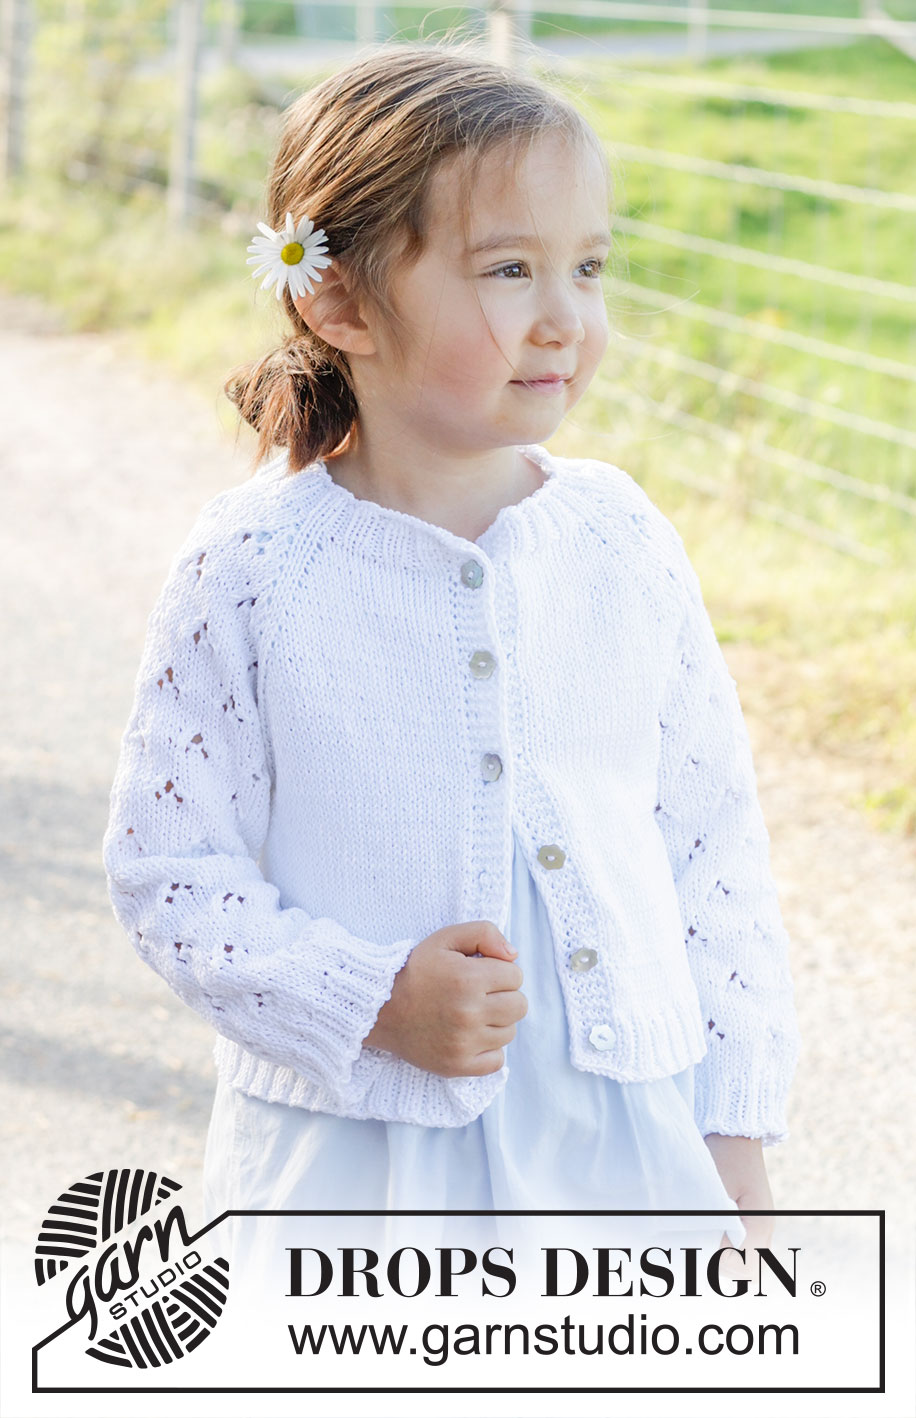
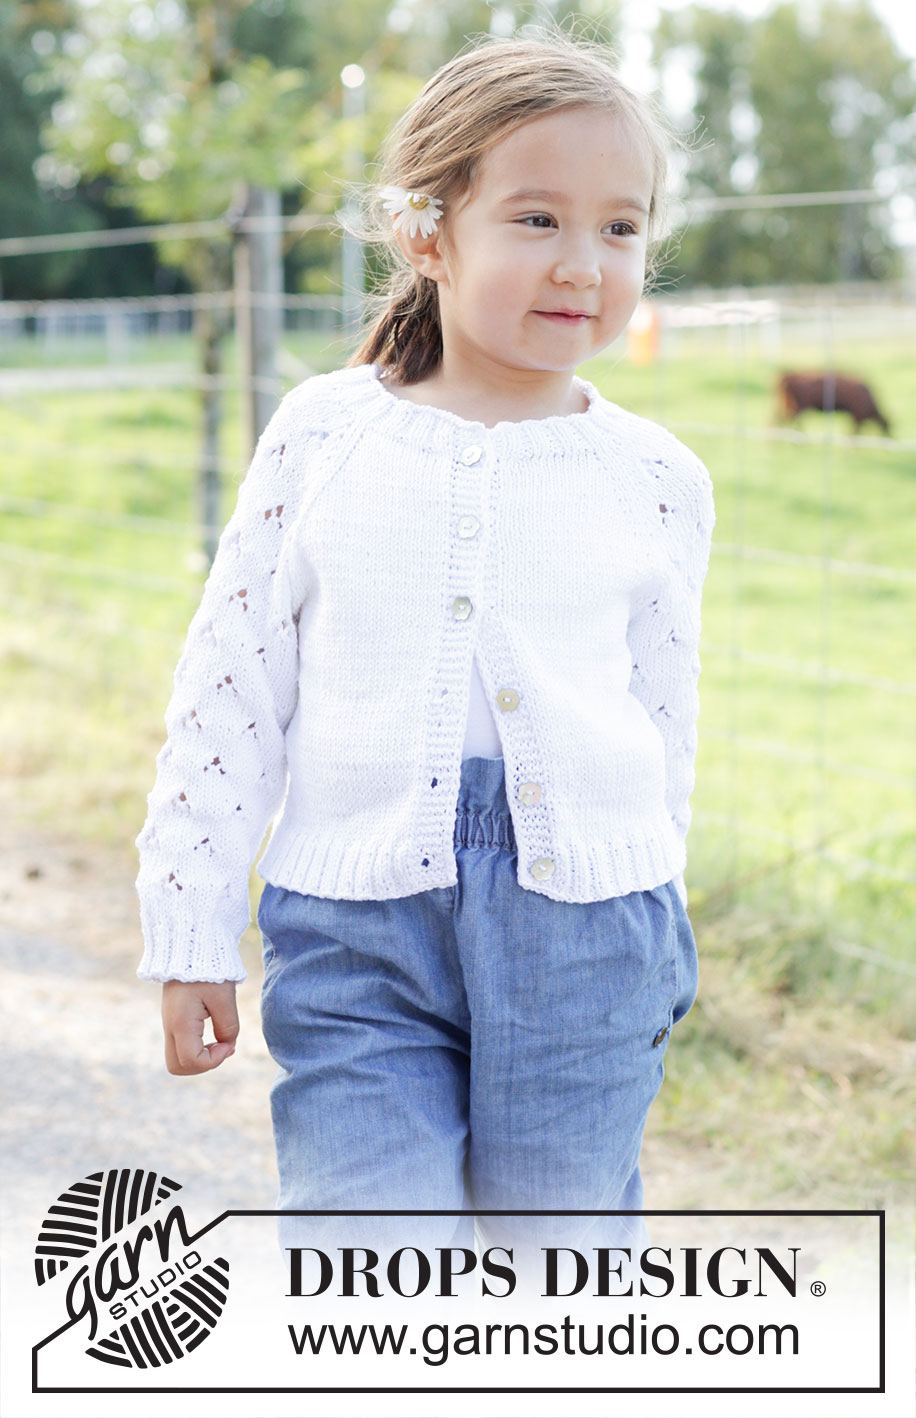
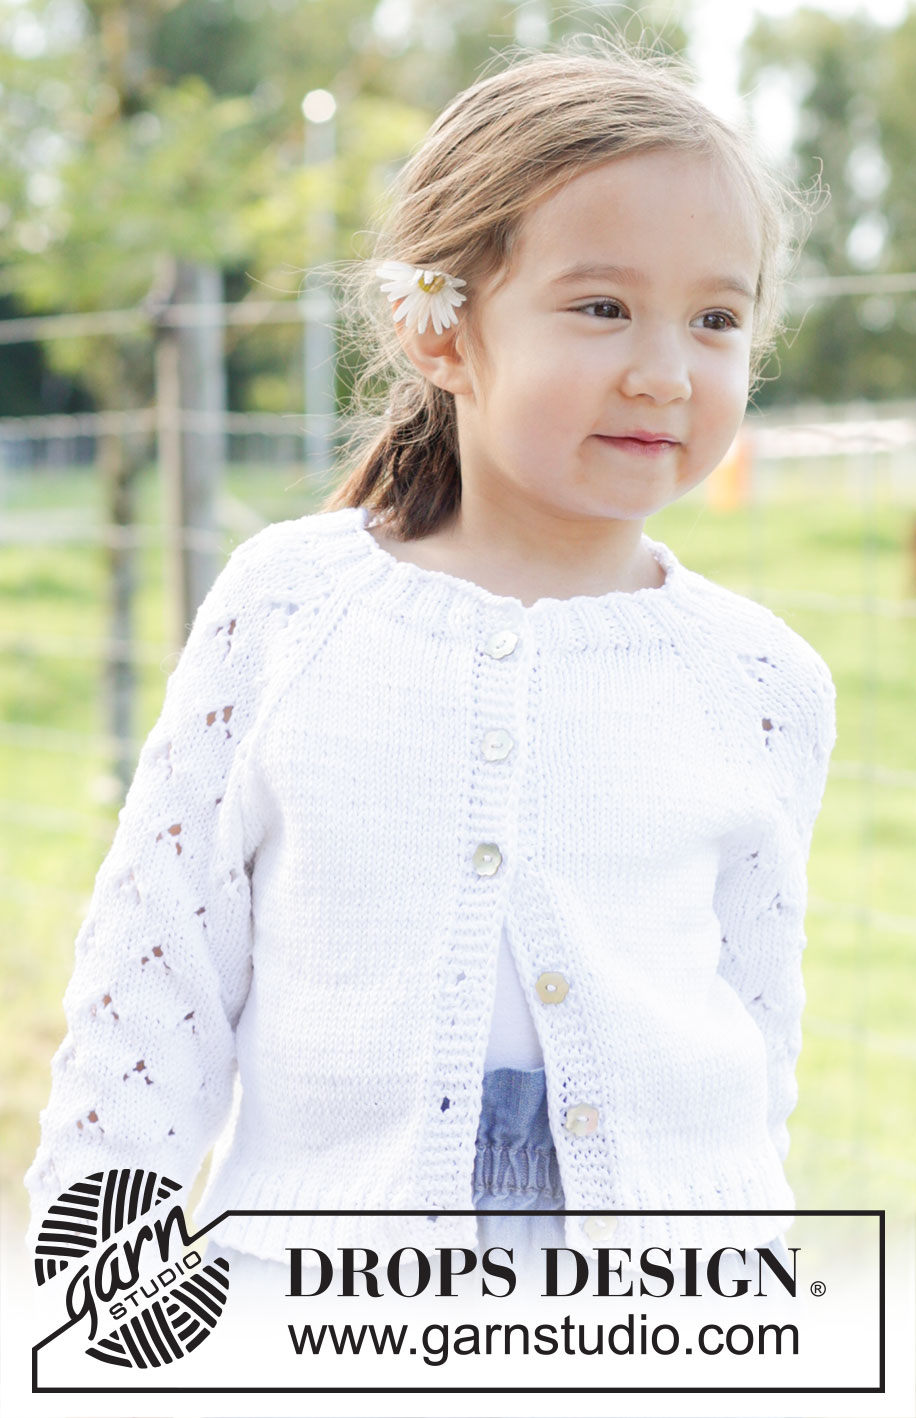
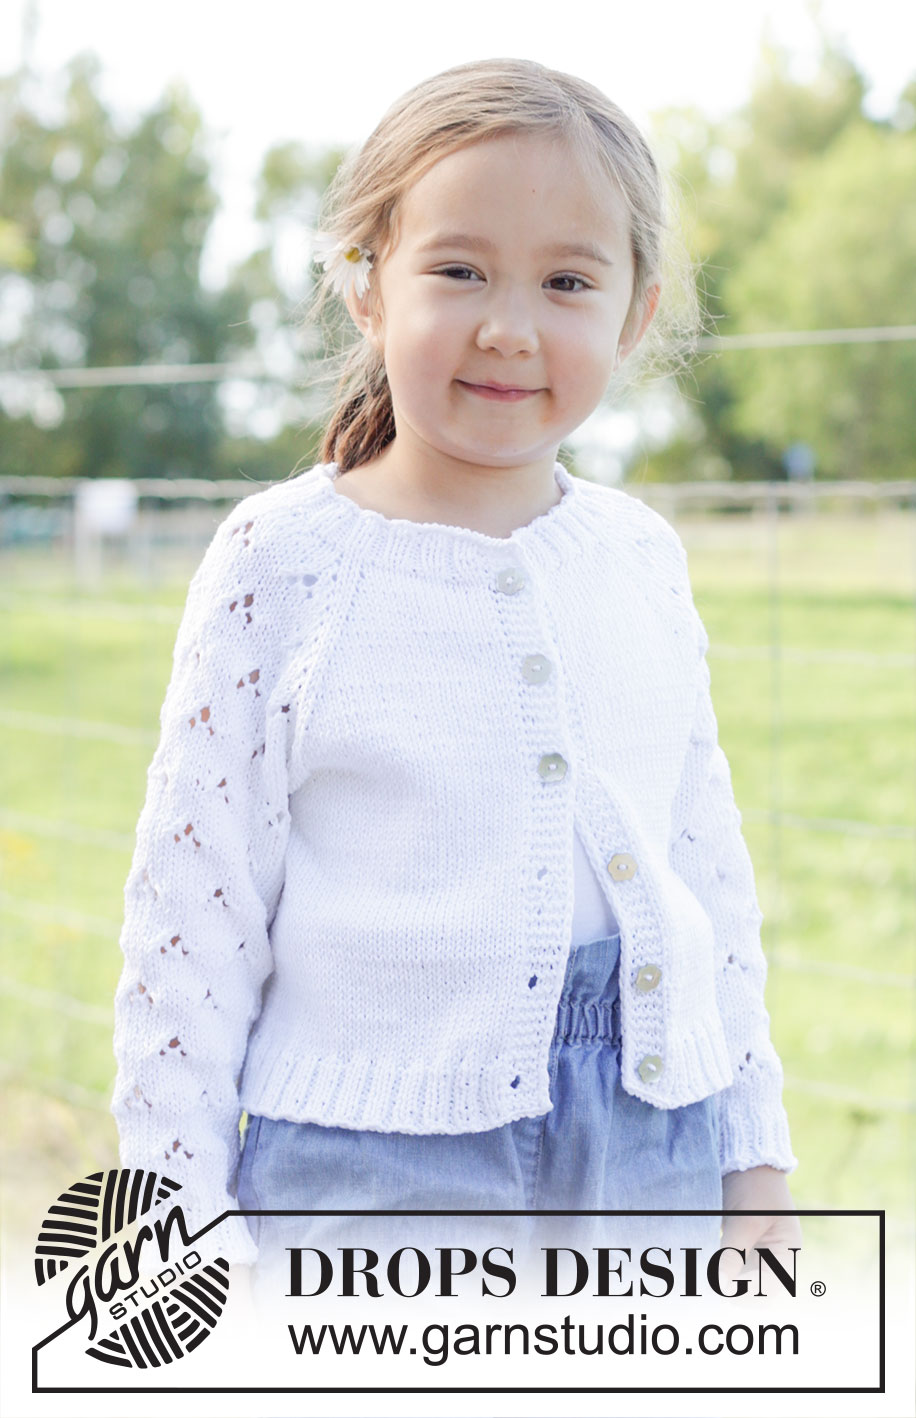
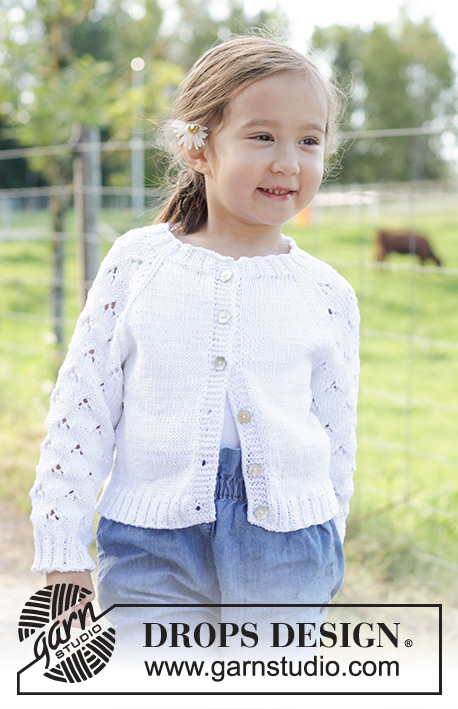
Knitted jacket for children in DROPS Muskat. The piece is worked top down with raglan, lace pattern on the sleeves and I-cord bands. Sizes 2 – 12 years.
DROPS Children 48-2 |
|||||||||||||
|
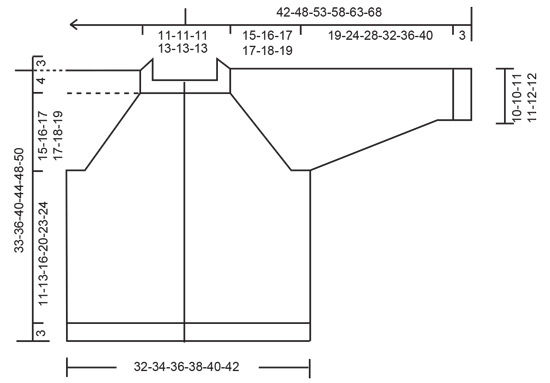
------------------------------------------------------- EXPLANATIONS FOR THE PATTERN: ------------------------------------------------------- GARTER STITCH (worked back and forth): Knit all rows. EDGE STITCHES (I-cord): WORK 2 EDGE STITCHES AT BEGINNING OF ROW: Slip 1 stitch purl-wise with the strand in front, knit 1. WORK 2 EDGE STITCHES AT END OF ROW: Work until there are 2 stitches left on the row, slip 1 stitch purl-wise with the strand in front, knit 1. Repeat at the beginning and end of each row. BUTTONHOLES: Work buttonholes on the right band (when the garment is worn). Work from the right side when there are 4 stitches left on the row as follows: Make 1 yarn over, knit 2 together, 2 edge stitches. On the next row (wrong side), knit the yarn over to leave a hole. The first buttonhole is worked on the first row after the neck. The other 5-5-5-6-6-6 buttonholes are then worked with 5-5½-6½-6-6½-7 cm between each one. NOTE: The bottom buttonhole is worked in the transition between the stocking stitch and rib. PATTERN: See diagrams A.1 to A.4. The diagrams show all rows in the pattern from the right side. RAGLAN: Increase 1 stitch before/after 2 knitted stitches in each transition between body and sleeves. The marker-threads sit between these 2 stitches. Increase 1 stitch by making 1 yarn over, which is purled twisted on the next row to avoid a hole. DECREASE TIP (for sleeves): Decrease 1 stitch on each side of the marker-thread as follows: Work until there are 3 stitches left before the marker-thread, knit 2 together, knit 2 (marker-thread sits between these 2 stitches), slip 1 stitch knit-wise, knit 1 and pass the slipped stitch over the knitted stitch (2 stitches decreased). ------------------------------------------------------- START THE PIECE HERE: ------------------------------------------------------- JACKET – SHORT OVERVIEW OF THE PIECE. The neck and yoke are worked back and forth with circular needle, from mid front and top down. The yoke is divided for body and sleeves and the body continued back and forth with circular needle. The sleeves are worked in the round with double pointed needles. NECK: Cast on 94-94-94-98-98-98 stitches with circular needle size 3 mm and DROPS Muskat. Purl 1 row from the wrong side. Work as follows from the right side: 2 EDGE STITCHES – read description above, 4 GARTER STITCHES - read description above (= 6 band stitches), * knit 2, purl 2*, work from *-* until there are 8 stitches left, knit 2, work 4 garter stitches and 2 edge stitches (= 6 band stitches). Work this rib for approx. 3 cm, with the next row from the wrong side. YOKE: Change to circular needle size 4 mm. From the wrong side, insert 4 marker-threads and increase stitches as follows: Work 6 band stitches as before, purl 13-13-13-13-13-13 (front piece), insert 1 marker-thread, purl 16 and increase 3 stitches evenly spaced (sleeve), insert 1 marker-thread, purl 24-24-24-28-28-28 (back piece), insert 1 marker-thread, purl 16 and increase 3 stitches evenly spaced (sleeve), insert 1 marker-thread, purl 13-13-13-13-13-13 (front piece), 6 band stitches as before = 100-100-100-104-104-104 stitches. On the next row (right side) begin to increase for raglan and work diagrams A.1 to A.3 over the sleeve-stitches as follows: - remember the BUTTONHOLES – read description above. NOTE! When A.1 to A.3 is finished in height, work 1 more repeat of A.2 in width between A.1 and A.3. Work 6 band stitches, knit 12-12-12-12-12-12, increase 1 stitch for RAGLAN – read description above, knit 2 (marker-thread sits between these 2 stitches), increase 1 stitch for raglan, work A.1, A.2, A.3, increase 1 stitch for raglan, knit 2 (marker-thread sits between these 2 stitches), increase 1 stitch for raglan, knit 22-22-22-26-26-26, increase 1 stitch for raglan, knit 2 (marker-thread sits between these 2 stitches), increase 1 stitch for raglan, work A.1, A.2, A.3, increase 1 stitch for raglan, knit 2 (marker-thread sits between these 2 stitches), increase 1 stitch for raglan, knit 12-12-12-12-12-12, 6 band stitches. Continue with the bands, stocking stitch on the front and back pieces, lace pattern on the sleeves and increase for raglan on each side of the 4 marker-threads every 2nd row a total of 9-9-7-8-8-7 times (including the first increase) = 172-172-156-168-168-160 stitches. Continue increasing every 2nd row but every 2nd increase is now only on the front and back pieces (4 increased stitches). I.e., increase on the front and back pieces every 2nd row, on the sleeves every 4th row. Increase like this 10-12-16-14-16-18 times on the front and back pieces (5-6-8-7-8-9 times on the sleeves). NB! The increases on the sleeves will not continue as shown in A.1 and A.3 because it is now increased on every 4th row. A.4 shows a repeat of the pattern, make sure it matches the established pattern. REMEMBER THE KNITTING TENSION! After the last increase there are 232-244-252-252-264-268 stitches; you have increased 19-21-23-22-24-25 times on the front and back pieces and 14-15-15-15-16-16 times on the sleeves. Continue with the bands, stocking stitch on the front and back pieces and lace pattern on the sleeves, without further increases, until the yoke measures 15-16-17-17-18-19 cm, from the neck mid-front. Now divide for the body and sleeves as follows: Work the first 38-40-42-41-43-44 stitches as before (front piece), place the next 47-49-49-49-51-51 stitches on 1 thread for the sleeve, cast on 6-6-6-8-8-10 stitches (in side under sleeve), work 62-66-70-72-76-78 stocking stitches (back piece), place the next 47-49-49-49-51-51 stitches on 1 thread for the sleeve, cast on 6-6-6-8-8-10 stitches (in side under sleeve), work the last 38-40-42-41-43-44 stitches as before (front piece). The body and sleeves are finished separately. The piece is now measured from here. BODY: = 150-158-166-170-178-186 stitches. Continue back and forth with stocking stitch and 6 band stitches as before on each side. When the body measures 11-13-16-20-23-24 cm from the division, work 1 row from the right side and increase 16-16-16-20-20-20 stitches evenly spaced (do not increase over the bands) = 166-174-182-190-198-206 stitches. Change to circular needle size 3 mm and work as follows from the wrong side: 6 band stitches, * purl 2, knit 2 *, work from *-* until there are 8 stitches left, knit 2, 6 band stitches. Continue this rib for 3 cm. Cast off with knit over knit and purl over purl when the piece measures 33-36-40-44-48-50 cm from the shoulder. SLEEVES: Place the 47-49-49-49-51-51 stitches from the thread on the one side of the piece on double pointed needles size 4 mm and knit up 1 stitch in each of the 6-6-6-8-8-10 stitches cast on under the sleeve = 53-55-55-57-59-61 stitches. Insert a marker-thread in the middle of the new stitches under the sleeve and allow it to follow your work onwards; it is used when decreasing under the sleeve. Start at the marker-thread and work pattern in the round according to A.4 – the stitches which do not fit into the pattern on each side under the sleeve are knitted. Make sure A.4 matches the established pattern from A.1-A.3. When the sleeve measures 2 cm, decrease 1 stitch on each side of the marker-thread – read DECREASE TIP. Decrease like this every 3-4-5½-6-7-8 cm a total of 6-6-5-5-5-5 times = 41-43-45-47-49-51 stitches. Continue working until the sleeve measures 19-24-28-32-36-40 cm from the division (or to desired length. There is 3 cm left). Knit 1 round and increase 7-5-7-5-7-5 stitches evenly spaced = 48-48-52-52-56-56 stitches. Change to double pointed needles size 3 mm and work rib (knit 2, purl 2) for 3 cm. Cast off with rib. The sleeve measures approx. 22-27-31-35-39-43 cm from the division. Work the other sleeve in the same way. ASSEMBLY: Sew the buttons onto the left band. |
|||||||||||||
Diagram explanations |
|||||||||||||
|
|||||||||||||
 |
|||||||||||||
 |
|||||||||||||
 |
|||||||||||||
Have you finished this pattern?Tag your pictures with #dropspattern #daisyfieldscardigan or submit them to the #dropsfan gallery. Do you need help with this pattern?You'll find 31 tutorial videos, a Comments/Questions area and more by visiting the pattern on garnstudio.com. © 1982-2026 DROPS Design A/S. We reserve all rights. This document, including all its sub-sections, has copyrights. Read more about what you can do with our patterns at the bottom of each pattern on our site. |
|||||||||||||


With over 40 years in knitting and crochet design, DROPS Design offers one of the most extensive collections of free patterns on the internet - translated to 17 languages. As of today we count 324 catalogues and 12290 patterns translated into English (UK/cm). 12290
We work hard to bring you the best knitting and crochet have to offer, inspiration and advice as well as great quality yarns at incredible prices! Would you like to use our patterns for other than personal use? You can read what you are allowed to do in the Copyright text at the bottom of all our patterns. Happy crafting!
Post a comment to pattern DROPS Children 48-2
We would love to hear what you have to say about this pattern!
If you want to leave a question, please make sure you select the correct category in the form below, to speed up the answering process. Required fields are marked *.