
Popular categories
Looking for a yarn?


Comments / Questions (24)
![]() Ina wrote:
Ina wrote:
Dank je wel Janine Pieters, ik hield ook 10 steken over. Dankzij jouw bericht begreep ik het. Ik vind ook dat het er niet duidelijk staat . Eerst A2 breien ( 5 steken) en dan pas de rechte steken breien
13.04.2026 - 19:52
![]() Hania wrote:
Hania wrote:
Robię rozmiar M. Mam 260 oczek i 3 cm ściągacza. W następnym okrążeniu mam zamknąć 54 oczka. 260:54=4,8. Czy mam zamykać po przerobieniu 4 oczek 5 i 6 razem czy po przerobieniu 5 oczek 6 i 7 razem?
06.04.2026 - 21:44DROPS Design answered:
Witaj Haniu, we wzorze w prawym dolnym rogu jest symbol kluczyka, tam rozwinie się kalkulator dodawania/zamykania oczek. Po wpisaniu ogólnej liczby oczek 260 i liczby oczek jaka ma być zamknięta czyli 54, zobaczysz jak dokładnie zamykać oczka. W razie problemów pisz. Pozdrawiamy!
07.04.2026 - 08:57
![]() Janine Pieters wrote:
Janine Pieters wrote:
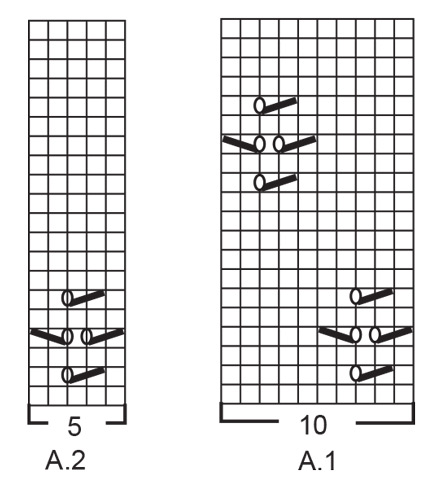
Er is al eerder een berichtje geschreven over de 5 steken van patroon A2, die vergeten zijn mee te tellen. Zodat er 10 st minder zijn bij de telling, wat echter niet het geval is. In het breipatroon staat eerder" brei A1 over ( bij maat L) de volgende 80 st." Waarom schrijft u niet ook " brei A2 over de volgende 5 st." ? Om verwarring te voorkomen. Ook ik miste de 10 st. las het eerdere berichtje en begreep het toen wel.
09.06.2025 - 17:22
![]() ANNIE BERNARDIN wrote:
ANNIE BERNARDIN wrote:
Bonjour, je voudrais tricoter ce modèle sur aiguille circulaire avec des aiguilles droites. Est ce que c'est possible ? Si oui, comment dois-je faire ? Je vous remercie d'avance pour votre réponse
03.06.2025 - 14:22DROPS Design answered:
Bonjour Mme Bernardin, vous trouverez ici quelques informations qui pourront vous aider à faire les ajustements nécessaires; notez que , pour le col, vous devrez d'abord coudre une seule des épaules puis relever les mailles autour de l'encolure, et quand le col est terminé, faites la couture de la 2ème épaule + du col, ainsi vous l'aurez aussi tricoté sur aiguilles droites. Bon tricot!
03.06.2025 - 16:07
![]() Rachel Topf wrote:
Rachel Topf wrote:
It says to reach 11” then divide for arms. Can you divide at any time or is it meant to be at the end of a full lace chart?
07.05.2025 - 23:27DROPS Design answered:
Dear Mrs Topf, it should be divided at anytime of the lace pattern as long as piece measures 11" - you will adjust how to work lace pattern on each piece to continue without displacing the lace pattern. Happy knitting!
08.05.2025 - 09:45
![]() SYLVIANE LEROY wrote:
SYLVIANE LEROY wrote:
Bonjour, Pouvez-vous m'expliquer comment dans la tête de manche après avoir rabattu les mailles de chaque côté du marqueur je tricote en allers et retours alors que je tricotais en rond ? Avec mes remerciements
18.04.2025 - 10:59DROPS Design answered:
Bonjour Mme Leroy, lorsque vous avez rabattu les 8, 10 ou 12 mailles au milieu sous la manche, terminez votre rang puis, tournez pour tricoter désormais alternativement sur l'endroit et sur l'envers et, en même temps, rabattez les mailles indiqué au début de chaque rang de chaque côté. Bon tricot!
22.04.2025 - 11:21
![]() Delannoy wrote:
Delannoy wrote:
Bonjour, je ne comprends pas le point fantaisie ajouré A1 et A2… je n y arrive pas je comprends pas sur combien des mailles c est et de plus que veut dire faire un jeté entre 2 mailles je suis frustrée et je ne suis pas débutante mais j y arrive pas mes mailles sont à chaque fois décalées…. Merci d avance
19.03.2025 - 10:41DROPS Design answered:
Bonjour Mme Delannoy, le point ajouré se tricote d'abord sur 10 mailles = A.1 et se termine par les 5 mailles de A.2, si vous avez par ex. 15 mailles, vous commencez et terminez par le point ajouré, et la 2ème fois, votre point ajouré est sur les 5 mailles centrales. Chaque diminution est compensée par 1 jeté, autrement dit, soit vous tricotez 2 m ens à l'end, 1 jeté (= 2ème rang A.1, A.2 par ex.) soit vous tricotez 1 jeté, glissez 1 m à l'end, 1 m end, passez la m glissée par-dessus la m tricotée (2ème diminution de A.1 et A.2). Pensez à bien mettre un marqueur entre chaque diagramme/chaque A.1 et avant A.2, pour mieux repérer vos mailles. Bon tricot!
19.03.2025 - 16:08
![]() Rie Cohen wrote:
Rie Cohen wrote:
Hvorfor er ribkanter på Dropsopskrifter med flere masker end det glatstrikkede eller mønsterstrikkede stykke ?
08.03.2025 - 11:49DROPS Design answered:
Hei Rie. For å få en penere overgang mellom vrangbord og bolen :) På 80-tallet skulle man gjerne ha en stram vrangbord, men nå ønsker man en penere overgang slik at plagget ser bedre ut når det has på. mvh DROPS Design
10.03.2025 - 14:43
![]() Ferrero wrote:
Ferrero wrote:
Il manque 10 mailles aux explications du dos et devant après les premières diminutions : exemple en taille XXL 28 + 90+40 +90 +12 = 260 et non 270
01.10.2024 - 22:21DROPS Design answered:
Bonjour Mme Ferrero, il semble que vous avez oublié les 5 mailles de A.2 dans votre descriptif, autrement dit, tricotez ainsi: 28 m endroit, 90 m de A.1, 5 m de A.2, 40 m endroit, 90 m de A.1, 5 m de A.2 et 12 m end soit: 28+90+5+40+90+5+12=270 mailles. Bon tricot!
02.10.2024 - 09:10
![]() Gabbie Day wrote:
Gabbie Day wrote:
Hi, I’m wondering what the measurements for your sizes are.
23.07.2024 - 04:24DROPS Design answered:
Hi Gabby, the measurements can be found at the bottom of the pattern, there is a schematic drawing there. Happy knitting!
23.07.2024 - 10:20
|
|||||||||||||
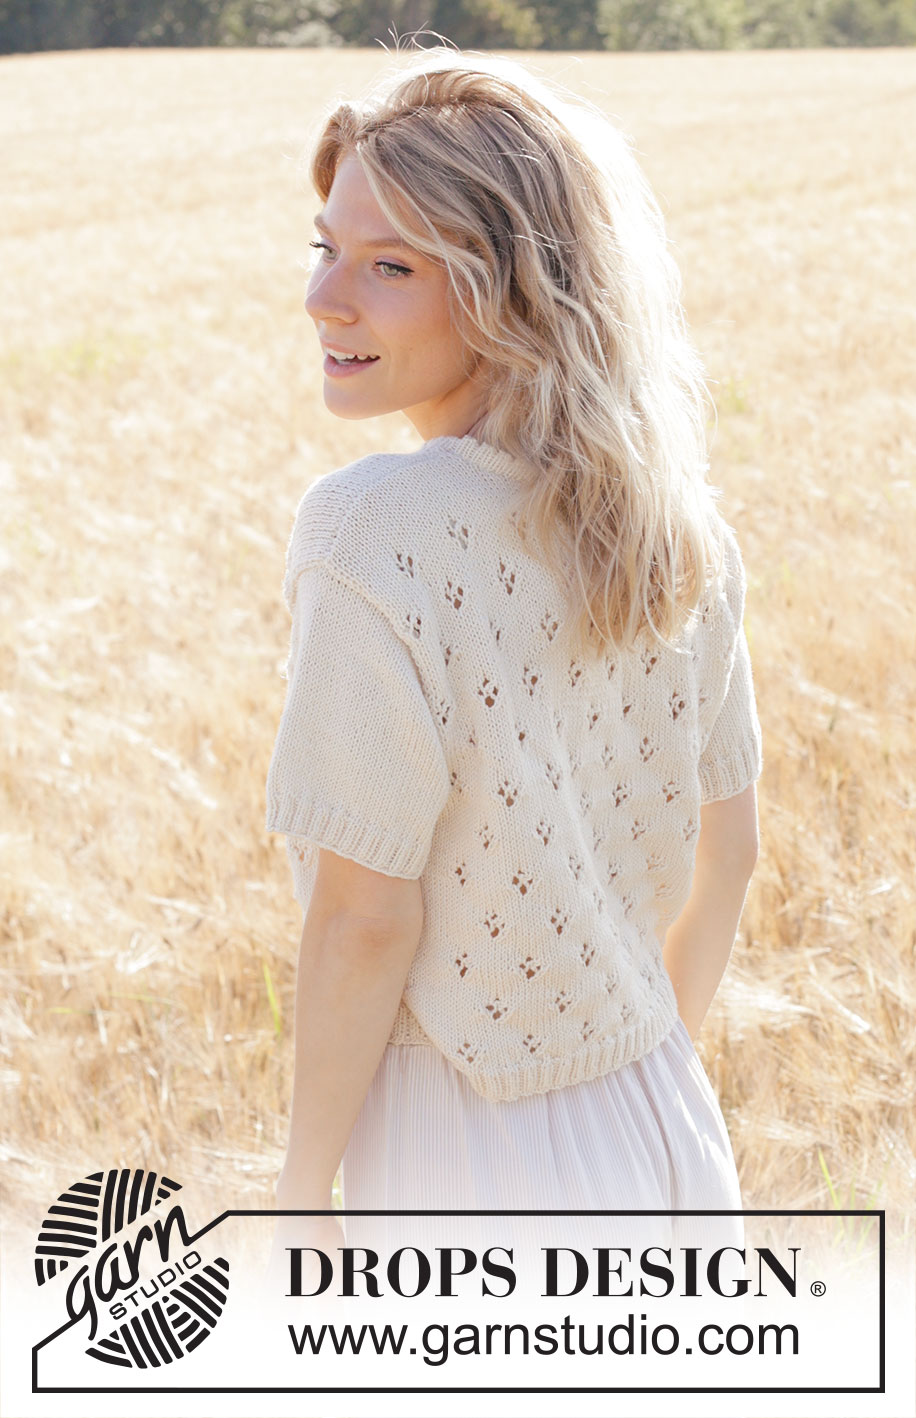
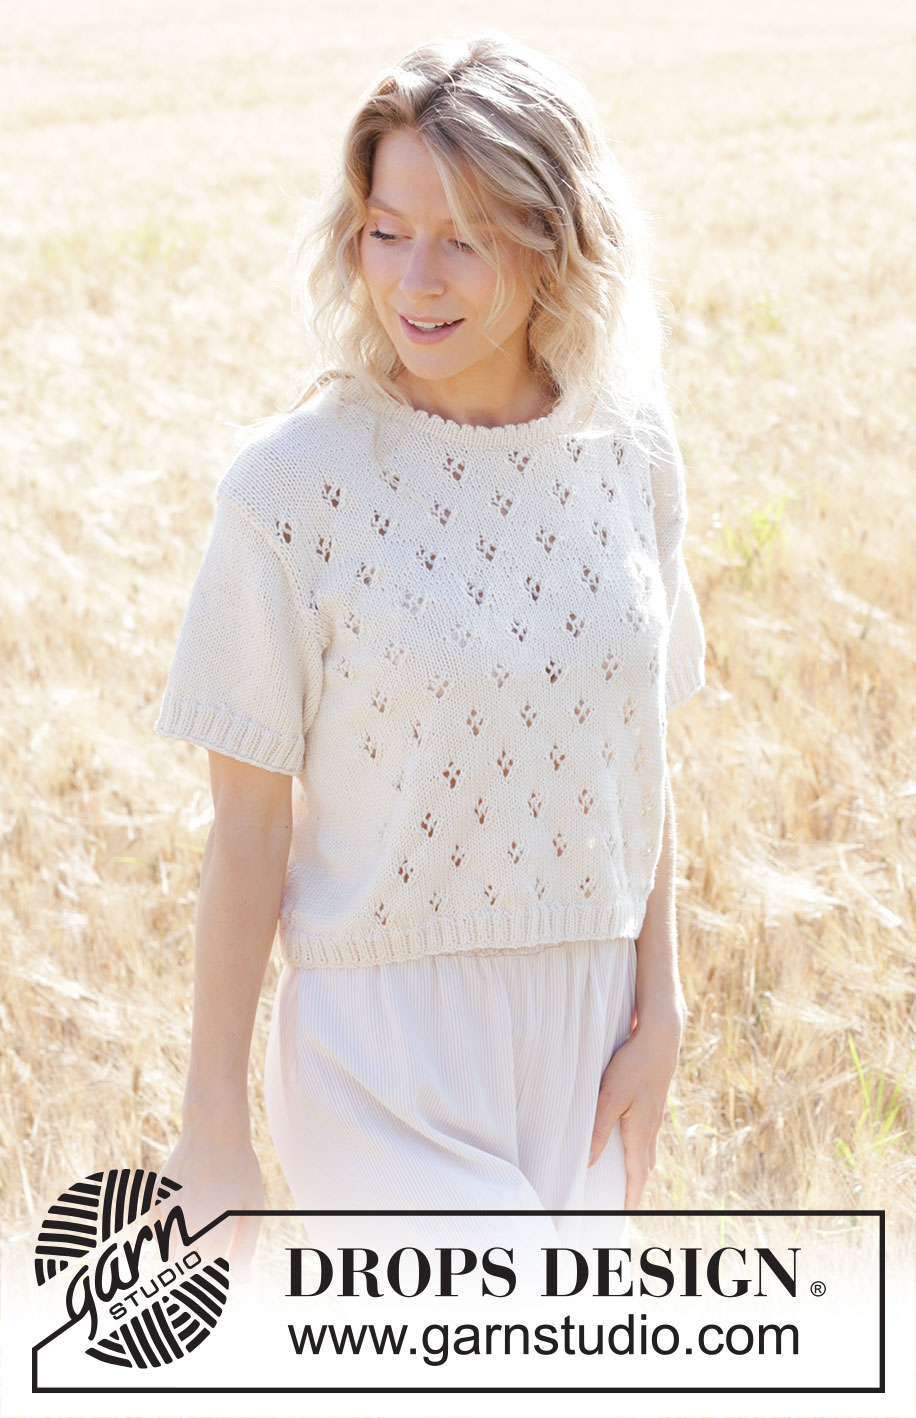
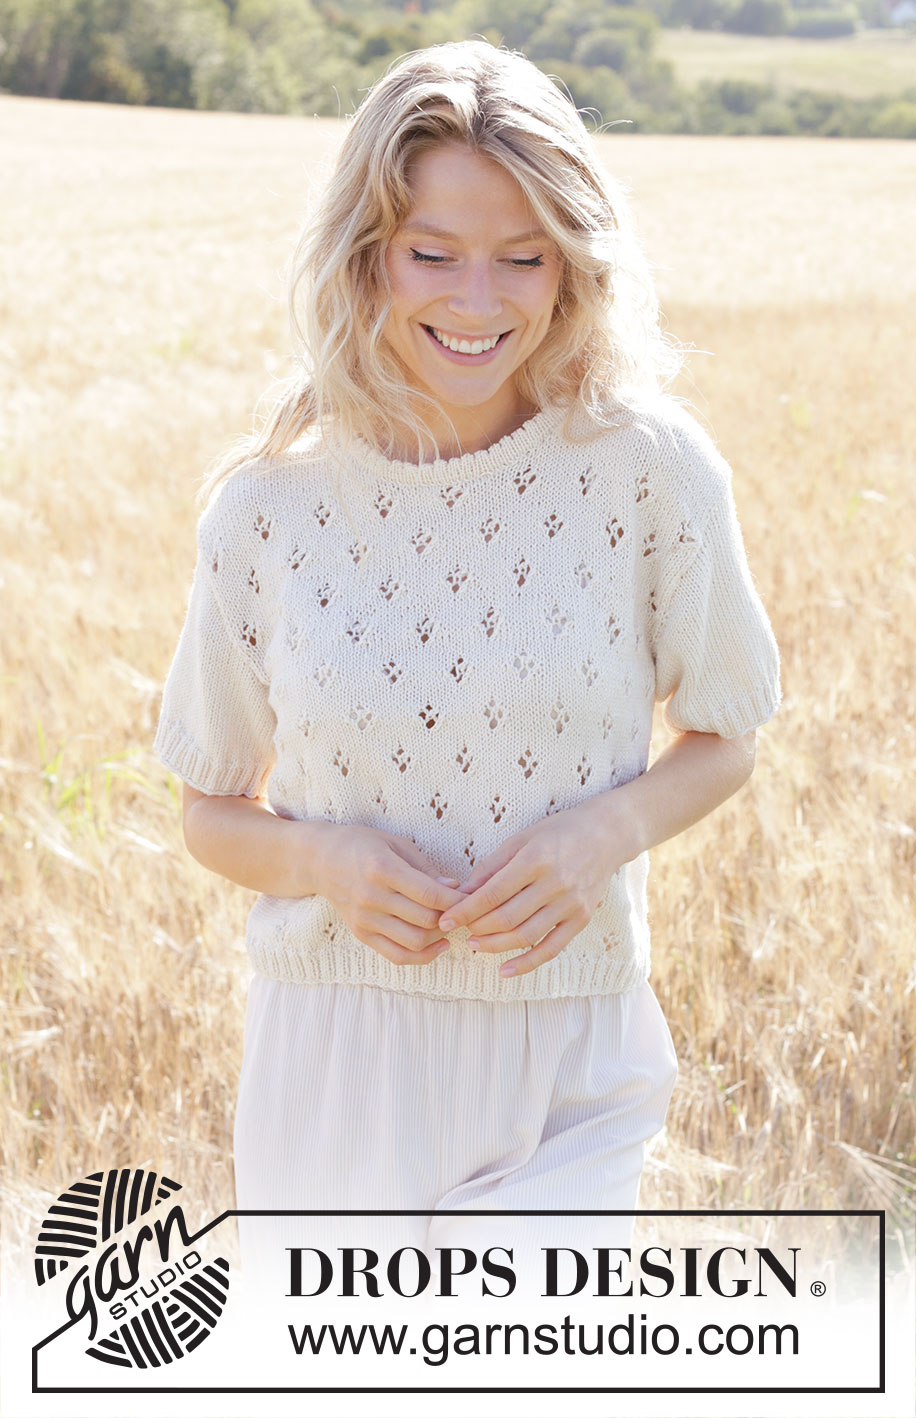
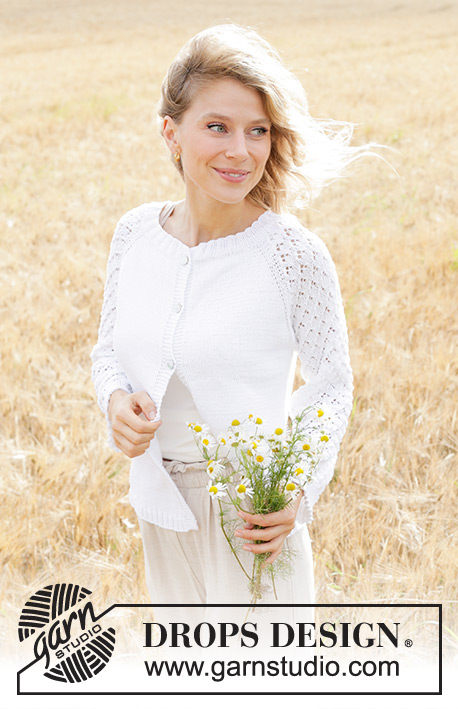
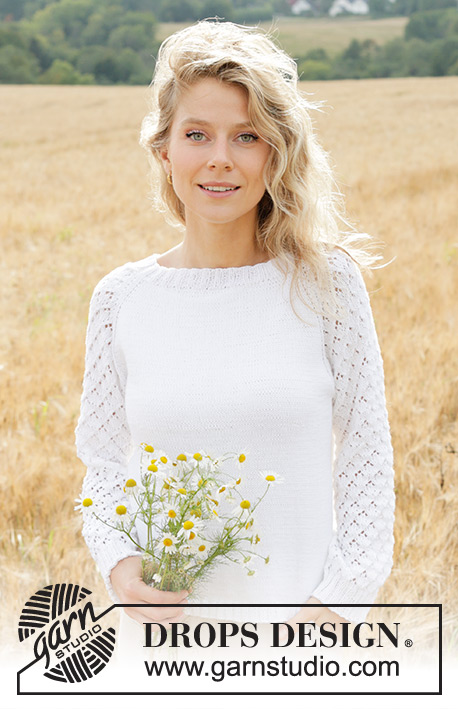
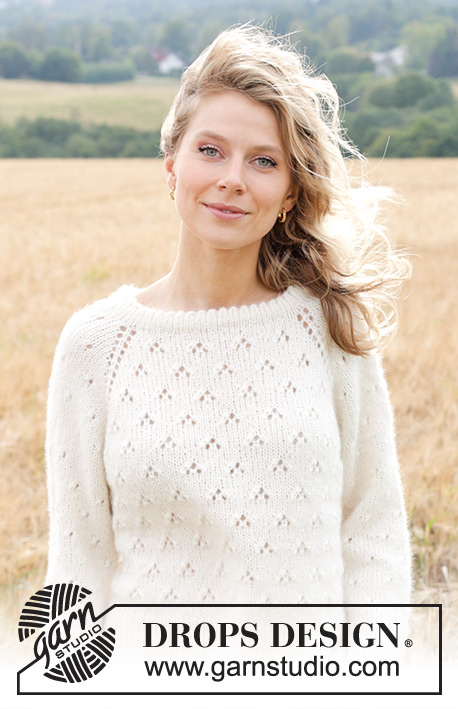
White Spring#whitespringtop |
|||||||||||||
 |
 |
||||||||||||
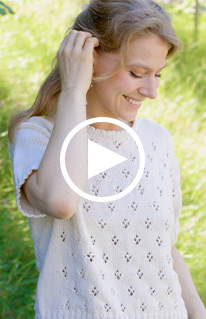
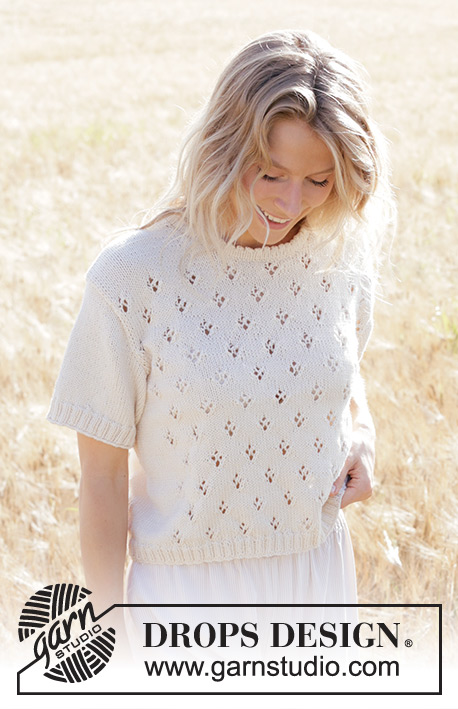
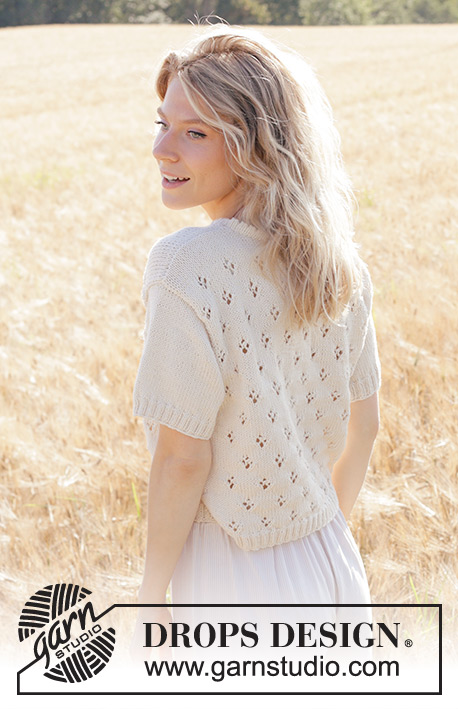
Knitted top in DROPS Cotton Merino. Piece is knitted bottom up with lace pattern and short sleeves. Size XS – XXL.
DROPS 250-7 |
|||||||||||||
|
---------------------------------------------------------- EXPLANATION FOR THE PATTERN: ---------------------------------------------------------- PATTERN: See diagrams A.1 and A.2. INCREASE TIP (applies to sleeves): Work until 1 stitch remains before marker thread, make 1 yarn over, knit 2 (marker thread is in the middle of these 2 stitches), make 1 yarn over. On next round knit yarns over twisted to avoid holes. Then work the new stitches in stocking stitch. ---------------------------------------------------------- START THE PIECE HERE: ---------------------------------------------------------- JUMPER - SHORT OVERVIEW OF THE PIECE: In this pattern long and short needles have been used, begin with fitting length and switch as needed. Piece is worked in the round on circular needle, from the bottom and up to armholes. Then divide the piece for front piece and back piece, and finish each part separately back and forth. Work sleeves bottom up, and work in the round on needle until armhole, then work sleeve back and forth on row. Sew parts together. Finish by picking up stitches around the neck and work a neck edge in the round. BODY: Cast on 216-236-260-280-308-336 stitches on circular needle size 2.5 mm with Cotton Merino. Knit 1 round. Then work rib (= knit 2/purl 2) in the round for 3 cm. Switch to circular needle size 4 mm. Knit next round while at the same time decreasing 42-46-54-58-66-66 stitches evenly = 174-190-206-222-242-270 stitches. Then work pattern from the beginning of round as follows: Knit 9-14-13-19-19-28, A.1 over the next 70-70-80-80-90-90 stitches, A.2, knit 12-20-18-26-26-40, A.1 over the next 70-70-80-80-90-90 stitches, A.2, knit 3-6-5-7-7-12. Continue the pattern like this. REMEMBER THE KNITTING TENSION! Work until piece measures 26-28-29-30-31-32 cm. DIVIDING FOR ARMHOLES: On next round divide the piece for front piece and back piece, work round as follows: * Cast off 6-8-8-12-12-16 stitches, knit 3-6-5-7-7-12, work A.1 over the next 70-70-80-80-90-90 stitches, work A.2, knit 3-6-5-7-7-12 *, work from *-* 1 more time on round. Fasten off. Now work front piece and back piece back and forth on needle until finished measurements. BACK PIECE: = 81-87-95-99-109-119 stitches. Continue back and forth with pattern as before, in each side cast off stitches for armholes, cast off as follows on every other row: 2 stitches 0-0-0-0-0-3 times, then 1 stitch 1-4-3-5-5-4 times = 79-79-89-89-99-99 stitches. When piece measures 41-44-46-48-50-52 cm, work in stocking stitch over all stitches, finish after a whole lace pattern. When piece measures 42-45-47-49-51-53, cast off the middle 13-13-15-15-17-17 stitches for neck and finish each shoulder separately. Then cast off for neck on every other row: Cast off 5 stitches 1 time, 3 stitches 1 time, then 1 stitch 1 time = 24-24-28-28-32-32 stitches for shoulder. Continue back and forth until piece measures 45-48-50-52-54-56 cm in total and cast off. Work the other shoulder the same way. FRONT PIECE: = 81-87-95-99-109-119 stitches. Continue back and forth with pattern as before, cast off for armholes the same way as on back piece = 79-79-89-89-99-99 stitches. When front piece measures 37-40-41-43-44-46 cm, work in stocking stitch over all stitches, finish after a whole lace pattern. When piece measures 38-41-42-44-45-47 cm, slip the middle 15-15-13-13-15-15 stitches on a thread for neck, and finish each shoulder separately. Then cast off for neck on every other row: Cast off 2 stitches 2-2-2-2-1-1 times, then 1 stitch 4-4-6-6-8-8 times = 24-24-28-28-32-32 stitches for shoulder. Continue back and forth until piece measures 45-48-50-52-54-56 cm in total and cast off. Work the other shoulder the same way. SLEEVES: Cast on 80-84-96-104-116-128 stitches on double pointed needles / short circular needle size 2.5 mm. Knit 1 round. Then work rib (= knit 2/purl 2) in the round for 3 cm. Switch to double pointed needles/short circular needle size 4 mm. Knit next round while AT THE SAME TIME decreasing 16-16-20-20-24-28 stitches evenly = 64-68-76-84-92-100 stitches. Insert a marker thread at beginning of round = mid under sleeve. Work in stocking stitch. When piece measures 4-4-4-5-6-6 cm, increase 1 stitch on each side of marker thread - read INCREASE TIP. Increase like this every 1-1-1-2-3-0 cm 6-6-4-3-1-1 times in total = 76-80-84-90-94-102 stitches. Work until piece measures 12-12-12-12-10-8 cm. SLEEVE CAP: On next round cast off 4-4-5-5-5-6 stitches on each side of marker thread (= 8-8-10-10-10-12 stitches cast off mid under sleeve). Then finish the piece back and forth on needle while at the same time casting off for sleeve cap in each side, cast off on every other row as follows: Cast off 3 stitches 2-2-3-3-4-2 times in each side, 2 stitches 2-1-1-2-1-1 times in each side. Then cast off 1 stitch in each side until piece measures 14-16-15-16-14-15 cm. Then cast off as follows in all sizes: Cast off 2 stitches 1 time in each side, 3 stitches 1 time in each side and 5 stitches 1 time in each side. Cast off the remaining stitches. Sleeve measures approx. 17-19-18-19-17-18 cm. ASSEMBLY: Sew the shoulder seams. Sew sleeves in body. NECK EDGE: Use circular needle / double pointed needles size 2.5 mm, pick up stitches around the neck from right side as follows: Begin at one shoulder seam and pick up 92 to 104 stitches (including stitches from thread mid front) – number of stitches must be divisible by 2. Work stocking stitch in the round for 2 cm. Then work an eyelet row as follows: * Knit 2 together, 1 yarn over *, work from *-* the entire round. Work in stocking stitch until neck edge measures 3½ cm. Loosely cast off. Fold the neck edge in eyelet row down on the inside of garment. Fasten neck edge to get a double neck edge. To avoid a tight neck edge that sticks out it is important to keep the seam elastic. |
|||||||||||||
Diagram explanations |
|||||||||||||
|
|||||||||||||
 |
|||||||||||||
 |
|||||||||||||
Have you finished this pattern?Tag your pictures with #dropspattern #whitespringtop or submit them to the #dropsfan gallery. Do you need help with this pattern?You'll find 30 tutorial videos, a Comments/Questions area and more by visiting the pattern on garnstudio.com. © 1982-2026 DROPS Design A/S. We reserve all rights. This document, including all its sub-sections, has copyrights. Read more about what you can do with our patterns at the bottom of each pattern on our site. |
|||||||||||||


With over 40 years in knitting and crochet design, DROPS Design offers one of the most extensive collections of free patterns on the internet - translated to 17 languages. As of today we count 325 catalogues and 12298 patterns translated into English (UK/cm). 12298
We work hard to bring you the best knitting and crochet have to offer, inspiration and advice as well as great quality yarns at incredible prices! Would you like to use our patterns for other than personal use? You can read what you are allowed to do in the Copyright text at the bottom of all our patterns. Happy crafting!
Post a comment to pattern DROPS 250-7
We would love to hear what you have to say about this pattern!
If you want to leave a question, please make sure you select the correct category in the form below, to speed up the answering process. Required fields are marked *.