Comments / Questions (18)
![]() Kinga wrote:
Kinga wrote:
Nie mogę przebrnąć początku .Chodzi o schematyA1 i A2 czy przy karczku przy dodawaniu oczek na początku jest schemat A 1 a potem tylko A 2 się powtarza ??
15.06.2025 - 22:38DROPS Design answered:
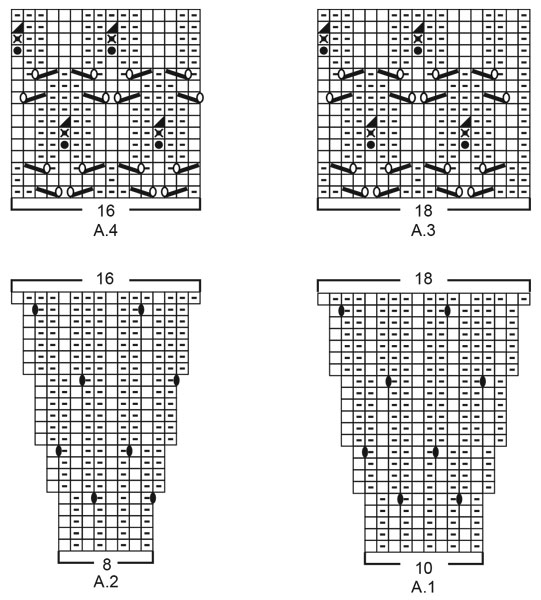
Witaj Kingo, '5 oczek obszycia przodu ściegiem francuskim, schemat A.1 (= 10 oczek), przerabiać A.2 aż zostaje 6 oczek , przerobić 1-sze oczko schematu A.1 i zakończyć przerabiając 5 oczek obszycia przodu ściegiem francuskim'. Tak wygląda pierwszy rząd wg schematów. Pozdrawiamy!
16.06.2025 - 15:52
![]() Marie wrote:
Marie wrote:
Jeg kan ikke få mønster til at blive ens på begge sider ved efter første udtagning i A1 og A2. 1 udtagning på retsiden er efter to masker og efter sidste udtagning er der 4 masker (de 3 masker i i A2 og den første maske i A1) skal det være sådan?
26.03.2023 - 12:34DROPS Design answered:
Hej Marie, udtagningerne er placerede så du får 1r, 2vr, 1r,1vr, 1r,2vr på 6.pind og når du tager ud næste gang får du 1r,2vr,1r,2vr osv :)
11.04.2023 - 15:49
![]() Martha wrote:
Martha wrote:
Just to confirm, the charts are worked 1st row from right to left and the next row left to right….is that correct? This applies to all charts?
12.07.2022 - 18:08DROPS Design answered:
Dear Martha, yes, this is the the correct way for reading our charts and applies to all patterns (unless explicitly stated otherwise). Happy knitting/crocheting!
12.07.2022 - 18:34
![]() Martha wrote:
Martha wrote:
I am still very confused with this pattern. The problem is where you knit on right side and purl on wrong, etc the pattern ends up as a garter stitch when you follow the graph. It doesn't knit into a stocking stitch. I am referring to A4 and A3. Is that how the pattern should be in a garter stitch. Even when there is a yarn over on the right side, if you follow the graph, it ends up knitting the yarn over on the wrong side instead of a purl. Please check your instructions
11.07.2022 - 16:24DROPS Design answered:
Dear Martha, from the right side, knit the white squares and purl the dash squares; from the wrong side, read from the left towards the right and purl the white square and knit the dash (= K over K and P over P) - the stitches in A.3/A.4 are worked the same way as in A.1/A.2 (where they looked like rib). Happy knitting!
11.07.2022 - 16:35
![]() Martha wrote:
Martha wrote:
Thanks for your response. However, when you follow the pattern, the digram explanations do not seem to make stocking stitch, but garter stitch as I have explained. Is this how the pattern is supposed to be or should I just knit the knit and purl the purl on whatever side its on. Thanks
11.07.2022 - 08:52DROPS Design answered:
Dear Martha, to work garter stitch, you should knit from RS and knit from WS while the stitches are either worked K from RS/P from WS = stocking stitch or P from RS/K from WS = reversed stocking stitch, hope it will help. Happy knitting!
11.07.2022 - 13:37
![]() Martha wrote:
Martha wrote:
Hi In the diagram explanations it says for the blank square - knit from the right side, purl from the wrong side and the square with a dash in it says purl from the right side, knit from the wrong side. Is this correct as it seems to make the stitches into a garter stitch? I think it should be knit the purl and purl the knit on the respective sides.
11.07.2022 - 07:13DROPS Design answered:
Dear Martha, the white squares are regular stocking stitch (knit from right side and purl from wrong side) and the dash are reversed stocking stitch (purl from right side and knit from wrong side). Hope it will help, happy knitting!
11.07.2022 - 08:42
![]() Táňa wrote:
Táňa wrote:
Dobrý den, u pletení sedla se střídají vzory A1 a A2, a na konci pak upletu 1. oko vzoru A.1 anebo upletu vzor A1, pak opakuji pouze vzor A2 a na konci pak upletu 1. oko vzoru A.1?
20.06.2022 - 19:56DROPS Design answered:
Dobrý den, Táňo, je to tak, že nejprve upleteme vzor A.1, pak A.2 který opakujeme a na konci upleteme jen 1. oko vzoru A.1 a 5 ok légy. Díky tomu bude vzor symetrický. Hodně zdaru! Hana
07.07.2022 - 08:50
![]() Janice wrote:
Janice wrote:
The mistake is on all sizes at the end of the 3rd row in A.5/A.6 . It should be a purl and not a knit (just like it is in row 3 in A.3/A.4). It should make an upside down 'T' of purls (3 purls in row 1 and 1 purl in the middle on each of row 2 and 3.) X X XXX
25.05.2022 - 21:23
![]() Janice wrote:
Janice wrote:
On A.5 and A.6 the far left side: isn't it the first 3 rows that should be a purl and not the first 2? On all the other charts it's an upside down 'T' (of purls) between all of these YO decreases.
25.05.2022 - 06:47DROPS Design answered:
Dear Janice, not sure what you mean here sorry, can you tell us which size you are working (different diagrams depending on the size) and which row in A.5/A.6 you are thinking of. Thanks in advance.
25.05.2022 - 16:19
![]() Julie wrote:
Julie wrote:
Ugh! I’m not that experienced at knitting and this pattern might be too much for me. What does “cast on 110 stitches including 5 band stitches in each side towards mid front” mean? I know I will have more ?? as I get going but I am having trouble even starting!
25.03.2022 - 01:20DROPS Design answered:
Dear Julie, since the 5 front band stitches are included you don't need to cast them on extra, you just need to cast on 110 stitches in size S. Happy knitting!
25.03.2022 - 07:51
Now and Forever Cardi#nowandforevercardi |
||||||||||||||||||||||||||||||||||
 |
 |
|||||||||||||||||||||||||||||||||
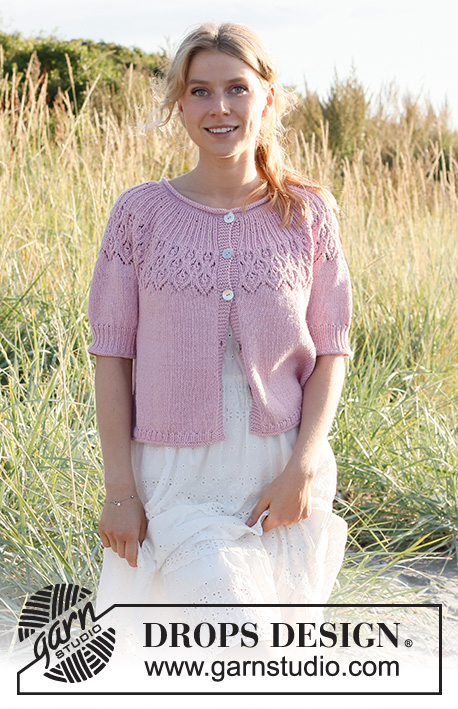
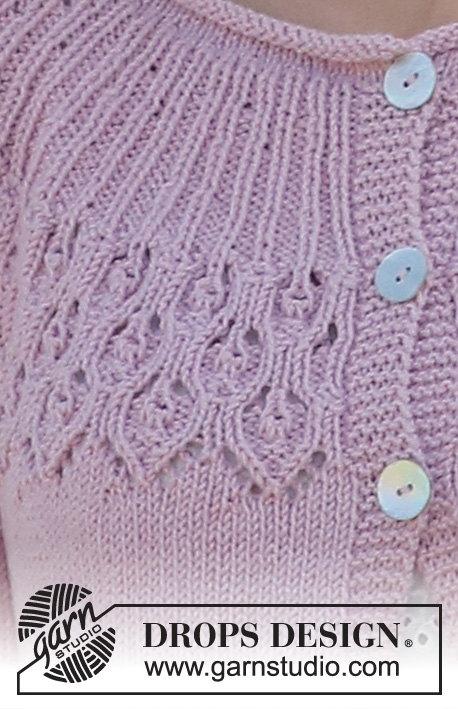
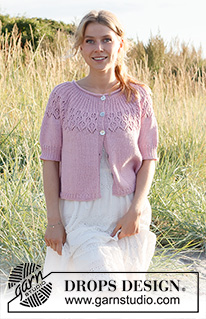
Knitted jacket in DROPS Cotton Merino. Piece is knitted top down with rolling edge in the neck, round yoke, lace pattern on yoke and short sleeves. Size: S - XXXL
DROPS 222-33 |
||||||||||||||||||||||||||||||||||
|
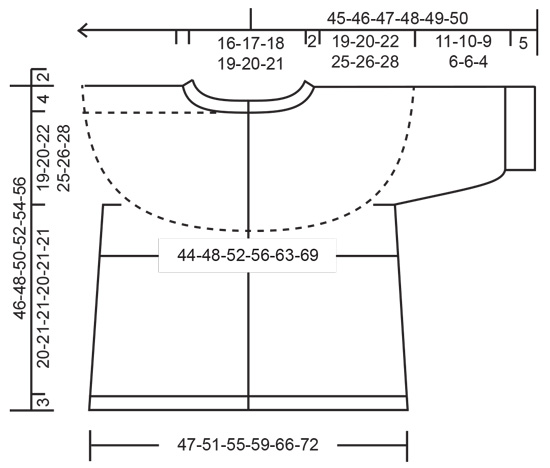
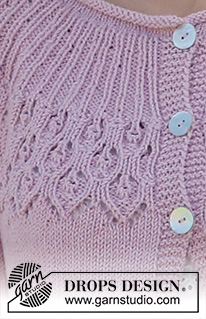
------------------------------------------------------- EXPLANATION FOR THE PATTERN: ------------------------------------------------------- GARTER STITCH (back and forth): Knit all rows. 1 ridge vertically = knit 2 rows. PATTERN: See diagrams A.1 to A.6. Choose diagram for your size (applies to A.5 and A.6). Diagrams show all rows in pattern seen from the right side. INCREASE/DECREASE TIP (evenly spaced): To calculate how to increase/decrease evenly, use the total number of stitches on row (e.g. 110 stitches) minus bands (e.g. 10 stitches), and divide the remaining 100 stitches by number of increases/decreases to be done (e.g. 39) = 2.6. In this example increase by making 1 yarn over after alternately approx. every 2nd and 3rd stitch, do not increase over bands. On next row work yarn overs twisted to avoid holes If decreasing knit in alternately approx. every 1st and 2nd stitch and every 2nd and 3rd stitch together. INCREASE TIP (applies to sides of body): All increases are done from the right side! Work until 4 stitches remain before marker thread, make 1 yarn over, work 8 stitches in stocking stitch (marker thread is in the middle of these 8 stitches), make 1 yarn over (= 2 stitches increased at the marker thread, and 4 stitches increased in total on row). On next row (wrong side) purl yarn overs twisted to avoid holes. Then work the new stitches in stocking stitch. BUTTONHOLES: Decrease for buttonholes on right band (when garment is worn). Decrease from right side when 3 stitches remain on row as follows: Make 1 yarn over, knit the next 2 stitches together, knit last stitch. On next row (wrong side) knit the yarn over to make a hole. Decrease for first buttonhole when rolling edge in the neck is done. Then decrease the next 4-4-5-5-5-5 buttonholes, approx. 8½-9-8-8-8½-9 cm between each. CAST-OFF TIP: To avoid a tight cast-off edge you may use a larger needle size. If this also is too tight, work a 1 yarn over after approx. every 6th stitch while casting off (cast off yarn overs as regular stitches). ------------------------------------------------------- START THE PIECE HERE: ------------------------------------------------------- JACKET - SHORT OVERVIEW OF THE PIECE: Work neck edge and yoke back and forth on circular needle from mid front, top down. Now divide yoke for body and sleeves. Work body back and forth on circular needle from mid front, top down. Work sleeves in the round on double pointed needles/short circular needle, top down. NECK EDGE: Cast on 110-114-118-124-128-132 stitches (including 5 band stitches in each side towards mid front) on circular needle size 3 mm with Cotton Merino. Purl 1 row (= wrong side). Then work in 8 rows in stocking stitch back and forth with 1 edge stitch in GARTER STITCH - read explanation above, in each side towards mid front (rolling edge). Insert 1 marker after the first 5 stitches on needle - measure yoke from this marker! Knit 1 row from right side while increasing 39-43-47-49-53-57 stitches evenly - read INCREASE/DECREASE TIP = 149-157-165-173-181-189 stitches. Remember BUTTONHOLES on right band - read explanation above. Purl 1 row from wrong side – purl yarn overs twisted, and knit the outermost 5 stitches in each side (= bands). Then work yoke as explained below. YOKE: Switch to circular needle size 4 mm and work first row from right side as follows: 5 band stitches in garter stitch, work A.1 (= 10 stitches), work A.2 until 6 stitches remain on row (= 16-17-18-19-20-21 repetitions of 8 stitches), work first stitch in A.1 (so that pattern begins and ends the same way in each side), and finish with 5 band stitches in garter stitch. Continue pattern like this back and forth and increase as shown in diagrams. REMEMBER THE KNITTING TENSION! When A.1 and A.2 have been worked vertically, there are 285-301-317-333-349-365 stitches on needle. Work next row as follows from right side: 5 band stitches in garter stitch, work A.3 (= 18 stitches), work A.4 until 6 stitches remain on row (= 16-17-18-19-20-21 repetitions of 16 stitches), work first stitch in A.3 (so that pattern begins and ends the same way in each side), and finish with 5 band stitches in garter stitch. NOTE! On the last 4 rows in last repetition of A.4 towards the band, work the last stitch in stocking stitch so that the pattern begins and ends the same way towards mid front. Continue pattern like this until A.3 and A.4 have been worked 1-1-1-2-2-2 times vertically. Work next row as follows from right side: 5 band stitches in garter stitch, work A.5 (= 18 stitches), work A.6 until 6 stitches remain on row (= 16-17-18-19-20-21 repetitions of 16 stitches), work first stitch in A.5 (so that pattern begins and ends the same way in each side), and finish with 5 band stitches in garter stitch. Continue pattern like this. On row marked with arrow in A.5 and A.6 increase 22-30-38-18-28-42 stitches evenly (there are 285-301-317-373-391-409 stitches on needle before increase begins) - remember INCREASE/DECREASE TIP = 307-331-355-391-419-451. When A.5 and A.6 have been worked vertically, work in stocking stitch back and forth with 5 band stitches in garter stitch in each side towards mid front until yoke measures 19-20-22-25-26-28 cm from marker at the neck. Now divide yoke for body and sleeves, i.e. work last row as follows: Work as before over the first 48-52-55-60-66-72 stitches (= front piece), slip the next 62-66-72-80-82-86 stitches on 1 stitch holder for sleeve, cast on 6-6-8-8-10-10 new stitches on needle (= in the side under sleeve), work 87-95-101-111-123-135 stitches in stocking stitch (= back piece), slip the next 62-66-72-80-82-86 stitches on 1 stitch holder for sleeve, cast on 6-6-8-8-10-10 new stitches on needle (= in the side under sleeve), and work as before over the remaining 48-52-55-60-66-72 stitches (= front piece). Finish body and sleeves separately. NOW MEASURE PIECE FROM HERE! BODY: = 195-211-227-247-275-299 stitches. Insert 1 marker thread after 51-55-59-64-71-77 stitches in from each side (= in the side of body). There are 93-101-109-119-133-145 stitches between marker threads on back piece. Move the marker threads upwards when working; they should be used for increase later in the sides on body. Work in stocking stitch back and forth with 5 band stitches in garter stitch in each side towards mid front. When piece measures 6 cm from division, increase 1 stitch on each side of both marker threads - read INCREASE TIP( = 4 stitches increased). Increase like this every 6 cm 3 times in total in each side = 207-223-239-259-287-311 stitches. Work until piece measures 20-21-21-20-21-21 cm from division. Approx. 3 cm remain until finished measurements, try the jacket on and work until desired length. Now increase stitches as explained below - this is done to avoid the rib from contracting the piece together. Work 1 row from right side while increasing 32-34-36-40-42-48 stitches evenly = 239-257-275-299-329-359 stitches. Switch to circular needle size 3 mm. Work next row as follows from wrong side: 5 band stitches in garter stitch, * purl 1, knit 2 *, repeat from *-* until 6 stitches remain on needle, purl 1 , and finish with 5 band stitches in garter stitch. Continue rib like this until 5 rows rib have been worked in total. Then knit 1 row from right side and knit 1 row from wrong side. Cast off by knitting from right side - read CAST-OFF TIP! Jacket measures approx. 46-48-50-52-54-56 cm from shoulder and down. SLEEVES: Slip the 62-66-72-80-82-86 stitches from stitch holder in one side of piece on double pointed needles or a short circular needle size 4 mm and pick in addition up 1 stitch in each of the 6-6-8-8-10-10 new stitches cast on under sleeve = 68-72-80-88-92-96 stitches. Work in stocking stitch in the round until piece measures 11-10-9-6-6-4 cm from division. Approx. 5 cm remain until finished measurements, try the jacket on and work until desired length. Knit 1 round while decreasing 8-6-8-10-8-6 stitches evenly - read INCREASE/DECREASE TIP = 60-66-72-78-84-90 stitches. Switch to double pointed needles size 3 mm. Work rib in the round = knit 1/purl 2 for 5 cm. Then knit 1 round and purl 1 round. Cast off by knitting– read CAST-OFF TIP. Sleeve measures approx. 16-15-14-11-11-9 cm from division. Work the other sleeve the same way. ASSEMBLY: Sew the buttons on to the left band. |
||||||||||||||||||||||||||||||||||
Diagram explanations |
||||||||||||||||||||||||||||||||||
|
||||||||||||||||||||||||||||||||||
 |
||||||||||||||||||||||||||||||||||
 |
||||||||||||||||||||||||||||||||||
 |
||||||||||||||||||||||||||||||||||
 |
||||||||||||||||||||||||||||||||||
Have you finished this pattern?Tag your pictures with #dropspattern #nowandforevercardi or submit them to the #dropsfan gallery. Do you need help with this pattern?You'll find 29 tutorial videos, a Comments/Questions area and more by visiting the pattern on garnstudio.com. © 1982-2026 DROPS Design A/S. We reserve all rights. This document, including all its sub-sections, has copyrights. Read more about what you can do with our patterns at the bottom of each pattern on our site. |
||||||||||||||||||||||||||||||||||






Post a comment to pattern DROPS 222-33
We would love to hear what you have to say about this pattern!
If you want to leave a question, please make sure you select the correct category in the form below, to speed up the answering process. Required fields are marked *.