DROPS Cotton Merino
DROPS Cotton Merino
50% Wool, 50% Cotton
from 3.55 £ /50g
Get the yarn to make this pattern from 28.40£.

The yarn cost is calculated from the pattern’s smallest size and the yarn’s cheapest product type. Looking for an even better price? You might find it on the DROPS Deals!

DROPS SS24

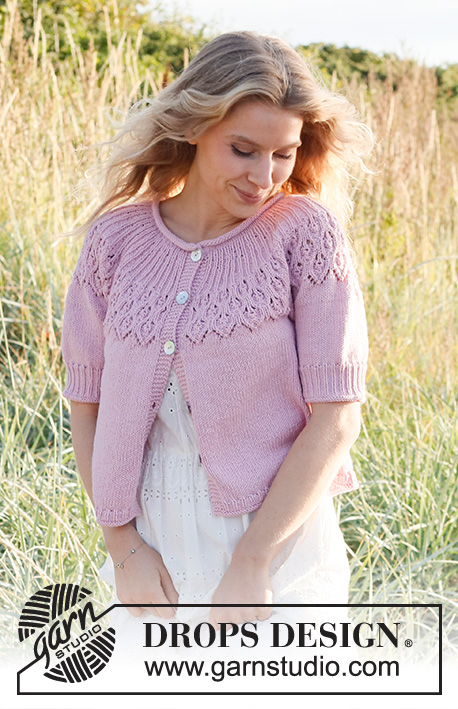
Now and Forever Cardi

Knitted jacket in DROPS Cotton Merino. Piece is knitted top down with rolling edge in the neck, round yoke, lace pattern on yoke and short sleeves. Size: S - XXXL

DROPS 222-33
DROPS design: Pattern cm-130
Yarn group B
-------------------------------------------------------

SIZE:
S - M - L - XL - XXL - XXXL

MATERIALS:
DROPS COTTON MERINO from Garnstudio (belongs to yarn group B)
400-450-450-500-550-600 g colour 05, powder pink

KNITTING TENSION:
21 stitches in width and 28 rows vertically in stocking stitch = 10 x 10 cm.

NEEDLES:
DROPS DOUBLE POINTED NEEDLES SIZE 4 mm
DROPS CIRCULAR NEEDLE SIZE 4 mm : Length 40 and 60 or 80 cm for stocking stitch.
DROPS DOUBLE POINTED NEEDLES SIZE 3 mm
DROPS CIRCULAR NEEDLE SIZE 3 mm: Length 80 cm for edges.
Needle size is only a suggestion! If you have too many stitches on 10 cm switch to a larger needle size. If you have too few stitches on 10 cm switch to a smaller needle size.

DROPS MOTHER-OF-PEARL BUTTON ARCHED (white), NO 522: 5-5-6-6-6-6 pieces

-------------------------------------------------------

Alternative Yarn – See how to change yarns here
Yarn Groups A to F – Use the same pattern and change the yarn here
Yarn usage using an alternative yarn – Use our yarn converter here

-------------------------------------------------------

DROPS Cotton Merino
DROPS Cotton Merino
50% Wool, 50% Cotton
from 3.55 £ /50g
Get the yarn to make this pattern from 28.40£.

The yarn cost is calculated from the pattern’s smallest size and the yarn’s cheapest product type. Looking for an even better price? You might find it on the DROPS Deals!

Pattern instructions

NOTE: This pattern is written in British English. All measurements in charts are in cm. For conversion from cm to inches - click here. There are different terms for crocheting in British and American English. If this pattern includes crochet, click for "crochet terms" here. For this pattern in American English, please click here.
-------------------------------------------------------

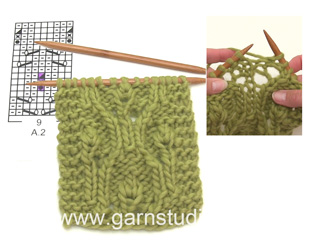
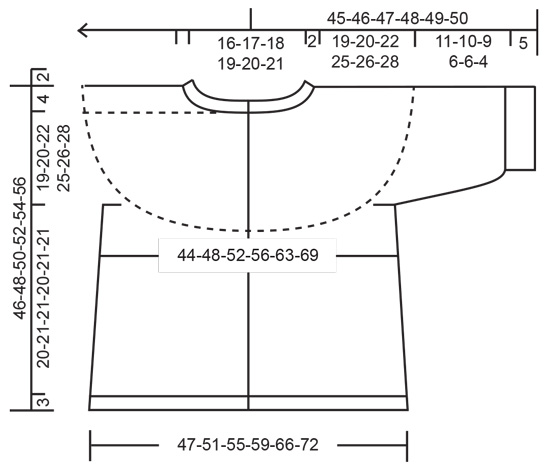
EXPLANATION FOR THE PATTERN:

-------------------------------------------------------

GARTER STITCH (back and forth):
Knit all rows.
1 ridge vertically = knit 2 rows.

PATTERN: 
See diagrams A.1 to A.6. Choose diagram for your size (applies to A.5 and A.6).
Diagrams show all rows in pattern seen from the right side.

INCREASE/DECREASE TIP (evenly spaced):
To calculate how to increase/decrease evenly, use the total number of stitches on row (e.g. 110 stitches) minus bands (e.g. 10 stitches), and divide the remaining 100 stitches by number of increases/decreases to be done (e.g. 39) = 2.6. 
In this example increase by making 1 yarn over after alternately approx. every 2nd and 3rd stitch, do not increase over bands. On next row work yarn overs twisted to avoid holes
If decreasing knit in alternately approx. every 1st and 2nd stitch and every 2nd and 3rd stitch together.

INCREASE TIP (applies to sides of body):
All increases are done from the right side!
Work until 4 stitches remain before marker thread, make 1 yarn over, work 8 stitches in stocking stitch (marker thread is in the middle of these 8 stitches), make 1 yarn over (= 2 stitches increased at the marker thread, and 4 stitches increased in total on row). On next row (wrong side) purl yarn overs twisted to avoid holes. Then work the new stitches in stocking stitch.

BUTTONHOLES:
Decrease for buttonholes on right band (when garment is worn). Decrease from right side when 3 stitches remain on row as follows: Make 1 yarn over, knit the next 2 stitches together, knit last stitch. On next row (wrong side) knit the yarn over to make a hole.
Decrease for first buttonhole when rolling edge in the neck is done. Then decrease the next 4-4-5-5-5-5 buttonholes, approx. 8½-9-8-8-8½-9 cm between each.

CAST-OFF TIP:
To avoid a tight cast-off edge you may use a larger needle size. If this also is too tight, work a 1 yarn over after approx. every 6th stitch while casting off (cast off yarn overs as regular stitches).

-------------------------------------------------------

START THE PIECE HERE:

-------------------------------------------------------

JACKET - SHORT OVERVIEW OF THE PIECE:
Work neck edge and yoke back and forth on circular needle from mid front, top down. Now divide yoke for body and sleeves. Work body back and forth on circular needle from mid front, top down. Work sleeves in the round on double pointed needles/short circular needle, top down.

NECK EDGE:
Cast on 110-114-118-124-128-132 stitches (including 5 band stitches in each side towards mid front) on circular needle size 3 mm with Cotton Merino. Purl 1 row (= wrong side). Then work in 8 rows in stocking stitch back and forth with 1 edge stitch in GARTER STITCH - read explanation above, in each side towards mid front (rolling edge).
Insert 1 marker after the first 5 stitches on needle - measure yoke from this marker!
Knit 1 row from right side while increasing 39-43-47-49-53-57 stitches evenly - read INCREASE/DECREASE TIP = 149-157-165-173-181-189 stitches. Remember BUTTONHOLES on right band - read explanation above.
Purl 1 row from wrong side – purl yarn overs twisted, and knit the outermost 5 stitches in each side (= bands). Then work yoke as explained below.

YOKE:
Switch to circular needle size 4 mm and work first row from right side as follows: 5 band stitches in garter stitch, work A.1 (= 10 stitches), work A.2 until 6 stitches remain on row (= 16-17-18-19-20-21 repetitions of 8 stitches), work first stitch in A.1 (so that pattern begins and ends the same way in each side), and finish with 5 band stitches in garter stitch.
Continue pattern like this back and forth and increase as shown in diagrams. REMEMBER THE KNITTING TENSION!
When A.1 and A.2 have been worked vertically, there are 285-301-317-333-349-365 stitches on needle.
Work next row as follows from right side: 5 band stitches in garter stitch, work A.3 (= 18 stitches), work A.4 until 6 stitches remain on row (= 16-17-18-19-20-21 repetitions of 16 stitches), work first stitch in A.3 (so that pattern begins and ends the same way in each side), and finish with 5 band stitches in garter stitch. NOTE! On the last 4 rows in last repetition of A.4 towards the band, work the last stitch in stocking stitch so that the pattern begins and ends the same way towards mid front.
Continue pattern like this until A.3 and A.4 have been worked 1-1-1-2-2-2 times vertically.
Work next row as follows from right side: 5 band stitches in garter stitch, work A.5 (= 18 stitches), work A.6 until 6 stitches remain on row (= 16-17-18-19-20-21 repetitions of 16 stitches), work first stitch in A.5 (so that pattern begins and ends the same way in each side), and finish with 5 band stitches in garter stitch. Continue pattern like this.

On row marked with arrow in A.5 and A.6 increase 22-30-38-18-28-42 stitches evenly (there are 285-301-317-373-391-409 stitches on needle before increase begins) - remember INCREASE/DECREASE TIP = 307-331-355-391-419-451.

When A.5 and A.6 have been worked vertically, work in stocking stitch back and forth with 5 band stitches in garter stitch in each side towards mid front until yoke measures 19-20-22-25-26-28 cm from marker at the neck.
Now divide yoke for body and sleeves, i.e. work last row as follows: Work as before over the first 48-52-55-60-66-72 stitches (= front piece), slip the next 62-66-72-80-82-86 stitches on 1 stitch holder for sleeve, cast on 6-6-8-8-10-10 new stitches on needle (= in the side under sleeve), work 87-95-101-111-123-135 stitches in stocking stitch (= back piece), slip the next 62-66-72-80-82-86 stitches on 1 stitch holder for sleeve, cast on 6-6-8-8-10-10 new stitches on needle (= in the side under sleeve), and work as before over the remaining 48-52-55-60-66-72 stitches (= front piece). Finish body and sleeves separately. NOW MEASURE PIECE FROM HERE!

BODY:
= 195-211-227-247-275-299 stitches. Insert 1 marker thread after 51-55-59-64-71-77 stitches in from each side (= in the side of body). There are 93-101-109-119-133-145 stitches between marker threads on back piece.
Move the marker threads upwards when working; they should be used for increase later in the sides on body.
Work in stocking stitch back and forth with 5 band stitches in garter stitch in each side towards mid front.
When piece measures 6 cm from division, increase 1 stitch on each side of both marker threads - read INCREASE TIP( = 4 stitches increased). Increase like this every 6 cm 3 times in total in each side = 207-223-239-259-287-311 stitches.
Work until piece measures 20-21-21-20-21-21 cm from division. Approx. 3 cm remain until finished measurements, try the jacket on and work until desired length.
Now increase stitches as explained below - this is done to avoid the rib from contracting the piece together.
Work 1 row from right side while increasing 32-34-36-40-42-48 stitches evenly = 239-257-275-299-329-359 stitches.
Switch to circular needle size 3 mm. Work next row as follows from wrong side: 5 band stitches in garter stitch, * purl 1, knit 2 *, repeat from *-* until 6 stitches remain on needle, purl 1 , and finish with 5 band stitches in garter stitch. Continue rib like this until 5 rows rib have been worked in total. Then knit 1 row from right side and knit 1 row from wrong side. Cast off by knitting from right side - read CAST-OFF TIP! Jacket measures approx. 46-48-50-52-54-56 cm from shoulder and down.

SLEEVES:
Slip the 62-66-72-80-82-86 stitches from stitch holder in one side of piece on double pointed needles or a short circular needle size 4 mm and pick in addition up 1 stitch in each of the 6-6-8-8-10-10 new stitches cast on under sleeve = 68-72-80-88-92-96 stitches.
Work in stocking stitch in the round until piece measures 11-10-9-6-6-4 cm from division. Approx. 5 cm remain until finished measurements, try the jacket on and work until desired length.
Knit 1 round while decreasing 8-6-8-10-8-6 stitches evenly - read INCREASE/DECREASE TIP = 60-66-72-78-84-90 stitches.
Switch to double pointed needles size 3 mm. Work rib in the round = knit 1/purl 2 for 5 cm.
Then knit 1 round and purl 1 round. Cast off by knitting– read CAST-OFF TIP. Sleeve measures approx. 16-15-14-11-11-9 cm from division. Work the other sleeve the same way.

ASSEMBLY:
Sew the buttons on to the left band.

This pattern has been corrected.

Updated online: 11.05.2021
Correction in diagram A.1.
Updated online: 11.05.2021
YOKE:...NOTE! On the last 4 rows in last repetition of A.4 towards the band, work the last stitch in stocking stitch so that the pattern begins and ends the same way towards mid front...

Diagram

symbols = knit from the right side, purl from the wrong side
symbols = purl from the right side, knit from the wrong side
symbols = between 2 stitches make 1 yarn over, on next row knit or purl yarn over as shown in diagram (it should make a hole)
symbols = between 2 stitches make 1 yarn over, on next row knit or purl yarn over twisted as shown in diagram (it should not make a hole)
symbols = knit 2 together (= 1 stitch decreased)
symbols = slip 1 stitch knitwise, knit 1, pass slipped stitch over stitch worked (= 1 stitch decreased)
symbols = in stitch below next stitch knit 1, 1 yarn over, knit 1 (= 2 stitches increased)
symbols = work 3 stitches in stocking stitch (i.e. purl from wrong side)
symbols = slip 2 stitches knitwise, knit 1, pass the 2 slipped stitches over stitch worked (= 2 stitches decreased)
symbols = slip 1 stitch knitwise, knit 2 stitches together, pass slipped stitch over stitches worked together (= 2 stitches decreased)
symbols = increase row
diagram
diagram
diagram
diagram

Each of our patterns has specific tutorial videos to help you.

Do you have a question? See a list of frequently asked questions (FAQ)

Knitting tension is what determines the final measurements of your work, and is usually measured per 10 x 10 cm. It is provided like so: number of stitches in width x number of rows in height - eg: 19 stitches x 26 rows = 10 x 10 cm.

The knitting tension is very individual; some people knit/crochet loosely while others work tightly. You adjust the knitting tension with the needle size, which is why the suggested needle size is only meant as a guide! You need to adjust this (up or down) to ensure that YOUR knitting tension matches the knitting tension provided in the pattern. If you work with a different knitting tension than provided you will have a different yarn consumption, and your work will have different measurements than what the pattern suggests.

The knitting tension also determines which yarns can replace each other. As long as you achieve the same knitting tension you can replace one yarn with another.

See DROPS lesson: How to measure your tension/gauge

See DROPS video: How to make a gauge tension swatch

The required amount of yarn is provided in grams, eg: 450 g. To calculate how many balls you’ll need you first need to know how many grams are in 1 ball (25g, 50g or 100g). This information is available if you click on the individual yarn quality on our pages. Divide the amount required with the amount of each ball. For example, if each ball is 50g (the most common amount), the calculation will be as follows: 450 / 50 = 9 balls.

The important thing when changing from one yarn to another is that the knitting/crochet tension remains the same. This is so that the measurements of the finished piece will be the same as on the sketch provided. It is easier to achieve the same knitting tension using yarns from the same yarn group. It is also possible to work with multiple strands of a thinner yarn to achieve the knitting tension of a thicker one. Please try our yarn converter. We recommend you to always work a test swatch.

Please NOTE: when changing yarn the garment might have a different look and feel to the garment in the photo, due to individual properties and qualities of each yarn.

See DROPS lesson: Can I use a different yarn than the one mentioned in the pattern?

All our yarns are categorised into yarn groups (from A to F) according to thickness and knitting tension – group A contains the thinnest yarns and group F the thickest. This makes it easier for you to find alternative yarns to our patterns, should you wish to switch yarn. All yarns within the same group have a similar knitting tension and can easily replace each other. However, different yarn qualities have different structures and properties which will give the finished work a unique look and feel.

Click here for an overview of the yarns in each yarn group

At the top of all our patterns you’ll find a link to our yarn calculator, which is a helpful tool should you wish to use a different yarn than suggested. By filling in the yarn quality you wish to replace, the amount (in your size) and number of strands, the calculator will present good alternative yarns with the same knitting tension. Additionally it will tell you how much you’ll require in the new qualities and whether you’ll need to work with multiple strands. Most skeins are 50g (some are 25g or 100g).

If the pattern is worked with multiple colours, every colour will have to be calculated separately. Similarly, if the pattern is worked with several strands of different yarns (for example 1 strand Alpaca and 1 strand Kid-Silk) you will have to find alternatives for each, individually.

Click here to see our yarn calculator

Since different yarns have different qualities and textures we have chosen to keep the original yarn in our patterns. However, you can easily find options among our available qualities by using our yarn calculator, or simply pick a yarn from the same yarn group.

It is possible that some retailers still have discontinued yarns in stock, or that someone has a few skeins at home that they would like to find patterns for.

The yarn calculator will provide both alternative yarn as well as required amount in the new quality.

If you think it's hard to decide what size to make, it can be a good idea to measure a garment you own already and like the size of. Then you can pick the size by comparing those measures with the ones available in the pattern's size chart.

You'll find the size chart at the bottom of the pattern.

See DROPS lesson: How to read size chart

The needle size provided in the pattern serves only as a guide, the important thing is to follow the knitting tension. And since knitting tension is very individual, you will have to adjust the needle size to ensure that YOUR tension is the same as in the pattern – maybe you’ll have to adjust 1, or even 2 needle sizes, up or down to achieve the correct tension. For this, we recommend that you work test swatches.

Should you work with a different knitting tension than the one provided, the measurements of the finished garment might deviate from the measurement sketch.

See DROPS lesson: How to measure your tension/gauge

See DROPS video: How to make a tension/gauge swatch

Working a garment top-down provides more flexibility and room for personal adjustment. For example it is easier to try the garment on while working, as well as making adjustments to length of yoke and shoulder caps.

The instructions are carefully explaining every step, in the correct order. Diagrams are adjusted to the knitting direction and are worked as usual.

The diagram depicts all rows/rounds, and every stitch seen from the right side. It is read from bottom to top, from right to left. 1 square = 1 stitch.

When working back and forth, every other row is worked from the right side and every other row is worked from the wrong side. When working from the wrong side, the diagram will have to be worked reversed: from left to right, knit stitches are purled, purl stitches are knit etc.

When working in the round every round is worked from the right side and the diagram are worked from right to left on all rounds.

See DROPS lesson: How to read knitting diagrams

The diagram depicts all rows/rounds, and every stitch seen from the right side. It is worked from bottom to top, from right to left.

When working back and forth every other row is worked from the right side: from right to left and every other row is worked from the wrong side: from left to right.

When working in the round, every row in the diagram are worked from the right side, from right to left.

When working a circular diagram you start in the middle and work your way outwards, counter clockwise, row by row.

The rows usually start with a given number of chain stitches (equivalent to the height of the following stitch), this will either be depicted in the diagram or explained in the pattern.

See DROPS lesson: How to read crochet diagrams

Instructions for working several diagrams after each other on the same row/round, will often be written like so: “work A.1, A.2, A.3 a total of 0-0-2-3-4 times". This means you work A.1 once, then A.2 is worked once, and A.3 is repeated (in width) the number of times provided for your size – in this case like so: S = 0 times, M = 0 times, L=2 times, XL= 3 times and XXL = 4 times.

The diagrams are worked as usual: begin with the first row in A.1, then work the first row in A.2 etc.

See DROPS lesson: How to read knitting diagrams

See DROPS lesson: How to read crochet diagrams

The total width of the garment (from wrist-to-wrist) will be larger in the larger sizes, despite the actual sleeves being shorter. The larger sizes have longer sleeve caps and wider shoulders, so there will be a good fit in all sizes.

The measurement sketch/schematic drawing provides information regarding the full length of the garment. If it’s a jumper or a jacket the length is measured from the highest point on the shoulder closest to the neckline, and straight down to the bottom of the garment. It is NOT measured from the tip of shoulder. Similarly, the length of yoke is measured from the highest point on the shoulder and down to where yoke is split into body and sleeves.

On a jacket measures are never taken along bands, unless specifically stated. Always measure inside band stitches when measuring the length.

See DROPS lesson: How to read a schematic drawing

Diagrams are often repeated on the round or in height. 1 repeat is the diagram the way it appears in the pattern. If it says to work 5 repeats of A.1 in the round, then you work A.1 a total of 5 times after/next to each other in the round. If it says to work 2 repeats of A.1 vertically/in height you work the entire diagram once, then begin again at the start and work the entire diagram one more time.

Chain stitches are slightly narrower than other stitches and to avoid working the cast-on edge too tight, we simply chain more stitches to begin with. The stitch count will be adjusted on the following row to fit the pattern and measurement sketch.

The rib edge is more elastic and will contract slightly compared to, for example, stocking stitch. By increasing before the rib edge, you avoid a visible difference in width between the rib edge and the rest of the body.

It’s very easy to cast off too tightly, and by making yarn overs while casting off (and simultaneously casting these off) you avoid a too tight cast off edge.

See DROPS video: How to bind off with yarn overs (yo)

To achieve an even increase (or decrease) you can increase on, for example: every 3rd and 4th row alternately, like so: work 2 rows and increase on the 3rd row, work 3 rows and increase on the 4th. Repeat this until the increase is complete.

See DROPS lesson: Increase or decrease 1 st on every 3rd and 4th row alternately

Should you prefer to work in the round instead of back and forth, you may of course adjust the pattern. You’ll need to add steeks mid-front (usually 5 stitches), and follow the instructions. When you would normally turn and work from the wrong side, simply work across the steek and continue in the round. At the end you’ll cut the piece open, pick up stitches to work bands, and cover the cut edges.

See DROPS video: How to knit steeks and cut open

Should you prefer to work back and forth instead of in the round, you may of course adjust the pattern so you work the pieces separately and then assemble them at the end. Divide the stitches for the body in 2, add 1 edge stitch in each side (for sewing) and work the front and back pieces separately.

See DROPS lesson: Can I adapt a pattern for circular needles into straight needles?

Pattern repeats can vary slightly in the different sizes, in order to get the correct proportions. If you’re not working the exact same size as the garment in the photo, yours might deviate slightly. This has been carefully developed and adjusted so that the complete impression of the garment is the same in all sizes.

Make sure to follow instructions and diagrams for your size!

If you have found a pattern you like which is available in women’s size it’s not very difficult to convert it to men’s size. The biggest difference will be the length of sleeves and body. Start working on the women size that you think would fit across the chest. The additional length will be worked right before you cast off for the armhole/sleeve cap. If the pattern is worked top-down you can add the length right after the armhole or before the first decrease on sleeve.

Regarding additional yarn amount, this will depend on how much length you add, but it is better with a skein too many than too few.

All yarns will have excess fibres (from production) that might come off as lint or shedding. Brushed yarns (ie hairier yarns) have more of these loose, excess fibres, causing more shedding.

Shedding also depends on what is worn under or over the garment, and whether this pulls at the yarn fibres. It’s therefore not possible to guarantee that there will be no shedding

Below are some tips on how to get the best result when working with hairier yarns:

1. When the garment is finished (before you wash it) shake it vigorously so the looser hairs come off. NOTE: do NOT use a lint roller, brush or any method that pulls at the yarn.

2. Place the garment in a plastic bag and put it in your freezer - the temperature will cause the fibres to become less attached to each other, and excess fibres will come off easier.

3. Leave in the freezer for a few hours before taking it out and shaking it again.

4. Wash the garment according to the instructions on the yarn label.

Pilling is a natural process that happens to even the most exclusive of fibers. It's a natural sign of wear and tear that is hard to avoid, and that is most visible in high friction areas of your garment like a sweater's arms and cuffs.

You can make your garment look as new by removing the pilling, using a fabric comb or a pill/lint remover.

Still can't find the answer you need? Then scroll down and leave your question so one of our experts can try to help you. This will be done normally within 5 to 10 working days.
In the meantime, you can read the questions and answers that others have left to this pattern or join the DROPS Workshop on Facebook to get help from fellow knitters/crocheters!

You might also like...

Post a comment to pattern DROPS 222-33

We would love to hear what you have to say about this pattern!

If you want to leave a question, please make sure you select the correct category in the form below, to speed up the answering process. Required fields are marked *.

Comments / Questions (18)

country flag Marie wrote:

Jeg kan ikke få mønster til at blive ens på begge sider ved efter første udtagning i A1 og A2. 1 udtagning på retsiden er efter to masker og efter sidste udtagning er der 4 masker (de 3 masker i i A2 og den første maske i A1) skal det være sådan?

26.03.2023 - 12:34

DROPS Design answered:

Hej Marie, udtagningerne er placerede så du får 1r, 2vr, 1r,1vr, 1r,2vr på 6.pind og når du tager ud næste gang får du 1r,2vr,1r,2vr osv :)

11.04.2023 - 15:49

country flag Martha wrote:

Just to confirm, the charts are worked 1st row from right to left and the next row left to right….is that correct? This applies to all charts?

12.07.2022 - 18:08

DROPS Design answered:

Dear Martha, yes, this is the the correct way for reading our charts and applies to all patterns (unless explicitly stated otherwise). Happy knitting/crocheting!

12.07.2022 - 18:34

country flag Martha wrote:

I am still very confused with this pattern. The problem is where you knit on right side and purl on wrong, etc the pattern ends up as a garter stitch when you follow the graph. It doesn't knit into a stocking stitch. I am referring to A4 and A3. Is that how the pattern should be in a garter stitch. Even when there is a yarn over on the right side, if you follow the graph, it ends up knitting the yarn over on the wrong side instead of a purl. Please check your instructions

11.07.2022 - 16:24

DROPS Design answered:

Dear Martha, from the right side, knit the white squares and purl the dash squares; from the wrong side, read from the left towards the right and purl the white square and knit the dash (= K over K and P over P) - the stitches in A.3/A.4 are worked the same way as in A.1/A.2 (where they looked like rib). Happy knitting!

11.07.2022 - 16:35

country flag Martha wrote:

Thanks for your response. However, when you follow the pattern, the digram explanations do not seem to make stocking stitch, but garter stitch as I have explained. Is this how the pattern is supposed to be or should I just knit the knit and purl the purl on whatever side its on. Thanks

11.07.2022 - 08:52

DROPS Design answered:

Dear Martha, to work garter stitch, you should knit from RS and knit from WS while the stitches are either worked K from RS/P from WS = stocking stitch or P from RS/K from WS = reversed stocking stitch, hope it will help. Happy knitting!

11.07.2022 - 13:37

country flag Martha wrote:

Hi In the diagram explanations it says for the blank square - knit from the right side, purl from the wrong side and the square with a dash in it says purl from the right side, knit from the wrong side. Is this correct as it seems to make the stitches into a garter stitch? I think it should be knit the purl and purl the knit on the respective sides.

11.07.2022 - 07:13

DROPS Design answered:

Dear Martha, the white squares are regular stocking stitch (knit from right side and purl from wrong side) and the dash are reversed stocking stitch (purl from right side and knit from wrong side). Hope it will help, happy knitting!

11.07.2022 - 08:42

country flag Táňa wrote:

Dobrý den, u pletení sedla se střídají vzory A1 a A2, a na konci pak upletu 1. oko vzoru A.1 anebo upletu vzor A1, pak opakuji pouze vzor A2 a na konci pak upletu 1. oko vzoru A.1?

20.06.2022 - 19:56

DROPS Design answered:

Dobrý den, Táňo, je to tak, že nejprve upleteme vzor A.1, pak A.2 který opakujeme a na konci upleteme jen 1. oko vzoru A.1 a 5 ok légy. Díky tomu bude vzor symetrický. Hodně zdaru! Hana

07.07.2022 - 08:50

country flag Janice wrote:

A picture is worth a thousand words: https://gyazo.com/40c716914d33a43e2c70aa3eba4cda96

25.05.2022 - 21:33

country flag Janice wrote:

The mistake is on all sizes at the end of the 3rd row in A.5/A.6 . It should be a purl and not a knit (just like it is in row 3 in A.3/A.4). It should make an upside down 'T' of purls (3 purls in row 1 and 1 purl in the middle on each of row 2 and 3.) X X XXX

25.05.2022 - 21:23

country flag Janice wrote:

On A.5 and A.6 the far left side: isn't it the first 3 rows that should be a purl and not the first 2? On all the other charts it's an upside down 'T' (of purls) between all of these YO decreases.

25.05.2022 - 06:47

DROPS Design answered:

Dear Janice, not sure what you mean here sorry, can you tell us which size you are working (different diagrams depending on the size) and which row in A.5/A.6 you are thinking of. Thanks in advance.

25.05.2022 - 16:19

country flag Julie wrote:

Ugh! I’m not that experienced at knitting and this pattern might be too much for me. What does “cast on 110 stitches including 5 band stitches in each side towards mid front” mean? I know I will have more ?? as I get going but I am having trouble even starting!

25.03.2022 - 01:20

DROPS Design answered:

Dear Julie, since the 5 front band stitches are included you don't need to cast them on extra, you just need to cast on 110 stitches in size S. Happy knitting!

25.03.2022 - 07:51