
Popular categories
Looking for a yarn?


Comments / Questions (70)
![]() Misia wrote:
Misia wrote:
Hei, haluan varmistaa: "kun olet neulonut piirrokset A.1 ja A.2 loppuun, jatka mallineuletta ja lisäyksiä kuten aiemmin" tarkoittaa siis, että pitsineuletta jatketaan niin, että joka toinen kerros lisätään silmukka A1a:n alkuun, A1c:n loppuun ja A2:n alkuun ja loppuun? Kuinka monta kerrosta tätä tulee yhteensä?
04.03.2021 - 15:19DROPS Design answered:
Kyllä, lisäyksiä jatketaan kuten aiemmin, eli työhön lisätään joka 2. kerroksella 8 silmukkaa. Tämä tehdään yhteensä 22-25-28-32-35-38 kertaa.
24.03.2021 - 16:41
![]() Elisabeth Burrell wrote:
Elisabeth Burrell wrote:
Trying to get the diagram into my head and already stuck on this question: does every other round begin with a YARN OVER as per your symbol description??
25.02.2021 - 03:13DROPS Design answered:
Hi Elizabeth, No, each round begins with knit 1, then you start the pattern, The same at the end of the round, you finish with knit 1. Happy knitting!
25.02.2021 - 07:29
![]() Thérèse Champagne wrote:
Thérèse Champagne wrote:
C'est la première fois que j'essaie un modèle de haut en bas, que veut dire en A.1b au-dessus des mailles? Est-ce que je dois monter 27 mailles? Merci beaucoup, j'aimerais tellement faire ce modèle.
19.02.2021 - 23:32DROPS Design answered:
Bonjour Mme Champagne, quand il est indiqué de tricoter A.1b au-dessus des 27 mailles suivantes, ceci veut dire que vous devez tricoter les 27 mailles suivantes en suivant le diagramme A.1b, autrement dit répétez 3 fois les 9 mailles du diagramme. Bon tricot!
22.02.2021 - 07:32
![]() Lena wrote:
Lena wrote:
Jeg har strikket denne toppen og den ble veldig fin, bortsett fra at avfellingskanten ruller seg utover. Jeg har sett videoen om å felle og felte av veldig løst, så jeg tror ikke at det er for stramt. Da burde kanten dessuten ha rullet innover. Jeg lurer på om jeg må ta opp og felle av strammere. Det er kanskje nok å presse ned kantene, men jeg vil ikke prøve fordi det da vil bli vanskeligere å ta opp hvis jeg må strikke om. Har dere et godt råd?
11.02.2021 - 11:20DROPS Design answered:
Hej Lena, ja det er muligt at du kan have felt af for løst. De 2 riller skal være med til at gøre så kanten ikke ruller, men prøv at felle lidt strammere. God fornøjelse!
16.02.2021 - 14:09
![]() Judy wrote:
Judy wrote:
What are the measurements for the different sizes please?
05.02.2021 - 17:26DROPS Design answered:
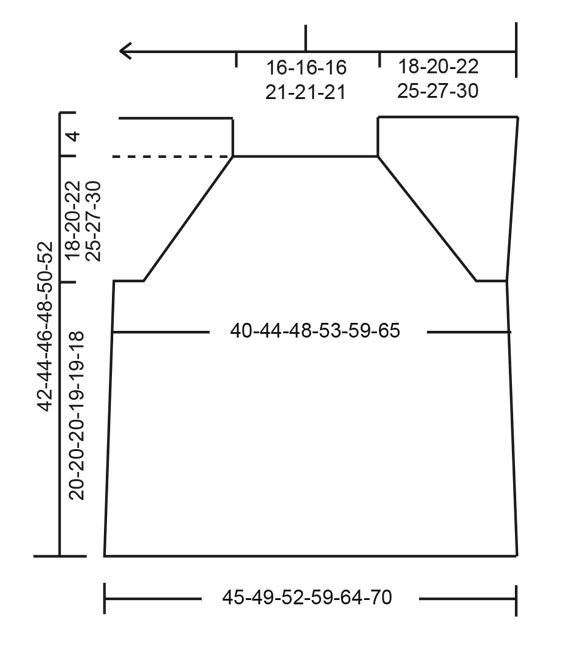
Hi Judy, you will find the schematic drawing for each garment below the pattern. how to read it you will find HERE . Happy knitting!
05.02.2021 - 17:35
![]() Karyn McLean wrote:
Karyn McLean wrote:
Hi, I\'m making XL total 376. I only have 5 more rows and after meticulously increasing 8 STS every other round not missing those sneaky yarn overs I only have a total count of only 232 STS on row 28. What rows do you suggest that I continue increasing every other row to get to 376 after I finish row 33.
28.01.2021 - 23:07DROPS Design answered:
Dear Mrs McLean, increasing 8 sts on every other round a total of 32 times means you will have worked 64 rows in total and increased (8x32=) 256 sts in total (+ 120 sts cast on = 376 sts). If you have only worked to row 28, this means you have increased 14 times 8 sts = 112 sts + 120= 232 sts. Continue increasing as shown in diagram and as you made before with 1 yarn over and working the yarn over twisted either k or p. Happy knitting!
29.01.2021 - 08:08
![]() Susan Senerth wrote:
Susan Senerth wrote:
Hello- When working the pattern according to the diagram - there are 17 increase rows . (8 stitches each increase row) Which would give you 136 additional stitches added to 102 starting stitches =238 total not the 278 that I need. In the pattern It states that there are 22 increase rows ( not 17) where are the additional increase rows outside the diagram? Please let me know when you get a chance. I appreciate the help- Sue
03.11.2020 - 15:36DROPS Design answered:
Dear Sue, after you have worked the diagrams one time in height, increases are not done, in size S you are supposed to increase a total of 22 times this means you have to work 5 more increase round (= 10 rounds in total). Continue pattern as before increasing the same way as before. 102 sts + (8 sts inc x 22 times) = 278 sts. Happy knitting!
03.11.2020 - 16:04
![]() Kaya wrote:
Kaya wrote:
Hadde planer om å strikke denne, men er tydelig noe feil i oppskrifta så den her dropper jeg. Synd, for toppen er utrolig fin!
01.11.2020 - 23:50
![]() Jutta wrote:
Jutta wrote:
Ich verstehe auch nicht, wie die passe gestrickt wird. Da steht : „ Die nächste Runde wie folgt stricken: Die ersten 78-86-92-105-115-125 Maschen wie zuvor stricken (ohne Zunahmen), kraus rechts über die nächsten 61-65-71-83-85-87 Maschen stricken, die nächsten 78-86-92-105-115-125 Maschen wie zuvor stricken (ohne Zunahmen), .... „. Wie Muss ich da Stricken? Was bedeutet“ohne Zunahmen“sind die raglanzunahnen im Diagramm enthalten?
29.06.2020 - 19:29DROPS Design answered:
Liebe Jutta, die Zunahmen sind jetzt fertig, stricken Sie die Maschen vom Vorder- und Rückenteil im Muster wie zuvor (mit den Umschlägen vom Lochmuster) und die Maschen von den Ärmeln stricken Sie krausrechts. Viel Spaß beim stricken!
30.06.2020 - 11:06
![]() Jutta wrote:
Jutta wrote:
Hallo, wo kommen denn in der passe die Markierungsfäden hin? Wo muss ich die Raglanzunahmen machen? Habe grade ein top mit anderer Anleitung von Ihnen fertig. Da war alles gut erklärt. Hier verstehe ich die passe leider nicht. In der kurzerklärung steht was von Einteilung mit markierungsfäden. Aber nicht mehr in der Anleitung.
29.06.2020 - 10:57DROPS Design answered:
Liebe Jutta, bei der Passe legen wird in der Anleitung keine Markierungsfäden ein, die Raglanline sind die 2 rechte Maschen die zwischen A.1a-b-c und A.2 gestrickt sind. Wenn Sie Markierungsfäden gerne einsetzen möchten, dann können Sie einen zwischen den jeweiligen 2 Maschen recht für den Raglan- die Raglanzunahmen entstehen auf beiden Seiten den 2 rechten Maschen - siehe Diagramme. Viel Spaß beim stricken!
29.06.2020 - 14:07
|
|||||||||||||||||||
Sweet Impressions#sweetimpressionstop |
|||||||||||||||||||
 |
 |
||||||||||||||||||
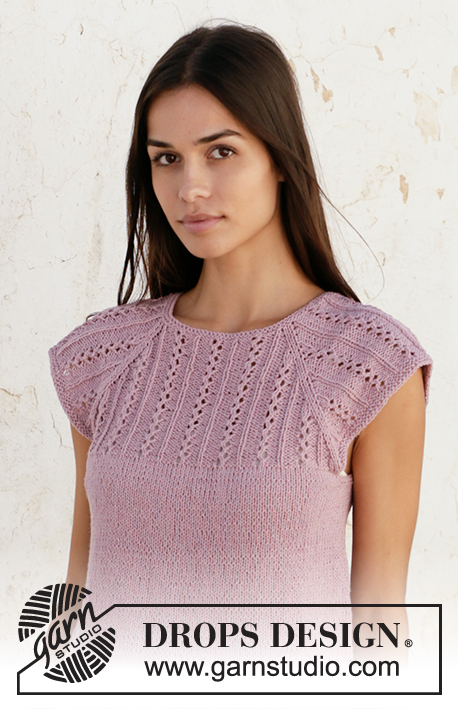
Knitted top with raglan in DROPS Belle. Piece is knitted top down with lace pattern. Size: S - XXXL
DROPS 211-12 |
|||||||||||||||||||
|
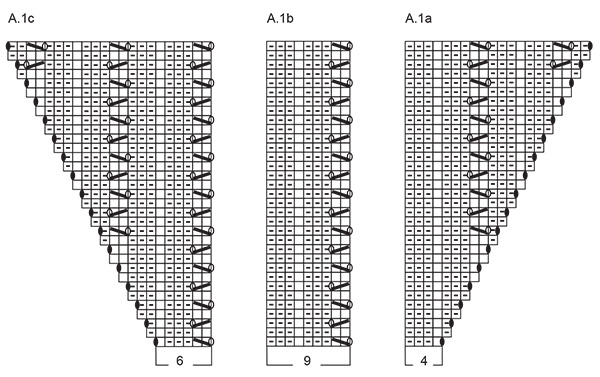
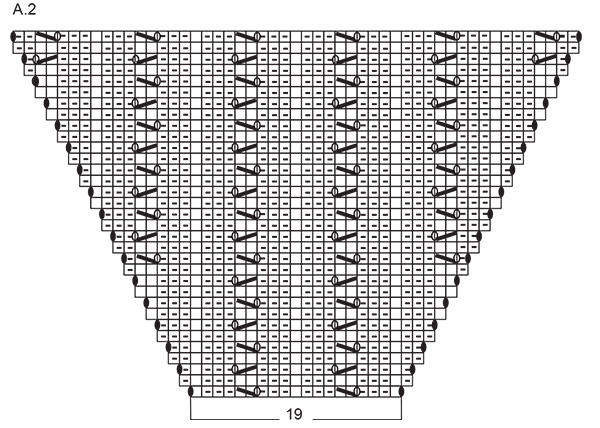
---------------------------------------------------------- EXPLANATION FOR THE PATTERN: ---------------------------------------------------------- GARTER STITCH (worked in the round): 1 ridge vertically = 2 rounds, i.e. knit 1 round and purl 1 round. PATTERN: See diagrams A.1 and A.2. INCREASE TIP (applies to sides of body): Work until 2 stitches remain before marker thread, 1 yarn over, knit 4 (marker thread is in the middle of these stitches), 1 yarn over. On next round knit yarn overs twisted to avoid holes. Then work the new stitches in stocking stitch. CAST-OFF TIP: To avoid a tight cast-off edge you may use a larger needle. If this also is too tight, make 1 yarn over after approx. every 4th stitch, cast off these as regular stitches. ---------------------------------------------------------- START THE PIECE HERE: ---------------------------------------------------------- TOP - SHORT OVERVIEW OF THE PIECE: Neck edge and yoke are worked in the round on circular needle, top down. Now divide yoke for body and sleeves. Body is worked in the round on circular needle, top down. NECK EDGE: Cast on 102-102-102-120-120-120 stitches on circular needle size 3 mm with Belle. Work 2 ridges in GARTER STITCH - see explanation above. Switch to circular needle size 4 mm. YOKE: Begin round in transition between left shoulder and back piece. Work pattern as follows: * Knit 1, A.1a (= 4 stitches), A.1b over the next 18-18-18-27-27-27 stitches (2-2-2-3-3-3 repetitions of 9 stitches), A.1c (= 6 stitches), knit 2, A.2 (= 19 stitches), knit 1 *, work from *-* 2 times. Work and increase as shown in diagram, when A.1 and A.2 have been worked one time vertically, continue pattern and increases the same way. Increase 8 stitches every other round, work stitches in pattern. Increase every other round 22-25-28-32-35-38 times in total. After all increases are done there are 278-302-326-376-400-424 stitches on needle. REMEMBER THE KNITTING TENSION! Work next round as follows (start this round 2-3-3-1-3-5 stitches before end of previous round): Work the first 78-86-92-105-115-125 stitches as before (without increases), work in garter stitch over the next 61-65-71-83-85-87 stitches, work the next 78-86-92-105-115-125 stitches as before (without increases), work in garter stitch over the last 61-65-71-83-85-87 stitches. Continue like this until 2 ridges have been worked (= 4 rounds). Work next round as follows: Knit the first 78-86-92-105-115-125 stitches (= back piece), cast off the next 61-65-71-83-85-87 stitches, knit the next 78-86-92-105-115-125 stitches (= front piece), cast off the last 61-65-71-83-85-87 stitches. NOW MEASURE PIECE FROM HERE! BODY: Work the first 78-86-92-105-115-125 stitches in stocking stitches, cast on 6-6-8-8-10-12 new stitches, work 78-86-92-105-115-125 stitches in stocking stitch, cast on 6-6-8-8-10-12 new stitches, and work in the round = 168-184-200-226-250-274 stitches. Work in stocking stitch, but over the new 6-6-8-8-10-12 stitches in each side work 2 ridges, before continuing with stocking stitch over all stitches. Insert 1 marker thread in each side, in the middle of the new stitches that were cast on. When piece measures 4 cm, increase 1 stitch on each side of marker threads in each side - read INCREASE TIP. Repeat increase every 3 cm 5 times in total = 188-204-220-246-270-294 stitches. When piece measures 19-19-19-18-18-17 cm from division, work 2 ridges over all stitches, then cast off - READ CAST-OFF TIP. |
|||||||||||||||||||
Diagram explanations |
|||||||||||||||||||
|
|||||||||||||||||||
 |
|||||||||||||||||||
 |
|||||||||||||||||||
 |
|||||||||||||||||||
Have you finished this pattern?Tag your pictures with #dropspattern #sweetimpressionstop or submit them to the #dropsfan gallery. Do you need help with this pattern?You'll find 23 tutorial videos, a Comments/Questions area and more by visiting the pattern on garnstudio.com. © 1982-2026 DROPS Design A/S. We reserve all rights. This document, including all its sub-sections, has copyrights. Read more about what you can do with our patterns at the bottom of each pattern on our site. |
|||||||||||||||||||


With over 40 years in knitting and crochet design, DROPS Design offers one of the most extensive collections of free patterns on the internet - translated to 17 languages. As of today we count 324 catalogues and 12290 patterns translated into English (UK/cm). 12290
We work hard to bring you the best knitting and crochet have to offer, inspiration and advice as well as great quality yarns at incredible prices! Would you like to use our patterns for other than personal use? You can read what you are allowed to do in the Copyright text at the bottom of all our patterns. Happy crafting!
Post a comment to pattern DROPS 211-12
We would love to hear what you have to say about this pattern!
If you want to leave a question, please make sure you select the correct category in the form below, to speed up the answering process. Required fields are marked *.