
Popular categories
Looking for a yarn?






























Comments / Questions (236)
 Berglind wrote:
„Færa prjónamerkið... hvert?“ Prjónamerki er ekki hluti af prjóninu. Þú færir það alltaf af vinstri prjóni yfir á þann hægri þegar þú kemur að því. En ef þú ert búin að búa til nýjar lykkjur fyrir merkið, þá vaknar spurningin: 👉 Á merkið að vera: á eftir nýju lykkjunum (þannig að nýju lykkjurnar tilheyri framstykkinu), eða á það að vera á milli tveggja ákveðinna lykkja sem eiga að mynda laskalínuna?
30.07.2026 - 11:36DROPS Design answered:
Blessuð Berglind. Þú færir prjónamerkið yfir á þann hægri þegar þú kemur að því. Þegar stendur að merkið situr hér er meint að þú ert komin að merkinu og að það sé staðsett þarna. Þegar þú prjónar áfram þá færir þú merkið. Gangi þér vel.
30.07.2026 - 13:38
Berglind wrote:
Ég er að prjóna 212.5 Í laska kaflanum er talað um að slá BARA upp á fram og bakstykki. Samt er sagt að auka út um 1/-2 l á UNDAN pm og þá hlýtur það að færast á axlarstykkið. Það er sagt að það bætist við 8 lykkjur í hv umferð og 4 þegar einni er bætt við en skv þessu gengur það ekki upp. Er þetta prj1 slá upp prj1 eða prj 1 slá upp prj 1 slá upp aftur?
29.07.2026 - 14:58DROPS Design answered:
Blessuð Berglind. Í útskýringu í UPPLÝSINGAR FYRIR MYNSTUR í kaflanum LASKALÍNA er útskýring á því hvernig þú eykur út fyrir LASKALÍNU. Í byrjun er aukið út um 2 lykkjur við hverja laskalínu á framstykki og bakstykki (= 8 lykkjur fleiri) síðan er aukið út um 1 lykkju við hverja laskalínu á framstykki og bakstykki (= 4 lykkjur fleiri). Þegar aukið er út um 2 lykkjur er prjónað þar til 2 lykkjur eru eftir á undan merki síðan er slegið 1 sinni uppá prjóninn, prjónuð 1 lykkja slétt, slegið 1 sinni uppá prjóninn, prjónuð 1 lykkja slétt, merkið situr hér. Vona að þetta hjálpi. Gangi þér vel.
30.07.2026 - 11:05
Berglind wrote:
Hæ það sést ekki á myndinni en eru bæði fram-og bakstykkin slétt? Mjög ruglingsleg uppsetning á útaukningunni...
27.07.2026 - 11:56DROPS Design answered:
Blessuð Berglind. Fram- og bakstykkið eru prjónuð slétt. Varðandi útaukninguna þá er aukið út á ermum í síðustu umferðinni fyrir berustykki (þegar aukið er út um 1 lykkju í hverri brugðinni einginu á hvorri ermi og aukið er út jafnt yfir á fram- og bakstykki), síðan er aukið út fyrir laskalínu en aðeins er aukið út á fram- og bakstykki en ekki á ermum. Gangi þér vel.
28.07.2026 - 11:36
 Gonny wrote:
Kan ik voor het boord en de pas/mouwen van patroon 212-15 de combinatie techniek gebruiken?
24.07.2026 - 12:54DROPS Design answered:
Dag Gonny,
Wat bedoel je met de combinatietechniek? De mouwen en boorden brei je in 2 recht, 2 avercht.
26.07.2026 - 16:45
 Sandra wrote:
The knitting gauge is using the size 5mm needle?
23.06.2026 - 01:09DROPS Design answered:
Dear Sandra, correct, the knitting gauge should be worked with the larger needle, size 5 mm or the size you will need to get this tension. Happy knitting!
23.06.2026 - 08:59
Pam wrote:
Do you have a video on how to do the increases for the shoulder. I just don't understand the pattern
17.06.2026 - 21:03DROPS Design answered:
Hi Pam, Here is a link to our video showing you how to work a yoke with raglan: https://www.garnstudio.com/video.php?id=592&lang=en Regards, Drops Team.
18.06.2026 - 05:42
Pam wrote:
Having a very difficult time with reading and understanding the pattern. Increases don\'t make sense. Do you have a video of this
14.06.2026 - 18:47
 Rosario wrote:
Llevo varios días tratando de entender el patrón y no lo consigo. Busco entre las preguntas y tampoco entiendo las respuestas. Por la cantidad de preguntas con respecto a los aumentos (más de 200) me atrevo a pensar que no está claramente explicado y me sorprende que prefieran contestarlas una a una en vez de subir una explicación entendible.
06.06.2026 - 05:34DROPS Design answered:
Hola Rosario, puedes hacer tu pregunta concreta aquí y nosotros contestaremos a tu pregunta. Hay veces que algunas técnicas que, por su complejidad, se entienden peor en el texto y requieren una explicación adicional para entenderlo completamente. Por eso, puedes escribir aquí tu duda con respecto al patrón y te contestaremos intentando resolver tu duda lo mejor posible. Puede ser que esta respuesta luego ayude a otras tejedoras con tu misma duda.
08.06.2026 - 02:40
 Ann wrote:
Brei dan in de buitenste steek aan elke kant van het voorpand en het achterpand in op de mouwen. Ik begrijp niet wat dit betekent, aan het einde van de pas
07.05.2026 - 20:03DROPS Design answered:
Dag Ann,
De zin is inderdaad niet zo goed geformuleerd, maar je hoeft daar niets mee te doen; het staat er als aanvullende informatie. Bij het verdelen van de pas komen de buitenste steken van het voorpand en het achterpand uiteindelijk bij de mouw. Maar als het goed is wordt dit in de paragraaf die daar direct op volgt duidelijk.
09.05.2026 - 08:03
 Carmen wrote:
Me podéis explicar por favor como cojer los puntos de las mangas con los 6 extras?? Gracias
04.05.2026 - 14:21DROPS Design answered:
Hola Carmen, los puntos a recoger son los puntos montados en las sisas para las mangas. Puedes ver aquí un vídeo sobre cómo recoger puntos en bordes de montaje.
11.05.2026 - 00:55
|
|
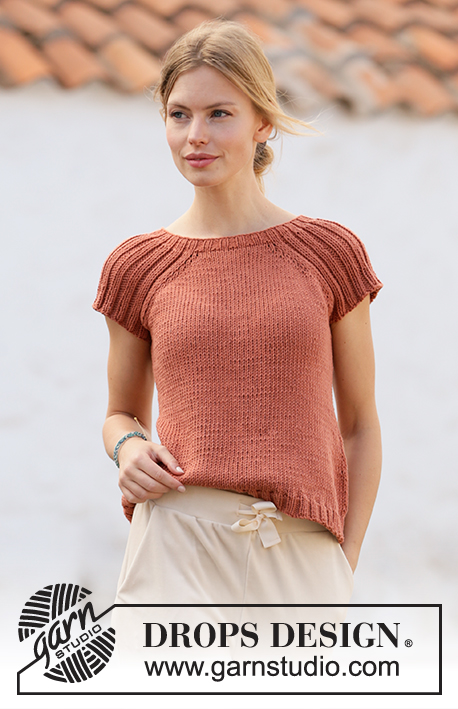
Canyon Clay#canyonclaytop |
|
 |
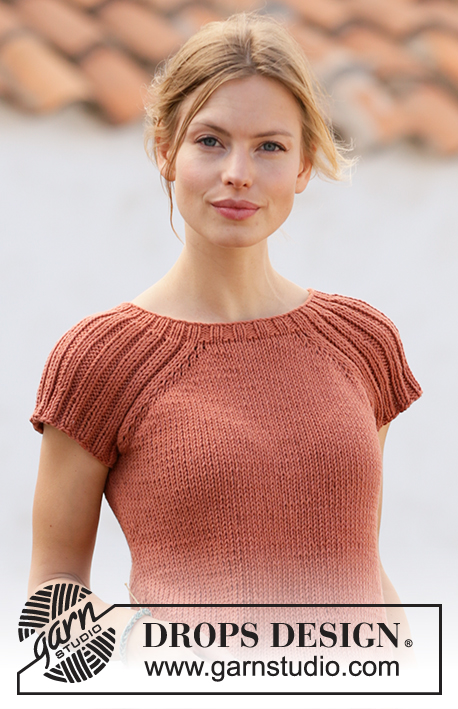 |
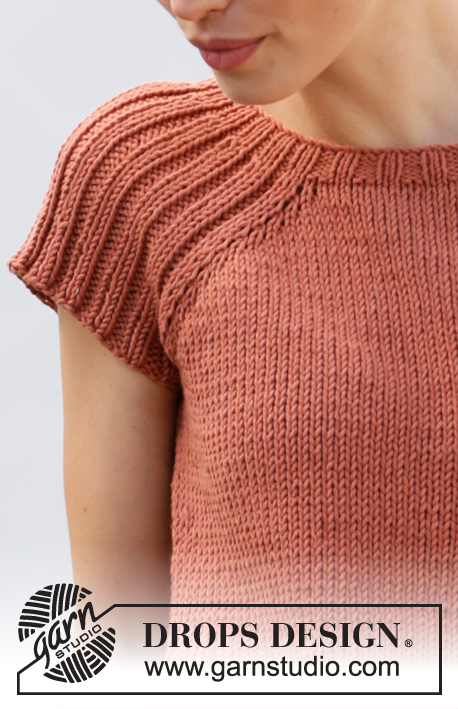
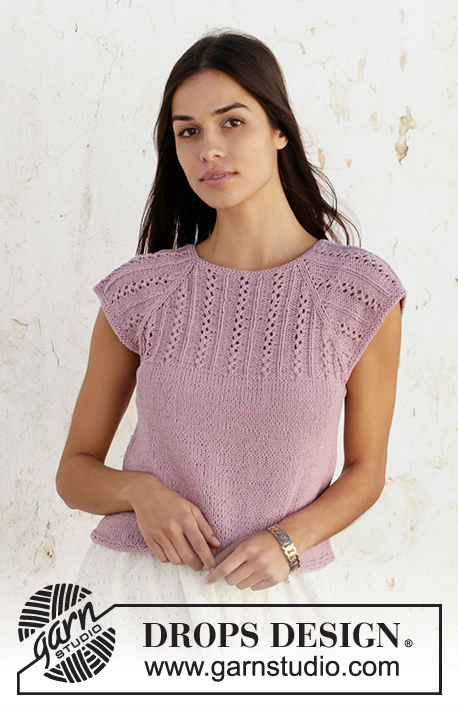
Knitted top with raglan in DROPS Paris. Piece is knitted top down with rib. Size: S - XXXL
DROPS 212-15 |
|
|
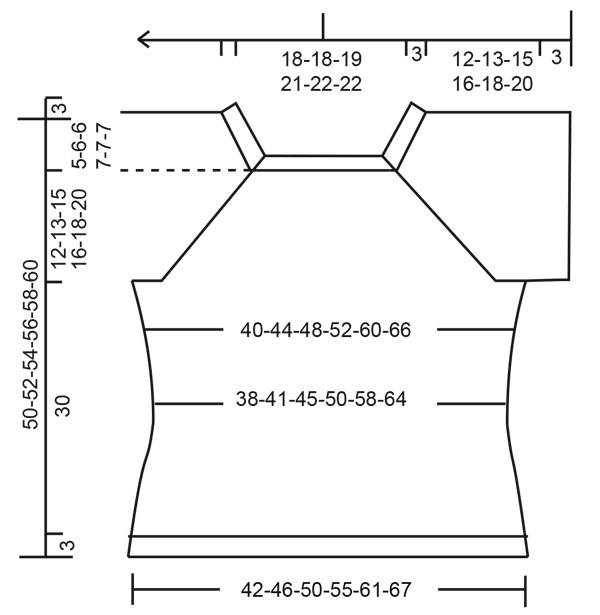
---------------------------------------------------------- EXPLANATION FOR THE PATTERN: ---------------------------------------------------------- INCREASE TIP-1 (evenly): To calculate how to increase evenly, count the stitches to be increased (e.g. 9 stitches) and divide by stitches of increases to be done (e.g. 2) = 4.5. In this example increase by making 1 yarn over after alternately every 4th and 5th stitch. On next row work yarn overs twisted to avoid holes. INCREASE TIP-2: Increase 1 stitch by making 1 yarn over. On next round purl yarn over twisted to avoid holes. Purl the new stitches. INCREASE TIP-3 (applies to sides of body): Work until 2 stitches remain before marker thread, 1 yarn over, knit 4 (marker thread is in the middle of these stitches), 1 yarn over. On next round knit yarn overs twisted to avoid holes. Then work the new stitches in stocking stitch. DECREASE TIP: Decrease 1 stitch on each side of marker thread as follows: Work until 3 stitches remain before marker thread and knit 2 together, knit 2 (marker thread is between these stitches), slip 1 stitch knitwise, knit 1, pass slipped stitch over stitch worked. RAGLAN: In the beginning increase 2 stitches towards each raglan on front and back piece (= 8 stitches increased on round), and thereafter increase 1 stitch towards each raglan on front and back piece (= 4 stitches increased on round). Increase 2 stitches before marker thread as follows: Work until 2 stitches remain before marker thread: 1 yarn over, knit 1, 1 yarn over, knit 1, marker thread is here. Increase 2 stitches after marker thread as follows: Knit 1, 1 yarn over, knit 1, 1 yarn over. Increase 1 stitch before marker thread as follows: Work until 1 stitch remains before marker thread: 1 yarn over, knit 1, marker thread is here. Increase 1 stitch after marker thread as follows: Knit 1, 1 yarn over. On next round knit yarn overs twisted to avoid holes. Then work the new stitches in stocking stitch. CAST-OFF TIP: To avoid a tight cast-off edge you may use a larger needle. If this also is too tight, make 1 yarn over after approx. every 4th stitch and cast off these as regular stitches. ---------------------------------------------------------- START THE PIECE HERE: ---------------------------------------------------------- TOP - SHORT OVERVIEW OF THE PIECE: Work neck edge and yoke in the round on circular needle from mid back, top down. Now divide yoke for body and sleeves. Work body in the round on circular needle. Work sleeves in the round on double pointed needles/short circular needle, top down. NECK EDGE: Cast on 112-118-126-138-144-144 stitches on circular needle size 3.5 mm with Paris. Knit 1 round. Work next round as follows: (Knit 2/purl 2) over the first 8-8-12-12-12-12 stitches, knit 1, insert a marker thread here (= in transition between back piece and right sleeve), knit 1, (purl 1/knit 2) over the next 33-36-36-42-45-45 stitches, purl 1, knit 1, insert a marker thread here (= in transition between right sleeve and front piece), knit 1, (purl 2/knit 2) over the next 16-16-20-20-20-20 stitches, purl 2, knit 1, insert a marker thread here (= in transition between front piece and left sleeve), knit 1, (purl 1/knit 2) over the next 33-36-36-42-45-45 stitches, purl 1, knit 1, insert a marker thread here (= in transition between left sleeve and back piece), knit 1, (purl 2/knit 2) over the next 8-8-8-8-8-8 stitches, purl 2. Continue in the round like this until rib measures 3 cm. When rib is done, work next round as follows: Knit until first marker thread and increase at the same time 2-3-3-3-3-4 stitches evenly – read INCREASE TIP-1, knit over knit and purl over purl until next marker thread and increase at the same time 1 stitch in every purl section – read INCREASE TIP-2, knit until next marker thread and increase at the same time 4-6-5-5-6-8 stitches evenly, knit over knit and purl over purl until next marker thread and increase at the same time 1 stitch in every purl section, knit the last 11-11-11-11-11-11 stitches and increase at the same time 2-3-2-2-3-4 stitches evenly = 144-156-162-178-188-192 stitches. Work 1 row with knit over knit and purl over purl (work the yarn overs twisted to avoid holes). Switch to circular needle size 5 mm. Insert 1 marker at the beginning of round (= approx. mid back), measure yoke from this marker! YOKE: Knit over knit and purl over purl. On first round start increase for RAGLAN – read explanation above. Only increase on front piece and back piece towards each raglan. Increase 2 stitches every other round 9-9-8-10-12-13 times in total, then increase 1 stitch every other round 2-4-6-6-8-8 times = 224-244-250-282-316-328 stitches. REMEMBER THE KNITTING TENSION! Continue with knit over knit and purl over purl until piece measures 12-13-15-16-18-20 cm from marker. The yoke is finished. Then work in the outermost stitch in each side of front piece and back piece in on sleeves. Work next round as follows: Work the first 30-33-37-41-47-50 stitches, slip the next 50-54-54-62-66-66 stitches on a stitch holder for sleeve and cast on 6-6-10-10-10-14 stitches on needle (= in the side under sleeve), work the next 62-68-71-79-92-98 stitches (= front piece), slip the next 50-54-54-62-66-66 stitches on a stitch holder for sleeve and cast on 6-6-10-10-10-14 stitches on needle (= in the side under sleeve), work the remaining 32-35-34-38-45-48 stitches on needle. Then finish body and sleeves separately. NOW MEASURE PIECE FROM HERE! BODY: = 136-148-162-178-204-224 stitches. Insert 1 marker thread in the in each side, in middle of the new stitches cast-on under the sleeves (= 3-3-5-5-5-7 new stitches on each side of marker thread). Move the marker threads upwards when working; they should be used for increase later in the sides. Work in stocking stitch in the round. When piece measures 4 cm from division, decrease 1 stitch on each side of marker threads - read DECREASE TIP. Decrease like this approx. every 8-7-6-5-4-3 cm 2 times in total = 128-140-154-170-196-216 stitches. When piece measures 20-18-16-14-12-10 cm from division, increase 1 stitch on each side of marker threads - read INCREASE TIP-3. Increase like this approx. every 3-4-4-5-6-6 cm 4-4-4-4-3-3 times in total = 144-156-170-186-208-228 stitches. When piece measures 30 cm from division (3 cm remain until finished measurements - work to desired length), knit 1 round while increasing 28-28-34-38-40-44 stitches = 172-184-204-224-248-272 stitches. Switch to circular needle size 3.5 mm. Work rib (knit 2/purl 2) in the round for 3 cm. Cast off with knit over knit and purl over purl - read CAST-OFF TIP. Top measures total 50-52-54-56-58-60 cm in total from shoulder and down. SLEEVE: Slip the 50-54-54-62-66-66 stitches from stitch holder in one side back on double pointed needles/circular needle size 5 mm, and pick up 1 stitch in each of the 6-6-10-10-10-14 stitches cast on under the sleeve = 56-60-64-72-76-80 stitches. Work rib (knit 2/purl 2) in the round. When sleeve measures 3 cm from division, cast off with knit over knit and purl over purl - remember CAST-OFF TIP. Work the other sleeve the same way. |
|
 |
|
Have you finished this pattern?Tag your pictures with #dropspattern #canyonclaytop or submit them to the #dropsfan gallery. Do you need help with this pattern?You'll find 16 tutorial videos, a Comments/Questions area and more by visiting the pattern on garnstudio.com. © 1982-2026 DROPS Design A/S. We reserve all rights. This document, including all its sub-sections, has copyrights. Read more about what you can do with our patterns at the bottom of each pattern on our site. |
|






With over 40 years in knitting and crochet design, DROPS Design offers one of the most extensive collections of free patterns on the internet - translated to 17 languages. As of today we count 333 catalogues and 12525 patterns translated into English (UK/cm). 12525
We work hard to bring you the best knitting and crochet have to offer, inspiration and advice as well as great quality yarns at incredible prices! Would you like to use our patterns for other than personal use? You can read what you are allowed to do in the Copyright text at the bottom of all our patterns. Happy crafting!
Post a comment to pattern DROPS 212-15
We would love to hear what you have to say about this pattern!
If you want to leave a question, please make sure you select the correct category in the form below, to speed up the answering process. Required fields are marked *.