
Popular categories
Looking for a yarn?


Comments / Questions (36)
![]() Elaine Benjamin wrote:
Elaine Benjamin wrote:
I love this pattern, but as with so many patterns I was going along really well and then got stymied at one part. I started to sew the top seam at least three times and undid it because I felt it looked too bulky. Can you give advice as to what seam is the best one for the top of the hat? I tried a mattress stitch from the right side but that was very bulky and I don't know what else. It is looking so good that I don't want to ruin it with a bad seam. Thank you in advance!
23.04.2021 - 22:43DROPS Design answered:
Dear Elanie, you can try the matress stitch shown in THIS video, or you can try to put the edges side by side and stitch only into the outer loop of the edge stitch. Happy Crafting!
23.04.2021 - 23:25
![]() Pia wrote:
Pia wrote:
Danke für Deine Antwort. Das werde ich das nächste Mal so machen...Wenn ich nun aber schon das Vorderteil gestrickt habe? Liebe Grüße pia
20.04.2021 - 09:53
![]() Pia wrote:
Pia wrote:
Hallo, darf ich die mitgeführten Fäden (orangemeliert) auf der Rückseite abschneiden / verknoten und vernähen? Sie sind sonst schon sehr störend und teilweise spannen sie auch. Beste Grüße Pia
18.04.2021 - 12:14DROPS Design answered:
Liebe Pia, am besten stricken Sie mit 3 Knäuel, - dieses Video zeigt, wie man so ein Muster strickt. Viel Spaß beim stricken!
19.04.2021 - 08:58
![]() Päivi wrote:
Päivi wrote:
Finns det mönster för 12-18 månader på Baby fox mössan, stor att det finns upp till 4 år i rubriken men bara de två minsta i mönstret? Tittar jag på fel ställe? Jättefin mössa!
06.01.2021 - 20:45DROPS Design answered:
Hej Päivi, Ja mössan finns även till 12/18 månader. Se i mönstret, det är storleken innan storleken i parantes. Lycka till :)
15.01.2021 - 15:59
![]() Maria Chiara wrote:
Maria Chiara wrote:
Nelle spiegazioni dite di usare ferri corcolari ma siamo sicuri e non ferri diritti? grazie
08.12.2020 - 21:57DROPS Design answered:
Buonasera Maria Chiara, nella maggior parte dei paesi al di fuori dell'Italia, i ferri circolari vengono utilizzati per tutte le lavorazioni. In ogni caso questo modello è lavorato in piano, quindi può utilizzare anche i ferri dritti. Buon lavoro!
08.12.2020 - 22:36
![]() Carola Örnfjäll wrote:
Carola Örnfjäll wrote:
Kan man sticka detta mönster utan rundsticka.
03.10.2020 - 21:30DROPS Design answered:
Hei Carola. Har du lange nok par pinner slik at ikke maskene faller lett av, kan du gjøre det. God Fornøyelse!
05.10.2020 - 13:41
![]() Carola Örnfjäll wrote:
Carola Örnfjäll wrote:
Vad menas med att sticka från avigsidan ett varv avigt, på rundsticka är ju alla varv räta. Förstår inte
03.10.2020 - 21:13DROPS Design answered:
Hei Carola. Det strikkes på rundpinne, men det strikkes ikke rundt. Det strikkes frem og tilbake. Når det er så mange masker er det lettere å strikke frem og tilbake på rundpinne enn par pinner. God Fornøyelse!
05.10.2020 - 13:32
![]() Caroline wrote:
Caroline wrote:
Hei, jeg skulle gjerne strikket både luen og vottene i str 3/4 år. Ser at det er mønsterdiagram på vottene for det, men det står ingenting i mønsterbeskrivelsen for annet enn de to minste votte størrelsene. Skal ikke vottene finnes i annet enn 1/3 og 6/9 mnd?
25.09.2020 - 18:33DROPS Design answered:
Hei Caroline. Det ser ut som det kun er oppskrift på de 2 minste størrelsene. Dette er votter uten tommel og når de blir større er det et ønske med tommel, men det er ikke på disse vottene (diagrammene for de største størrelsen vil bli slettet på siden). Takk for at du gjorde oss oppmerksom på dette. Vi har noen andre reve votter, og da med tommel og for større barn, se oppskrift 0-1217. mvh DROPS design
28.09.2020 - 17:17
![]() Barbara wrote:
Barbara wrote:
Hallo, haben Sie vielleicht eine Anleitung, wie man die Ohren abnäht für die Mütze? Kriege das gar nicht vernünftig hin =( Vielen Dank!
22.06.2020 - 03:36DROPS Design answered:
Liebe Barbara, die Ohren sind ein Dreieck: legen Sie 2 Markierer: der eine: 3 cm oben (von der aussen Seite bis die Mitte) und der andere 3 cm an der Seite (von der Naht oben an die Seite entlang) - jetzt nähen Sie einfach zusammen von einem Markierer bis zum anderen. Viel Spaß beim fertigstellen!
22.06.2020 - 08:48
![]() Reveillaud wrote:
Reveillaud wrote:
Bonjour je ne trouve le schéma largeur/hauteur en cm du bonnet fini svp. Je fais la taille 0/1. Cordialement
27.05.2020 - 23:19DROPS Design answered:
Bonjour Mme Reveillaud, nous n'avons pas de schéma de mesure pour les bonnets - pensez à bien vérifier votre échantillon et conservez la bonne tension en tricotant le bonnet, ainsi vous obtiendrez la bonne taille. Bon tricot!
28.05.2020 - 08:16
|
||||||||||||||||||||||
Baby Fox#babyfoxhat |
||||||||||||||||||||||
 |
 |
|||||||||||||||||||||
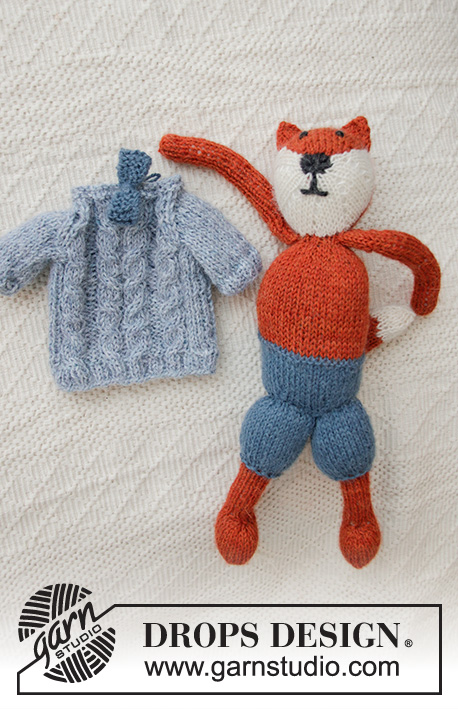
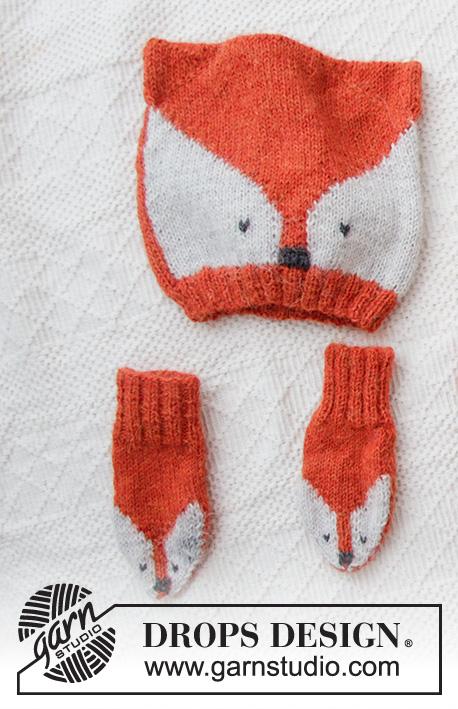
Knitted hat and mittens for babies with fox-pattern in DROPS Alpaca. Sizes Premature – 4 years.
DROPS Baby 36-1 |
||||||||||||||||||||||
|
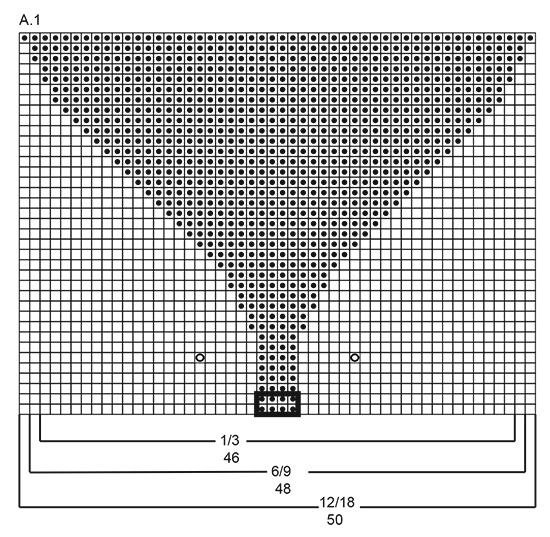
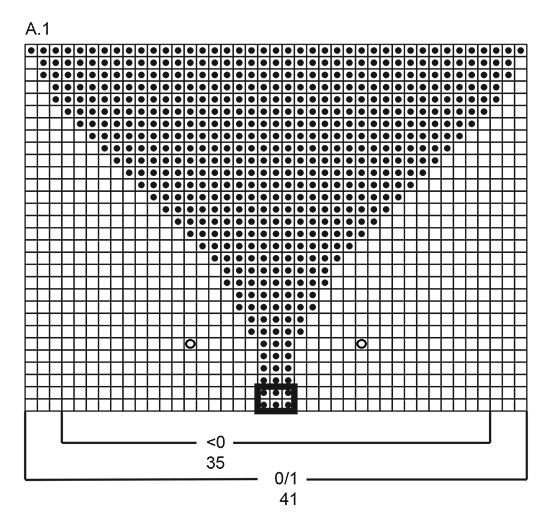
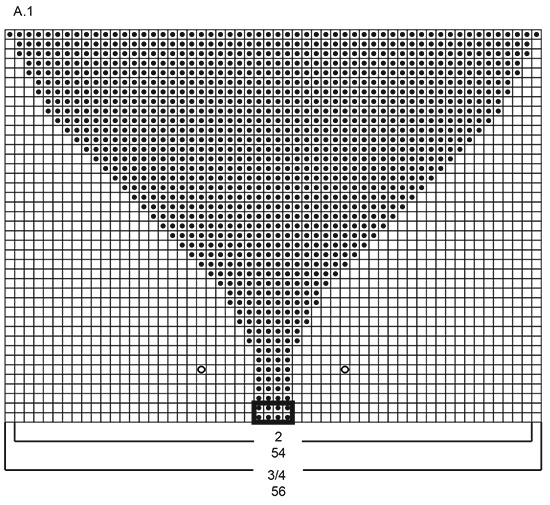
------------------------------------------------------- EXPLANATIONS FOR THE PATTERN: ------------------------------------------------------- RIDGE/GARTER STITCH (worked back and forth): Knit all rows. 1 ridge in height = Knit 2 rows. PATTERN: Hat: See diagram A.1 – choose diagram for your size. Mittens: See diagram A.2 – choose diagram for your size. The diagrams are worked in stocking stitch. NOTE: To avoid holes when changing colour, twist the 2 strands together. The thick square around the stitches marks where you work duplicate stitches for the fox’s nose. The diagram shows all rows in the pattern from the right side. DECREASE TIP (for hat): Decrease evenly spaced from the wrong side by purling 2 together (= 1 stitch decreased). ------------------------------------------------------- START THE PIECE HERE: ------------------------------------------------------- HAT – SHORT OVERVIEW OF THE PIECE: The piece is worked back and forth with circular needle in 2 sections which are sewn together to finish. Section 1 is worked with fox-pattern and section 2 is worked with one colour. SECTION 1 (with fox-pattern): Cast on (40) 44-48-52-52 (56-60) stitches (including 1 edge stitch on each side) with circular needle size 2.5 mm and rust. Purl 1 row from the wrong side. Then work as follows from the right side: Work 1 edge stitch in GARTER STITCH – read description above, * knit 2, purl 2 *, work from *-* until there are 3 stitches left, knit 2 and 1 edge stitch in garter stitch. When the rib measures (2) 2-2-2-3 (3-3) cm, change to circular needle size 3 mm. Purl 1 row from the wrong side and decrease (3) 1-0-2-0 (0-2) stitches evenly spaced – read DECREASE TIP = (37) 43-48-50-52 (56-58) stitches. Then work pattern as follows: 1 edge stitch in garter stitch (edge stitch worked in same colour as the first stitch in A.1), A.1 (= (35) 41-46-48-50 (54-56) stitches) and finish with 1 edge stitch in garter stitch (edge stitch worked in same colour as the last stitch in A.1). When working with 2 colours, work the first part with light pearl grey using the strand from the outside of the ball, the part with rust using the strand from the outside of the ball and the second part with light pearl grey using the strand from the inside of the ball (i.e. you are using 3 strands, 2 strands light pearl grey and 1 strand rust on the same row). Continue this pattern. REMEMBER THE KNITTING TENSION! When all stitches have been worked with rust (the piece measures approx. (10) 11-12-13-15 (15-16) cm), continue with rust until the piece measures (16) 16-17-18-19 (20-21) cm. Cast off with knit from the right side. SECTION 2 (one-coloured): Cast on (40) 44-48-52-52 (56-60) stitches (including 1 edge stitch on each side) with circular needle size 2.5 mm and rust. Purl 1 row from the wrong side. Then work as follows from the right side: 1 edge stitch in garter stitch, * purl 2, knit 2 *, work from *-* until there are 3 stitches left, purl 2 and 1 edge stitch in garter stitch. When the rib measures (2) 2-2-2-3 (3-3) cm, change to circular needle size 3 mm. Purl 1 row from the wrong side and decrease (3) 1-0-2-0 (0-2) stitches evenly spaced = (37) 43-48-50-52 (56-58) stitches. Work stocking stitch with 1 edge stitch in garter stitch on each side, using rust until the piece measures (16) 16-17-18-19 (20-21) cm; adjust to match section 1. Cast off with knit from the right side. ASSEMBLY: Sew the hat together inside the 1 edge stitch on each side. Sew the top of the hat neatly together. Sew a triangle in each corner at the top, sewing through both layers, from approx. 3 cm down the side to approx. 3 cm across the top of the hat (= fox-ears). Sew the nose and eyes with duplicate stitches using dark grey – see markings in the diagram. ------------------------------------------------------- MITTENS - SHORT OVERVIEW OF THE PIECE: The piece is worked back and forth with circular needle. MITTEN: Cast on 42-46 stitches (including 1 edge stitch on each side) with circular needle size 2.5 mm and rust. Purl 1 row from the wrong side then work rib (= knit 2, purl 2) starting from the right side and with 1 edge stitch in GARTER STITCH – read description above, on each side. When the piece measures 4-4 cm, work stocking stitch with 1 edge stitch in garter stitch on each side until the piece measures 5-6½ cm. REMEMBER THE KNITTING TENSION! Work 1 edge stitch in garter stitch, A.2 (= 40-44 stitches) and 1 edge stitch in garter stitch. When working with 2 colours, work the first part with light pearl grey using the strand from the outside of the ball, the first part with rust using the strand from the outside of the ball, the second part with light pearl grey using the strand from the inside of the ball and the second part with rust using the strand from the inside of the ball (i.e. you are using 4 strands, 2 strands light pearl grey and 2 strands rust on the same row). When A.2 has been worked 1 time in height there are 10 stitches left on the needle. Cut the strand and pull it through the remaining stitches and fasten well. The mitten measures approx. 12-14 cm. Work 1 more mitten in the same way. ASSEMBLY: Sew nose and eyes with duplicate stitches and dark grey – see markings in the diagram. Sew the mitten together inside the 1 edge stitch. |
||||||||||||||||||||||
Diagram explanations |
||||||||||||||||||||||
|
||||||||||||||||||||||
 |
||||||||||||||||||||||
 |
||||||||||||||||||||||
 |
||||||||||||||||||||||
 |
||||||||||||||||||||||
Have you finished this pattern?Tag your pictures with #dropspattern #babyfoxhat or submit them to the #dropsfan gallery. Do you need help with this pattern?You'll find 21 tutorial videos, a Comments/Questions area and more by visiting the pattern on garnstudio.com. © 1982-2026 DROPS Design A/S. We reserve all rights. This document, including all its sub-sections, has copyrights. Read more about what you can do with our patterns at the bottom of each pattern on our site. |
||||||||||||||||||||||


With over 40 years in knitting and crochet design, DROPS Design offers one of the most extensive collections of free patterns on the internet - translated to 17 languages. As of today we count 324 catalogues and 12290 patterns translated into English (UK/cm). 12290
We work hard to bring you the best knitting and crochet have to offer, inspiration and advice as well as great quality yarns at incredible prices! Would you like to use our patterns for other than personal use? You can read what you are allowed to do in the Copyright text at the bottom of all our patterns. Happy crafting!
Post a comment to pattern DROPS Baby 36-1
We would love to hear what you have to say about this pattern!
If you want to leave a question, please make sure you select the correct category in the form below, to speed up the answering process. Required fields are marked *.