
Popular categories
Looking for a yarn?


Comments / Questions (57)
![]() Emeraude wrote:
Emeraude wrote:
Thank you very much for your prompt answer. Very useful! Kind regards.
13.08.2021 - 18:08
![]() Emeraude wrote:
Emeraude wrote:
Are the instructions for this pattern available for knitting it throughout with traditional straight needles? Thanks!
11.08.2021 - 19:37DROPS Design answered:
Dear Emeraude, this pattern is not available written specifically for straight needles, however we do have a lesson about how to convert pattern for them HERE. Happy Stitching!
12.08.2021 - 05:03
![]() HOURDEBAIGT wrote:
HOURDEBAIGT wrote:
Bonjour. J’ai utilisé le convertisseur pour une alternative avec 2 fils mais celui ci ne m’a pas trouvé de solution de remplacement. Auriez-vous une idée pour résoudre mon problème? Merci
04.03.2021 - 10:34DROPS Design answered:
Bonjour Mme Hourdebaigt, pour voir les alternatives proposées pour remplacer 1 fil DROPS Melody par 2 autres fils, utilisez le convertisseur en indiquant la quantité pour la taille et 1 fil Melody - Retrouvez d'autres infos sur les alternatives ici - Rappelez-vous de toujours bien faire votre échantillon au préalable pour vérifier si la texture vous convient avec les alternatives choisies. Votre magasin saura également vous conseiller, même par mail ou téléphone. Bon tricot!
04.03.2021 - 11:40
![]() Gisela Antony wrote:
Gisela Antony wrote:
Hallo, ich verstehe die Anleitung. Nur an einer Stelle bei den Ärmeln nicht: "und zusätzlich je 1 Masche aus den 8-8-8-10-10-12 Maschen an der unteren Ärmelmitte auffassen". Was bedeutet das? Und gibt es dazu eine Anleitung? Danke und viele Grüße Gila
10.01.2021 - 19:47DROPS Design answered:
Liebe Frau Antony, diese Lektion zeigt, wie man einen Pullover von oben nach unten strickt - das Foto 18B zeigt hier, wie man diese 8-8-8-10-10-12 Maschen in die 8-8-8-10-10-12 am End der Passen angeschlagten Maschen auffassen soll. Viel Spaß beim Stricken!
11.01.2021 - 09:55
![]() Mariann Ring Nielsen wrote:
Mariann Ring Nielsen wrote:
Drops 210-3. Er lige gået i gang med opskriften. Jeg mangler at der står hvor knaphullerne skal være. Er det noget man selv skal finde ud af?
28.10.2020 - 19:19DROPS Design answered:
Hej Mariann. Du hittar info om det under KNAPPHULL längst upp på oppskriften. Mvh DROPS Design
29.10.2020 - 07:32
![]() Marianne Nilsson wrote:
Marianne Nilsson wrote:
Hej! Stickar en kofta i melody (053) och har fastnat rejält i momentet att öka 4m. för raglan. Hur jag än räknar och funderar blir ökningen 5m. Alltså en maska för mycket. Jag vill ha hjälp och tips med detta. Vad kan jag göra för fel? Tack på förhand. Hälsningar Marianne.
20.10.2020 - 16:09DROPS Design answered:
Hej Marianne. Har du sett denna video? Där kan du se hur man ska göra för att öka 4 maskor i en maska. Mvh DROPS Design
21.10.2020 - 09:54
![]() Gunilla Andersson wrote:
Gunilla Andersson wrote:
Koftan blev jättefin, men har så mycket garn över. fick mer än 4 st nystan övers,om man inte kan lämna tillbaks. Är det något fel på mönstret,så borde ni se över det. synd att köpa så mycket kan till ingen nytta.
11.10.2020 - 17:20
![]() Merja Nilsson wrote:
Merja Nilsson wrote:
Kan man sticka framstyckena och bakstycket samma gång fram och tillbaka på en runsticka
22.09.2020 - 12:05DROPS Design answered:
Hej Merja. Ja det borde du kunna göra. Vill du ändå ha sprundet på koftan så får du dela arbetet där istället. Mvh DROPS Design
23.09.2020 - 11:36
![]() WallisAnn wrote:
WallisAnn wrote:
Can the sleeve be converted to a set in sleeve? If so would you have directions as to how?
25.07.2020 - 00:02DROPS Design answered:
Dear WallisAnn, we are unfortunately not able to adjust every pattern to every single request - please contact your DROPS store for any further individual assistance. Happy knitting!
29.07.2020 - 09:57
![]() Nicole Kortink wrote:
Nicole Kortink wrote:
Kan ik bij het vest Classic comfort het lijf en het voor en achterpand aan elkaar breien, in plaats van zoals aangegevnen staat het lijf en het voor en achterpand aprat verder breidn?
12.06.2020 - 14:59DROPS Design answered:
Dag Nicole,
Ja, je zou de panden inderdaad ook aan elkaar kunnen breien. Je moet dan de kantsteken eraf halen. Als je een split wilt, kun je de panden 12 cm voor het einde weer apart van elkaar breien.
18.06.2020 - 11:06
|
|
Classic comfort#classiccomfortcardigan |
|
 |
 |
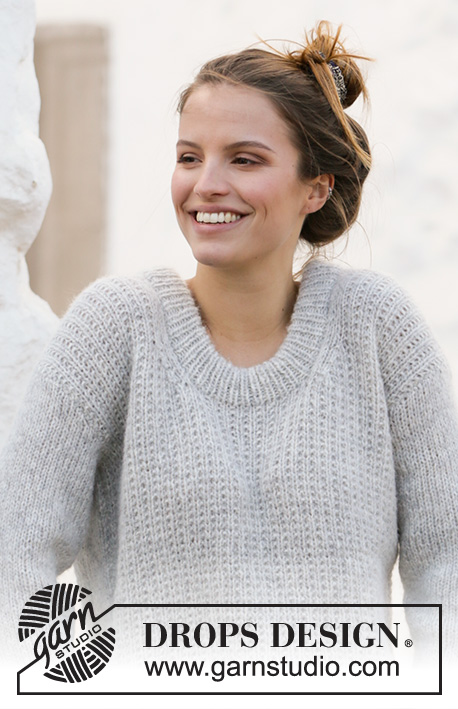
Knitted jacket in DROPS Melody. Piece is knitted top down with raglan, pockets and vents in the sides. Size XS–XXL.
DROPS 210-3 |
|
|
---------------------------------------------------------- EXPLANATION FOR THE PATTERN: ---------------------------------------------------------- GARTER STITCH (back and forth): Knit all rows. 1 ridge vertically = knit 2 rows. DECREASE/INCREASE TIP (evenly): To calculate how to decrease/increase evenly, use the total number of stitches on row (e.g. 95 stitches) minus bands (e.g. 8 stitches) , and divide the remaining 87 stitches by number of decrease/increases to be done (e.g. 25) = 3.5. In this example decrease by knitting alternately approx. every 2nd and 3rd stitch and every 3rd and 4th stitch together, and do not decrease over bands. If increasing make in this example 1 yarn over after alternately approx. every 3rd and 4th stitch, and do not increase over band . On next row work yarn overs twisted to avoid holes. RAGLAN: Increase for raglan in every transition between front/back piece and sleeves as explained below. All increases are done from right side and increase every 4th row (i.e. on every other row from right side) as explained in pattern. INCREASE 4 STITCHES AS FOLLOWS: Knit 1 in stitch below stitch with marker (raglan stitch), do not slip stitches off the needle, make 1 yarn over on right needle, knit 1 in same stitch, but wait to slip off the needle, make 1 yarn over on right needle and knit 1 in same stitch, then slip the stitch off the left needle (= 4 stitches increased). Insert 1 marker in the middle of these 5 stitches (for next increase). INCREASE 2 STITCHES AS FOLLOWS: Knit 1 in stitch below stitch with marker (raglan stitch), do not slip stitches off the needle, make 1 yarn over on right needle, knit 1 in same stitch, then slip the stitch off the left needle (= 2 stitches increased). Insert 1 marker in the middle of these 3 stitches (for next increase - only applies to size L). DECREASE TIP (applies to mid under sleeves): Decrease 1 stitch on each side of marker thread as follows: Work until 3 stitches remain before marker thread, knit 2 together, knit 2 (marker thread is between these 2 stitches), slip 1 stitch knitwise, knit 1, pass slipped stitch over stitch worked (= 2 stitches decreased by marker). BUTTONHOLES: Decrease for buttonholes on right band (when garment is worn). Decrease from right side when 3 stitches remain on row as follows: Make 1 yarn over, knit the next 2 stitches together, finish with 1 stitch in garter stitch. On next row (wrong side) knit the yarn over to make a hole. Decrease first buttonhole when neck edge measures approx. 2 cm. Then decrease the next 4-4-5-5-6-6 buttonholes, approx. 9-9½-8-8½-8-8½ cm apart. CAST-OFF TIP: To avoid a tight cast-off edge you may use a larger needle size. ---------------------------------------------------------- START THE PIECE HERE: ---------------------------------------------------------- JACKET - SHORT OVERVIEW OF THE PIECE: Work neck edge and yoke back and forth on circular needle from mid front, top down. Now divide yoke for front pieces, back piece and sleeves. Work front pieces and back piece back and forth on circular needle separately, top down. Work sleeves in the round on double pointed needles/short circular needle, top down. Then work pocket to sew on. NECK EDGE: Cast on 95-99-103-105-109-111 stitches (including 4 band stitches in each side towards mid front) on circular needle size 4.5 mm with Melody. Purl 1 row (= wrong side). Work next row as follows from right side: Work 4 band stitches in GARTER STITCH - read explanation above, * knit 1, purl 1 *, work from *-* until 5 stitches remain on row, knit 1 and finish with 4 band stitches in garter stitch. Continue rib like this for 4 cm. When rib is done, knit 1 row from right side while at the same time decreasing 25-25-25-27-27-29 stitches evenly - read DECREASE/INCREASE TIP = 70-74-78-78-82-82 stitches. Insert 1 marker after band, at the beginning of row mid front. Measure yoke from this marker! Switch to circular needle size 8 mm and purl 1 row from wrong side with 4 band stitches in garter stitch in each side. Then work yoke as explained below. YOKE: Insert 4 markers in the piece as explained below. Use markers when increasing for raglan. Count 14-15-16-16-17-17 stitches (= front piece), insert 1 marker in next stitch, count 10 stitches (= sleeve), insert 1 marker in next stitch, count 18-20-22-22-24-24 stitches (= back piece), insert 1 marker in next stitch, count 10 stitches (= sleeve), insert 1 marker in next stitch. There are 14-15-16-16-17-17 stitches after last marker on front piece. Now work and increase for raglan as explained below: Begin from right side and work in stocking stitch back and forth with 4 band stitches in garter stitch in each side as before. REMEMBER THE KNITTING TENSION! AT THE SAME TIME on first row from right side increase for RAGLAN – read explanation above. I.e. increase first 4 stitches in every stitch with marker (= 16 stitches in total increased on stitches). Continue like this and increase for raglan on every 4th row (i.e. every other row from right side) 5-6-7-7-9-9 times in total vertically = 150-170-190-190-226-226 stitches. Continue with increase every 4th row, but now increase only 2 stitches in every stitch with marker, as explained above (= 8 stitches in total increased on needle). Increase 2 stitches at every marker 1-1-1-2-0-1 times in total vertically. After last increase there are 158-178-198-206-226-234 stitches on needle. Work stocking stitch with 4 band stitches in garter stitch in each side as before, until piece measures 19-21-23-25-27-29 cm from marker by the neck. Now divide yoke for body and sleeves. I.e. work next row as follows: Work 27-30-32-34-38-40 stitches as before (= front piece), slip the next 30-34-40-40-42-42 stitches on 1 stitch holder for sleeve, cast on 8-8-8-10-10-12 new stitches on row (= in the side under sleeve), work 44-50-54-58-66-70 stitches as before (= back piece), slip the next 30-34-40-40-42-42 stitches on 1 stitch holder for sleeve, cast on 8-8-8-10-10-12 new stitches on needle (= in the side under sleeve), work 27-30-32-34-38-40 stitches as before (= front piece). Finish body and sleeves separately as explained below. NOW MEASURE PIECE FROM HERE! BODY: = 114-126-134-146-162-174 stitches. Insert 1 marker after 31-34-36-39-43-46 stitches in from each side (= in the side of body). There are 52-58-62-68-76-82 stitches between markers on back piece. Now divide body at the markers to work back piece separately and front pieces separately. BACK PIECE: = 52-58-62-68-76-82 stitches. Work in stocking stitch back and forth with 2 edge stitches in garter stitch in each side until piece measures 42-43-44-45-46-47 cm from division (approx. 5 cm remain until finished measurements, try the jacket on and work to desired length). Switch to circular needle size 4.5 mm. Knit 1 row from right side while increasing 27-29-31-35-39-41 stitches evenly - remember INCREASE/DECREASE TIP = 79-87-93-103-115-123 stitches. Work next row as follows from wrong side: 2 edge stitches in garter stitch, * purl 1, knit 1 *, repeat from *-* until 3 stitches remain on needle, purl 1, and finish with 2 edge stitches in garter stitch. Continue rib like this for 5 cm. Cast off stitches with knit over knit and purl over purl - read CAST OFF TIP! Jacket measures approx. 70-73-76-79-82-85 cm from shoulder and down. RIGHT FRONT PIECE (when garment is worn): = 31-34-36-39-43-46 stitches. Work in stocking stitch back and forth with 2 edge stitches in garter stitch towards the side and 4 band stitches in garter stitch towards mid front until front piece measures 42-43-44-45-46-47 cm from division (adjust according to back piece). Switch to circular needle size 4.5 mm. Knit 1 row from right side while increasing 16-17-19-20-22-23 stitches evenly = 47-51-55-59-65-69 stitches. Work next row as follows from wrong side: 4 band stitches in garter stitch, * purl 1, knit 1 *, repeat from *-* until 3 stitches remain on needle, purl 1, and finish with 2 edge stitches in garter stitch. Continue rib like this for 5 cm. Cast off stitches with knit over knit and purl over purl. LEFT FRONT PIECE (when garment is worn): = 31-34-36-39-43-46 stitches. Work in stocking stitch back and forth with 4 band stitches in garter stitch towards mid front and 2 edge stitches in garter stitch towards the side until front piece measures 42-43-44-45-46-47 cm from division (adjust according right front piece). Switch to circular needle size 4.5 mm. Knit 1 row from right side while increasing 16-17-19-20-22-23 stitches evenly = 47-51-55-59-65-69 stitches. Work next row as follows from wrong side: 2 edge stitches in garter stitch, * purl 1, knit 1 *, repeat from *-* until 5 stitches remain on needle, purl 1, and finish with 4 band stitches in garter stitch towards mid front. Continue rib like this for 5 cm. Cast off stitches with knit over knit and purl over purl. SLEEVES: Slip the 30-34-40-40-42-42 stitches from stitch holder in one side of piece on double pointed needles or short circular needle size 8 mm, and pick in addition up 1 stitch in each of the 8-8-8-10-10-12 stitches under sleeve = 38-42-48-50-52-54 stitches. Insert 1 marker thread in the middle of the 8-8-8-10-10-12 stitches under sleeve and move the marker thread upwards when working. Use marker later when decreasing mid under sleeve. Begin round at the marker thread and work stocking stitch in the round. When sleeve measures 3 cm from division in all sizes, decrease 2 stitches mid under sleeve - read DECREASE TIP. Decrease like this every 12-6-4-3-3-3 cm 3-5-7-8-8-8 times in total = 32-32-34-34-36-38 stitches. Work until sleeve measures 37-35-34-32-31-29 cm from division (approx. 5 cm remain until finished measurements, try the jacket on and work to desired length). Knit 1 round while increasing 16-16-16-18-18-18 stitches evenly = 48-48-50-52-54-56 stitches. Switch to double pointed needles size 4.5 mm. Work rib in the round = knit 1/purl 1 for 5 cm. Cast off with knit over knit and purl over purl - remember CAST-OFF TIP. Sleeve measures approx. 42-40-39-37-36-34 cm from division. Work the other sleeve the same way. POCKET: Cast on 22-22-24-24-26-26 stitches on circular needle size 8 mm with Melody. Work in stocking stitch back and forth with 2 edge stitches in garter stitch in each side. When pocket measures 13-13-14-14-15-15 cm, switch to circular needle size 4.5 mm. Knit 1 row from right side while increasing 11-11-13-13-13-13 stitches evenly = 33-33-37-37-39-39 stitches. Continue in rib, i.e. work first row as follows from wrong side: 2 edge stitches in garter stitch, * purl 1, knit 1 *, repeat from *-* until 3 stitches remain on needle, purl 1, and finish with 2 edge stitches in garter stitch. Continue rib like this for 4 cm. Cast off stitches with knit over knit and purl over purl. Pocket measures approx. 18-18-20-20-22-22 cm in width and 17-17-18-18-19-19 cm vertically. Work the other pocket the same way. Sew one pocket on to each front piece, directly above rib in bottom edge and approx. 5-5-6-7-7-8 cm in from mid front (try the jacket on and adjust placement of pockets). ASSEMBLY: Sew side seams on jacket – begin at the top under sleeve and sew edge to edge in outer loops of edge stitches to get a flat seam but stop seam when approx. 12 cm remain at the bottom in each side (= vent). Sew the buttons on to the left band. |
|
 |
|
Have you finished this pattern?Tag your pictures with #dropspattern #classiccomfortcardigan or submit them to the #dropsfan gallery. Do you need help with this pattern?You'll find 28 tutorial videos, a Comments/Questions area and more by visiting the pattern on garnstudio.com. © 1982-2026 DROPS Design A/S. We reserve all rights. This document, including all its sub-sections, has copyrights. Read more about what you can do with our patterns at the bottom of each pattern on our site. |
|


With over 40 years in knitting and crochet design, DROPS Design offers one of the most extensive collections of free patterns on the internet - translated to 17 languages. As of today we count 324 catalogues and 12290 patterns translated into English (UK/cm). 12290
We work hard to bring you the best knitting and crochet have to offer, inspiration and advice as well as great quality yarns at incredible prices! Would you like to use our patterns for other than personal use? You can read what you are allowed to do in the Copyright text at the bottom of all our patterns. Happy crafting!
Post a comment to pattern DROPS 210-3
We would love to hear what you have to say about this pattern!
If you want to leave a question, please make sure you select the correct category in the form below, to speed up the answering process. Required fields are marked *.