
Popular categories
Looking for a yarn?


Comments / Questions (35)
![]() Odile wrote:
Odile wrote:
Merci de m’éclairer encore une fois.Je ne comprends pas pourquoi après avoir tricoté A2 A3 et A4 , on doit avoir au tour suivant selon les indications pour la taille L 77 m pour le dos mais 81 pour le devant , alors que les 2 se tricotent de la même manière , cela veut il dire que les .mailles de raglan sont comptées pour le devant ? Je ne comprends pas trop . Merci pour vos précieux conseils 07.12.2025 - 14:35
07.12.2025 - 14:37DROPS Design answered:
Bonjour Odile, notez que les 3 dernières mailles du tour seront aussi attribuées au dos, ainsi vous aurez bien 77 + 3 = 81 mailles pour le dos, comme pour le devant. Bon tricot!
08.12.2025 - 09:39
![]() Odile wrote:
Odile wrote:
Bonjour Dans A1 les jetés après le raglan et après la manche se font ils tous les tours ou tous les 2 tours ?merci
16.11.2025 - 18:26DROPS Design answered:
Bonjour Odile, les jetés de chaque côté de A.1 puis au début de A.2 et à la fin de A.4 se font tous les 2 tours, juste comme le montre les diagrammes. Bon tricot!
17.11.2025 - 08:28
![]() Odile wrote:
Odile wrote:
Bonjour, ce modèle est vraiment magnifique et j’ai mesuré les dimensions la taille L me conviendrait mais je souhaiterais le faire plus court car je ne suis pas grande. Que me conseillez-vous ?Dois-je faire un dessin en moins ? Y a-t-il autre chose à faire pour le raccourcir ? Merci beaucoup pour votre aide
07.11.2025 - 17:34DROPS Design answered:
Bonjour Odile, comme on le tricote de haut en bas, il est facile d'ajuster la longueur, après la division de l'empiècement, vous répétez les diagrammes A.5-A.7 en hauteur, vous ajusterez la longueur ainsi facilement en fonction de celle que vous souhaitez, vous pourrez essayer le pull, pensez à arrêter comme indiqué (après 1 motif en hauteur et 4 cm avant la hauteur totale souhaitée (pour les côtes)). Bon tricot!
10.11.2025 - 06:53
![]() Mrs Vanessa Mann wrote:
Mrs Vanessa Mann wrote:
After the decrease under the sleeve the pattern "...when the pattern measures X cm..." for me it's 6cm. Am I measuring 6cm from when the sleeves were originally picked up, or from the decreases?
01.06.2025 - 12:04DROPS Design answered:
Dear Vanessa, you measure 6cm from where the yoke was divided for the body and sleeves (so, from the start of the BODY section). Happy knitting!
01.06.2025 - 22:42
![]() Heloise wrote:
Heloise wrote:
Bonjour, Je suis bloqué sur le diagramme A1, à la 6eme augmentation. Il me manque systématiquement 3 mailles pour finir le diagramme. Je n-arrive pas à voir l'erreur. Est ce que vous pourriez m'aider? J'ai pourtant déjà fait ce genre de modèle avec vos explications... Merci de votre aide, Héloise
11.10.2024 - 21:39DROPS Design answered:
Bonjour Heloise, vous pouvez essayer de mettre de marqueurs entre chaque pièce pour bien vérifier votre nombre de mailles dans chaque partie/diagramme, et ainsi vérifier à chaque tour que votre nombre de mailles/d'augmentations est juste. Bon tricot!
14.10.2024 - 07:47
![]() Edith Ventura wrote:
Edith Ventura wrote:
Hallo bei a1 werden am rücken- und vorderteil in jeder 2. runde am rand verschränkte aufnahmen gemacht. nur bei den ärmeln werden die umschläge re gestrickt damit ein loch entsteht. auf dem bild sind die löcher aber beidseits der raglanmaschen zu sehen. könnte es sein, dass beidseitig die umschläge nur re gestrickt werden? vielen dank und liebe grüsse edith
14.05.2021 - 22:10DROPS Design answered:
Liebe Frau Ventura, die Umschläge für die Raglanzunahmen werden verschränkt gestrickt, um Löcher zu vermeiden, es kann kleine Löcher entstehen, aber viel kleiner als beim Lochmuster. Viel Spaß beim stricken!
17.05.2021 - 08:44
![]() Laura Johnson wrote:
Laura Johnson wrote:
Where do you start knitting from when starting the body? The instructions say to break the yarn after putting the sleeves on threads, which indicates the knitting will start elsewhere but it doesn't say whereabouts.
10.04.2021 - 19:21DROPS Design answered:
Dear Laura, it is best to start the round at one of the sides (at one of the markers, you've put under the sleeve). I usually start on the left side, but this is mostly personal preference. Happy Knitting!
10.04.2021 - 19:34
![]() Elisabeth wrote:
Elisabeth wrote:
J'aimerai pouvoir imprimer les explications de ce modèle, surtout les diagrammes. Merci par avance
14.12.2020 - 15:30DROPS Design answered:
Bonjour Élisabeth, cliquez sur le bouton "Imprimer" pour lancer l'impression. Bon tricot!
14.12.2020 - 15:58
![]() Maminko wrote:
Maminko wrote:
Je viens juste de terminer ce magnifique pull, mais j'ai allongé le corps et fait des manches moins bouffantes. C'était un bonheur de le tricoter : grâce à ces motifs, il n'y avait aucune monotonie dans le travail. Cependant, avec les modèles que l'on réalise de haut en bas, on est gênée par le poids de l'ouvrage lorsque l'on tricote les manches du moins lorsqu'il s'agit d'un modèle pour adulte.
15.11.2020 - 18:26
![]() Maggie wrote:
Maggie wrote:
Beste, misschien kijk ik er over maar ik kan nergens een matentabel vinden op de site zodat ik aan de hand van mijn borstomtrek, taille, heupomtrek kan bepalen welke maten er gehanteerd worden op deze site. Dank bij voorbaat.
28.09.2020 - 16:03DROPS Design answered:
Dag Maggie,
Dat klopt er staat geen matentabel op de site. Bij ieder patroon staat onderaan het patroon een tekening met maten erbij. Je kan de maten het beste vergelijken met een bestaand kledingstuk die je goed zit.
28.09.2020 - 16:28
|
|||||||||||||||||||||||||
Berry Diamond#berrydiamondsweater |
|||||||||||||||||||||||||
 |
 |
||||||||||||||||||||||||
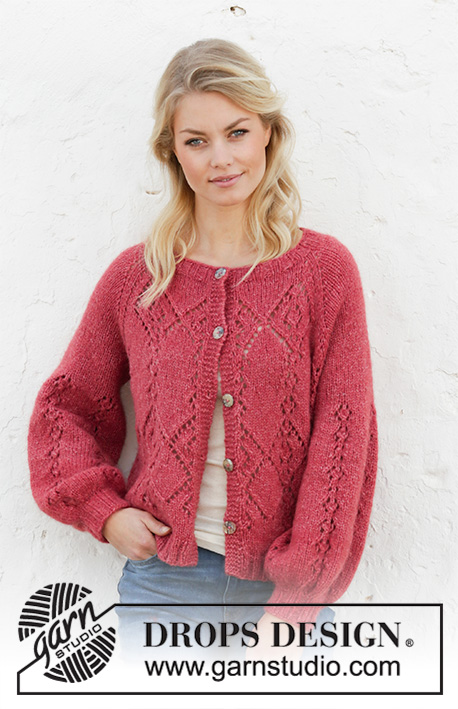
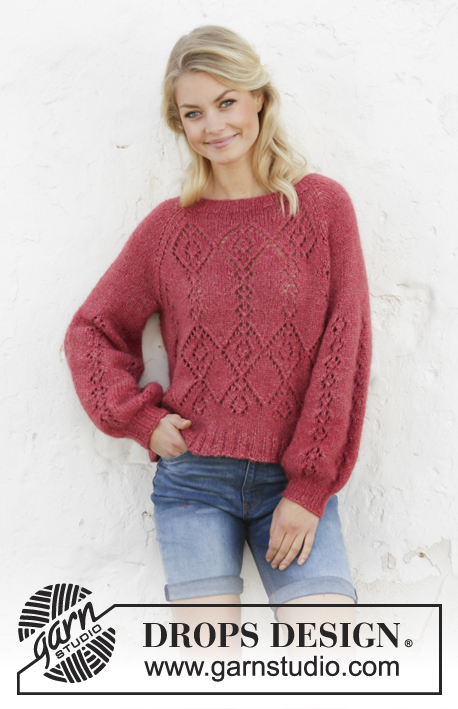
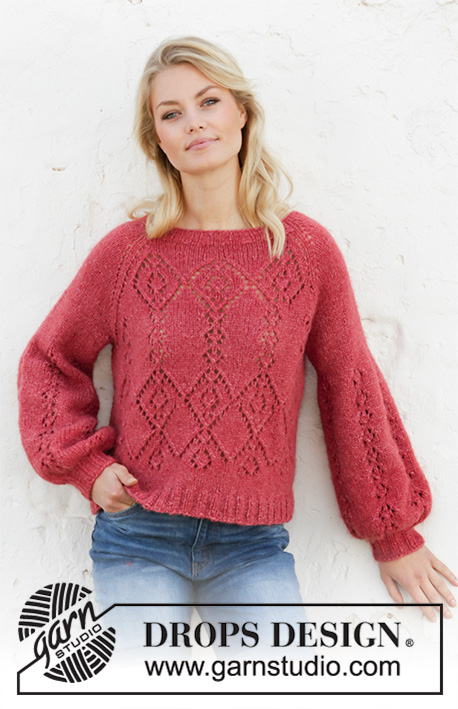
Knitted jumper with raglan and balloon sleeves in DROPS Air. The piece is worked top down with lace pattern. Sizes S - XXXL.
DROPS 202-18 |
|||||||||||||||||||||||||
|
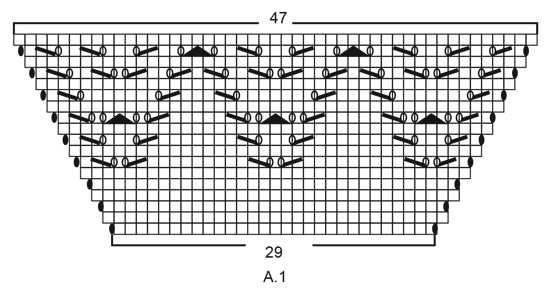
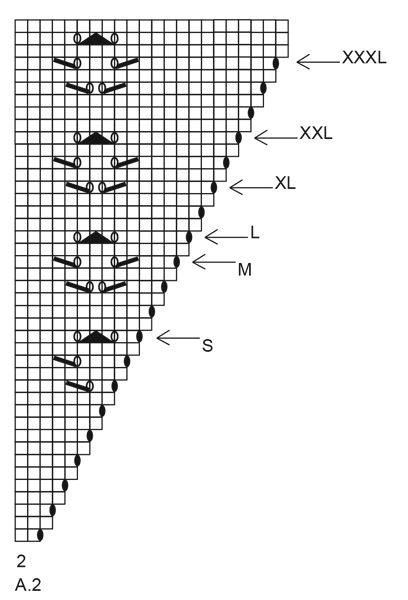
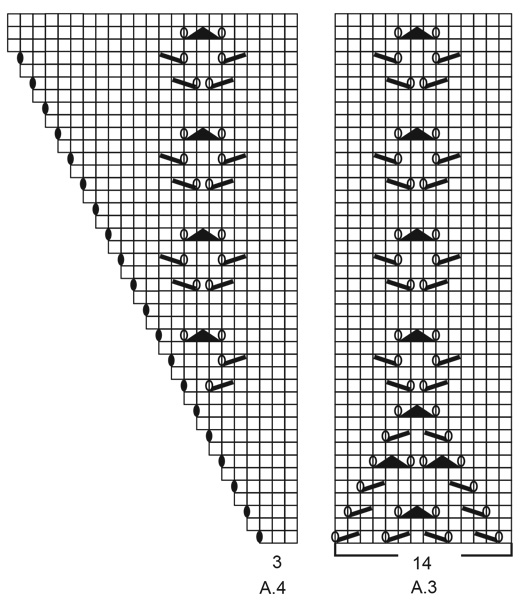
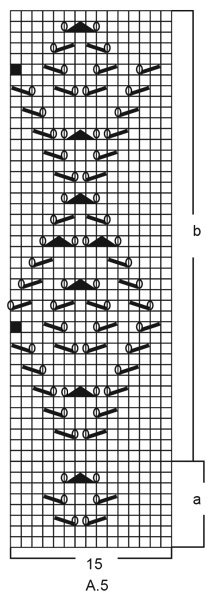
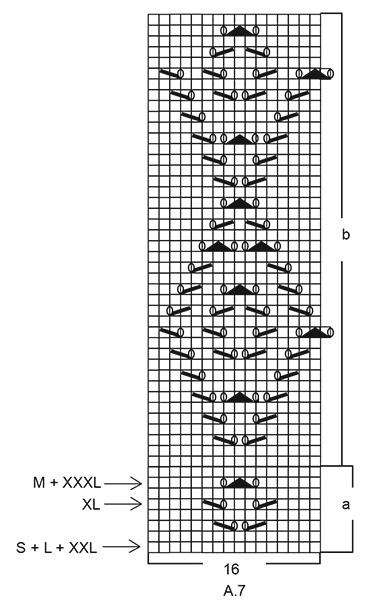
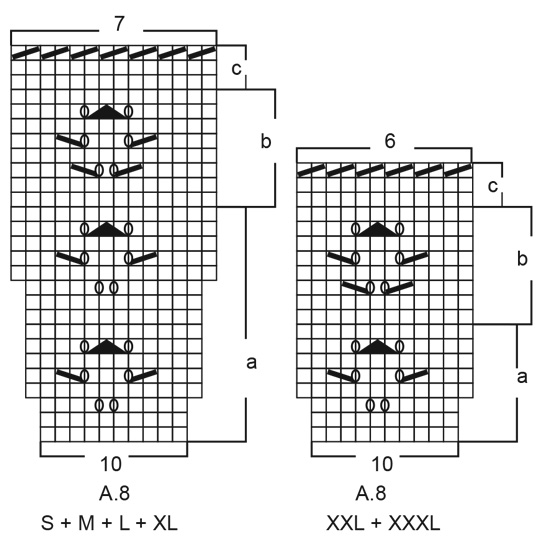
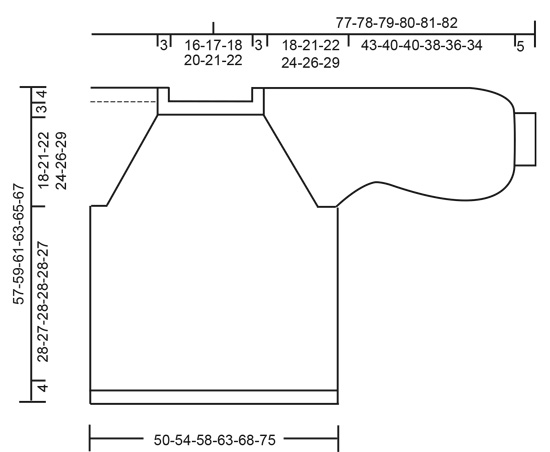
------------------------------------------------------- EXPLANATIONS FOR THE PATTERN: ------------------------------------------------------- INCREASE/DECREASE TIP (evenly spaced): To work out how to increase/decrease evenly, count the total number of stitches on the needle (e.g. 78 stitches) and divide by the number of increases/decreases to be made (e.g. 10) = 7.8. In this example, increase by making 1 yarn over after approx. each 8th stitch. On the next round knit the yarn overs twisted to avoid holes. When decreasing knit approx. each 7th and 8th stitch together. PATTERN: See diagrams A.1 to A.8. Choose diagram for your size (applies to A.8). DECREASE TIP (for sleeves): Decrease 1 stitch on each side of the marker thread as follows: Work until there are 3 stitches left before the marker thread, knit 2 together, knit 2, (marker thread sits between these stitches), slip 1 stitch as if to knit, knit 1 and pass the slipped stitch over the knitted stitch. ------------------------------------------------------- START THE PIECE HERE: ------------------------------------------------------- JUMPER - SHORT OVERVIEW OF THE PIECE: Neck, yoke and body are worked in the round with circular needle from the transition between sleeve and back piece, top down. Sleeves are worked in the round with short circular needle/double pointed needles, top down. NECK: Cast on 76-80-84-88-92-96 stitches with circular needle size 4.5 mm and Air. Knit 1 round. Then work rib (= knit 2 / purl 2) for 3 cm. Knit 1 round where you increase 10 stitches evenly spaced in all sizes – read INCREASE/DECREASE TIP = 86-90-94-98-102-106 stitches. Change to circular needle size 5.5 mm. Then work yoke as described below. YOKE: The first round is worked as follows: Work A.1 over 29 stitches (= back piece), work 2 stitches in stocking stitch (= raglan line), make 1 yarn over, 10-12-14-16-18-20 stitches in stocking stitch (= sleeve), 1 yarn over, 2 stitches in stocking stitch (= raglan line), work A.1 over 29 stitches (= front piece), 2 stitches in stocking stitch (= raglan line), 1 yarn over, 10-12-14-16-18-20 stitches in stocking stitch (= sleeve), make 1 yarn over and 2 stitches in stocking stitch (= raglan line). There are now 94-98-102-106-110-114 stitches on needle. Continue this pattern, i.e. on front and back pieces you increase on each side as shown in A.1. On the sleeves you increase on each side with a yarn over either side of the stitches in stocking stitch. Raglan line is always 2 stitches in stocking stitch. Increase like this every 2nd round. On the next round knit the yarn overs twisted to avoid holes. On the sleeves work the increased stitches in stocking stitch. On front and back pieces work the increased stitches into the pattern as shown in A.1. REMEMBER THE KNITTING TENSION! When A.1 has been completed in height there are 158-162-166-170-174-178 stitches on the needle. Continue the increases both on sleeves and front/back pieces, but now work A.2 to A.4 over the 47 stitches in A.1 as follows: Work A.2 (= 2 stitches), A.3 over 42 stitches (= 3 repeats of 14 stitches) and work A.4 (= 3 stitches). Raglan line and sleeves are worked as before. When you have worked as far as the round marked with an arrow in your size, you have increased a total of 18-21-22-24-26-29 times from the beginning of the yoke and there are 230-258-270-290-310-338 stitches on the needle. The piece measures approx. 21-24-25-27-29-32 cm from the cast-on edge mid front. The next round is worked as follows: Work 68-74-77-83-89-97 stitches as before (= back piece), place the next 44-52-54-56-58-62 stitches on 1 thread for sleeve, cast on 8-8-10-10-12-12 new stitches on needle (= in side under sleeve), work the next 71-77-81-89-97-107 stitches as before (= front piece), place the next 44-52-54-56-58-62 stitches on 1 thread for sleeve, cast on 8-8-10-10-12-12 new stitches on needle (= in side under sleeve)) and work the last 3-3-4-6-8-10 stitches as before (= back piece). Cut the strand. Body and sleeves are continued separately. THE PIECE IS NOW MEASURED FROM HERE! BODY: = 158-170-182-198-218-238 stitches. Insert 1 marker thread in each side in the middle of the 8-8-10-10-12-12 stitches cast on under each sleeve. Allow them to follow your work onwards; they mark the sides. The first round is worked as follows (start on round marked with an arrow in your size so that the pattern continues): Work 3-6-9-13-4-9 stitches in stocking stitch, A.5a (= 15 stitches), A.6a over the next 42-42-42-42-70-70 stitches (= 3-3-3-3-5-5 repeats of 14 stitches), work A.7a (= 16 stitches), 6-12-18-26-8-18 stitches in stocking stitch (marker thread sits in the middle of these stitches), work A.5a (= 15 stitches), A.6a over the next 42-42-42-42-70-70 stitches (= 3-3-3-3-5-5 repeats of 14 stitches), work A.7a (= 16 stitches) and finish with 3-6-9-13-4-9 stitches in stocking stitch. Repeat A.5a to A.7a in height (the remaining stitches are worked as before) until the piece measures approx. 4-5-4-6-4-4 cm from the division – adjust so that you finish after a complete repeat in height. Then continue with A.5b to A.7b, the remaining stitches worked as before. Work until A.5b to A.7b have been completed 1 time in height. Then continue in stocking stitch over all stitches. When the piece measures 28-27-28-28-28-27 cm from the division, knit 1 round where you increase 30-34-38-38-42-50 stitches evenly spaced = 188-204-220-236-260-288 stitches. Change to circular needle size 4.5 mm and work rib (= knit 2 / purl 2) for 4 cm. Loosely cast off with knit over knit and purl over purl, but to avoid the cast-off edge being tight you can cast off with needle size 5.5 mm. SLEEVE: Place the 44-52-54-56-58-62 stitches from the thread on the one side of the piece on short circular needle/double pointed needles size 5.5 mm and knit up 1 stitch in each of the 8-8-10-10-12-12 stitches cast on under the sleeve = 52-60-64-66-70-74 stitches. Insert 1 marker thread in the middle of the 8-8-10-10-12-12 stitches under the sleeve and allow it to follow your work onwards; it will be used when decreasing. Start the round by the marker thread and work stocking stitch in the round. When the piece measures 2 cm from the division, decrease 2 stitches mid under sleeve (does not apply to size XXL) – read DECREASE TIP. Decrease like this every 2nd round a total of 1-5-2-3-0-2 times = 50-50-60-60-70-70 stitches. When the piece measures 7-8-8-6-8-6 cm work pattern in the round as follows: Work A.8a over all stitches (= 5-5-6-6-7-7 reports of 10 stitches). When A.8a has been completed there are 70-70-84-84-84-84 stitches on the needle. Continue with A.8b. Repeat A.8b in height until the piece measures approx. 41-38-38-36-34-32 cm from the division (shorter measurements in larger sizes due to wider shoulders and longer sleeve cap) – adjust so that you finish after a complete repeat in height. Continue with A.8c. When A.8c has been completed there are 35-35-42-42-42-42 stitches on the needle. Knit 1 round where you decrease 3-3-6-6-2-2 stitches evenly spaced = 32-32-36-36-40-40 stitches. Change to double pointed needles size 4.5 mm and work rib (= knit 2 / purl 2) for 5 cm. Loosely cast off with knit over knit and purl over purl, but to avoid the cast-off edge being tight you can cast off with needle size 5.5 mm. The sleeve measures approx. 48-45-45-43-41-39 cm from the division. Work the other sleeve in the same way. |
|||||||||||||||||||||||||
Diagram explanations |
|||||||||||||||||||||||||
|
|||||||||||||||||||||||||
 |
|||||||||||||||||||||||||
 |
|||||||||||||||||||||||||
 |
|||||||||||||||||||||||||
 |
|||||||||||||||||||||||||
 |
|||||||||||||||||||||||||
 |
|||||||||||||||||||||||||
 |
|||||||||||||||||||||||||
 |
|||||||||||||||||||||||||
Have you finished this pattern?Tag your pictures with #dropspattern #berrydiamondsweater or submit them to the #dropsfan gallery. Do you need help with this pattern?You'll find 25 tutorial videos, a Comments/Questions area and more by visiting the pattern on garnstudio.com. © 1982-2026 DROPS Design A/S. We reserve all rights. This document, including all its sub-sections, has copyrights. Read more about what you can do with our patterns at the bottom of each pattern on our site. |
|||||||||||||||||||||||||


With over 40 years in knitting and crochet design, DROPS Design offers one of the most extensive collections of free patterns on the internet - translated to 17 languages. As of today we count 324 catalogues and 12290 patterns translated into English (UK/cm). 12290
We work hard to bring you the best knitting and crochet have to offer, inspiration and advice as well as great quality yarns at incredible prices! Would you like to use our patterns for other than personal use? You can read what you are allowed to do in the Copyright text at the bottom of all our patterns. Happy crafting!
Post a comment to pattern DROPS 202-18
We would love to hear what you have to say about this pattern!
If you want to leave a question, please make sure you select the correct category in the form below, to speed up the answering process. Required fields are marked *.