
Popular categories
Looking for a yarn?


Comments / Questions (61)
![]() Bernadetta wrote:
Bernadetta wrote:
Ma se faccio la ALZATA poi le maglie aumentano e lo schama A1 verrebbe ripetuto più volte di quelle indicate. per esempio nella taglia L verrebbe ripetuto 24 volte anziche 21. Mi potete confermare che il mio calcolo è corretto? grazie.
09.10.2020 - 21:22DROPS Design answered:
Buongiorno Benedetta. Quando si lavora l'alzata si eseguono dei ferri accorciati, quindi si lavora solo sul numero di maglie indicato. Non ci sono aumenti nel numero delle maglie. Buon lavoro!
10.10.2020 - 06:51
![]() Pia Schütt wrote:
Pia Schütt wrote:
Hej, jeg strikker blusen i str.xl. Er nu færdig med første mønster del A1. Der står at når jeg er færdig med A2 så vil jeg have 391 masker på pinden, men jeg kan ikke se nogen * markering for udtagning på A2 str. xl diagrammet?
21.07.2020 - 06:51DROPS Design answered:
Hej Pia, jo A.2 til de største størrelser er nederst i opskriften lige over måleskitsen. Første udtagning er i starten af 3.pind ifølge diagrammet, det vil sige at du laver et omslag for hver 12.maske osv. Sæt gerne et mærke imellem rapporterne. God fornøjelse!
28.07.2020 - 15:54
![]() Deborah Carol Evenich wrote:
Deborah Carol Evenich wrote:
I don't understand how to incorporate the pattern in the yoke. I see the directions for increases for the yoke, and I see separate directions for the pattern, but I don't understand how to combine them. What am I missing?
27.04.2020 - 03:13DROPS Design answered:
Dear Mrs Evenich, when pattern says to work diagram A.1 over all stitches, then work diagram A.1 bottom up reading each round from the left towards the right ( read more about diagrams here increasing evenly on the rows with a star as explained here). Hope this will help. Happy knitting!
27.04.2020 - 09:44
![]() Eilin Tresnes wrote:
Eilin Tresnes wrote:
Hei. Jeg har aldri strikket genser overfra og ned. Finnes det alternativ løsning om å begynne nedenfra og opp?
09.04.2020 - 17:38DROPS Design answered:
Hei Eilin. Ja, du kan strikke den nede og opp, du må bare omgjøre oppskriften. Fellinger/økninger/snu diagrammet osv. Anbefaler deg å prøve å strikke ovenifra og ned, les gjerne leksjonen om hvordan det gjøres (Hvordan strikke en genser ovenfra og ned) eller se videoen: Hvordan strikke en genser ovenfra og ned. God Fornøyelse!
15.04.2020 - 15:19
![]() Valérie wrote:
Valérie wrote:
Bonjour, bien qu'ayant respecté les instructions, je n'obtiens pas du tout une encolure aussi grande que sur la photo du modèle et le bord est aussi beaucoup plus large (3 côtes mousse). Merci de m'éclairer.
04.04.2020 - 18:38DROPS Design answered:
Bonjour Valérie, aviez-vous bien le bon échantillon? Avez-vous bien respecté la même tension tout du long en tricotant? N'hésitez pas à montrer votre ouvrage à votre magasin (même en photo par mail), ils pourront vous aider beaucoup plus facilement. Bon tricot!
09.04.2020 - 13:25
![]() Valérie wrote:
Valérie wrote:
Bonjour, merci pour votre réponse. Les 22 augmentations (taille S) sont-elles comprises dans ces 2 côtes mousse ? Merci d'avance.
01.04.2020 - 11:59DROPS Design answered:
Bonjour Valérie, les augmentations se font au rang suivant les 2 côtes mousse, on tricote ensuite 1 tour envers (avec les jetés torse) puis on tricote la réhausse dos et le diagramme A.1. Bon tricot!
01.04.2020 - 12:19
![]() Valérie wrote:
Valérie wrote:
Bonjour, il est indiqué au tout début de tricoter 2 côtes mousses, hors sur la photo, on voit clairement 1 côte mousse. S'agit il d'une erreur dans les explications ? Merci.
31.03.2020 - 19:23DROPS Design answered:
Bonjour Valérie, ce modèle commence bien par 2 côtes mousse, toutefois, vous pouvez n'en faire qu'une seule si vous préférez. Bon tricot!
01.04.2020 - 08:15
![]() Perezvv wrote:
Perezvv wrote:
Je ne trouve pas où se trouvent les explications en français Merci pour votre aide
15.03.2020 - 00:54DROPS Design answered:
Bonjour Mme Perezvv, tous nos modèles sont disponibles en français, cliquez sur le menu déroulant sous la photo et sélectionnez "français" dans la liste. Bon tricot!
16.03.2020 - 09:51
![]() Ingunn Hodø wrote:
Ingunn Hodø wrote:
Strikker Agnes genser til voksen, str S. Finnes det rettelser til ermestrikk? Ermlengde er lengst på minste størrelse, og med 3 riller blir de Ca 20-30 cm lengre.
01.03.2020 - 19:50DROPS Design answered:
Hei Ingunn. Kortere mål i de større størrelsene pga bredere skuldervidde. Usikker på hva du mener med 3 riller så blir de ca 20-30 cm lengre. 1 rille = 1 omgang rett og 1 omgang vrang (3 riller = 6 omganger). I oppskriften står det: Når ermet måler 42-41-40-39-37-36 cm fra der ermet ble DELT FRA BOLEN,..... Neste gang det henviser til et mål er det fra OPPLEGGSKANTEN. mvh DROPS design
02.03.2020 - 13:40
![]() Genevieve Charlier wrote:
Genevieve Charlier wrote:
Bonjour que signifie fil groupe b pour le convertisseur il faut indiquer fil 1 ou 2 etc la laine sky comme pour le modele je ne sais pas merci encore de vos reponses
15.11.2019 - 10:07DROPS Design answered:
Bonjour Mme Charlier, vous trouverez ici comment utiliser notre convertisseur; DROPS Sky appartient au groupe B de nos fils; Ce pull se tricote avec 1 seul fil DROPS Sky, laissez "1 fil" par défaut dans le convertisseur et cliquez sur "Trouver des alternatives" pour voir la quantité nécessaire dans les différentes suggestions. Bon tricot!
15.11.2019 - 11:43
|
|||||||||||||||||||||||||
Agnes Sweater#agnessweater |
|||||||||||||||||||||||||
 |
 |
||||||||||||||||||||||||
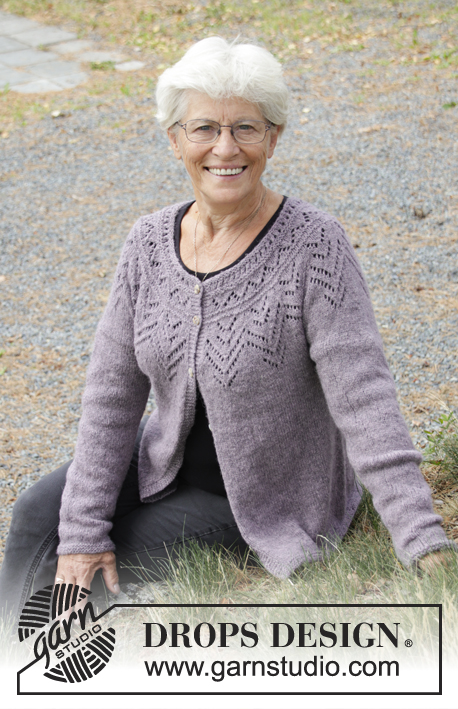
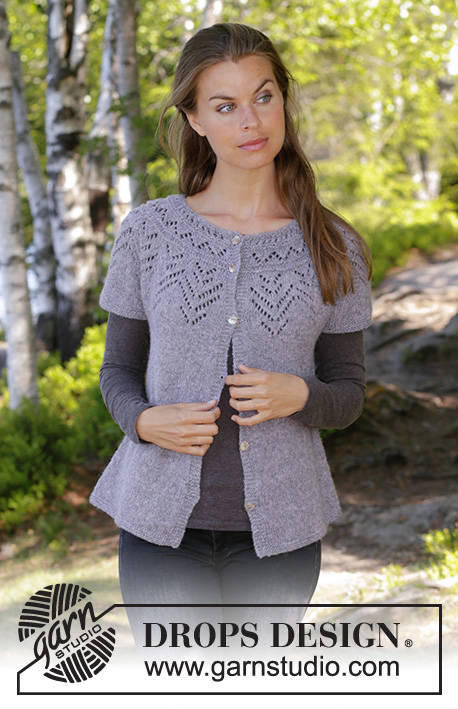
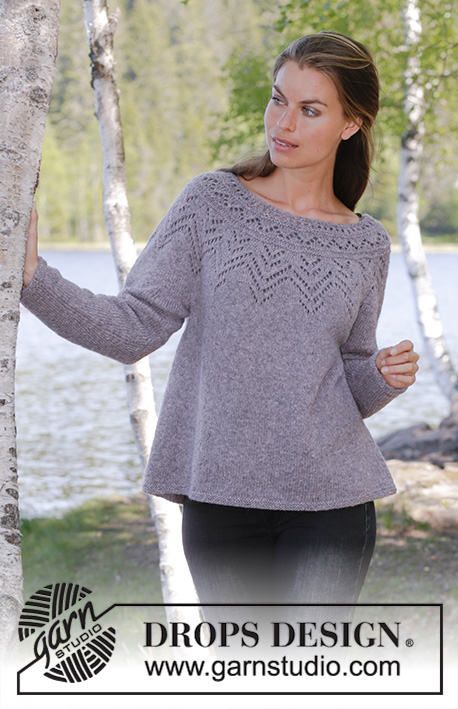
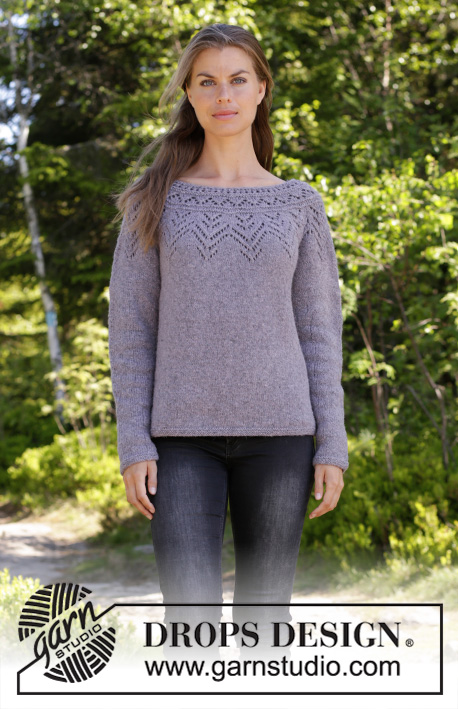
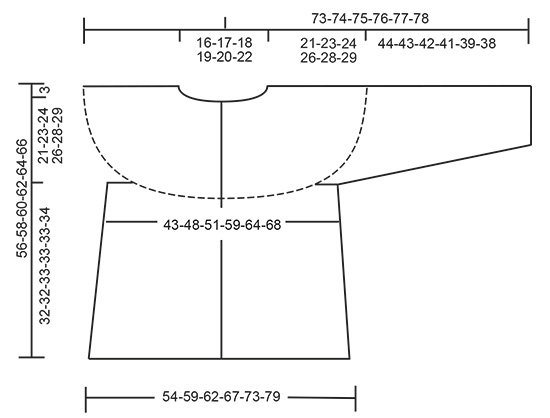
Knitted jumper with round yoke in DROPS Sky. The piece is worked top down with lace pattern. Sizes S - XXXL.
DROPS 197-16 |
|||||||||||||||||||||||||
|
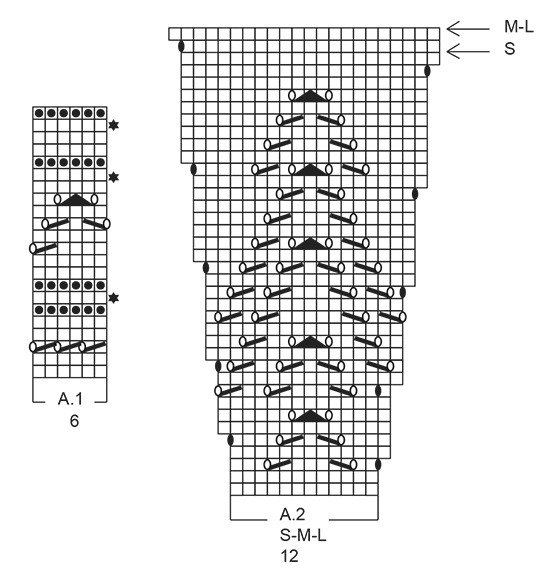
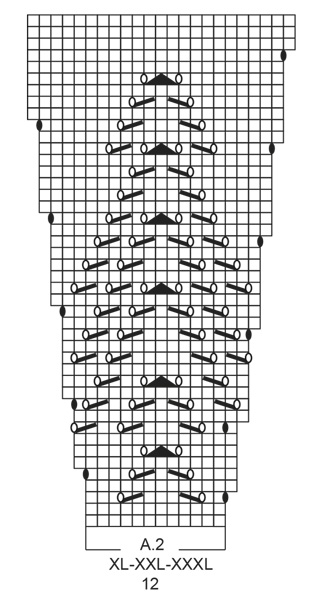
EXPLANATIONS FOR THE PIECE: ------------------------------------------------------- RIDGE/GARTER STITCH (worked in the round): 1 ridge = 2 rounds. Knit 1 round and purl 1 round. PATTERN: See diagrams A.1 and A.2. Choose diagram for your size. ELEVATION (for back of neck): The elevation is worked in garter stitch. Insert 1 marker at the start of the round (= approx. mid back). Start from the right side and knit as far as 7-8-8-9-9-10 stitches past the marker thread, turn, tighten the strand and knit 14-16-16-18-18-20 stitches back. Turn, tighten the strand and knit 21-24-24-27-27-30 stitches, turn, tighten the strand and knit 28-32-32-36-36-40 stitches back. Turn, tighten the strand and knit 35-40-40-45-45-50 stitches, turn, tighten the strand and knit 42-48-48-54-54-60 stitches back. Turn, tighten the strand and knit 49-56-56-63-63-70 stitches back, turn, tighten the strand and knit to marker thread. INCREASE TIP-1 (evenly spaced): To work out how to increase evenly, count the total number of stitches on the needle (e.g. 92 stitches) and divide these stitches by the number of increases to be made (e.g. 22) = 4.18. In this example, increase by making 1 yarn over after approx. each 4th stitch. On the next round, work the yarn overs twisted to avoid holes. INCREASE TIP-2 (for sides of body): All increases are made from the right side. Work until there are 2 stitches left before the marker thread, 1 yarn over, knit 4 stitches (the marker thread sits in the middle of these stitches) 1 yarn over. On the next round work the yarn overs twisted to avoid holes. Then work the new stitches in stocking stitch. DECREASE TIP-1 (for sleeves): Decrease 1 stitch on each side of the marker thread as follows: Work until there are 3 stitches left before the marker thread, knit 2 together, knit 2 (marker thread sits in the middle of these stitches), slip 1 as if to knit, knit 1, pass the slipped stitch over the knitted stitch. ------------------------------------------------------- START THE PIECE HERE: ------------------------------------------------------- JUMPER - SHORT OVERVIEW OF THE PIECE: The piece is worked in the round, top down with circular needle as far as the armholes, then the body and sleeves are finished separately. The body is continued in the round with circular needle. The sleeves are worked in the round with double pointed needles. YOKE: Cast on 92-96-100-108-112-118 stitches with circular needle size 3.5 mm and Sky. Work 2 RIDGES – read description above. Knit 1 round and increase 22-24-26-24-26-26 stitches evenly on round – read INCREASE TIP-1 = 114-120-126-132-138-144 stitches. Purl 1 round. Change to circular needle size 4 mm. For a better fit, you can now work an elevation in the back of the neck so that the yoke is slightly higher at the back. This elevation can be left out; the neck will then be the same front and back – read ELEVATION. Work A.1 (= 6 stitches) over all stitches (= a total of 19-20-21-22-23-24 times in width). On each round with a star (= increase round) work as follows: REMEMBER THE KNITTING TENSION! INCREASE 1: Increase 24-24-24-24-30-30 stitches evenly on round = 138-144-150-156-168-174 stitches. A.1 is then repeated 23-24-25-26-28-29 times in width. INCREASE 2: Increase 18-18-24-24-24-30 stitches evenly on round = 156-162-174-180-192-204 stitches. A.1 is then repeated 26-27-29-30-32-34 times in width. INCREASE 3: Increase 12-18-18-24-24-24 stitches evenly on round = 168-180-192-204-216-228 stitches. A.1 is then repeated 28-30-32-34-36-38 times in width. When A.1 has been worked 1 time in height the piece measures approx. 8 cm from the cast-on edge. Work A.2 (= 12 stitches) over all stitches (= 14-15-16-17-18-19 times in width). When A.2 has been worked 1 time in height there are 294-330-352-391-414-437 stitches on the needle. The piece measures approx. 21-22-22-24-24-24 cm. Continue in the round with stocking stitch until the piece measures 21-23-24-26-28-29 cm from the cast-on edge. Now divide the piece for body and sleeves as follows: Work stocking stitch over the first 42-47-49-57-62-66 stitches, place the next 64-72-78-82-84-88 stitches on a thread for sleeve and cast on 8-8-10-10-12-12 stitches under the sleeve, work stocking stitch over the next 83-93-98-114-123-130 stitches, place the next 64-72-78-82-84-88 stitches on a thread for sleeve and cast on 8-8-10-10-12-12 stitches under the sleeve, work 41-46-49-56-61-65 stitches stocking stitch = 182-202-216-247-270-285 stitches. BODY: Insert 1 marker thread in the middle of the 8-8-10-10-12-12 stitches under each sleeve. Work stocking stitch. When the piece measures 2 cm from where the body was divided from the sleeves, increase 1 stitch on each side of both marker threads – read INCREASE TIP-2. Increase like this every 2-2-2-3-3-2 cm a total of 11-11-11-9-9-12 times = 226-246-260-283-306-333 stitches. Continue with stocking stitch until the piece measures 30-30-31-31-31-32 cm from where the body was divided from the sleeves. Change to circular needle size 3.5 mm and work garter stitch until the piece measures 32-32-33-33-33-34 cm from where the body was divided from the sleeves. Cast off with knit. The piece measures approx. 56-58-60-62-64-66 cm from the shoulder down. SLEEVE: Place the 64-72-78-82-84-88 stitches from the thread on the one side of the piece on double pointed needles size 4 mm and knit up 1 stitch in each of the 8-8-10-10-12-12 stitches under the sleeve = 72-80-88-92-96-100 stitches. Insert 1 marker thread in the middle of the 8-8-10-10-12-12 stitches under the sleeve. Work stocking stitch in the round. When the piece measures 3 cm, decrease 1 stitch on each side of the marker thread - read DECREASE TIP-1. Decrease like this every 2½-2-1½-1½-1½-1½ cm a total of 13-16-19-19-20-21 times = 46-48-50-54-56-58 stitches. When the piece measures 42-41-40-39-37-36 cm from where the sleeve was divided from the body, change to double pointed needles size 3.5 mm and work 3 RIDGES in the round - see description above. Then cast off with knit. The sleeve measures a total of 65-66-66-67-67-67 cm from the cast-on edge. Work the other sleeve in the same way. |
|||||||||||||||||||||||||
Diagram explanations |
|||||||||||||||||||||||||
|
|||||||||||||||||||||||||
 |
|||||||||||||||||||||||||
 |
|||||||||||||||||||||||||
 |
|||||||||||||||||||||||||
Have you finished this pattern?Tag your pictures with #dropspattern #agnessweater or submit them to the #dropsfan gallery. Do you need help with this pattern?You'll find 29 tutorial videos, a Comments/Questions area and more by visiting the pattern on garnstudio.com. © 1982-2026 DROPS Design A/S. We reserve all rights. This document, including all its sub-sections, has copyrights. Read more about what you can do with our patterns at the bottom of each pattern on our site. |
|||||||||||||||||||||||||


With over 40 years in knitting and crochet design, DROPS Design offers one of the most extensive collections of free patterns on the internet - translated to 17 languages. As of today we count 324 catalogues and 12290 patterns translated into English (UK/cm). 12290
We work hard to bring you the best knitting and crochet have to offer, inspiration and advice as well as great quality yarns at incredible prices! Would you like to use our patterns for other than personal use? You can read what you are allowed to do in the Copyright text at the bottom of all our patterns. Happy crafting!
Post a comment to pattern DROPS 197-16
We would love to hear what you have to say about this pattern!
If you want to leave a question, please make sure you select the correct category in the form below, to speed up the answering process. Required fields are marked *.