
Popular categories
Looking for a yarn?


Comments / Questions (34)
![]() Francyw wrote:
Francyw wrote:
Credo di aver finalmente capito!ultimo dubbio (almeno spero)le maglie a legaccio devo distribuirle tra i segnapunto...cioè 8 maglie prima del segnapunto e 8 dopo?grazie infinite per la vostra disponibilità 😁
10.06.2019 - 15:32DROPS Design answered:
Buongiorno Francy. Sì esatto. Sono le 8 maglie prima e le 8 maglie dopo il segnapunti. Buon lavoro!
10.06.2019 - 15:51
![]() Francy wrote:
Francy wrote:
Mi spiace tanto , ma continuo a non capire...sarà la mia inesperienza...x due coste s’intendono due maglie da lavorare?perchè su 8?devo quindi lavorare 2 maglie a punto legaccio e 6 a diritto?o in senso inverso...sono proprio una frana😂
10.06.2019 - 14:40DROPS Design answered:
Buongiorno Francy. Per costa a legaccio si intendono 2 ferri (o giri se si sta lavorando in tondo) a punto legaccio. Nel punto da lei indicato, deve lavorare 2 coste a legaccio sulle 16 maglie. Quindi lavora così: 1° giro lavora le 16 m a diritto; 2° giro, lavora le 16 m a rovescio; 3° giro: lavora le 16 m a diritto; 4° giro, lavora le 16 m a rovescio. Ci riscriva se è ancora in difficoltà. Buon lavoro!
10.06.2019 - 15:06
![]() Francy wrote:
Francy wrote:
Salve, sono alle Prime armi...potete spiegarmi il passaggio all’altezza 11 cm lavorare 2 coste ...cosa significa ? Grazie
10.06.2019 - 12:24DROPS Design answered:
Buongiorno Francy. Deve lavorare 2 coste a maglia legaccio sulle 8 maglie che precedono e sulle 8 maglie che seguono ognuno dei due segnapunti. Buon lavoro!
10.06.2019 - 12:39
![]() Annalisa wrote:
Annalisa wrote:
Chiedo nuovamente una spiegazione per lo schema. Al primo giro con il gettato si intende una maglia dritta o due prima dell'accavallata
07.06.2019 - 17:30DROPS Design answered:
Buongiorno Annalisa, ogni quadratino corrisponde a una maglia, per cui sul terzo ferro lavora un gettato e 2 maglie diritto prima dell'accavallata doppia. Buon lavoro!
07.06.2019 - 17:36
![]() Annalisa wrote:
Annalisa wrote:
Ringrazio per il chiarimento precedente , ma prima di partire vorrei anche capire il diagramma A.1 : all'inizio il primo ferro sono 3 maglie dritte ,poi faccio le maglie accavvalte, poi nuovamente 3 dritti +1 dritto di separazione tra i due disegni? ringrazio nuovamente ma non sono molto pratica con i diagrammi. complimenti per il sito e i modelli
04.06.2019 - 14:51DROPS Design answered:
Buongiorno Annalisa, si il primo ferro di A.1 si lavora con 3 maglie diritto, 1 accavallata doppia e 4 maglie diritto. In questo modo si diminuiscono 2 maglie per ogni ripetizione, e quindi al ferro successivo il n° di maglie di ogni ripetizione sarà minore. Buon lavoro!
04.06.2019 - 15:00
![]() Annalisa wrote:
Annalisa wrote:
Salve vorrei capire se inizio già la lavorazione in tondo , e i segnapunti all'inizio e dopo 72 maglie. Non riesco a capire . Grazie
04.06.2019 - 14:11DROPS Design answered:
Buongiorno Annalisa. Dopo aver avviato le maglie, le chiude in cerchio e lavora in tondo fino agli scalfi. Dopo aver lavorato il diagramma A.1, sui ferri avrà 144 maglie. Mette un segnapunti dove inizia il giro e uno dopo 72 maglie, In questo modo avrà 72 maglie per il davanti e 72 maglie per il dietro. buon lavoro!
04.06.2019 - 14:34
![]() Anna wrote:
Anna wrote:
Buongiorno, non capisco come far passare il cordino attorcigliato attraverso le coste per la conclusione del lavoro. Grazie e complimenti i lavori sono veramente belli e ben spiegati.
24.04.2019 - 11:15DROPS Design answered:
Buongiorno Anna. Deve far passare il cordino attraverso due maglie dell’ultimo ferro del davanti e del dietro, nell’angolo, come mostrato in fotografia. Buon lavoro!
25.04.2019 - 21:03
![]() Marquet wrote:
Marquet wrote:
Bonjour, si je tricote avec des aiguilles droites, comment terminer A1 pour que cela fonctionne Merci
27.03.2019 - 20:26DROPS Design answered:
Bonjour Mme Marquet, vous trouverez dans cette leçon comment adapter un modèle sur aiguilles droites. Bon tricot!
01.04.2019 - 16:56
![]() Kiara wrote:
Kiara wrote:
Buongiorno lavoro a maglia da poco tempo e ho un dubbio. I ferri pari di A.1, se lavoro con i ferri dritti bisogna lavorarli a rovescio? Grazie
19.06.2018 - 15:48DROPS Design answered:
Buongiorno Kiara. Sì esatto. Se lavora avanti e indietro, lavora i ferri pari a rovescio. Buon lavoro!
19.06.2018 - 16:08
![]() Pascale wrote:
Pascale wrote:
Pour moi aussi c'est trop grand. Je suis obligée de tout redéfaire et recommencer. Je vais prendre des aiguilles plus petites et cette fois, faire un échantillon ...
31.05.2018 - 23:28
|
||||||||||
Fabulous Farrah#fabulousfarrahtop |
||||||||||
 |
 |
|||||||||
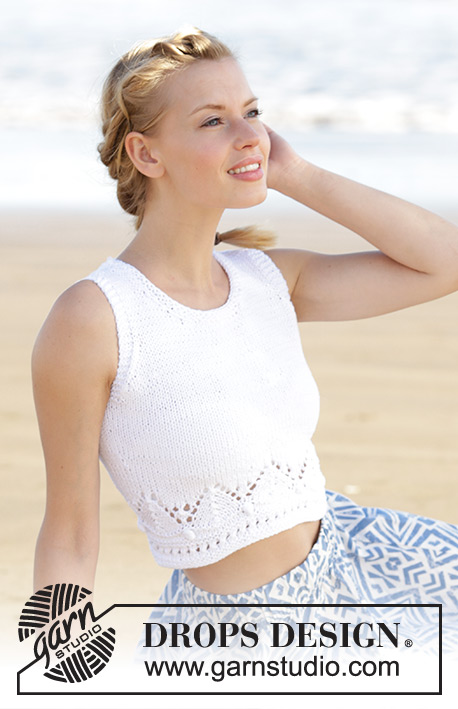
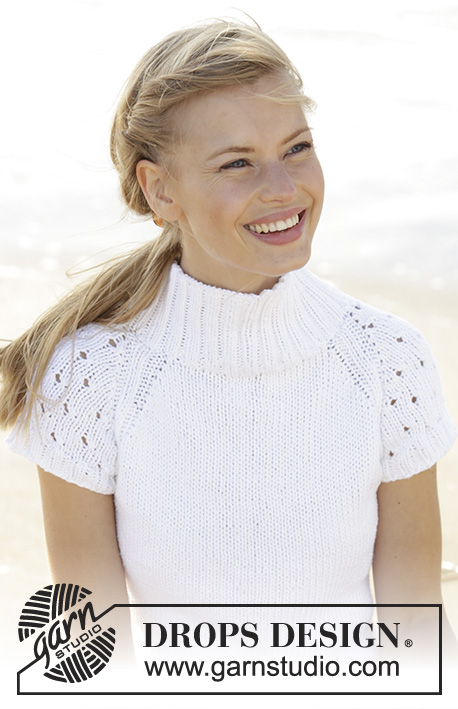
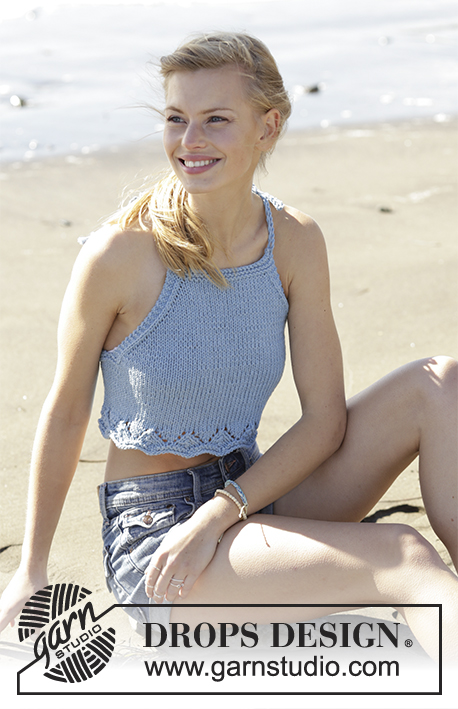
Knitted top with lace pattern in DROPS Paris. Size: S - XXXL
DROPS 178-68 |
||||||||||
|
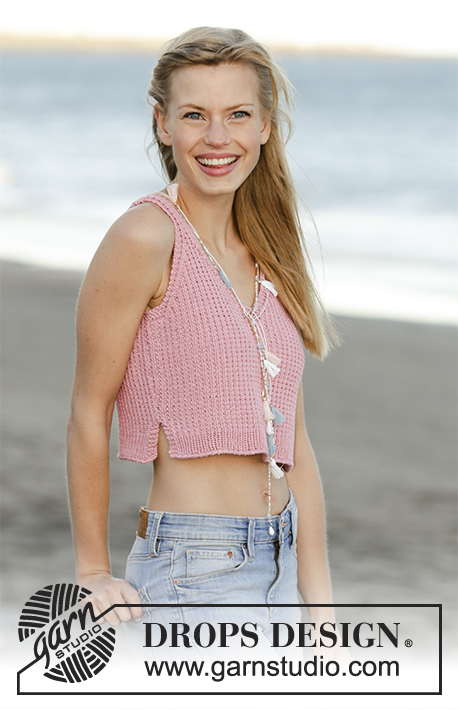
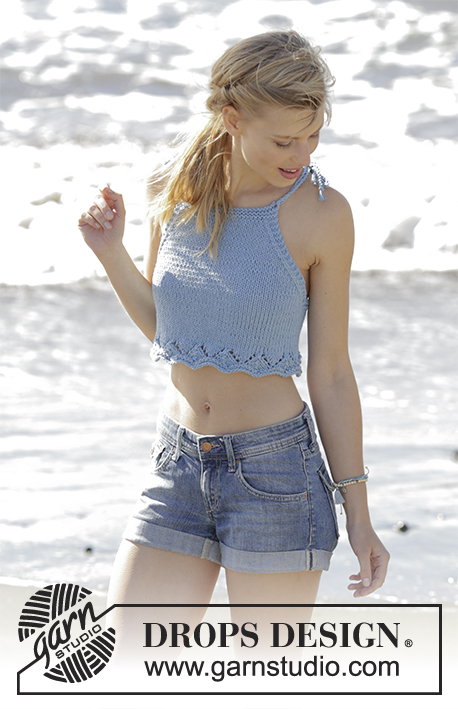
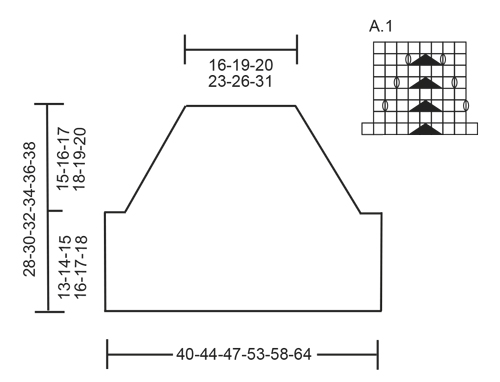
GARTER STITCH (worked in the round): 1 ridge = 2 rounds. Knit 1 round and purl 1 round. GARTER STITCH (back and forth): 1 ridge = knit 2 rows. DECREASE TIP: All decreases are done from the right side. Decrease 1 stitch inside 3 stitches in garter stitch in each side. Decrease as follows after 3 stitches in garter stitch: Slip 1 stitch knitwise, knit 1, pass slipped stitch over stitch worked Decrease as follows before 3 stitches in garter stitch: Work until 5 stitches remain on needle. Knit 2 together. Work 3 stitches in garter stitch. ---------------------------------------------------------- TOP: Worked in the round on circular needle up to armhole, then work front and back piece separately. Cast on 180-200-210-240-260-290 stitches on circular needle size 4.5 mm with Paris. Work 1 ridge in GARTER STITCH - see explanation above. Then work A.1 over all stitches (= 18-20-21-24-26-29 repetitions in width). When A.1 has been worked 1 time vertically, there are 144-160-168-192-208-232 stitches on needle. Insert 2 marker threads in piece; 1 at the beginning of round and 1 after 72-80-84-96-104-116 stitches (= in the sides). Work in stocking stitch over all stitches. When piece measures 11-12-13-14-15-16 cm, work 2 ridges over 16-16-16-18-20-20 stitches in each side (= 8-8-8-9-10-10 stitches on each side of marker threads in each side), continue the remaining stitches in stocking stitch. When 2 ridges have been worked over the 16-16-16-18-20-20 stitches, cast off 10-10-10-12-14-14 stitches in each side on next round (cast off 5-5-5-6-7-7 stitches on each side of each marker thread). Finish each part separately = 62-70-74-84-90-102 stitches on each part. FRONT PIECE: Continue in stocking stitch with 3 stitches in GARTER STITCH in each side - see explanation above. Decrease 1 stitch in each side on every other row (= every row from right side) 17-18-19-21-22-23 times in total - READ DECREASE TIP = 28-34-36-42-46-56 stitches. When all decreases are done, work 3 ridges, then cast off. Piece measures approx. 28-30-32-34-36-38 cm. BACK PIECE: Work as on front piece. TWINED STRING: Cut 2 lengths of 3 metres each. Twine the strands tog until they resist, fold the string double so that it twines again. Tie a knot in each end so that strings stay twined. Make 2 strings like this. Thread the string through the upper ridge on one side of front piece, thread the string through top of one side on back piece and tie a knot on the shoulder. Repeat on the other side of top. |
||||||||||
Diagram explanations |
||||||||||
|
||||||||||
 |
||||||||||
Have you finished this pattern?Tag your pictures with #dropspattern #fabulousfarrahtop or submit them to the #dropsfan gallery. Do you need help with this pattern?You'll find 25 tutorial videos, a Comments/Questions area and more by visiting the pattern on garnstudio.com. © 1982-2026 DROPS Design A/S. We reserve all rights. This document, including all its sub-sections, has copyrights. Read more about what you can do with our patterns at the bottom of each pattern on our site. |
||||||||||


With over 40 years in knitting and crochet design, DROPS Design offers one of the most extensive collections of free patterns on the internet - translated to 17 languages. As of today we count 324 catalogues and 12290 patterns translated into English (UK/cm). 12290
We work hard to bring you the best knitting and crochet have to offer, inspiration and advice as well as great quality yarns at incredible prices! Would you like to use our patterns for other than personal use? You can read what you are allowed to do in the Copyright text at the bottom of all our patterns. Happy crafting!
Post a comment to pattern DROPS 178-68
We would love to hear what you have to say about this pattern!
If you want to leave a question, please make sure you select the correct category in the form below, to speed up the answering process. Required fields are marked *.