
Popular categories
Looking for a yarn?


Comments / Questions (60)
![]() Irene Thallaug wrote:
Irene Thallaug wrote:
Hvor mange nøster Melody til Bente genser? Mvh Irene
08.11.2025 - 17:17DROPS Design answered:
Hei Irene. Kommer an på hvilken str. du skal strikke, men mellom 5-7 nøster. mvh DROPS Design
10.11.2025 - 15:45
![]() Ragnheidur Arnadottir wrote:
Ragnheidur Arnadottir wrote:
Hello. Which yarn can I use for this pattern instead of two strands of Kid Silk. Or is there one yarn which can be substituted for the two strands of kid silk plus the one strand of Alpacca. What quantities would I need for size small with these alternatives? I’m finding it quite complicated to work out.
30.10.2025 - 12:25DROPS Design answered:
Hi, Ragnheidur, at the bottom of the Yarn Group page, there is a guide for changing yarns from one group to another. You can use this to find other alternative yarns for the pattern, just remember that the finished result may not have the same look as the jumper in the pictures. When changing yarns, you must make sure that you have enough yarn, look at the original yarns in the pattern and how many meters you need for the size you want. Happy knitting!
30.10.2025 - 13:12
![]() Bonnie wrote:
Bonnie wrote:
Ik ben linkshandig en brei van rechts naar links. Kan ik dit patroon gewoon volgen zoals het beschreven is? Het lijkt een symmetrische trui.
18.09.2025 - 20:23DROPS Design answered:
Dag Bonnie,
Ja, je kan dan inderdaad het patroon gewoon volgen, ook als je hem linkshandig breit.
21.09.2025 - 19:52
![]() Mia wrote:
Mia wrote:
En ymmärrä miksi työssä ennen kaula-aukon resorin aloittamista ensin neulotaan 2 kertaa 2 silmukkaa yhteen molemmilla puolilla ja sitten kohta lisätään silmukoita yht. 4 kappaletta. Mikä idea tässä on?
24.06.2025 - 17:25DROPS Design answered:
Hei, ennen joustinneuleen aloittamista kavennetaan pääntietä varten. Kun jatkat neulomista kaikilla silmukoilla, sinun tulee poimia työhön uudet silmukat, jottei kappaleiden rajakohtiin jäisi reikiä.
24.06.2025 - 17:50
![]() Corina Avram wrote:
Corina Avram wrote:
Thanks for the reply. Would short (40 cm) needles work instead of double-pointed for the sleeves?
29.03.2024 - 08:36DROPS Design answered:
Dear Corina, It CAN work, but how well depends on your perosnal knitting style and preference. Some people like really short needles, others not so much. If you have that size at hand, I suggest to go ahead and try. If you find it uncomfortable, you can always change it to a longer one. Happy Knitting!
30.03.2024 - 00:45
![]() Corina Avram wrote:
Corina Avram wrote:
Hello. I can't find the double-pointed needles in sizes 7 and 6 mm. Could I knit the sleeves with straight needles? Thank you!
28.03.2024 - 22:08DROPS Design answered:
Dear Corina, the sleeves are on this sweater knitted on the round, if you cannot find double pointed needles, I would suggest to use 60 cm long circular needles. With straight needles, you will have to knit the sleeves back and forth, open at the seamline at the undersleeve and then sew it up. Happy Knitting!
29.03.2024 - 08:16
![]() Véro wrote:
Véro wrote:
Bonjour, Pour les augmentations des manches où doit-on se référer ? Merci d’avance pour votre réponse.
18.05.2022 - 15:12DROPS Design answered:
Bonjour Véro, il manquait ce paragraphe au début des explications, merci pour votre retour, cela est fait maintenant: vous faites 1 jeté avant la dernière maille du tour+ 1 autre jeté après la 1ère maille du tour. Bon tricot!
18.05.2022 - 16:50
![]() Dori wrote:
Dori wrote:
Hola de nuevo!! Que significa recoger y trabajar 2 puntos a cada lado del escote? Es que hay que aumentar 4 puntos? Gracias.
23.02.2022 - 22:14DROPS Design answered:
Hola Dori, sí, se aumentan un total de 4 puntos en la fila para que no quede un agujero en la transición entre el escote y los puntos del hombro.
28.02.2022 - 16:51
![]() Dori wrote:
Dori wrote:
Hola,me gusta mucho este patron pero no se hacerlo con agujas circulares. Me podriais ayudar a hacerlo con agujas rectas? Gracias!
08.02.2022 - 00:10DROPS Design answered:
Hola Dori, puedes leer la siguiente lección para ajustar el patrón: https://www.garnstudio.com/lesson.php?id=13&cid=23
13.02.2022 - 19:25
![]() Laura wrote:
Laura wrote:
Potrei avere lo schema per utilizzare i Ferri tradizionali?
02.01.2022 - 17:28DROPS Design answered:
Buonasera Laura, questo modello è stato progettato per essere lavorato in tondo, se preferisce lavorarlo in piano può aggiungere una maglia di vivagno a ogni lato per le cuciture. Buon lavoro!
02.01.2022 - 22:31
|
|
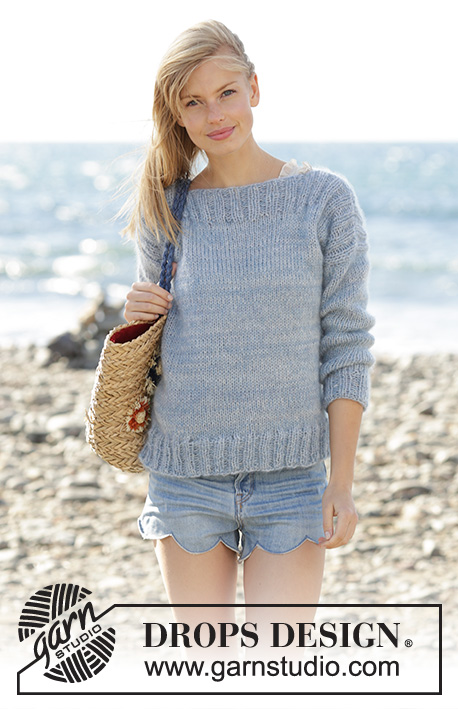
Bente#bentesweater |
|
 |
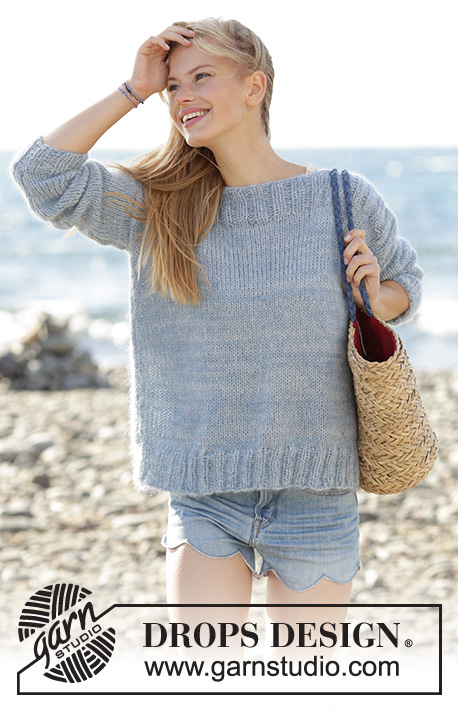 |
Jumper in stocking stitch and rib with 1 strand DROPS Alpaca and 2 strands DROPS Kid-Silk. Sizes S - XXXL.
DROPS 177-2 |
|
|
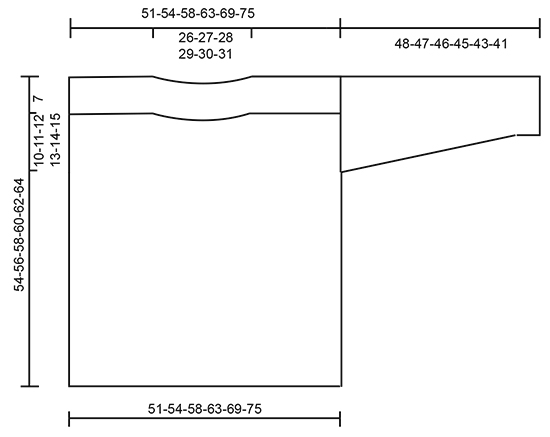
INCREASE TIP: Increase as follows mid under sleeve – start 1 stitch before the marker thread: Make 1 yarn over, knit 2 (the marker thread sits between these 2 stitches), 1 yarn over. On the next round work the yarn overs twisted knit to prevent holes. ---------------------------------------------------------- JUMPER: The jumper is worked in the round with circular needle up to the armholes, then the back and front pieces are worked separately back and forth. BODY: Cast on 144-152-164-176-192-208 stitches with circular needle size 6 mm and 1 strand Alpaca, 1 strand off white Kid-Silk and 1 strand light steel blue Kid-Silk (= 3 strands). Knit 1 round, then work rib (knit 2/ purl 2). Work rib for 7 cm. Change to circular needle size 7 mm and work 1 round stocking stitch where you decrease 12-12-12-12-12-12 stitches evenly along the round = 132-140-152-164-180-196 stitches. Continue with stocking stitch. When the piece measures 37-38-39-40-41-42 cm work only across the first 66-70-76-82-90-98 stitches on the needle, the last 66-70-76-82-90-98 stitches are placed on a thread. FRONT PIECE: = 66-70-76-82-90-98 stitches. Continue with stocking stitch. When the piece measures 46-48-50-52-54-56 cm place the middle 32-32-34-34-36-36 stitches on a thread for the neck. Knit 1 row from the right side across the first 17-19-21-24-27-31 stitches (to the thread), turn, purl the first 2 stitches together and purl to end of the needle. Place the stitches on a thread. Knit 1 row from the right side across the last 17-19-21-24-27-31 stitches on the needle, turn and purl 1 row from the wrong side, at the end of the row purl the last 2 stitches together. Place all the stitches back on the needle and knit 1 row from the right side and knit up 2 stitches in each side (between the stitches for the neck and the stitches on the shoulder) towards the neck = 68-72-78-84-92-100 stitches. Purl 1 row from the wrong side where you increase 6-6-4-6-6-6 stitches evenly along the row = 74-78-82-90-98-106 stitches. Change circular needle size 6 and work as follows – from the right side: knit 2 * purl 2, knit 2 *, repeat from *-* the complete row. Work rib for 7 cm, the piece measures approx. 54-56-58-60-62-64 cm, then cast off with knit over knit and purl over purl. BACK PIECE: Worked in the same way as the front piece. SLEEVE: The piece is worked in the round with double pointed needles. Use a short circular needle when there are enough stitches. Cast on 32-32-36-36-40-40 stitches with double pointed needle size 6 mm and 1 strand Alpaca, 1 strand off white Kid-Silk and 1 strand light steel blue Kid-Silk (= 3 strands). Work 1 round stocking stitch, then work rib (knit 2/ purl 2). Work rib for 5 cm. Change to double pointed needle size 7 mm, work 1 round stocking stitch where you decrease 4-4-6-6-8-6 stitches evenly along the round = 28-28-30-30-32-34 stitches. Insert 1 marker thread at the beginning of the round = mid under sleeve. Work stocking stitch, when the piece measures 7 cm increase 1 stitch on each side of the marker thread – READ INCREASE TIP. Increase every 5½-4½-4½-4-4-4 cm in total 8-9-9-10-10-10 times = 44-46-48-50-52-54 stitches. Cast off when the piece measures 48-47-46-45-43-41 cm. NOTE! shorter measurements in the larger sizes due to broader shoulder measurements. ASSEMBLY: Sew the shoulder seams, leave approx. 26-27-28-29-30-31 cm for the neck. Sew in the sleeves. |
|
 |
|
Have you finished this pattern?Tag your pictures with #dropspattern #bentesweater or submit them to the #dropsfan gallery. Do you need help with this pattern?You'll find 24 tutorial videos, a Comments/Questions area and more by visiting the pattern on garnstudio.com. © 1982-2026 DROPS Design A/S. We reserve all rights. This document, including all its sub-sections, has copyrights. Read more about what you can do with our patterns at the bottom of each pattern on our site. |
|


With over 40 years in knitting and crochet design, DROPS Design offers one of the most extensive collections of free patterns on the internet - translated to 17 languages. As of today we count 324 catalogues and 12290 patterns translated into English (UK/cm). 12290
We work hard to bring you the best knitting and crochet have to offer, inspiration and advice as well as great quality yarns at incredible prices! Would you like to use our patterns for other than personal use? You can read what you are allowed to do in the Copyright text at the bottom of all our patterns. Happy crafting!
Post a comment to pattern DROPS 177-2
We would love to hear what you have to say about this pattern!
If you want to leave a question, please make sure you select the correct category in the form below, to speed up the answering process. Required fields are marked *.